

AZJeff
-
Posts
1312 -
Joined
-
Last visited
-
Days Won
1
Content Type
Profiles
Forums
Gallery
Everything posted by AZJeff
-
Oh, I replaced that too, because the horn was not functional. I forgot to mention that. It did nothing for the cruise.
-
OK, so here is my problem: I press the cruise control power "on" switch on the steering wheel, and about 1/3 of the time, the light saying "cruise" illuminates in the cluster, indicating the cruise is ready to accept commands. In anywhere between 2 and 10 seconds thereafter, the "cruise" light shuts off, and cannot be turned on again until the vehicle is shut off and restarted. The issue "may" be connected to bumps and jars in the road surface, since I am always moving when I attempt to turn the cruise control on. So far, I have, with the aid of the factory shop manual for a 2000XJ, checked continuity for all wires between the steering column and the PCM, and from the PCM to the cruise control servo. I even temporarily bypassed ALL the wires between the PCM and servo, and between the PCM and the steering column switches. None of that did anything. I also replaced the cruise control servo with new OEM since the connector on it looked "nasty" but there was not change. I installed a different set of cruise control buttons (used) in the steering wheel, but they ohm out with the same impedances as the original set, and thus there was no change there. I even sent the PCM out to the shop that had previously "remanfactured" the PCM before I owned the vehicle, and asked them to confirm if the PCM cruise control functions are normal. They reported no trouble found. I also ran the instrument cluster through it's self-diagnostic tests, and it passes them all per the shop manual. I am convinced the issue is some sort of intermittent connection in the cruise control circuit(s), and I have tested all circuits except ONE. The ONLY part of the system I cannot test is the twisted pair CCD wiring between the instrument cluster and the PCM. Apparently there is a diagnostic tool dealers used to verify the function of this communication bus, but I, of course, do not have that tool. Do you have any suggestions?
-
Were you a tech at a Jeep dealer back when this issue was going on? If so, I have some questions about the CCD bus, if you know anything about the details of it's operation. Please advise and, if so, we can take this to private message to avoid a topic that is not really pertinent to "regular" MJ's.
-
As my sig lines shows, my MJ has a dashboard from a 97+ XJ in it. I am trying to track down intermittent cruise control light function on the instrument cluster, and I suspect the issue may be a CCD bus communication issue. The CCD bus runs thru the two blind mate connectors on the back of the instrument cluster, and I know there was some sort of TSB related to these connectors having erratic operation. I think the TSB involved changing these connectors to a more reliable design. how can I determine if my connectors are of the older (flakey) design, or the new improved variant!
-
Best place to tap into dash lights
AZJeff replied to 1989commanche's topic in MJ Tech: Modification and Repairs
Thanks!! -
Messed Up My Front Axle
AZJeff replied to BizarroStormy's topic in MJ Tech: Modification and Repairs
I agree, and even with a ball joint/u-joint press, it’s a pain. I have gotten more careful over the years, after trashing a few yokes the one in the photo from the OP. I also always clean the bores of the yokes with sandpaper or emery cloth before a press in the new cups. -
Depending on the environment where the donor vehicle resided, it may be questionable to use junkyard seatbelts. Fo example, a belt from a vehicle here in AZ where the belt has had sun beating on it steadily for years with the window down or door open/missing would probably have belt webbing quite sun-weakened.
-
Perhaps. I have detailed photos of a disassembled 97+ XJ heater box. If someone has photos os a disassembled pre-97 XJ/MJ heater box, I would be glad to compare them.
-
I got replacements from "Seat Belts Plus" , but they were not perfect. Very good construction, but they have a small flaw: Because the MJ retractor is mounted higher up than the XJ, the end of the belt when it's fully retracted (stowed), the belt flopped around enough to fall out the door. I needed to shorten the belt to get rid of the excess slack. To do this, I ended up cutting off some of the belt and having someone resew the end where the belt attaches to the metal cleat that bolts to the inside of the rocker panel adjacent to the seat. I think I wound up taking off about 12 inches. I cut the belt and heat sealed the end of the webbing, and then took the metal cleat with the cut-off webbing to get it sewn. A regular seamstress wouldn't touch my request, since her sewing machine wasn't strong enough to run the heavy thread through the three layers of webbing to match the original factory stitching method. I wound up going to a saddle shop, and told the guy to fold/stitch the webbing exactly like it was done with the factory pattern. He had no problem doing so, because he had a sewing machine that would stitch through up to TWO INCHES of leather The end result it about as close as you can get to OEM belts. (Actually, they are better, since the inboard end of the belt uses one of those stiff plastic coated cables instead of a flat type stiffener.)
-
Interesting. What's most notable is that, for the most part, I cannot think of any modern cars that have a water shutoff valve for the heater core. It's like the auto manufacturers figure it's not worth the hassle (probably more likely the cost) of adding in that device for the small difference. I kinda wonder if my old 2000 XJ (or my current MJ with 2001 dash) had sported a heater valve if it would have been more efficient. I guess if I REALLY want to get motivated, I can temporarily bypass the core and do some measuring. Maybe this summer.....
-
The later XJ’s were plumbed from the factory without the heater control valve, and I never noticed poor AC performance because of it, and I live in Phoenix. if I had an XJ or MJ with a leaky valve, I would delete it.
-
To make sure the nuts don’t come loose, beat the free end of the threads to distort them. It’s like hillbilly nut staking. I hope you realize I am kidding, of course.
-
Fog light switch in my cab isnt getting a 12V constant
AZJeff replied to Deleted's topic in MJ Tech: Modification and Repairs
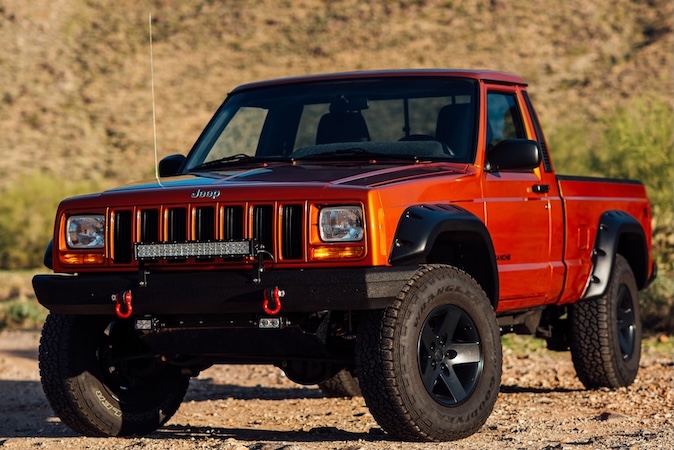
Actually, I have both driving lights and fogs on my MJ. The fogs are for illuminating the sides of trails and the large rocks on them. The driving lights are more for the rural highways. I suspect that AZ law enforcement are a bit more lenient on aux. lighting as opposed to back East, as long as one is not a complete jerk about when/where one uses that added illumination. -
I know that many people reuse u-bolts all the time, but all the spring shops I know of say it’s not a wise practice, for reasons Dzimm noted. reusing nuts should not be an issue, since it’s the bolt that yields, and not the nut, when the torque is applied.
-
I will have to consult my shop manual to see what are the possible causes of no reverse gear. in the meantime, if I was swapping in a replacement AW-4, I would put un a new front pump seal, a new filter, and a new pan gasket before I installed it.
-
Sway bar bushing replacement
AZJeff replied to EdJarHead's topic in MJ Tech: Modification and Repairs
Here is a pro tip—NEVER use a screw extractor on a threaded fastener that has broken off due to corrosion. Those devices are intended for use on screws are are still relatively easy to remove, but broken at or below flush. for bolts such as those the OP encountered, drilling in successively larger increments until you get to the proper size for the tap to chase/recut the threads is the way to restore the threads with lowest risk. -
Factory jack retention strap option
AZJeff replied to schardein's topic in MJ Tech: Modification and Repairs
That's a pretty neat setup. Since my MJ didnt have any of the factory parts, I wound up cobbling together my own setup from XJ pieces and other stuff. My jack setup has to add some pieces that the factory never needed. Since my MJ has a 3.5 inch lift, I have to carry a section of 4x4 wood as a spacer to put under the jack to get the proper lift height. Another thing I need here in AZ is a small piece of plywood (about 12 x 18") to put under the jack when it's being used in soft gravel/sand/dirt. Otherwise the jack just buries itself in the dirt. I wound up modifying the jack setup so the plywood goes against the cab wall, and the jack sits on top of the 4x4 block, and the whole thing is attached with a velcro strap to keep it in place. My lug wrench is an MJ/XJ type, but since I don't have the original spare tire winch, I made my own spare tire carrier using the winch from a Ford Explorer, and that required I come up with another way to engage the winch. I used a 1/4 drive socket welded to the crank shaft of the Explorer winch, and a long 1/4 drive extension and a "speeder" handle allows me to crank the spare up and down. The lug wrench, socket extension, and speeder handle are in a pouch my wife sewed for me under the drivers seat. It does the trick, but it's certainly not even CLOSE to OEM. -
Renix/HO mashup questions (fuel pressure)
AZJeff replied to JeepComanche89's topic in MJ Tech: Modification and Repairs
The ‘01 XJ fuel pump assy. has a built in pressure regulator. You will need that to work with the fuel rail from an ‘01. The gauge sender is different, of course, on the MJ fuel gauges😢 The perfect setup would be to somehow mount MJ fuel sender onto your XJ pump assy., and then mount that whole thing into you MJ tank. The last part is the toughest, and I suspect that’s why most guys wind up putting in a tank compatible with the late XJ style pump assembly. -
When the key is turned to "ON", the fuel pump will be engaged. It will pump until the appropriate fuel line pressure is achieved, and then it will stop. (It then starts up again and delivers more fuel as the fuel line pressure drops due to fuel consumption. It repeats this pulsing process as needed as long as the engine is running.) Does your whirring sound occur for the first few seconds after the key is turned "ON",but before the engine is actually running? If that is the case, it's the fuel pump. My wife's KJ makes some fuel pump noise before the engine starts, but then again, the vehicle is 15 years old. Maybe yours is the same way.
-
You say you "tightened the steering box a full turn". Does that mean you turned the pitman shaft screw on the top of the box a FULL TURN? That's WAY more than what would be expected for "tightening up" a slightly loose box. A quarter turn is more expected. If you turned it that much, there is a good chance you have created binding in the box, but that can only be detected by having the front end unloaded (no weight on wheels), and even then, it's hard to determine unless the pitman arm is disconnected from the drag link. If your box has 150K miles or more a new (reman) box would be a wise move, assuming you have more than normal play in the box proper. Notice I say "the box proper", because lots of guys try to address steering linkage looseness issues by cranking on the pitman shaft thrust screw, and all that does is trash the steering box.
-
Well then it's not the fuel pump. So you are saying you hear a whirring sound with the key on, but the engine not running? Dumb question---is your radio/audio system OFF? There is nothing else in the back of a stock MJ that would make noise when the engine is not running but the key is "ON"
-
It is probably the fuel pump, as there are no other parts that move under the vehicle under the bed to make noise when it's not actually rolling. I would be concerned about a pump that just started making noise out of the clear blue. Perhaps others can offer more knowledge of fuel pump failure modes, but if it was MY fuel pump, I would be planning on replacing it.
-
Fog light switch in my cab isnt getting a 12V constant
AZJeff replied to Deleted's topic in MJ Tech: Modification and Repairs
Eagle, you and I have talked about this issue on this forum in the past. Yes, most state motor vehicle codes limit how much light you can have projected from the front of the vehicle. However, there are times and places where some drivers would want more illumination, such as in the rural areas here in Arizona. It gets REALLY dark out here away from towns, and I, for one, want all the illumination I can get, whether I am driving on paved roads or on forest service trails. The key, of course, is to use common sense. If you are driving whether there is other traffic, don't use auxiliary lighting, since it might blind other drivers. Stick to the factory lamps, and use them accordingly (dimming the brights, etc.) I also suspect that there is a difference in law enforcement attitude to extra lighting in various parts of the country. Out in rural areas, it's recognized that added lighting is actually a safety benefit, assuming you are using it away from other vehicles, and a police officer wouldn't do much about someone running a light bar or whatever, as long as you used it like one would their high beam headlights. -
Fog light switch in my cab isnt getting a 12V constant
AZJeff replied to Deleted's topic in MJ Tech: Modification and Repairs
I tap into the power that feeds the parking lights. That new power wire feeds the switch(es) that control the relay(s) that power any auxiliary lights. Doing this means that the auxiliary lights automatically shut off whenever the parking lights are off, even if the auxiliary light switches are in the "on" position. -
Fog light switch in my cab isnt getting a 12V constant
AZJeff replied to Deleted's topic in MJ Tech: Modification and Repairs
I always wire any auxiliary lights to be “hot” whenever the parking lights are on. I do this by feeding the relay control switch from the feed to the parking lights themselves. of course, this means you have to make sure any aux. lights that are not compliant with your local and state laws are switched off when you are on paved roads...