

Airborne Janitor
-
Posts
481 -
Joined
-
Last visited
-
Days Won
1
Content Type
Profiles
Forums
Gallery
Everything posted by Airborne Janitor
-

'97+ Power Door Swap
Airborne Janitor replied to CatfishJoe's topic in MJ Tech: DIY Projects and Write-Ups
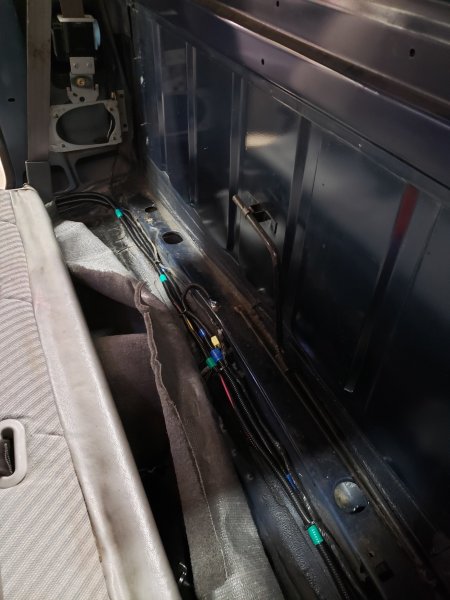
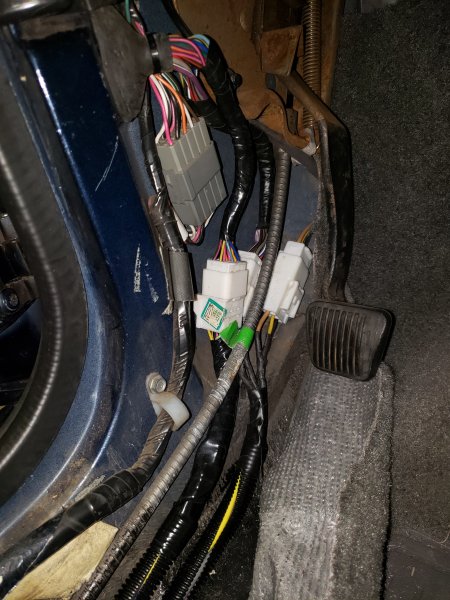
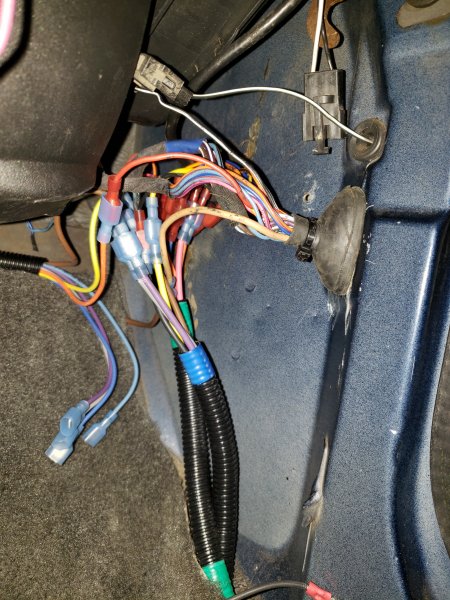
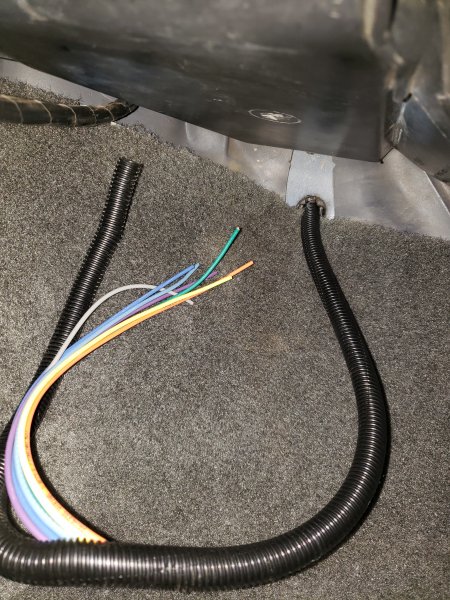
CatfishJoe, thanks for taking the time for putting together an in depth write-up and wiring diagram. I was able to wire up my 97 XJ Country doors to my MJ thanks to you. I will say your wiring diagram was spot on except I needed to wire up a brown/white wire for the power windows instead of blue/white. Also my mirror power wire was brown/pink instead of yellow/green. I reviewed several wiring diagrams and it appears that the driver lightblue/yellow wire and the passenger black/white wire control the power mirror defog circuit, at least for a 97. I decided to leave it as is. I built my own wiring harness, but I did cut off the pigtails on the driver side door harness to reuse. Per your advice I used both 12ga and 16ga wiring, I purchased bulk wiring in colors from acdcwireandsupply on ebay. I also installed a Painless Wiring fuse block 70107 on the engine side firewall which has a mix of constant hot and ignition hot circuits to tap into. With 13 wires to run from door to door I didnt have any luck trying to squeeze them under the dash to hide them away. So I decided to run the wiring along the edge of the floorboard and along the back of the cab under the carpet. I used a ton of crimp on quick-disconnects for the passenger door wiring. I ran the power wires from the fuse block thru the firewall on the passenger side. After testing the wiring, everything worked except the door locks, I could hear them click but not actually engage. The passenger window control also would only lower the window, not raise it. Replacing the passenger window switch fixed all my issues thankfully. Very happy to have this part of my MJ project complete.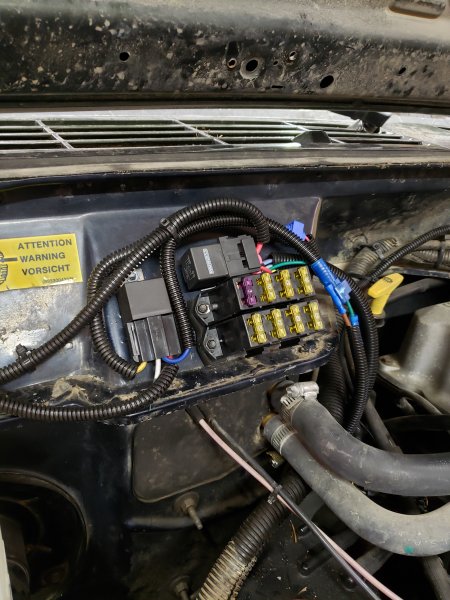
-
Wiring diagram for Power Windows
Airborne Janitor replied to Phillip Gwin's topic in MJ Tech: Modification and Repairs
I just finished this project this week. This is the best write up with wiring diagram I've seen. I was going to take some more photos and update the thread with some info this weekend. -
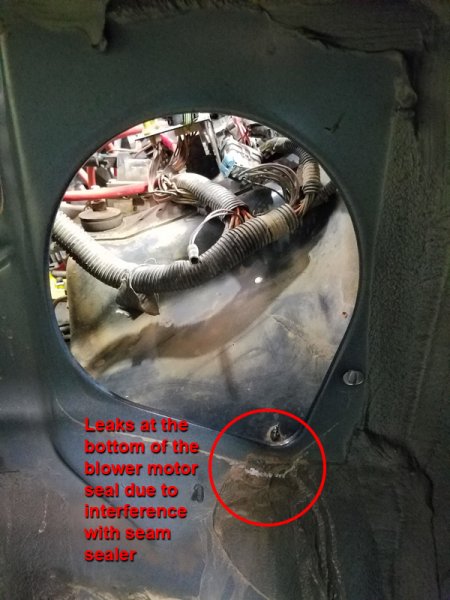
Hey Virginia I just stumbled on this topic, I know it's a few months old. My MJ has 2 small water leaks that end up with water in the passenger floorboard. One is the seal for the rear glass, right in the bottom corner on the passenger side, theres a small trickle that will come down from the seal, down the interior of the cab, then to the floor. The 2nd leak came from where the blower motor seals to the firewall. There was a bit of seam sealer that was interfering with the proper seal. I used a dremel to grind it down, then used some silicone to seal it back up. My 98 XJ leaks here too fyi.
-
Thank you! I'm doing this build with her in mind, thinking one day maybe she will be the one driving it.
-
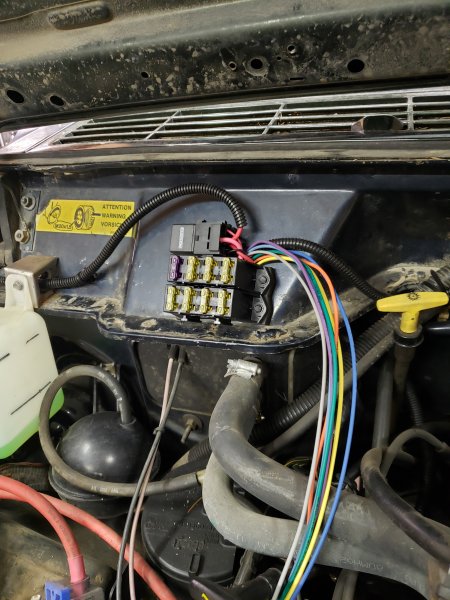
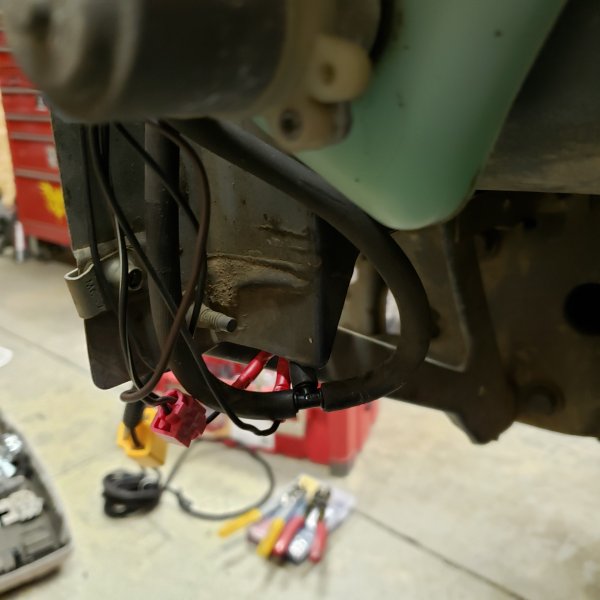
In anticipation of wiring up the power doors and an overhead console in the near future, I decided to install a Painless 70107 fuse block. I liked that it has a mix of circuits both ignition and constant hot. I installed one of these inside my XJ years ago and was really pleased with it, but I could not find a space inside the MJ where I was happy installing the fuse block itself. I decided to install it on the interior firewall above the blower motor. Then ran the circuit wires through the firewall near the floor. There was a plug I removed and drilled a hole through to create a grommet essentially.
-
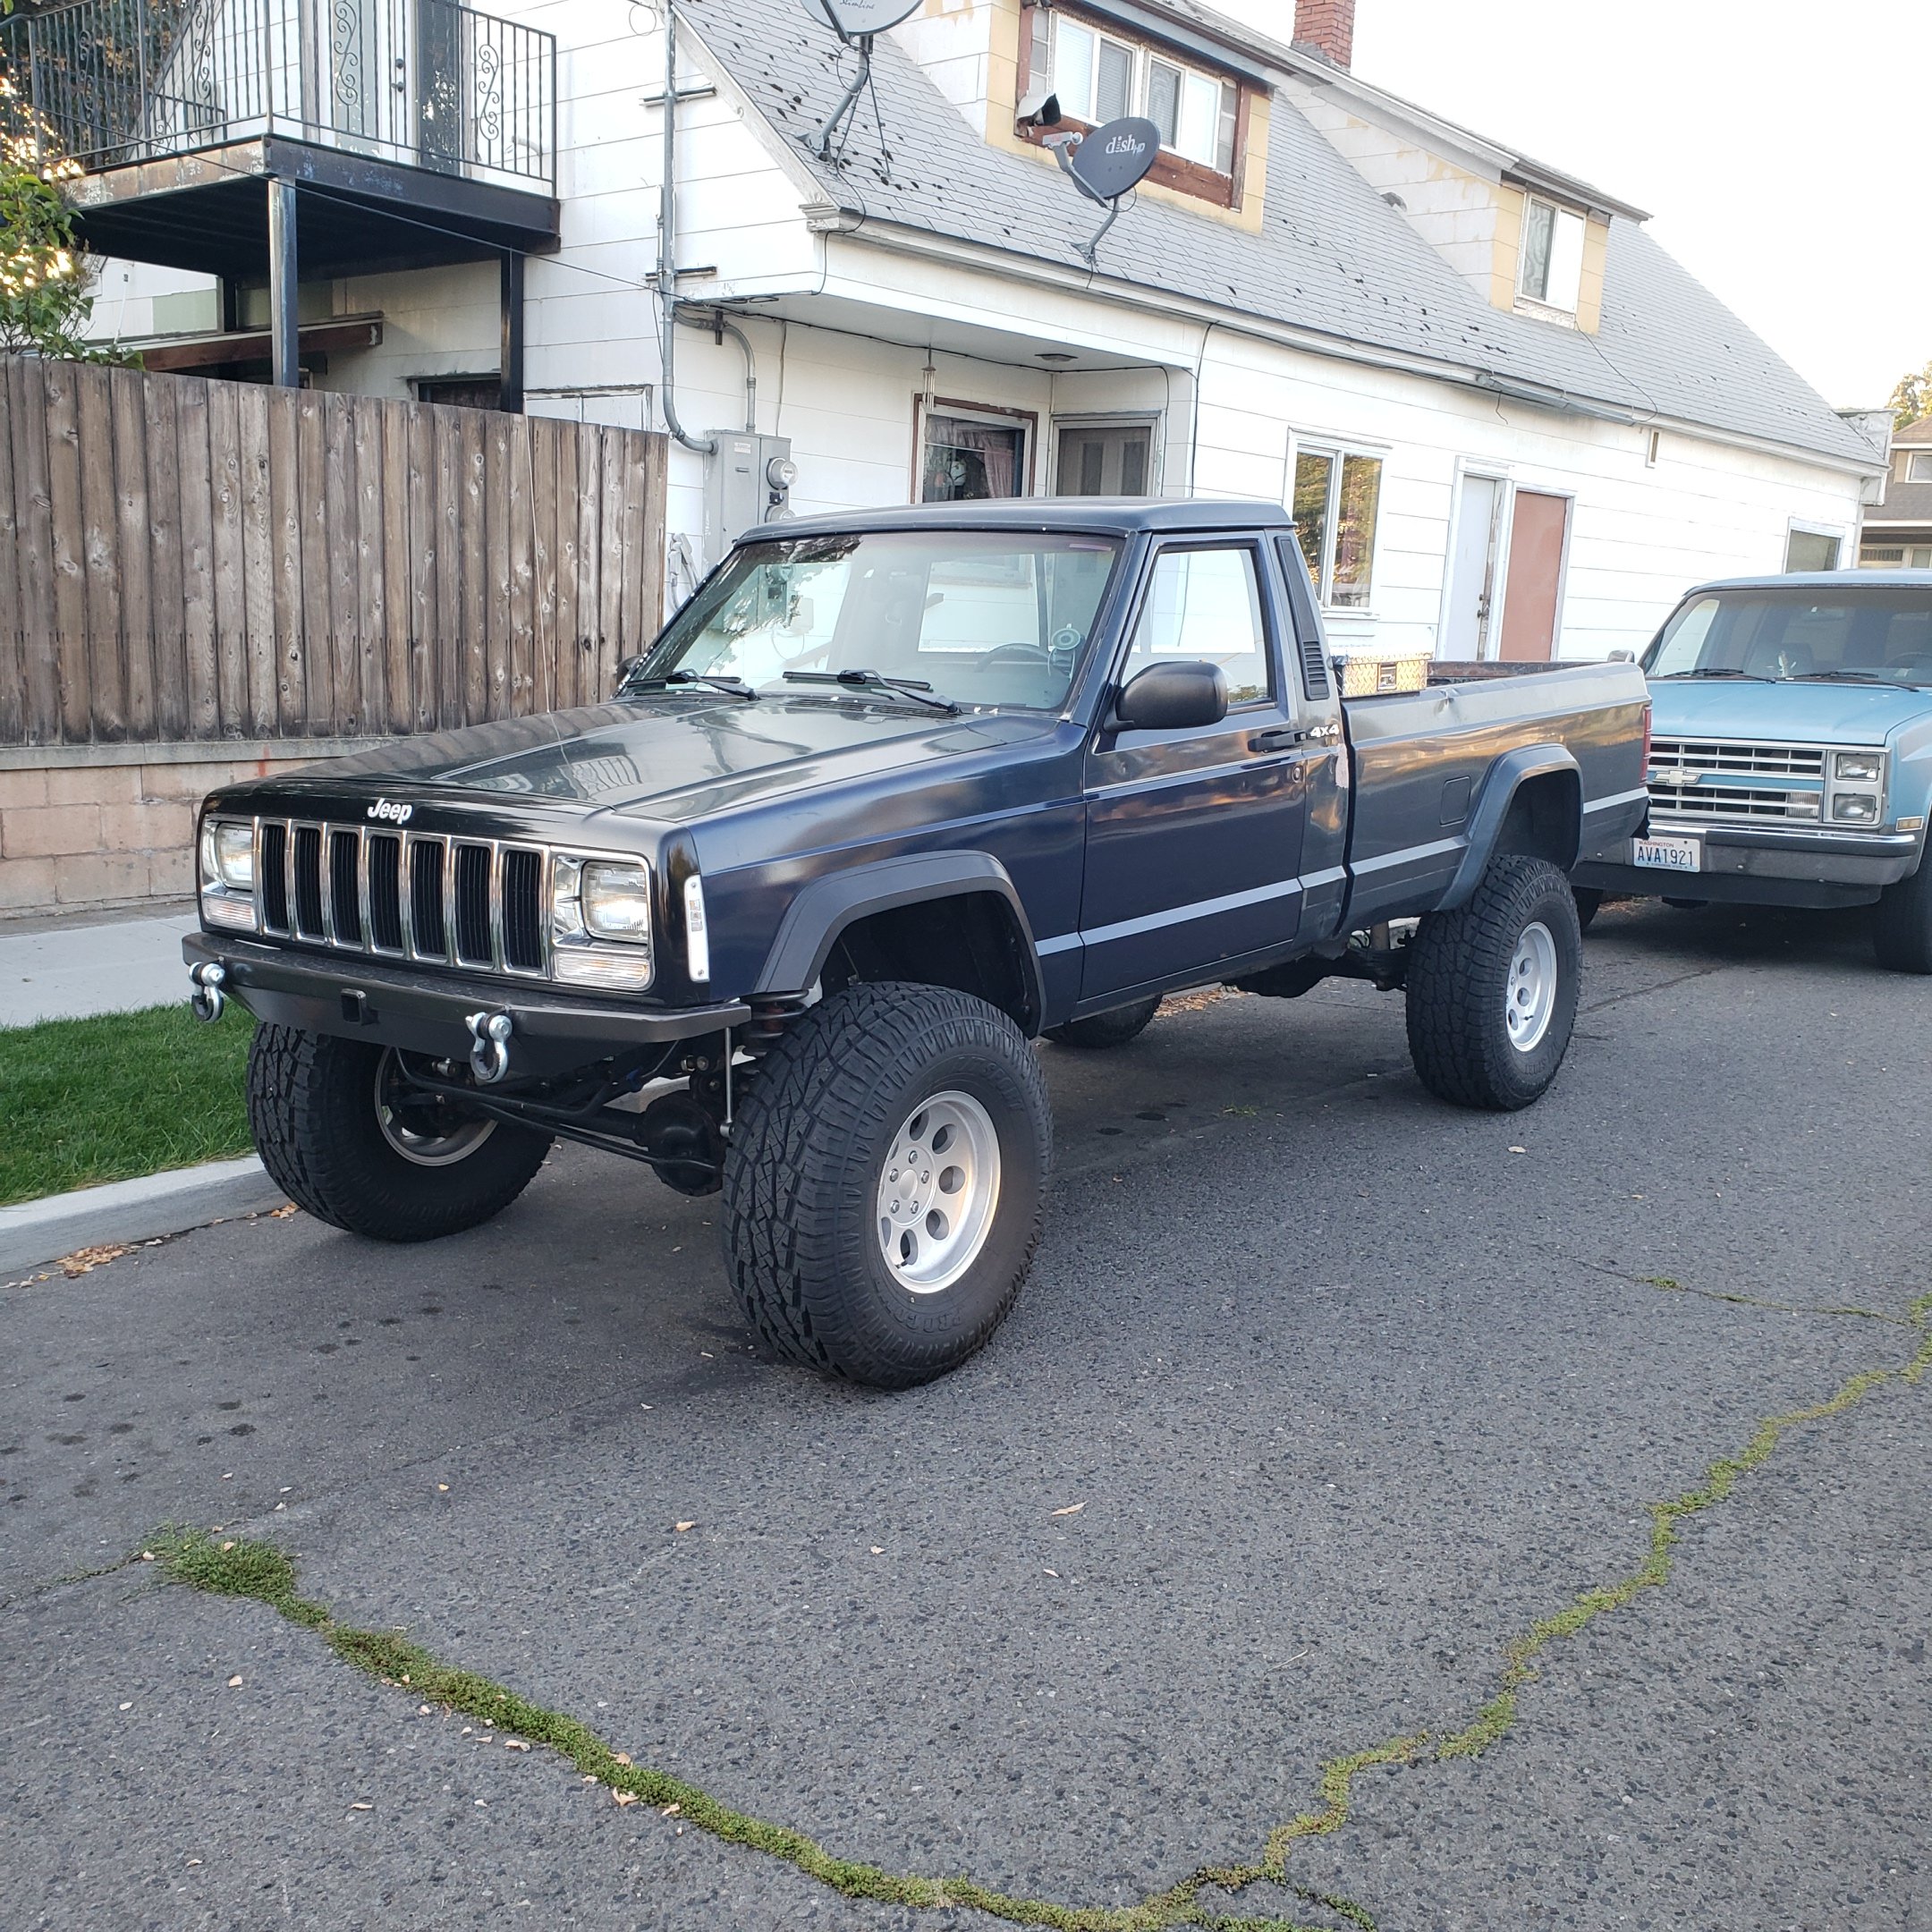
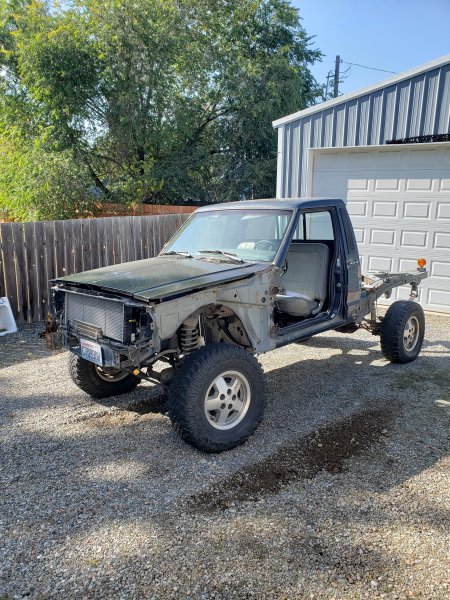
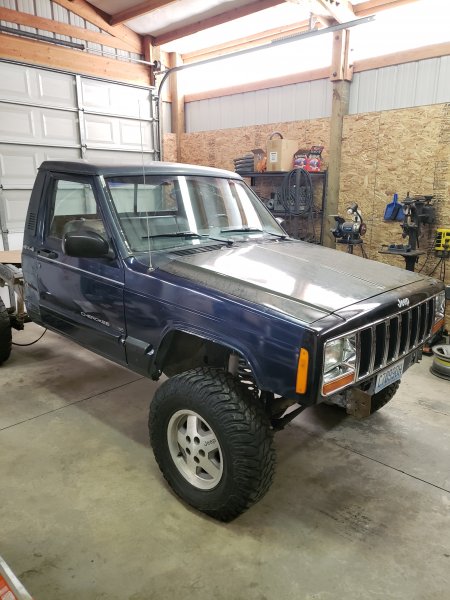
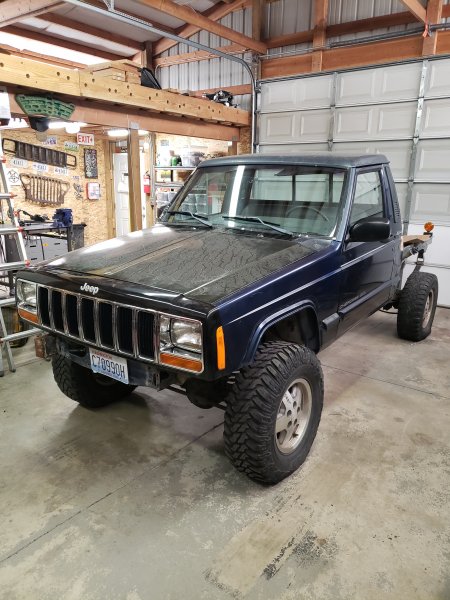
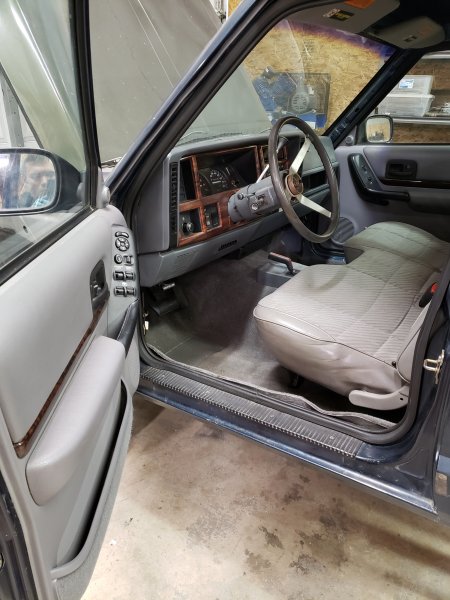
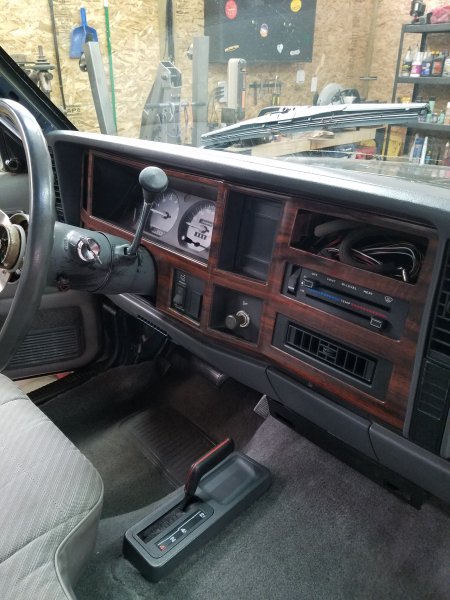
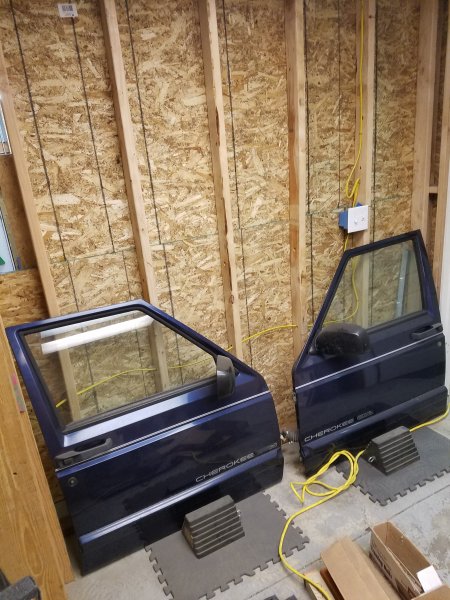
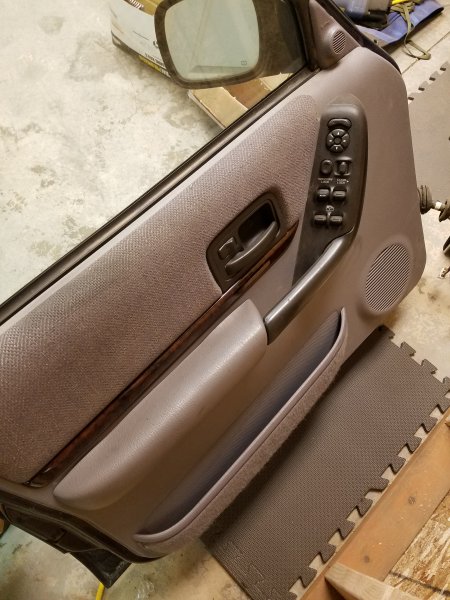
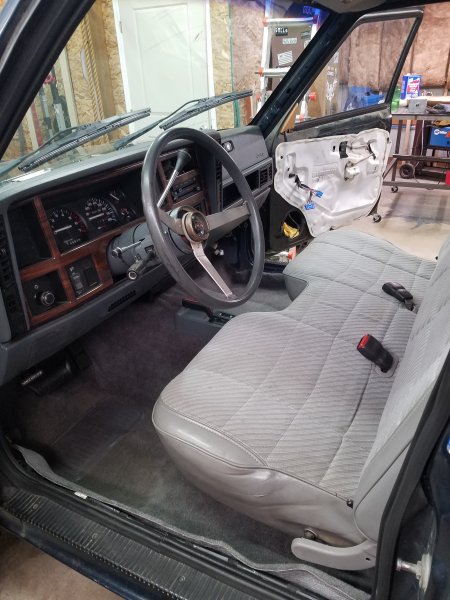
Well it's been awhile since my last update. Lots of things happened between now and then, including going back to school, changing careers, and an addition to the family... Not that I had forgotten about the MJ, but it did sit for awhile. Months. The bed came off in order to powerwash all the mud and hornet nests inside the frame, with future plans to put some type of undercoating on the bed frame, POR15 maybe. When I finally got around to putting on the 97 Country doors I found an XJ at the local pick-n-pull that had matching navy blue fenders, so I pulled those. So of course everything had to come apart again. Figured while the fenders were off I'd install the 97+ XJ windshield washer reservoir. I used this thread for reference: Now I have some space to get that 96 XJ brake booster in there. Got the 97 Country doors on which required quite a bit of shimming and test fitting to get on to match the body lines. I purchased some XJ door shims from ebay which were almost 3/16" thick, compared to the 1/16" shims I had. They worked perfectly on the driver side. The passenger side required me to double up on 1/16" shims on the bottom hinge with a single 1/16" shim up top. From there I was able to reinstall the fenders and the header panel. Eventually I want to paint the entire truck navy blue with chrome accents, so I decided to swap out the black grill with a chrome aftermarket one from ebay. It's actually starting to look like a complete truck again! I'm glad even though it's 4 different colors, they're blue/black/green so it doesn't look too ghetto, right? Back to the interior. I'm not doing a full 97+ XJ swap. I am keeping the MJ dash, column shift, and bench seat. But wanted a "luxury" package including power windows and locks with wood interior trim. I literally spent years trying to get these pewter & wood trim door panels. I actually ended up needing additional door panels with the map pockets in order to repair a set into good working order. Although the grey is not a perfect color match with the dash and upholstery, it doesn't really bother me.

-
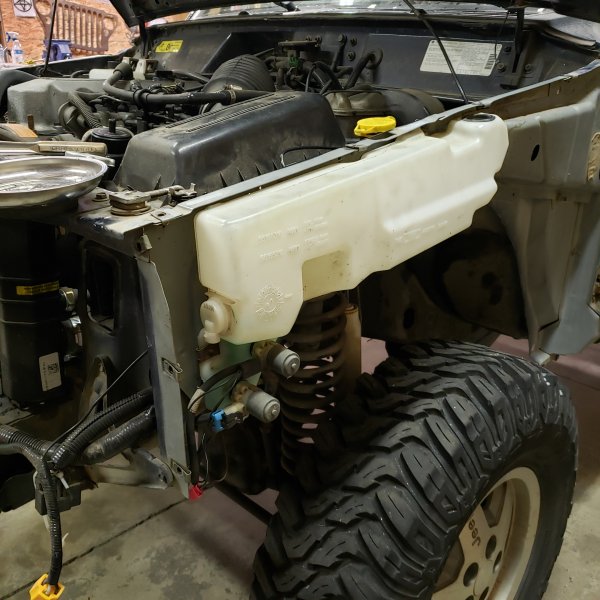
New Windshield Washer Tank Installed
Airborne Janitor replied to HOrnbrod's topic in MJ Tech: DIY Projects and Write-Ups
Recently did this mod while I had the fenders off. Having all the space and a hole saw made it easy. I ended up spicing both pumps to come one when activated, and used a T-connector to splice the rubber hosing. Works great.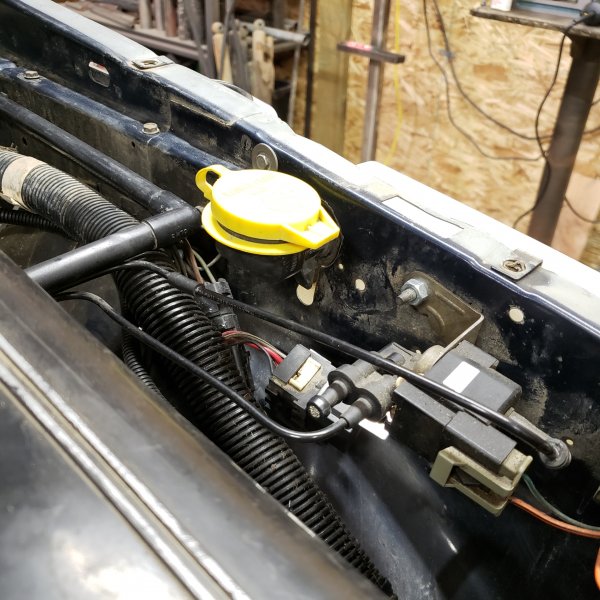

-
The Golden Eagle MJ
Airborne Janitor replied to jbain's topic in MJ Hardcore Tech: Epic Journeys to Greatness
Damn this thing is looking mean! Love how it's all coming together. -
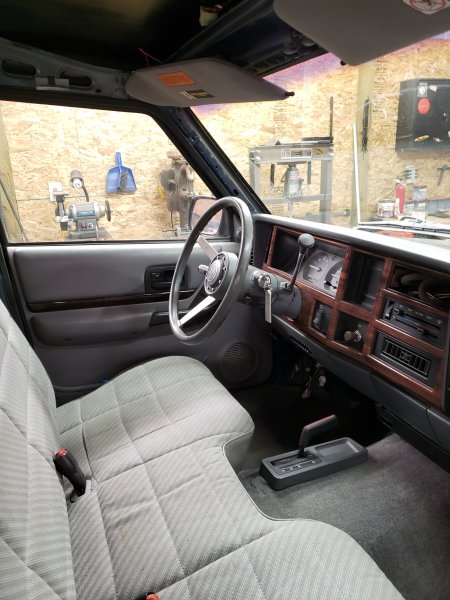
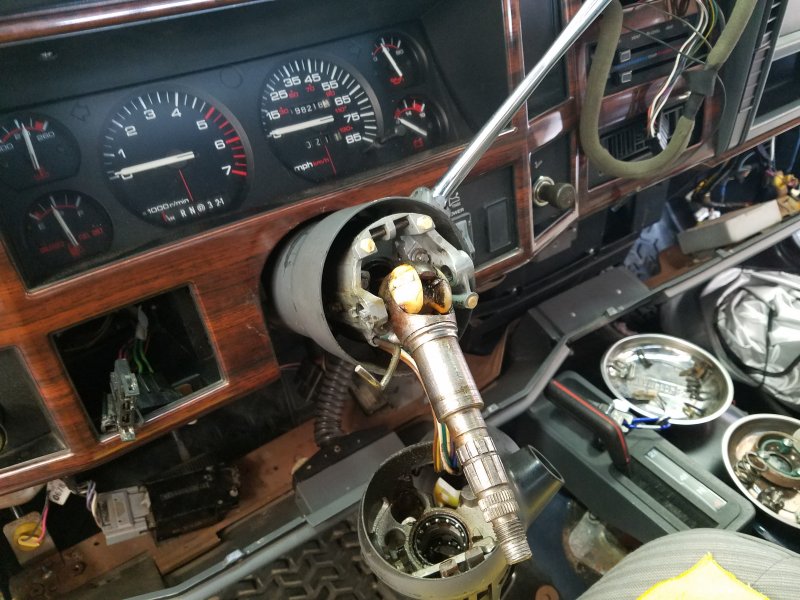
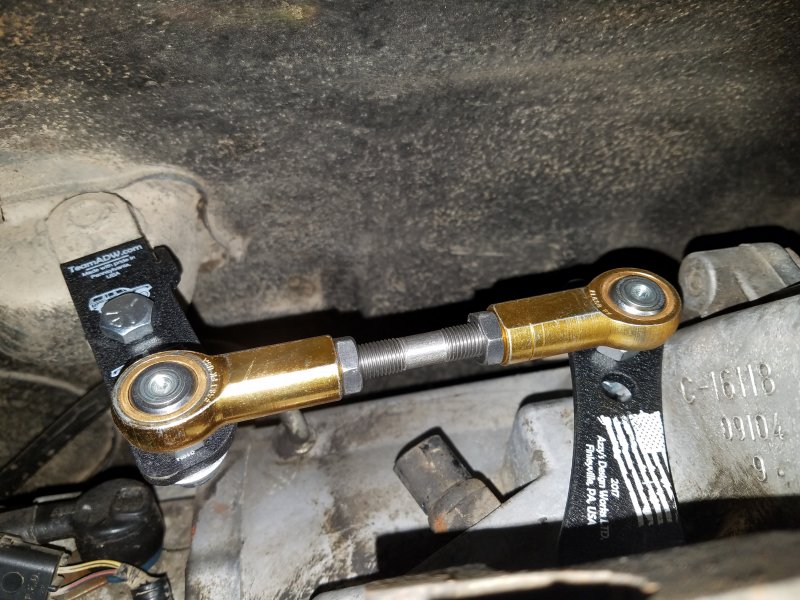
Well it's been awhile since I last updated. I got a few projects done but not as much as I would have liked. I've had to direct my efforts to my business lately but I'm hoping to devote more time to the MJ in the next few months. Ended up replacing the alternator because it was squealing like a pig, I installed a new ACDelco (335-1008) 100 amp unit which has been doing great. Next was to rebuild the tilt steering column. I already had a steering wheel puller, but I did buy a pivot pin and lock plate puller off amazon for the job. I followed the directions from this forum on an El Camino, but it's the same column that's in the MJ so everything applies: http://www.elcaminocentral.com/showthread.php?t=27192 I also made sure to install a new gear selector stalk spring (GM 07812853) while I had it apart since mine was broken. I had never done this job before, but I took my time and followed the El Camino directions and it's now 1000% better. There are 4 bolts that secure the tilt mechanism, and only two of mine were attached and they were finger loose! Then I "rebuilt" the front bench seat, which I am planning on keeping. I really like the column shift bench seat combo in this truck, I got my XJ for buckets and a stick shift. Also got the ACC carpet from stockinteriors.com installed. Accidentally cut too much for the 4WD floor shifter, so I busted out the hot glue gun and stitched in more carpet. I should have measured better but I guess I got overzealous even when I used the old carpet as a template. If I were to do it again I would cut a cross "+" where the shift lever cover goes, put the carpet in then cut around the actual 4WD lever. I also installed the Azzy Design Works transfer case linkage, which is a better nicer set up than that stock crap. Next project is to get these 97 XJ Country doors installed.

-
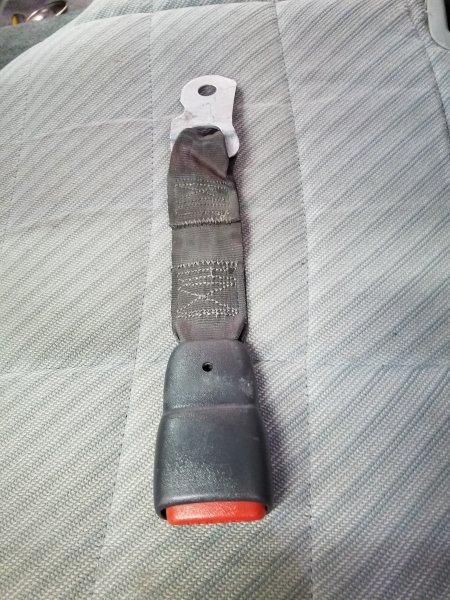
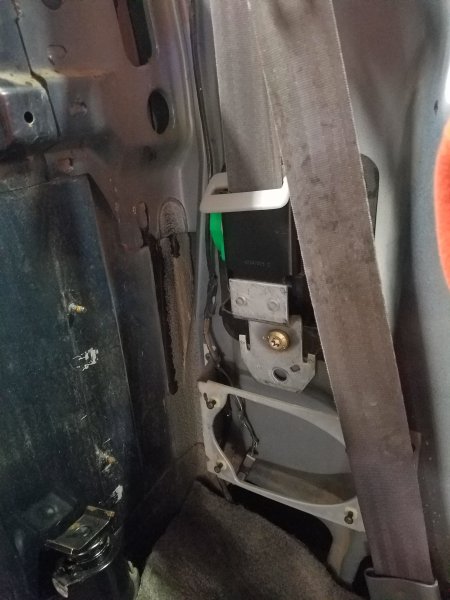
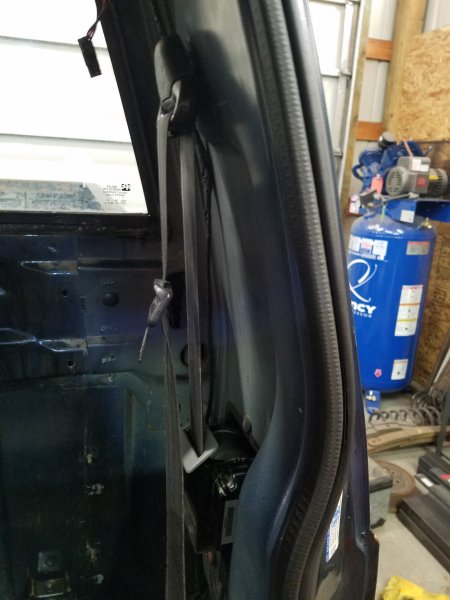
While I had the seat out I decided to replace the worn out MJ seat belts with some 97+ XJ style ones. I'm going for a semi-97+ XJ interior, but keeping the stock seat and dash. They nearly bolt in, but you do have to drill a hole for the B-pillar bolt, and I had to bend the metal "hook" tabs straight as to not interfere with a tight install. For the female seat buckles I pulled the rear seat 97 XJ+ buckles (which have two belts attached to one bracket) and cut the bracket to make a single buckle, and popped the plastic sleeves off so they would fit through the bench seat. They ended up being a little shorter than the stock female buckles, which means I can't move the bench to the full front position, which doesn't bother me since I never keep the seat that close to the wheel. Overall very happy with these small improvements and getting this thing one step closer to being road worthy.
-
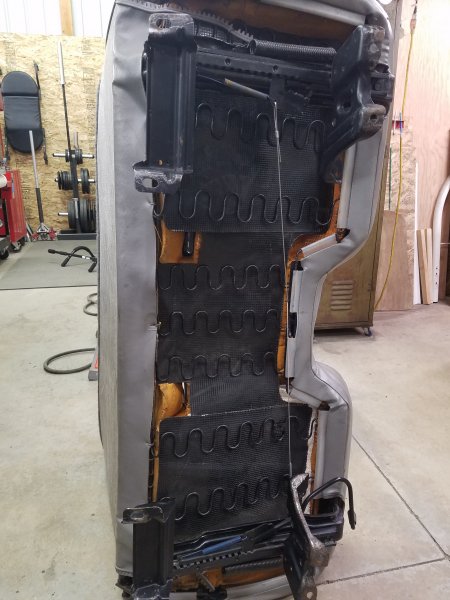
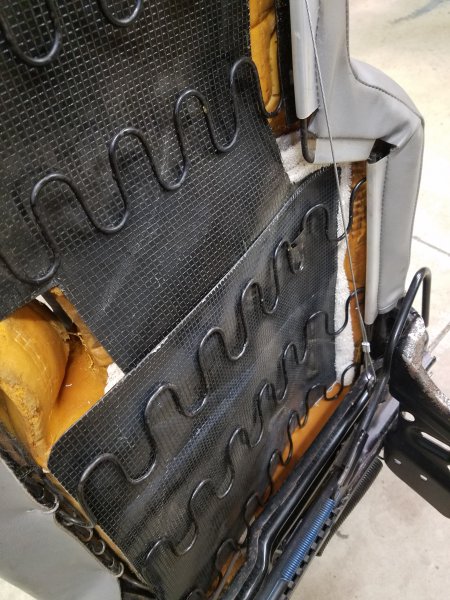
I know it's super popular to swap to bucket seats in these things but I wanted to keep the bench because my dog prefers it, and I wanted the interior to be different from my XJ. I saw a previous post where someone had stiffened up their benchseat by shoving a cut-up plastic floor mat between the foam and the springs. I decided to do the same to my very saggy bench, using a black office mat I got off amazon. I cut the mat with a pair of scissors pretty easily, don't forget to cutout notches for the seat belts, and just slid them under the springs. Unfortunately the driver seat was super worn and the mat didn't do much (did great on the passenger side), so I ended up cutting up a towel, folding it over, and shoving it between the mat and the foam, and that made a big improvement. I did have to partially remove the seat cover to make room for the towels. My seat is now firm and comfortable. I also ended up replacing the cable that runs from the driver to the passenger rails that engages the sliding mechanism for both. I used a 1/16" steel cable with clamped ferrules at the ends. I also swapped the large springs from driver-to-passenger, since the driver side was a little more worn and it was tough to adjust the seat position.
.jpg.fa179b48686e2a02bc08d59fc54d71bd.jpg)
-
test 4ettt

-
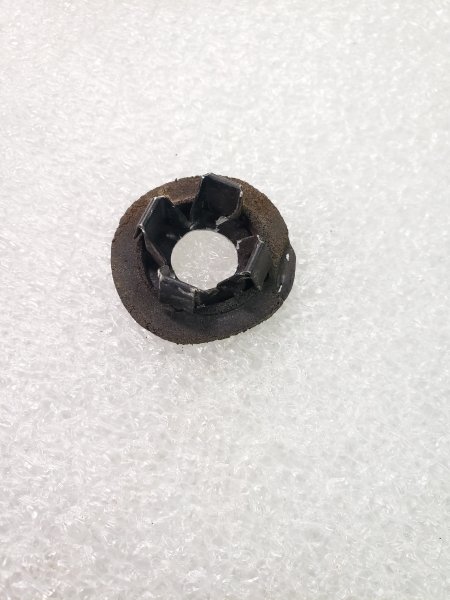
Studds that attach air box to the fire wall.
Airborne Janitor replied to Jtrux's topic in MJ Tech: Modification and Repairs
It's Mopar #J8124425, but you probably won't be able to find it anymore. I think your best bet is your closest pick n pull. -
Heater/evaporator box foam and compatibility
Airborne Janitor replied to Jtrux's topic in MJ Tech: Modification and Repairs
Here's where you can get the seal for the heater core while you're in there. I got one from here and it was almost a 100% fit, nothing a quick trim with a box cutter can't handle. https://www.moparpartsgiant.com/parts/mopar-seal-heater-core-tubes~56001322.html?Make=Jeep&Model=Comanche&Year=1989&Submodel=&Filter=(E=ERB;T=DGS)&Location=heater-air-conditioning-housing-core-heater,0000192S,15 -
Did it help or are you still having issues?
-
I would also replace those household wire nuts with some automotive butt connectors/crimps.
-
What should I get - parts MJ?
Airborne Janitor replied to 87MJTIM's topic in MJ Tech: Modification and Repairs
I like those tail lights w/ the chrome trim, but seems they're cracked and one has a hole? I wonder if you can swap that trim or is it one piece molded with the lens? -
Replacement (aftermarket) Seat Belts
Airborne Janitor replied to Comanchakazie's topic in MJ Tech: Modification and Repairs
I would go with an OEM replacement if you want the right color. Try eBay, or post in the Wanted section of the classifieds here. -
97+ front clip swap
Airborne Janitor replied to mattbuch96's topic in MJ Tech: Modification and Repairs
You also need the 97+ brackets that attach the header panel to the fenders, even if you retain the old fenders (assuming they bolt to them). There's lots of info about the swap on the forums if you search. Check the link in my sig, there's a wiring diagram for the lighting. -
What about the block, behind the thermostat housing? What did the fluid look like there?
-
You may be going down the rabbit hole when you replace the thermostat/housing. Yes, that is where you want to start since it is clearly leaking. But just like omega_rugal said, if it looks that nasty on the outside it probably looks just as bad inside the block. You may end up replacing all the cooling system components whether you want to or not. When I got my MJ the previous owner filled up the block with hose water, which rusted over time and froze on me in the winter shortly after I bought it. Popped out a freeze plug and as I pulled the manifolds off to get a better look it was clear the entire block was filled with brown water/rust/junk. I probably flushed 20+ gallons through until it was clear, not including a baseball-sized amount of rust/flakes/sand I pulled out by hand that was in the back of the block, behind the rear freeze plug. All said and done I ended up having to replace everything: radiator, hoses, water pump, thermostat, heater core, since it was all contaminated. Hopefully a flush is all you need. Take a pic once you pull that housing off. Hopefully it's just some nasty sealant/gasket from the housing mixed with coolant....
-
Sand inside the frame
Airborne Janitor replied to SBpunk's topic in MJ Tech: Modification and Repairs
There are holes along the sides of the frame rails that are just big enough for the tip of a pressure washer nozzle to get into. My MJ was used as a mud truck apparently and has inches of mud caked inside the rails. I plan to pull the bed soon as well to get a better shot at getting it clean. -
I have the digital FSM for 1989 & 1999 Jeep vehicles and a Haynes manual which is almost 20 years old. I like to think they compliment each other well. Yes, the FSM is the official stealership's guide but definitely lacks detail in a lot of areas. Step 1 remove driveshaft. Step 2 remove transmission. Like its always that easy. The Haynes manual has definitely been worth the $20 I paid for it in 99. Some part are generic and sometimes the steps & details are cumbersome. But the pictures are usually decent and I've found some pics/steps are the same as they are in the FSM. Just my 2 cents.
-
Nice truck man, looks like we're doing similar tear downs, but your truck is in better shape than mine. I live in the valley BTW, we should link up to wrench sometime. Could use an extra hand to pull the bed off in the near future.
-
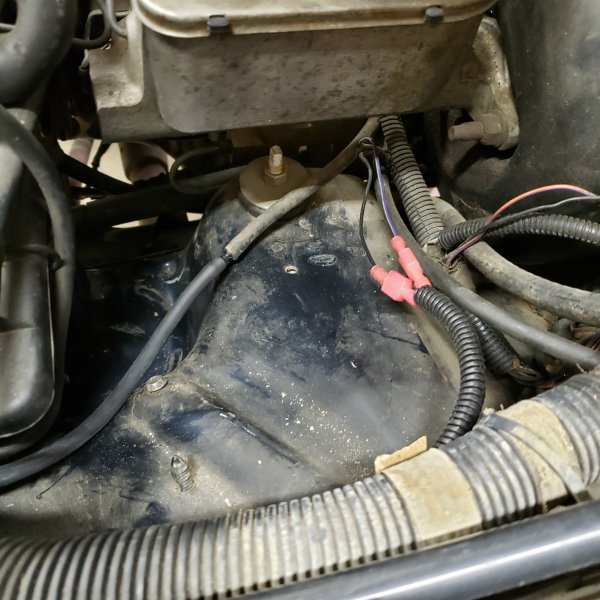
Found it. Dorman 603-001. Looks like it works perfect. I'm going to order one (or a couple) since I hate the bottle I have and my early 2.5L XJ bottle has been backordered for months. Cool, mine sits right on top of the blower motor and fit perfect with those brackets. I think I paid like $10 at Napa.