


cruiser54
-
Posts
9413 -
Joined
-
Last visited
-
Days Won
14
Content Type
Profiles
Forums
Gallery
Everything posted by cruiser54
-

Looking for Help in the Phoenix Area
cruiser54 replied to Discoman9001's topic in MJ Tech: Modification and Repairs
2 excellent leads^^ so far!! -
Tips for a cool running comanche?
cruiser54 replied to Discoman9001's topic in MJ Tech: Modification and Repairs
This^^ -
Tips for a cool running comanche?
cruiser54 replied to Discoman9001's topic in MJ Tech: Modification and Repairs
Yep. -
Tips for a cool running comanche?
cruiser54 replied to Discoman9001's topic in MJ Tech: Modification and Repairs
No kidding?? -
Tips for a cool running comanche?
cruiser54 replied to Discoman9001's topic in MJ Tech: Modification and Repairs
Actually, I was just messing around to get a rise out of Jeff. but, there may be some folks in your area from Comanche Club who would help you out. -
Tips for a cool running comanche?
cruiser54 replied to Discoman9001's topic in MJ Tech: Modification and Repairs
woostah. I was born in Pittsfield 69 years ago. -
Tips for a cool running comanche?
cruiser54 replied to Discoman9001's topic in MJ Tech: Modification and Repairs
Where in Mass? -
Tips for a cool running comanche?
cruiser54 replied to Discoman9001's topic in MJ Tech: Modification and Repairs
Take it over to Jeff's in Queen creek. -
Replacement closed system radiator?
cruiser54 replied to robfg67's topic in MJ Tech: Modification and Repairs
It's 1193A when I click on it. Take a run down to Napa. -
Replacement closed system radiator?
cruiser54 replied to robfg67's topic in MJ Tech: Modification and Repairs
https://www.napaonline.com/en/search?text=radiator&referer=v2 NR1193A at Napa. -
Replacement closed system radiator?
cruiser54 replied to robfg67's topic in MJ Tech: Modification and Repairs
According to the photo, it does. The years of application are wrong though. Should be 87 to 90. No biggie. -
INSANE OIL PRESSURE GUAGE?
cruiser54 replied to ruralandalone's topic in MJ Tech: Modification and Repairs
I'd be concerned if my oil pressure gauge was reading temperatures....... Unplug the sender and see what happens. -
You have no camshaft position sensor. Here's something to look at also. CRUISER'S MOSTLY RENIX TIPS RENIX CPS TESTING AND ADJUSTING OCTOBER 30, 2015 SALAD 131 COMMENTS EDIT Renix CPSs have to put out a strong enough signal to the ECU so that it will provide spark. Most tests for the CPS suggest checking it for an ohms value. This is unreliable and can cause some wasted time and aggravation in your diagnosis of a no-start issue as the CPS will test good when in fact it is bad. The problem with the ohms test is you can have the correct amount of resistance through the CPS but it isn’t generating enough voltage to trigger the ECU to provide spark. Unplug the harness connector from the CPS. Using your voltmeter set on AC volts and probing both wires in the connector going to the CPS itself as shown in Figure 2 as Connector A, crank the engine over. It won’t start with the CPS disconnected. You should get a reading of .5 AC volts. If you are down in the .35 AC volts range or lower on your meter reading, you can have intermittent crank/no-start conditions from your Renix Jeep. Some NEW CPSs (from the big box parts stores) have registered only .2 AC volts while reading the proper resistance!! That’s a definite no-start condition. Best to buy your CPS from NAPA or the dealer. Sometimes on a manual transmission equipped Renix Jeep there is an accumulation of debris on the tip of the CPS. It’s worn off clutch material and since the CPS is a magnet, the metal sticks to the tip of the CPS causing a reduced voltage signal. You MAY get by with cleaning the tip of the CPS off. A little trick for increasing the output of your CPS is to drill out the upper mounting hole to 3/8″ from the stock 5/16″, or slot it so the CPS bracket rests on the bell housing when pushed down. Then, when mounting it, hold the CPS down as close to the flywheel as you can while tightening the bolts. Another little tip to save tons of aggravation is to stick a bit of electrical tape to your 11mm socket and then shove the bolt in after it. This reduces the chances of dropping that special bolt into the bell housing.
-
Looking into upgrading stock carb
cruiser54 replied to DzienManche's topic in MJ Tech: Modification and Repairs
http://www.redlineweber.com/carb-kits/auto/jeep/ -
Looking into upgrading stock carb
cruiser54 replied to DzienManche's topic in MJ Tech: Modification and Repairs
We converted 2 V6s to four barrels. Not worth the $ for a minimal performance gain. I'd go Weber. -
Tips for a cool running comanche?
cruiser54 replied to Discoman9001's topic in MJ Tech: Modification and Repairs
Radiator is likely a bit clogged. ever replace it? Good time to convert to an open system. Also use a Mopar thermostat. -
Get a diagnostic on my MJ
cruiser54 replied to Virginia's topic in MJ Tech: Modification and Repairs
Any of us live near Virginia that could give recommendations or actually do the inspection? Virginia, who is gonna do the necessary repairs after the diagnosis? -
Get a diagnostic on my MJ
cruiser54 replied to Virginia's topic in MJ Tech: Modification and Repairs
A local 4WD shop that XJ/NJ enthusiasts frequent? -
Replacement closed system radiator?
cruiser54 replied to robfg67's topic in MJ Tech: Modification and Repairs
Napa NR2802 -
Get a diagnostic on my MJ
cruiser54 replied to Virginia's topic in MJ Tech: Modification and Repairs
I wouldn't take it to them at all. Their techs aren't old enough to know our era of Jeeps. -
Intermittant Blower motor and A/C
cruiser54 replied to HellCreek's topic in MJ Tech: Modification and Repairs
CRUISER'S MOSTLY RENIX TIPS IMPROVING BLOWER MOTOR PERFORMANCE NOVEMBER 28, 2015 CRUISER54 30 COMMENTS On 1984 to 1990 MJs and XJs, the blower motor’s factory grounding point is on the driver side inner fender under the sheet metal screw. This ground is shared with windshield wipers, front windshield washers, rear windshield washers, AC clutch relay, fan control relay, fog lamps, fan motor, headlamps, front turn signals, front side markers, and park lamps. So your blower motor has its ground point 10 feet away from where it is located!! What we’re going to do is leave that ground intact and also ground the blower motor on the passenger side inner fender much closer to the blower motor itself. This will also benefit the other components on the factory ground circuit. Take this opportunity to refresh the factory ground as a matter of course. Remove the screw, scrape the surface to bare metal and reinstall the screw securely. Here’s what I do to get the ground much closer to the blower motor and add another ground point to this overloaded ground circuit. Find the blower motor connector on the passenger side. Red and Black two wire connector. Find a location where the black wire can be made to reach the passenger side inner fender, and cut the wire. You may have to do some rerouting of the harness to achieve this. Take both cut pieces of wire and put them together into a yellow eyelet and crimp. Fasten the eyelet to a place on the passenger side inner fender with a sheet metal screw after applying OxGard to the contact surfaces. Be sure to scrape the attaching point on the fender to bare metal first. Your blower motor will now turn faster and last longer, and the other electrical components on the circuit will benefit from a better ground path. -
At idle RPM drop and feels like its about to stall
cruiser54 replied to tdtony's topic in MJ Tech: Modification and Repairs
without a doubt. -
can't hurt and can only help.
-
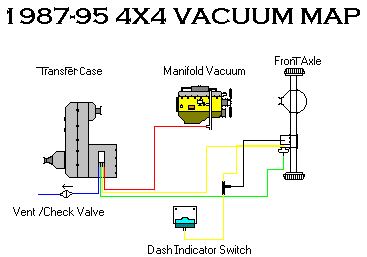
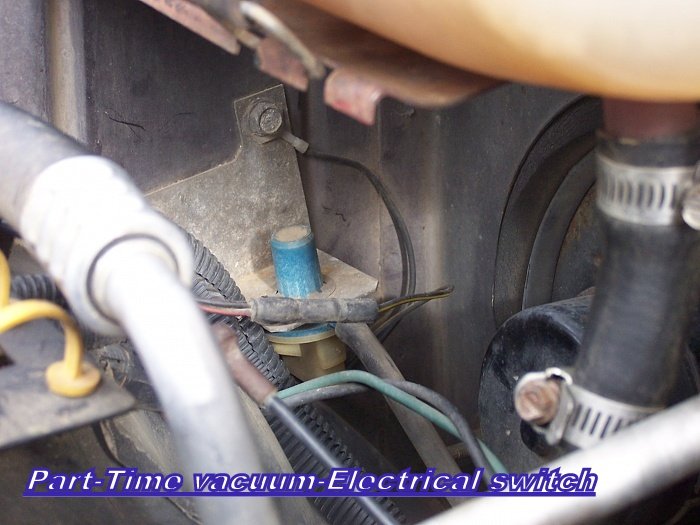
Vacuum crap and dash indicator switch for the CAD system. Per second photo.
-
You guys need to grab every ECU you can. especially 89 to 90.