cruiser54
-
Posts
9413 -
Joined
-
Last visited
-
Days Won
14
Content Type
Profiles
Forums
Gallery
Everything posted by cruiser54
-

What is this pieces of weather stripping called?
cruiser54 replied to EUREKA's topic in MJ Tech: Modification and Repairs
Can you order the late model ones anywhere? -
What is this pieces of weather stripping called?
cruiser54 replied to EUREKA's topic in MJ Tech: Modification and Repairs
that one mounts on the A-pillar, correct? If so, there's a trick to cut down on drafts and wind noise. Get those pieces from a later model XJ. They're way more rigid and don't pucker along their length. -
What is this pieces of weather stripping called?
cruiser54 replied to EUREKA's topic in MJ Tech: Modification and Repairs
Nice catch. For clarification, I was referring to the diagram on the left's #5. -
What is this pieces of weather stripping called?
cruiser54 replied to EUREKA's topic in MJ Tech: Modification and Repairs
That's mounted on the body, right? Not the door? -
Numbers matching GM engine in a Jeep? The 2.8 is a turd. Always was.
-
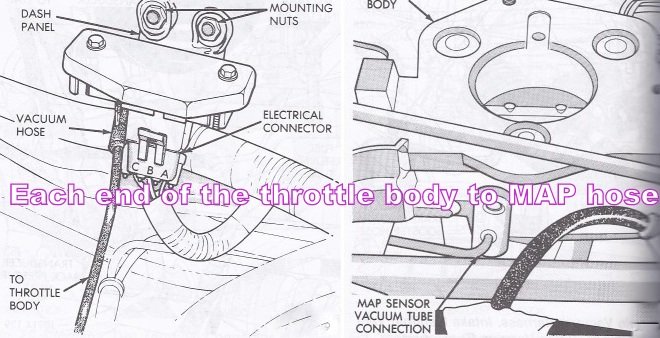
I know that fit of the rubber into the throttle body is sketchy, but make sure the plastic pipe fits snugly into the rubber. A little glue on the outside of the plastic pipe where it fits into the sketchy rubber part is good.
-
That tube can cause lots of issues. Did you see my fix?
-
Also, the hose/piping from throttle body to MAP sensor may have a crack/split in it. It flexes under engine torque. Check it carefully!! CRUISER'S MOSTLY RENIX TIPS THROTTLE BODY TO MAP SENSOR HOSE FIX JANUARY 23, 2016 CRUISER54 51 COMMENTS The Renix throttle bodies have a strange and failure prone connector on the side where the MAP supply originates and then runs up to the MAP sensor located on the firewall. This hose/pipe assembly is no longer available for purchase. The real kicker here is how critical this line is in supplying the correct vacuum signal to the MAP, the most relied upon sensor for the ECU to read regarding air/fuel ratio. Any cracks, melted spots, or loose rubber connectors can cause major starting and driveability issues. There’s a simple fix though. All that’s required is a 1/8” NPT tap, a new throttle body gasket ( Napa FPG 60742 ), a vacuum fitting (Napa 05703-B102), two vacuum elbows (Napa CRB2670), and a length of new plastic piping (Napa CRB2672). Remove the throttle body and take it to the workbench. Using an oiled tap along with a driver, carefully thread the lower of the 2 holes of the throttle body where the old fitting was plugged in. Don’t go too deep. These are pipe threads. Flush the hole with carb cleaner and inspect for any left over cuttings. This is an excellent time to do a complete throttle body and IAC cleaning. See Tip 11. Take the vacuum fitting (05703-B102 ) and apply a LITTLE bit of thread sealer on the threads only. I prefer Permatex #2 but almost anything is fine. . Carefully screw the fitting in until snug. Install one of the vacuum elbows on the MAP sensor so it points toward the throttle body, and the other vacuum elbow on your new throttle body fitting so it points up to the MAP sensor. Cut a length of the new plastic tubing (approximately 13 inches) to fit between the vacuum elbows and install it making sure there is enough slack for some engine movement. Route it according to the photo. We don’t want any rubbing or chafing with engine movement. Not a bad idea to use some contact cement or Gasga-Cinch sparingly on the tubing to elbow connectors.
-
Refresh grounds and connections per my website. Clean out the C101 connector.
-
The ZJ box in an MY or XJ feels like it's the box they shoulda had in the first place.
-
THIS^^^^
-
I did it on my 87 MJ. Quickened up the steering input. I liked it.
-
How about the steering box off a ZJ?
-
Drill it until the metal piece rests on the bell housing.
-
PM me your shipping info plz
-
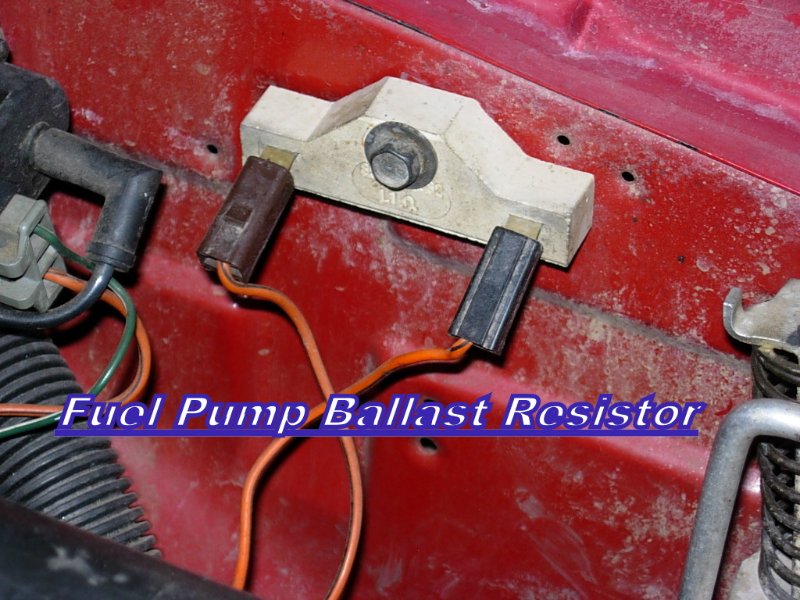
Do you know how to use a voltmeter? We need to know if there is power to the fuel pump. Does the gas gauge work? In the meantime, now would be a great time to upgrade your fuel pump ground. CRUISER'S MOSTLY RENIX TIPS IMPROVING THE FUEL PUMP GROUND JANUARY 3, 2016 CRUISER54 60 COMMENTS The fuel pump and fuel tank sending unit ground at a sheet metal screw up behind the spare tire on an XJ, and behind the driver’s taillamp on an MJ. Not only is a sheet metal screw a lousy way to ground things, this ground path is long and travels through some connectors that are prone to corrosion and moisture. Locate the black wire on the HARNESS side of the fuel pump/sender 3 wire connector. Remove a 6″ length of the split loom covering. Strip back about 1/2″ of insulation from the BLACK wire. Take your new ground wire, preferably at least 14 gauge and 12 to 18 inches long as needed, strip it about 3/4″, and wrap it around the exposed part of the harness plug wire.Solder the connection. Tape it up and reinstall the split loom covering. At the other end of your new ground wire, add a crimp on eyelet. Attach the eyelet under a bolt that goes directly into the chassis. Be sure to clean the attaching point til shiny and apply OxGard to the contact surfaces.
-
Not to hijack this thread, but would anyone like a fistful of used MJ dome lamps? Maybe for refurbishing or something? Just pay shipping. Total lot only.
-
Of course I love the AMC colors and "RENIX"
-
Put a jumper wire across it.
-
You should see it move.
-
Look back 2 posts. You can modify the output.
-
Have you completed any of the Tips on my website?
-
All good advice^^.
-
Ohm, you are correct.
-
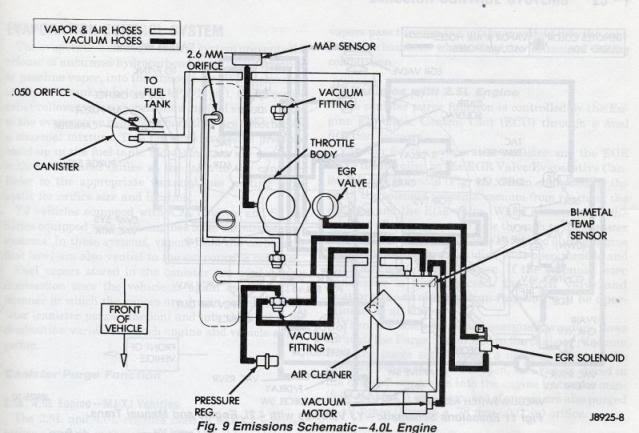
How long have you owned this Jeep? Are you positive the hoses are where they're supposed to go or did you just replace the bad hoses? Here's a diagram for verification if that's the case.