


cruiser54
-
Posts
9413 -
Joined
-
Last visited
-
Days Won
14
Content Type
Profiles
Forums
Gallery
Everything posted by cruiser54
-

Can stalling my truck lock the starter?
cruiser54 replied to VorTekX's topic in MJ Tech: Modification and Repairs
You have a very oily starter. Why or how doesn't the starter fit? -
Skid plate year comparability
cruiser54 replied to Anthi4078's topic in MJ Tech: Modification and Repairs
Is it the front one? An FYI if it is, all that skid plate guards is the inability to work on your truck. In the way for performing numerous repairs. -
Skid plate year comparability
cruiser54 replied to Anthi4078's topic in MJ Tech: Modification and Repairs
Fronts are the same. The transfer skid plate came in a couple of versions depending on the trans/transfer case combo. -
Can stalling my truck lock the starter?
cruiser54 replied to VorTekX's topic in MJ Tech: Modification and Repairs
Is your starter covered in engine oil by chance? -
-
-
Innovative Performance Chips
cruiser54 replied to JimiGibbs's topic in MJ Tech: Modification and Repairs
Want more power? Index your distributor. 60mm throttle body. Advance your CPS. Eliminate the D crush in your exhaust downpipe. -
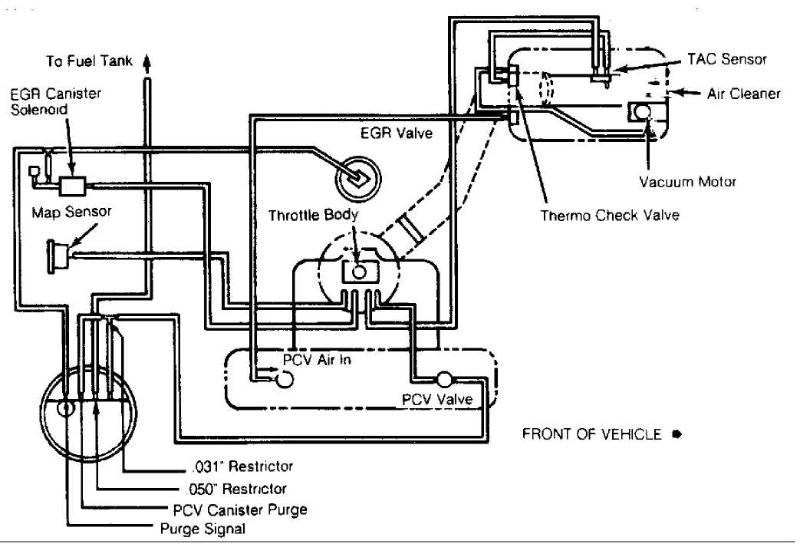
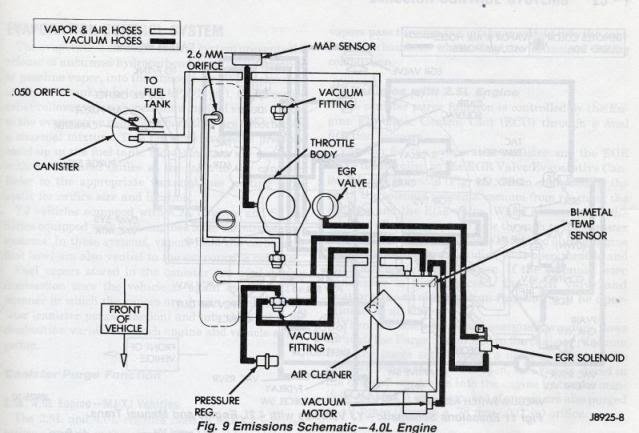
Renix Vacuum Canister OEM Location
cruiser54 replied to Salvagedcircuit's topic in MJ Tech: Modification and Repairs
I mounted mine in the engine bay and eliminated all those hoses and piping.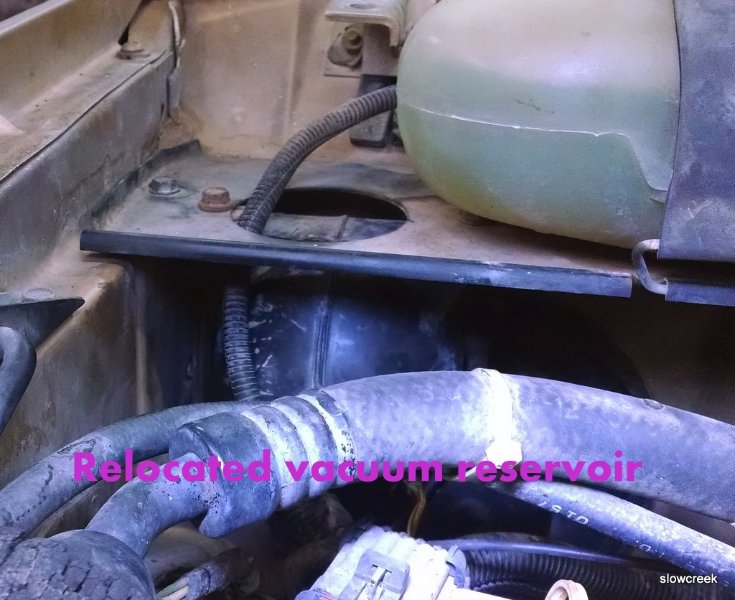
-
Not at all.
-
At idle RPM drop and feels like its about to stall
cruiser54 replied to tdtony's topic in MJ Tech: Modification and Repairs
NICE!! -
Only Runs with Bypasses Resistor
cruiser54 replied to Discoman9001's topic in MJ Tech: Modification and Repairs
I'd be curious about the voltage at the pump while running. -
Bucket Seats not folding forward
cruiser54 replied to Warren99's topic in MJ Tech: Modification and Repairs
I remember when zip ties were invented............... -
CRUISER'S MOSTLY RENIX TIPS HO INTO RENIX SWAP OCTOBER 31, 2015 SALAD 76 COMMENTS EDIT This swap is easier than some will lead you to believe. And generally Pooh-poohed by those who have never done it. Those of us who have done it, like myself, will share with you the things that need to be done for a successful swap. Just think of it as swapping in a long block. XJ Cherokee and ZJ Grand Cherokee 4.0L engine blocks interchange. 2000+ TJ Wrangler and WJ Grand Cherokee 4.0L engine blocks interchange. YJ and 1997-1999 4.0L TJ blocks will interchange in XJ/ZJ XJ/ZJ blocks, and the 2000+ TJ/WJ blocks do not interchange without significant modifications. TJ/WJ 4.0L Engine blocks underwent clean sheet design changes effective in the 1999 WJ Grand and 2000 TJ Wrangler. These blocks are not interchangeable with XJ/ZJ engine blocks. The reason is motor mount bolt holes and belt driven accessory mounting bolt holes are in different locations, or not present at all, TJ/WJ vs. XJ/ZJ. Now that we know which engines we can use, let’s get down to business. The HO and Renix have some differences but none that can’t be overcome very easily. One running change was that the rear of the head was no longer drilled and tapped for the temperature gauge sender beginning in the 96 model year. The sender can be relocated to the threaded hole in the thermostat housing taken from an HO engine. You’ll have to extend the wire to that location. Some brave souls even drill and tap the HO head at the rear for the sender. You will be using the intake and exhaust manifolds from your Renix, along with all your sensors and wiring. Since the intake ports of the HO are slightly different, you use a new Renix gasket. Exhaust ports are identical. An alternative on exhaust manifolds: As far as exhaust, you can use the Renix exhaust manifold and be fine. If you want to use the HO exhaust manifold, you must go with an HO headpipe and screw your O2 sensor into that headpipe. Standard Renix harness is plenty long to do so. A bung can be welded into the HO manifold to accept the EGR tube. You will need to use your Renix distributor as it is different than the HO design. See Tips #12 – Setting Your 4.0 to #1 TDC and #13 – Distributor Indexing to be sure you get the distributor installed correctly. The flywheel or flexplate from the Renix must be used so your CPS gets the correct signals. The valve cover from the Renix allows you to keep your CCV system intact and requires no modifications. The HO block will have a plug in the coolant galley on the driver’s side of the block, closest to the front, which needs to be removed so your Coolant Temp Sensor can be installed in it’s place just as it is on the Renix. It requires a 5/16” square drive or a modified 3/8” drive that has been ground down to fit. Do this before installing the engine. As for the knock sensor, which is located just above the oil pan on the driver’s side of the engine about mid way, all the blocks I’ve seen are threaded for it. If not, I’ve heard they may be drilled but not tapped. Tap the hole if that’s the case. XJ: “Regular” (not Grand) Cherokees ’84-’01 ZJ: Grand Cherokee ’93-’98 (Gen1) WJ: Grand Cherokee ’99-’04 (Gen2) YJ: Wrangler ’87-’95 (Gen1) TJ: Wrangler ’97-’06 (Gen2)
-
Only Runs with Bypasses Resistor
cruiser54 replied to Discoman9001's topic in MJ Tech: Modification and Repairs
Bad ground at fuel pump? Here ya go. CRUISER'S MOSTLY RENIX TIPS IMPROVING THE FUEL PUMP GROUND JANUARY 3, 2016 CRUISER54 60 COMMENTS EDIT The fuel pump and fuel tank sending unit ground at a sheet metal screw up behind the spare tire on an XJ, and behind the driver’s taillamp on an MJ. Not only is a sheet metal screw a lousy way to ground things, this ground path is long and travels through some connectors that are prone to corrosion and moisture. Locate the black wire on the HARNESS side of the fuel pump/sender 3 wire connector. Remove a 6″ length of the split loom covering. Strip back about 1/2″ of insulation from the BLACK wire. Take your new ground wire, preferably at least 14 gauge and 12 to 18 inches long as needed, strip it about 3/4″, and wrap it around the exposed part of the harness plug wire.Solder the connection. Tape it up and reinstall the split loom covering. At the other end of your new ground wire, add a crimp on eyelet. Attach the eyelet under a bolt that goes directly into the chassis. Be sure to clean the attaching point til shiny and apply OxGard to the contact surfaces. -
ME!!!!!
-
At idle RPM drop and feels like its about to stall
cruiser54 replied to tdtony's topic in MJ Tech: Modification and Repairs
No -
You know the difference between a BMW and a porcupine?
-


-

-
At idle RPM drop and feels like its about to stall
cruiser54 replied to tdtony's topic in MJ Tech: Modification and Repairs
Closely inspect the harness from firewall to engine. -
Renix Running Rich/want to fix some problems
cruiser54 replied to Shade's topic in MJ Tech: Modification and Repairs
Also, make sure the rest of the intake manifold bolts aren't loose. If those vacuum lines are full of oil, that can affect performance also. Here's a coupla other things to consider: https://cruiser54.com/?p=60 https://cruiser54.com/?p=131 https://cruiser54.com/?p=121 -
Renix Running Rich/want to fix some problems
cruiser54 replied to Shade's topic in MJ Tech: Modification and Repairs
Inspect the MAP hose closely. You might consider doing this: CRUISER'S MOSTLY RENIX TIPS THROTTLE BODY TO MAP SENSOR HOSE FIX JANUARY 23, 2016 CRUISER54 51 COMMENTS EDIT The Renix throttle bodies have a strange and failure prone connector on the side where the MAP supply originates and then runs up to the MAP sensor located on the firewall. This hose/pipe assembly is no longer available for purchase. The real kicker here is how critical this line is in supplying the correct vacuum signal to the MAP, the most relied upon sensor for the ECU to read regarding air/fuel ratio. Any cracks, melted spots, or loose rubber connectors can cause major starting and driveability issues. There’s a simple fix though. All that’s required is a 1/8” NPT tap, a new throttle body gasket ( Napa FPG 60742 ), a vacuum fitting (Napa 05703-B102), two vacuum elbows (Napa CRB2670), and a length of new plastic piping (Napa CRB2672). Remove the throttle body and take it to the workbench. Using an oiled tap along with a driver, carefully thread the lower of the 2 holes of the throttle body where the old fitting was plugged in. Don’t go too deep. These are pipe threads. Flush the hole with carb cleaner and inspect for any left over cuttings. This is an excellent time to do a complete throttle body and IAC cleaning. See Tip 11. Take the vacuum fitting (05703-B102 ) and apply a LITTLE bit of thread sealer on the threads only. I prefer Permatex #2 but almost anything is fine. . Carefully screw the fitting in until snug. Install one of the vacuum elbows on the MAP sensor so it points toward the throttle body, and the other vacuum elbow on your new throttle body fitting so it points up to the MAP sensor. Cut a length of the new plastic tubing (approximately 13 inches) to fit between the vacuum elbows and install it making sure there is enough slack for some engine movement. Route it according to the photo. We don’t want any rubbing or chafing with engine movement. Not a bad idea to use some contact cement or Gasga-Cinch sparingly on the tubing to elbow connectors. -
and upholstery. and clearcoat....
-
Bucket Seats not folding forward
cruiser54 replied to Warren99's topic in MJ Tech: Modification and Repairs
These seats come apart with a phillips screwdriver. Don't be afraid to tackle the job. You might see if there's a sharp edge or burr at the tip of the locking pawl first though. -
Nice!! Our climate out here is very kind to vehicles.