


cruiser54
-
Posts
9413 -
Joined
-
Last visited
-
Days Won
14
Content Type
Profiles
Forums
Gallery
Everything posted by cruiser54
-

Coolant hose connector help
cruiser54 replied to billyblankss's topic in MJ Tech: Modification and Repairs
couldn't agree more. ^^^^^^^^^^^^^^^^^^^^^^^^^^ -
Coolant hose connector help
cruiser54 replied to billyblankss's topic in MJ Tech: Modification and Repairs
# 34 Eliminating the heater control valve in XJs/MJs Why would you want to? This valve is unnecessary and a source of leaks and complications. Jeep eliminated it as time passed and so can you. With the valve gone, radiator water flows to the heater core all the time, but your hot/cold door position blocks it when heat is off or when on AC. Your call if you must remain original for your year. In which case you probably haven’t eliminated the front axle disconnect either. Jeep also did away with that! Here is what the control valve looks like; four hoses to and from the radiator, and to and from the heater core, AND a vacuum line which controls the valve. Pull off the vacuum line and plug it securely before you forget. Your engine will tell you if you forgot! Now pull the hoses off the valve. These can be discarded, EXCEPT you likely will need some of the hose going down to water pump so, leave it in place until you decide if and how much you need and where to cut it. A big caution: be careful when you remove the hoses from the core inlets going through the firewall. The hoses will be frozen on, and excessive force could damage the heater core causing you big problems! Suggest you cut the hoses close to the core inlets, then peel back a little hose at a time and gently cut with a utility knife until you can easily twist it off. Note: the core connectors are different sizes as shown! Bottom about 5/8” and top close to ¾”. I purchased two Gates hoses as shown for a ’97 XJ, Gates numbers 19039 for the longer and 19038 for the smaller. Inspection suggests these are right—good fit! The bigger and longer hose connects from the thermostat housing, top, front of the engine and the larger connector at the firewall. The smaller hose goes on the smaller core connector and comes back to join the hose going down to the water pump. Note: this smaller hose only reaches back to the AC compressor because Jeep brought up a metal pipe in later models alongside the AC. You probably won’t have that but, you did leave the hose going down there in place, right? You just need to connect the 19038 up with that hose using a barbed, 5/8” connector, brass or PVC. You may need to cut the 19038 to fit based on the positioning of your barb connector. All you need now is to install and tighten clamps. Couple issues: Some claim the PVC connectors fail in time. I have never experienced that, but I needed a new one and bought brass (easy to find—standard garden hose 5/8” connector). Secondly, there is an argument about air bubbles and water flow with some suggesting that the larger hose 19039 coming from the thermostat should go to the smaller heater core connector on the firewall. Well, the smaller hose coming up from the water pump is pressurized, so going to the lower and smaller heater core connection seems right to me. Also, if you feel the need to switch them, then you have to cut both hoses and downsize one and upsize the other on the heater core end! For me, I just install where they logically fit by size, big end to big fitting, and they look the cleanest with nice parallel hoses. DONE! -
Coolant hose connector help
cruiser54 replied to billyblankss's topic in MJ Tech: Modification and Repairs
It's the heater control valve. You don't even need it. There are options. I get a radiator for let's say a 1992 Cherokee. Get the heater hoses for a 97 and later Cherokee. Ditch the pressure bottle and install a universal coolant overflow tank. I'm working on a Tip to show how simple this is to do. It eliminates decades old heater hoses which are NLA, eliminates a real failure prone and unnecessary part, and gets you a new radiator without using the crappy pressure bottles. -
Cold weather woes - Solved!!!
cruiser54 replied to Tex06's topic in MJ Tech: Modification and Repairs
Ever seen this? CRUISER'S MOSTLY RENIX TIPS IMPROVING THE FUEL PUMP GROUND JANUARY 3, 2016 CRUISER54 60 COMMENTS The fuel pump and fuel tank sending unit ground at a sheet metal screw up behind the spare tire on an XJ, and behind the driver’s taillamp on an MJ. Not only is a sheet metal screw a lousy way to ground things, this ground path is long and travels through some connectors that are prone to corrosion and moisture. Locate the black wire on the HARNESS side of the fuel pump/sender 3 wire connector. Remove a 6″ length of the split loom covering. Strip back about 1/2″ of insulation from the BLACK wire. Take your new ground wire, preferably at least 14 gauge and 12 to 18 inches long as needed, strip it about 3/4″, and wrap it around the exposed part of the harness plug wire.Solder the connection. Tape it up and reinstall the split loom covering. At the other end of your new ground wire, add a crimp on eyelet. Attach the eyelet under a bolt that goes directly into the chassis. Be sure to clean the attaching point til shiny and apply OxGard to the contact surfaces. -
89 4.0 Running great until sudden no start
cruiser54 replied to ttanton's topic in MJ Tech: Modification and Repairs
excellent!! Always refresh connections before replacing components. That said, your Jeep is due for plugs, wires, cap and rotor every 30,000 miles. -
89 4.0 Running great until sudden no start
cruiser54 replied to ttanton's topic in MJ Tech: Modification and Repairs
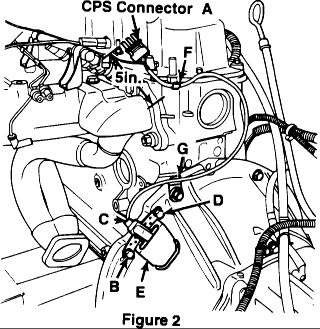
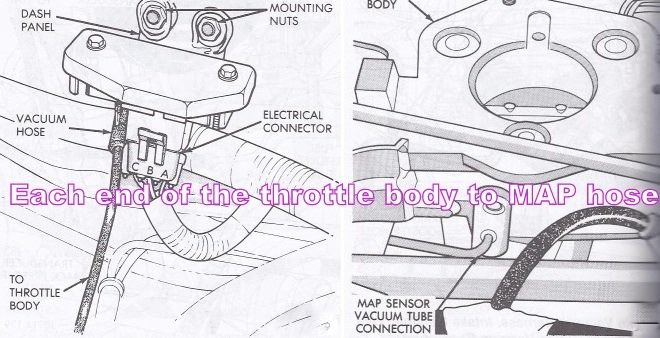
All good advice so far. Take a peek at the throttle body to MAP sensor tubing while you're at it and make sure your CPS wires aren't melted on the exhaust.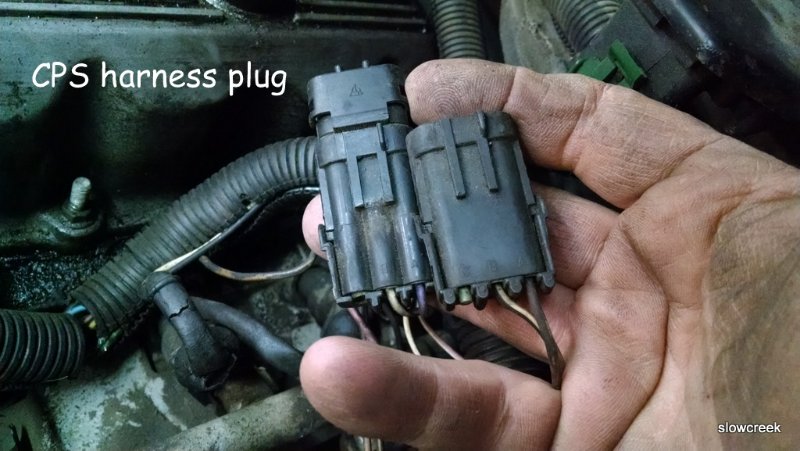
-
Injector Replacement or Clean
cruiser54 replied to Orthocad's topic in MJ Tech: Modification and Repairs
5ish. -
Injector Replacement or Clean
cruiser54 replied to Orthocad's topic in MJ Tech: Modification and Repairs
Sorta. But you make a great point about what the Tips help improve. -
Injector Replacement or Clean
cruiser54 replied to Orthocad's topic in MJ Tech: Modification and Repairs
Improved, but not eliminated. -
Injector Replacement or Clean
cruiser54 replied to Orthocad's topic in MJ Tech: Modification and Repairs
NOTHING will eliminate the longish cranking of a Renix Jeep. There's a guy on Cherokee Forum that rebuilds the later injectors to use in our Renix Jeeps. I've used multiple sets with excellent results. They even come with a flowsheet!! trevor.skankfootracing@gmail.com -
Those are available for about $55.
-
Do you want the connector with the wires in it or not?
-
Oil won't drain back if you use a quality oil filter. If you wanna use the common later oil filter, do this. CRUISER'S MOSTLY RENIX TIPS RENIX OIL FILTER TO SAE FILTER JANUARY 3, 2016 CRUISER54 9 COMMENTS EDIT Tired of having a poor selection of oil filters for your Renix Jeep? Limited availabilty a pain for you? 20mm threads? We don’t need mumblemeter threads on our oil filters. Here’s a simple mod that allows you to use the very popular SAE threaded oil filters which are more readily available. The old standard 3/4″ SAE thread. You can purchase a new oil filter nipple from the dealer for under $10 and never be bothered again. Part number 53007563AB. It’s the one on the left. Or, grab one off a 91 and later XJ at the junkyard. Be forewarned though. You need a 7/8 wrench to remove a Renix nipple, but a 15/16 wrench for the later style. And just in case you need to replace your oil filter adapter o-rings, here’s a handy guide. Oil Filter Adapter O-Ring Sizes 87-90 Renix Model O-rings 0.799 x 0.103 AS568 size -117 1.296 x 0.139 AS568 size -219 2.484 x 0.139 AS568 size –230 Dealer Part Numbers for Renix. Sold individually: 33002970, 33002971, 33002972 Renix kit from Crown Automotive-33002970K 91-01 HO Model Orings 0.676 x 0.070 AS568 size -017 0.859 x 0.139 AS568 size -212 2.484 x 0.139 AS568 size -230
-
Is your engine bad? Oil filter housing will work but no point in changing it that I see. Thermostat housing will fit but it has a sensor in it you won't be using.
-
Power steering fluid thru radiator
cruiser54 replied to Warthog's topic in MJ Tech: Modification and Repairs
I'm with Jeff on this. -
How hard do you crank it?
cruiser54 replied to WranglerMangler's topic in MJ Tech: Modification and Repairs
Time, not brute strength. Acetone, diesel fuel, ATF and Marvel Mystery Oil. All mixed together. -
this^^
-
The 2.1. Sure it was available in 1987 through 1994 in the US? It never lasted more than 2 years IIRC. I have seen automatics behind the 2.1. I'll never forget that customer. Complained of low power. No $#!&!! It was a dog.
-
Radiator gave up the ghost
cruiser54 replied to Smokeyyank's topic in MJ Tech: Modification and Repairs
It's done everything it came here to do.................... -
Electrical Issues, Part 2
cruiser54 replied to Rooster92's topic in MJ Tech: Modification and Repairs
I probably stole the idea from someone else anyway. It's all good. -
Cold weather woes - Solved!!!
cruiser54 replied to Tex06's topic in MJ Tech: Modification and Repairs
ASSumptions can kick your @$$ when diagnosing these kind of issues. -
Electrical Issues, Part 2
cruiser54 replied to Rooster92's topic in MJ Tech: Modification and Repairs
I was referring to that standard connector that turns green with corrosion. I live in a very dry climate so I can get by cleaning and putting them back together as long as no wires are broken. -
Cold weather woes - Solved!!!
cruiser54 replied to Tex06's topic in MJ Tech: Modification and Repairs
Yeah, and you can check that side's socket at the same time. -
Electrical Issues, Part 2
cruiser54 replied to Rooster92's topic in MJ Tech: Modification and Repairs
What did you end up doing with that connector by the battery? Don't forget the ground behind the left tail lamp. CRUISER'S MOSTLY RENIX TIPS IMPROVING THE FUEL PUMP GROUND JANUARY 3, 2016 CRUISER54 60 COMMENTS EDIT The fuel pump and fuel tank sending unit ground at a sheet metal screw up behind the spare tire on an XJ, and behind the driver’s taillamp on an MJ. Not only is a sheet metal screw a lousy way to ground things, this ground path is long and travels through some connectors that are prone to corrosion and moisture. Locate the black wire on the HARNESS side of the fuel pump/sender 3 wire connector. Remove a 6″ length of the split loom covering. Strip back about 1/2″ of insulation from the BLACK wire. Take your new ground wire, preferably at least 14 gauge and 12 to 18 inches long as needed, strip it about 3/4″, and wrap it around the exposed part of the harness plug wire.Solder the connection. Tape it up and reinstall the split loom covering. At the other end of your new ground wire, add a crimp on eyelet. Attach the eyelet under a bolt that goes directly into the chassis. Be sure to clean the attaching point til shiny and apply OxGard to the contact surfaces. -
Cold weather woes - Solved!!!
cruiser54 replied to Tex06's topic in MJ Tech: Modification and Repairs
CRUISER'S MOSTLY RENIX TIPS IMPROVING THE FUEL PUMP GROUND JANUARY 3, 2016 CRUISER54 60 COMMENTS EDIT The fuel pump and fuel tank sending unit ground at a sheet metal screw up behind the spare tire on an XJ, and behind the driver’s taillamp on an MJ. Not only is a sheet metal screw a lousy way to ground things, this ground path is long and travels through some connectors that are prone to corrosion and moisture. Locate the black wire on the HARNESS side of the fuel pump/sender 3 wire connector. Remove a 6″ length of the split loom covering. Strip back about 1/2″ of insulation from the BLACK wire. Take your new ground wire, preferably at least 14 gauge and 12 to 18 inches long as needed, strip it about 3/4″, and wrap it around the exposed part of the harness plug wire.Solder the connection. Tape it up and reinstall the split loom covering. At the other end of your new ground wire, add a crimp on eyelet. Attach the eyelet under a bolt that goes directly into the chassis. Be sure to clean the attaching point til shiny and apply OxGard to the contact surfaces.