

gogmorgo
-
Posts
5984 -
Joined
-
Last visited
-
Days Won
4
Content Type
Profiles
Forums
Gallery
Everything posted by gogmorgo
-
So what kind of lights are you running?
gogmorgo replied to Spinnakerblue89's topic in MJ Tech: Modification and Repairs
I haven’t really been a fan of the Euro lights. The high beam is definitely excellent, but the way the low beam kicks up on the right is aggravating. I ended up with them aimed so low to stop from blinding myself in falling snow, or off road signs, that I don’t have a ton of visibility on the left. I’ve also been able to tell that oncoming traffic with a slight right hand bend is unhappy, or anyone travelling the same direction in a lane to my right. For anyone going H4 housing I’d strongly recommend sticking with SAE lenses. You might also encounter legality issues there. We can run them up here because Transport Canada accepts both ECE and SAE lighting standards, but US DOT doesn’t permit the ECE. I don’t expect you’ll run into actual problems any more than anyone running the trash offshore LEDs, but you never know. -

-
Do you still have the JPG to add to the post? Even if it’s fuzzy, original sources are nice. The one glaring typo I noticed is in point 11, where you typed “ending” instead of I believe “engine”. I think for the most part you got it down, it’s just that in typical service info fashion the method that’s different on the MJ gets obscured by all the generic bleeding instructions that most people familiar with brake bleeding will skip past. But it’s possible a couple lines got left out. I don’t really see anything about closing the front bleed screw and bleeding the rear a second time, which is the method that gets repeated on this forum.
-
What issues do the headlights give you? The switch and pigtail for it are common issues, as the switch contacts wear they make poor connections and then it likes to get HOT, like, set your truck on fire hot, which melts the connector and insulation on the wires which causes other problems. You can alleviate most of that concern with a relay harness, but you may still find you need a new switch. Another common culprit if you live in a place that experiences winter is the 10-pin connector for the headlight harness that lives under the airbox likes to fill up with moisture and corrode.
-
Brake distribution (proportioning) valve rebuild?
gogmorgo replied to Eagle_SX4's topic in MJ Tech: Modification and Repairs
Well OP did apparently bleed both. But the suggested order is to bleed the bypass first and then bleed everything else. The OP suggests they bled everything first, then opened the front bleeder to bleed the rears, and is now having problems getting fluid out of the bleeders. I was postulating that having done the bleeding out of order may have shuttled the valve the "wrong" direction for bleeding and now getting it to go back the other way is causing problems. Of course it's also entirely possible that the master cylinder is shot and not pumping fluid as it should, or some debris got pulled in from the reservoir and blocked something. Or the rubber hoses are disintegrating. All we really know is that the brake fluid is not doing what it's "supposed" to be doing. We may be entirely overthinking the problem with the distribution block, and the real solution is just to start at the top and figure out where we have the correct pressure/flow and where it stops being correct. -
New AX15, very chirpy but not the TOB
gogmorgo replied to brucecooner's topic in MJ Tech: Modification and Repairs
If you’re changing the ujoints in the CV for the front driveshaft, get the centring ball for it too. The ball on its own is Dana part number 10018465 or for not a lot more money you can get the whole centring yoke with the ball in it, 211355X. And yes for ujoints the Dana 5153X imo is the best option out there, as long as you grease them. I’ve used others in the MJ and never had them fail, but we run 1310 shafts for the crank-driven PTO shaft for the hydraulics on our plow trucks. The Dana u-joints have a nice meaty cross where the grease nipple is and are easier to get a grease gun into than the others. In that application this was critical because not getting grease onto them meant they seized up within a few months and then they’d experience catastrophic failure. And I don’t think I need to tell you how much carnage can be done by an 18” piece of steel being whipped around by a 15L diesel engine. -
Land Rover axles in a Comanche
gogmorgo replied to Steve F's topic in MJ Tech: Modification and Repairs
Yeah, it wouldn’t be any different than swapping in another axle. Cut everything superfluous off the axle, and weld on perches and control arm mounts in the correct locations for your vehicle. The concerns with oddball axles is they’re odd. Finding parts may not be the easiest, finding wheels that work, that sort of thing. Land Rover parts shouldn’t be impossible to find but aren’t always known for being cheap. Make sure you know what you’re putting in if you do go this way. There were a bunch of different axles that went into landrovers over the years. There are also different models of Land Rover that used different parts. Don’t rely on diff cover bolt counts to make assumptions that axles from different manufacturers might be the same. I’ve also seen arguments in Land Rover forums over whether they should be counting diff cover bolts or the bolts that mount the ring gear to the carrier. -
Budget front recovery points?
gogmorgo replied to jakesmog's topic in MJ Tech: Modification and Repairs
That's a tough one. Most of the cheap easy bolt-ons are meant to go directly under the factory bumper, which isn't necessarily going to work out with an aftermarket bumper, but every bumper is different. I guess the advantage to the cheap tow hooks is you could then just bolt them on anywhere to your new bumper, including potentially on top where they'll be more useful. I don't know if it was a kit or just something I saw on here, but it was a setup that was just a flat plate with holes drilled in it for the factory bumper bolts, similar to the tow hook bracket kit, but that poked through the factory bumper (you'd have to cut the hole) with a hole for mounting a bow shackle. There was also a tube welded between the two that sat inside the front bumper to tie the frame together. The beauty of this being you could then build your bumper off that setup and include the recovery points. But it is a bigger project. Oh hey, found it! but unfortunately most of the pictures are broken, but some of them are reposted much further down the thread. I wouldn't be as concerned about "tweaking" the front of the frame with those hooks so much as tearing the bolts straight through it. There's not a lot of steel down there in front of those bolt holes. I don't really see it as being any sturdier than just looping a rope around the front axle. -
So what kind of lights are you running?
gogmorgo replied to Spinnakerblue89's topic in MJ Tech: Modification and Repairs
+2 on this one. Aiming headlights correctly does a lot more for vision than just installing brighter lights... or in the case of most cheap LEDs, whiter but less bright. -
So what kind of lights are you running?
gogmorgo replied to Spinnakerblue89's topic in MJ Tech: Modification and Repairs
Sealed beams with a DIY relay harness behind some retro stone guards on my daily driver. Still no complaints. The other MJ has Rampage H4 housings in it. I wasn't as impressed as I was expecting to be but I haven't got around to building a relay harness for it yet. I've been thinking about trying to rig up an xj washer fluid tank and turn the rear washer circuit into a headlight washer jet, so I could run the 3000K Retrobrights without so much concern for them not being heated. I want to try them out. I find most LEDs are in the 5-6000K range which makes them not great in the snow, and the ones that aren't almost all look ridiculous. -
Budget front recovery points?
gogmorgo replied to jakesmog's topic in MJ Tech: Modification and Repairs
How much are you willing to spend? These work great: https://www.quadratec.com/products/12007_800_07.htm for a no-drill install that I trust a little more than the two bolt hooks directly to the frame. But they're not great for side pulls, and they interfere with your front air dam so that either needs removed or trimmed to accommodate. I've seen that style for sale from a few different brands, also generically unbranded on eBay. I've had some on my longbed for ten years now. Ideally you want the frame horns tied together for the most strength. Like this: https://www.ironrockoffroad.com/product/xj-tow-hook-mount.html This particular one has the advantage of hooks that open sideways instead of downwards so your rope or strap is much more likely to stay in the hook without tension on it. You can also get a front hitch, which not only ties the frame horns together also allows you to reuse all the recovery equipment you'd use in the rear. Maybe find a winch cradle to go in it. Lets you put other hitch-mount accessories up front. My 2wd shortbed has an A-frame tow bar setup on the front for flat towing it (behind an RV, etc) that I've used for a solo recovery point, just hooked it to the back end of my ZJ and dragged it out into the street and parked both units without needing another person to sit in the MJ to steer or stop. I see them come up used in the usual places from time to time, or at junkyards. But at any rate the front end is exactly the same as an XJ Cherokee, so any front recovery mounts for an XJ will fit an MJ too. And there's lots of options out there for the XJ, including lots of relatively easy DIY stuff. -
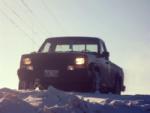
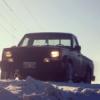
I honestly don't mind that most people walk right on past my MJs without seeing much more than an old truck. Driving my Lada around the US got me a LOT of attention. It's got a small tank and isn't super economical so you end up stopping for gas a lot. And probably every third gas station someone walks up to talk to you about it. It's understandable given most Americans don't know what it is as they weren't sold in your country. Maybe 5% of people know what it is and are excited, either because they or their grandparents or someone used to have one back in the old country, or people who recognized it from pictures but were shocked to see one in the USA. But 95% of the interactions would be someone walking up to me, reading the BWA off the aftermarket(ish)wheels, asking questions but never paying any attention to my answers including when I try to correct them on what it is, and then they walk away going "wow that's cool I've never seen a BWA before". One particularly memorable guy in Tennessee walked up and asked what it was, then when I answered said "I didn't know Volkswagen made a 4x4 like that". I must've said "it's not a Volkswagen" a dozen times during an extended one-sided conversation of him asking questions and making up the answers on his own. It doesn't have anything on it that looks like a VW logo, it doesn't look particularly like a VW other than vaguely European styling cues... It's just a frustrating waste of my time when getting gas in your country is already a frustrating process because you haven't figured out how credit card pins work.
-
Brake distribution (proportioning) valve rebuild?
gogmorgo replied to Eagle_SX4's topic in MJ Tech: Modification and Repairs
I'm also curious about a rebuild. There's really no reason you shouldn't be able to do it. The things to watch out for would be getting the correct material o-rings correctly sized, and correctly seated. You also don't want any debris getting in there. You'd want to watch for any erosion on machined seal surfaces as well. I strongly suspect the main reason the service manual says not to is because the cost of a new one is small compared to the risk of something going wrong during a rebuild. I'd recommend lubing the o-rings with brake fluid before putting them in. I recently had my valve shuttle itself during a panic stop. I blew a rear line. The light came on, the pedal got soft, but with the valve fully shuttled the rear lines are fully blocked and no longer leaking. Looking at the cutaway, I think that's supposed to happen. I haven't actually addressed the issue yet, so no real experienced advice on what to do. But I will point out that every procedure I've seen until a very recent post here said to open the front bleeder to simulate the front failure first, bleed the rears, close the front bleeder and bleed the rears again, then the fronts. I wonder if having the front bleeder open initially while bleeding the rear is critical to pushing the valve in the correct direction so it doesn't shuttle the valve the wrong direction at the wrong time and block brake flow in a way that's difficult to correct? You'd think pushing the pedal with both front bleeders open would be enough to overcome that, but it's possible it's not. I wonder if cracking the brake line on the master cylinder and removing the pressure from the functioning circuit would be enough to shuttle the valve back the other direction and unblock the line? I've never actually paid attention while bleeding to see if the light comes on indicating the valve shuttles. As in I've never done it with the key on. I've also never done a proper bleed on this particular truck that popped a rear line, I don't think the rear brakes have ever worked correctly for it and I've never made much effort to make them do so. But I guess I have to now. -
DYI Transmission Control Unit repair
gogmorgo replied to Scottybbythesea's topic in MJ Tech: Modification and Repairs
Most issues with electronics are just something simple like this. Or a cracked solder joint. Those I can deal with easily enough, usually just takes a gentle poke with a soldering iron to reflow the blob. I wish I had the time to learn more about electronic components and testing. I can guarantee you’d save thousands over a life of repairs. -
New Automatic Trans - won't Shift
gogmorgo replied to ETjeep's topic in MJ Tech: Modification and Repairs
Cruiser’s also got a tip on the trans computer itself. There’s an inline fuse that sometimes blows. There are some year-to-year changes on computers and pin outs. I think just a Renix VS HO thing… don’t remember for sure. But if you put a used computer in you might want to double check it’s compatible. -
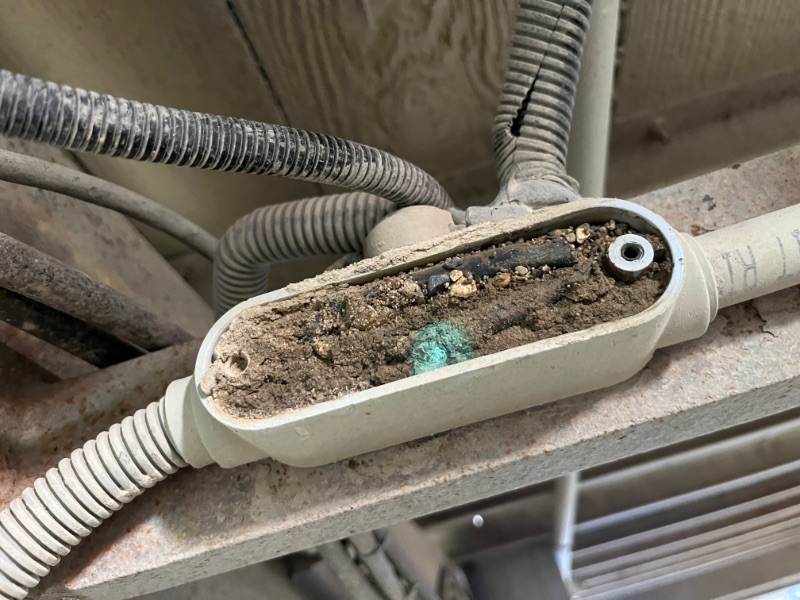
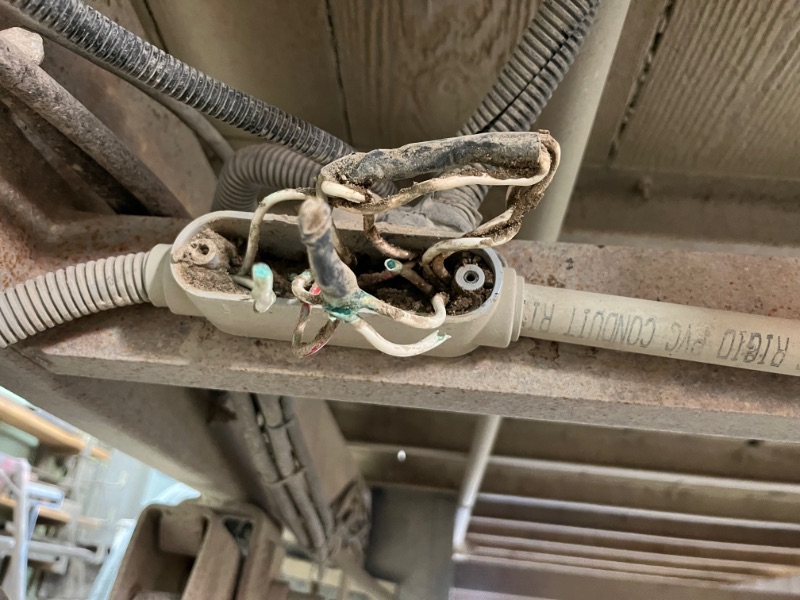
This is why you don’t put junction boxes underneath a vehicle. Any guesses why the brakes on this trailer don’t work?
-
So if the schematic and lights go together, these aren't fog lights. They're strobes. Emergency lighting, for a tow truck, or similar roadside work. They're designed to be seen, not to see with. Probably not what you want, but I don't know what you're trying to do with them. Doesn't look like a super complicated setup. Just a couple push switches to trigger the relay. I'd be willing to bet you could skip the fancy setup and just power the lights directly. Most of these LED strobes that I've messed around with have the strobe unit contained inside the light, and the light will have three wires, a power, ground, and a separate wire that does the mode switching. Usually the switch wire just needs touched to ground or power while the light is on to toggle between modes. Sometimes they'll have a fourth wire to communicate with other lights in the system, if you want alternating, or synced strobing. Generally they'll just be wired all in parallel, and the switching wire will be touched to ground or power until it's in the desired mode, then you tape up the switching wire and leave them in the same mode unless you want fancy patterns. But if the "relay" contains the strobe unit and mode switching as well, the lights might just have a ground and then a power wire for the amber and white circuits. Then you'd be able to ditch the fancy switch unit and set them up with regular relays and your rocker switch. Two position rockers are available if you'd want both amber and white settings from the same switch, or you could have them switched individually. But without messing around with the setup myself it's tough to say how it'll operate. Shouldn't be too difficult to figure out on the bench with a battery and test light.
-
I was able to track down a TJ parts manual. And it hasn't really clarified much: It only lists the 52088157 so I guess that's the primary difference. TJ vs YJ. It does split them out for left- and right-hand-drive (the J and U respectively) but they're the same part number. Oddly it lists them as 15x7 for '97 and '98. The 52090000 it lists as a 15x8 under the same image is the part number used '95+ for the 10-hole wheel without rivets https://www.ebay.com/itm/404331951012 which is a different wheel and 15x7 so I don't know what's up with that. Kinda makes me distrust the manual. For '99 it just has the 52088157 listed as a 15x8 with no other options:
-
JWL is a Japanese market alloy wheel standard. Kinda like a US DOT rating. My first guess is the JWL wheel(s) are off a wrong-hand-drive mail Jeep. Seems like the internet in general uses the two part numbers interchangeably as fitting YJ and TJ from '91 to '99, but I saw one reference in my 30 second search that the 52088157 fits '97-'99. The YJ parts manuals only lists the 52007398. I don't have a copy of the TJ parts manuals to confirm whether the 52088157 supersedes the 52007398 directly for the TJ or if there were separate USDM and JDM wheels for the TJ. We recently saw another example of slight differences in wheels between US and European specs for a different set of wheels:
-
Switching From Renix to OBD11 ~Staying RENIX~
gogmorgo replied to Drahcir495's topic in MJ Tech: Modification and Repairs
Just my two cents, cause I haven't thrown them in yet. I'm betting the only reason your mechanic wants to convert to OBD2 is because he can't plug his diagnostic tool into an OBD2 port on your truck. To me that's not a valid enough reason to justify a conversion. Now I haven't looked into every possible diagnostic tool out there, but last time I dug into it every diagnostic (scan) tool that I had at hand had the software to communicate with the early ECU, it was just a hardware issue of having the correct adapters to plug into it. And the correct adapters could be had, you just had to buy a very expensive kit of OBD1 connectors for darn near everything pre-OBD2 instead of getting them individually by application. But if you're paying someone else to do the work, I'd be willing to bet you'd get more value out of your dollars buying the mechanic the tools to talk to your truck instead of paying them to replace a bunch of parts that don't need fixing. Or you could go on eBay and buy a pro-grade diagnostic tool from the '90's or early 2000's that comes with the adapters you need for less than the new set of adapters, which is what I did. The early diagnostic bricks are kinda clunky by modern standards but they do work. Probably too late now for this truck but for anyone else stumbling across this thinking about going the same route. -
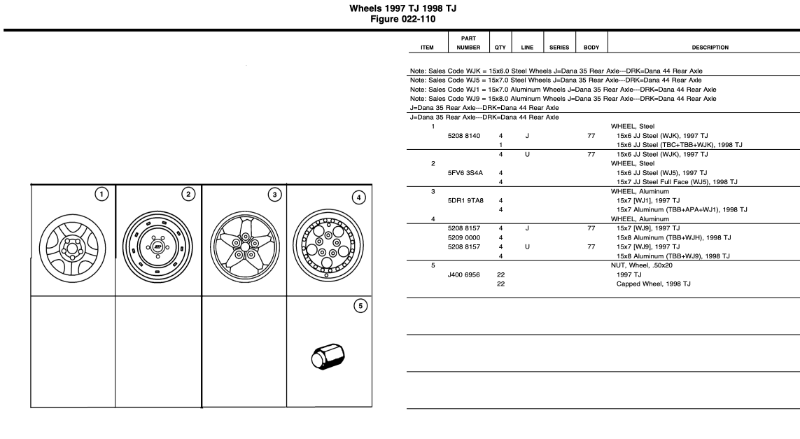
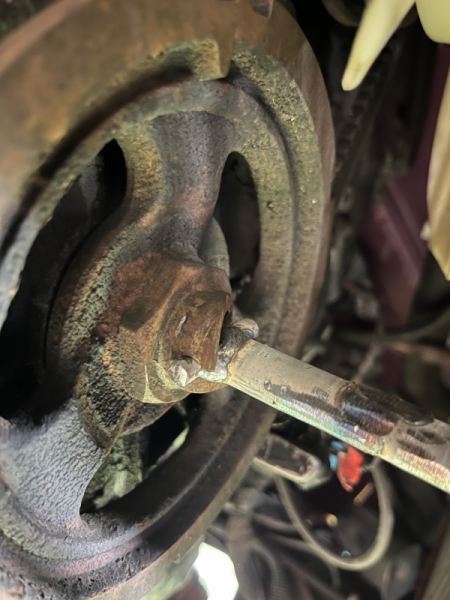
Well the repaired crank handle is also successful at starting the engine. Had to pull it out leaving the hardware store today. I think the starter solenoid is on its way out, but TBD. Wrapping the exhaust manifold around the starter is a choice… doesn’t make starter diagnosis easy when it’s still hot!
-
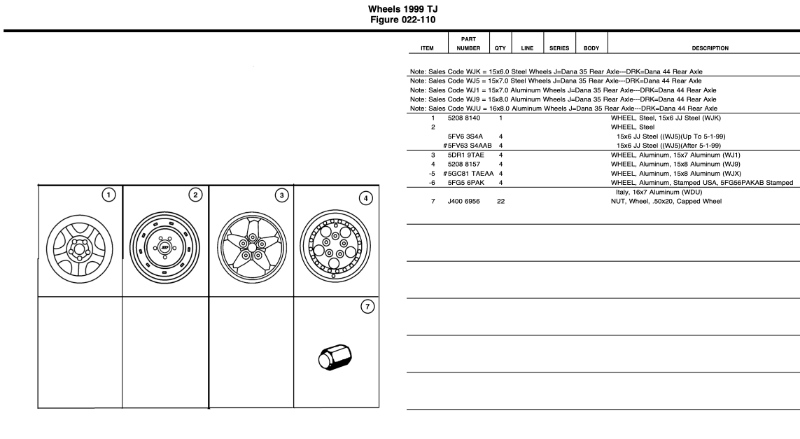
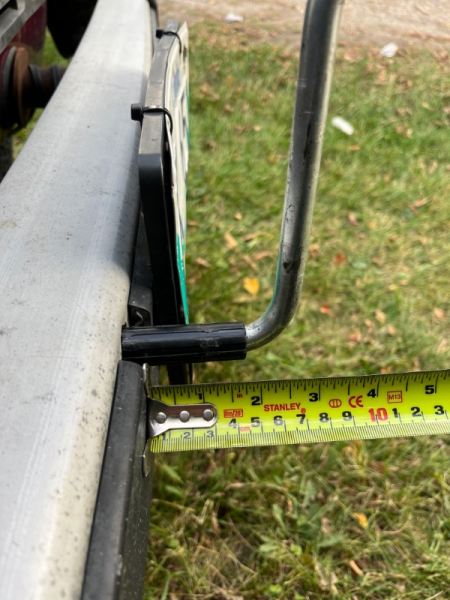
I’ve got a new concept on crank handles. Not ready for manufacturing yet because I don’t really have a material source. I’ve been debating using an old school speed wrench to avoid needing to do all the bends but the trick is finding a cheap one to cut up. Just need to find a decent quality steel rod though, the bends aren’t that big a deal. The mild steel rod I used the first time definitely wasn’t up to task. But after ripping the cross bit out of my original Lada crank handle (from overuse… I hand started this thing a LOT) I welded a chunk of 1/2” grade 8 bolt onto the end of the Lada handle then instead of drilling and pressing in the cross bit I just cut the shank out of a 1/4” bolt, grade 8 again of course and welded that across the end. Hoping the weld will be stronger than what’s left of the rod after drilling through it. The extend-a-shaft weld is a little sloppy because the original material is 12mm instead of 1/2” so it’s not a perfect alignment. From the bend to the cross piece is roughly 17”. I extended that about an inch and a half with the bolt because the original crank put the bend super close to the bumper, and that made it tricky to line up. The lever throw is about 7” but that’s not a critical dimension. I think the first one I made was in the 9” range. I also remember an old forum post about a guy modifying the spare tire crank from a Nissan truck (Frontier maybe?) for the same purpose. I haven’t tracked one of them down yet. Edit to add a picture with dimensions. This is after fettling the cross bit to make it fit. Missing the nub at the end doesn’t seem to affect engagement much. You’ll still want to check where it sits to make sure it is fully seated before cranking. As for the length, I’m not sure 17” is the best. I need that to clear my front license plate, but that’s not a big deal for you in SK... The plate could also get moved further away from the crank hole I guess. The issue with it sticking out this far is it wants to bend where it’s supported at the crank hole. You are putting a fair bit of force into the thing so it would be nice to make the bend as close to the bumper as possible. That or make it far enough out you can grab it with your other hand to support it. But it’s sturdy enough with the cross piece just welded to the tip, I was able to toss the engine over quite a few times with no ill effect on the repair. I didn’t actually try starting it, that’s tough to do cold. The TBI loses where the crank and cam are every time you shut the key off and it needs a few full revolutions at a reasonable speed to figure it out. I’ve done it completely by hand but it sucks. Any of the videos I’ve taken I left the key on and stalled it to make it much easier on myself and the viewers… I doubt anyone wants to watch my fat @$$ throw that crank over for a few minutes. I don’t know how the carb would behave there. But I do know there is a real risk of backfires and reverse rotation smacking you on the wrist. Even with the injection, I’ve had it pop backwards if I stopped turning at the top of a compression stroke. I don’t know if it was from a spark or just the compressed gas decompressing and pushing the piston back down, but either way it hurt. I reduce the risk of that by pushing up as far into a compression stroke as I can and then throwing some heft into it to kick it past and around, and if I doesn’t start I let go and pull my hand back to reposition for the next attempt. But if all you want to do is turn the crank by hand, you can still use a socket on the hex like a regular crank bolt.

-
Found: Leer Camper Top
gogmorgo replied to Javelinmania's topic in MJ Tech: Modification and Repairs
Not common to find one built specifically to fit a Comanche, no. Most come off some other small truck, and some fit better than others. -
Replacing the heater core without yanking the dash
gogmorgo replied to Pete M's topic in MJ Tech: DIY Projects and Write-Ups
Pull the lower dash panel and passenger side kick panel. Pull the upper dash panel at the base of the windsheild. Remove the passenger side lower dash mount bolt, and the right and centre upper dash mount bolts. This gives you more than enough clearance to take the evaporator/blower motor sections off the HVAC box and you can get the heater core out from there. Not really a big deal, again, I had the heater core out in under an hour. I don't have great lighting in the garage but if I remember I'll try to get photos as it goes back together. Maybe come up with a bit better guide than what's out there. I just picked up the evaporator today so hopefully I'll have time this week. It's getting to the time of year I'll start needing my defroster. I mostly just wanted to do it without having to open up the a/c system, but now that I've got everything apart I don't know that it's possible. -
Yeah I was thinking there was something preventing that but I parted out my last xj too long ago to remember. But pretty well any generic/universal lap belt should work.