reson46 Posted October 24, 2008 Author Posted October 24, 2008 Did you build the rockslider?? Yes. Willy
jtdesigns Posted October 25, 2008 Posted October 25, 2008 Did you build the rockslider?? Yes. Willy Freakin nice job.. They look very professional
reson46 Posted October 27, 2008 Author Posted October 27, 2008 Did you build the rockslider?? Yes. Willy Freakin nice job.. They look very professional Thanks. Willy
reson46 Posted November 3, 2008 Author Posted November 3, 2008 Pulled it out of the garage and took it for a drive. A few pics of it outside. After running the wiring for the SPAL, I had the joy of ripping half of it out and doing it again. I wanted to be able to control the fans three different ways: - Both off - Both managed by the SPAL controller - Both on My first attempt included running completely separate wiring through relays to both of the fans to control whether both fans were on with an in cab switch. I didn't realize at the time that the SPAL controller uses the ground to control the main fan. Since I added a ground for the main fan in my bypass wiring, the main fan would run constantly whether the SPAL was on or not. In the end I completely removed the relays and my original bypass wiring. What I now have are two in cab switches. Switch number 1 controls the SPAL. With this switch off, neither of the fans will run. When on, the fans are controlled through the SPAL. Switch number 2 controls if the fans are on manually, bypassing the SPAL through the AC wire of the SPAL controller. Now I have the three features I want: - Switch 1 off, switch 2 off: both fans are off - Switch 1 on, switch 2 off: both fans are controlled through the SPAL - Switch 1 on, switch 2 on: both fans are on Also spooled the winch cable. Even though I kept the cable wrapped up nicely, it still ended up in a wonderful bird's nest when I went to spool it around the winch. :doh: Added in cab winch controls. Thankfully I got that wiring right the first time. :thumbsup: Willy
reson46 Posted November 11, 2008 Author Posted November 11, 2008 The local NAXJA chapter adopted a trail at Walker Valley ORV. We joined them for a little trail maintenance Saturday. Want to guess who got to haul all the gravel? :brows: Of course we were the only MJ that showed up. :D We had a lot of fun, but Deb and I were both definitely glad to see another trail once we finished hauling gravel. We got a little rain off and on most of the day, but most of the day turned out pretty nice. The light played some interesting tricks through the fog/mist. Rest of the pics are here. Willy
JeepcoMJ Posted December 11, 2008 Posted December 11, 2008 your fabrication skills are great! awesome project...I'm thinking about a box4rox too soon...and you've given me some ideas :D
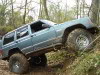
Impact Posted December 12, 2008 Posted December 12, 2008 The local NAXJA chapter adopted a trail at Walker Valley ORV. We joined them for a little trail maintenance Saturday. Want to guess who got to haul all the gravel? :brows: Of course we were the only MJ that showed up. :D We had a lot of fun, but Deb and I were both definitely glad to see another trail once we finished hauling gravel. We got a little rain off and on most of the day, but most of the day turned out pretty nice. The light played some interesting tricks through the fog/mist. Rest of the pics are here. Willy wow that second picture totally reminds me of home.... nice looking MJ! Tires could stick out a little more for my liking ;)
reson46 Posted December 12, 2008 Author Posted December 12, 2008 nice looking MJ! Tires could stick out a little more for my liking ;) Thanks. All that will do is get you fined around here. Willy
spanaway mudder Posted December 13, 2008 Posted December 13, 2008 nice looking MJ! Tires could stick out a little more for my liking ;) Thanks. All that will do is get you fined around here. Willy say's who? mine stick out.. :dunno:
Impact Posted December 13, 2008 Posted December 13, 2008 nice looking MJ! Tires could stick out a little more for my liking ;) Thanks. All that will do is get you fined around here. Willy say's who? mine stick out.. :dunno: Thats too funny... it all depends on who you ask. I am just north of you guys and as far as we know as long as you arent a $&!T disturber your tires can stick out as much as you want. Key word "arent"...lol
jtdesigns Posted December 13, 2008 Posted December 13, 2008 wife's mj my butt........... :shake: :teehee:
reson46 Posted December 13, 2008 Author Posted December 13, 2008 nice looking MJ! Tires could stick out a little more for my liking ;) Thanks. All that will do is get you fined around here. Willy say's who? mine stick out.. :dunno: Been to Evan's Creek lately? Officer Dan loves to write tickets for this BS. There's also a Kent cop that enjoys ticketing for anything he can find. We've been lucky so far, but it seems like everybody I wheel with has at least one similar story. :thumbsup: Willy
ironhead03 Posted December 14, 2008 Posted December 14, 2008 Hey Willy Hope you do'nt mind me asking questions.Did the 231 yoke bolt right on to the Mazda shaft or did you have to do some machine work? Thanks. Gary For the front driveshaft I already had a stock one and I didn't want it to hang down really low, especially with the high clearance TNT arms. I ended up using the carrier bearing and driveshaft out of a Mazda B truck. I had the driveshaft shortened and mounted the CV yoke from the front output of an NP 231 to it. This allowed me to attach the stock front driveshaft to it. Before having it shortened. After having it shortened. Willy
ironhead03 Posted December 14, 2008 Posted December 14, 2008 Hey Willy Hope you do'nt mind me asking questions.Did the 231 yoke bolt right on to the Mazda shaft or did you have to do some machine work? Thanks. Gary For the front driveshaft I already had a stock one and I didn't want it to hang down really low, especially with the high clearance TNT arms. I ended up using the carrier bearing and driveshaft out of a Mazda B truck. I had the driveshaft shortened and mounted the CV yoke from the front output of an NP 231 to it. This allowed me to attach the stock front driveshaft to it. Before having it shortened. After having it shortened. Willy
reson46 Posted December 14, 2008 Author Posted December 14, 2008 Hey WillyHope you do'nt mind me asking questions.Did the 231 yoke bolt right on to the Mazda shaft or did you have to do some machine work? Thanks. Gary Yes, the 231 yoke bolted right on. I didn't have to change anything besides have the shaft shortened. Willy
reson46 Posted December 14, 2008 Author Posted December 14, 2008 Hey WillyHope you do'nt mind me asking questions.Did the 231 yoke bolt right on to the Mazda shaft or did you have to do some machine work? Thanks. Gary Yes, the 231 yoke bolted right on. I didn't have to change anything besides have the shaft shortened. Willy
reson46 Posted December 19, 2008 Author Posted December 19, 2008 Finally got around to building the rock slider for the driver's side. Took a few more pictures this time. I had already cut most of the pieces when I built the passenger slider. Added the angle iron to the pinch seam and drilled a few holes. I made sure not to drill through any of the spot welds in the pinch seam. Chopped out a couple of sections of the angle iron and pinch seam for the square tube to fit in. The feet for the unirails. I trimmed the first one to clear the cab support. This is the backing plate behind the fuel filter for the middle unirail foot. The front and middle feet will be sleeved through the unirail. This is the rear foot that catches the eye bolt for the leaf spring. I added a second 1/2" bolt to the spring pocket. The angle iron that will be tied into the rear foot for vertical support. Clamped in place and started tacking everything together. Removed and moved to the bench for final welding. It is currently fully welded. Now I need to clean it up and start painting. :D Willy
Darren Posted December 19, 2008 Posted December 19, 2008 Nice job willy. Those look stout and quite well built.
reson46 Posted January 15, 2009 Author Posted January 15, 2009 Started on some tail light boxes. I'm not entirely happy with the shape right now, but it is getting there. Ordered two sets of 2.5" LED S/T/T lights and one set of 2" reverse lights. I plan to use one set of the S/T/T lights as side marker lights and one set as S/T/T lights. Hopefully that will be enough to stay legal. The 2.5" LEDs are not DOT approved, but I haven't had any luck finding out why. :dunno: Willy
ComancheKid45 Posted January 17, 2009 Posted January 17, 2009 I know this picture was from back with the stock bumpers but i like how you cut the front flares and eliminated that valance underneath the bumper. My Question is if you did any extended trips and did that valance missing cause any overheating issues or any issues in general......let me know whenever, thanks! :thumbsup: O Yeah the Truck is awesome!
reson46 Posted January 18, 2009 Author Posted January 18, 2009 I know this picture was from back with the stock bumpers but i like how you cut the front flares and eliminated that valance underneath the bumper. My Question is if you did any extended trips and did that valance missing cause any overheating issues or any issues in general......let me know whenever, thanks! :thumbsup: O Yeah the Truck is awesome! Didn't really drive it much like that. Maybe a few hundred miles. But, there were no cooling issues. I don't see how removing that from below the bumper would result in any cooling issues. Since the radiator surface area is completely above the bumper I don't think the valance would deflect any more air through the radiator. Do you have concerns about removing it? Willy
ComancheKid45 Posted January 18, 2009 Posted January 18, 2009 Yeah i had heard on some trucks (not all MJs) that removing the front valance under the front end can/may result in cooling issues b/c of the air flow disruption, i started a topic in the Tech Section and were discussing it a bit more. Thanks for the answer though :thumbsup:
reson46 Posted January 19, 2009 Author Posted January 19, 2009 The S/T/T and reverse lights arrived Saturday. :clapping: Even thought the seller listed these as not DOT approved, they have DOT numbers. :hmm: Willy
reson46 Posted January 22, 2009 Author Posted January 22, 2009 Built the tail light box for the driver side. Any thoughts for light placement? I think I am leaning towards option #1. #1 #2 #3 Willy
89eliminator Posted January 22, 2009 Posted January 22, 2009 looks great. its a toss up between #1 and #3 for me. Between those two, i would pic #3.

Recommended Posts
Create an account or sign in to comment
You need to be a member in order to leave a comment
Create an account
Sign up for a new account in our community. It's easy!
Register a new accountSign in
Already have an account? Sign in here.
Sign In Now