Ryno Posted June 12, 2019 Posted June 12, 2019 So I`m ready to take the plunge and repaint my `manche... The PO of mine spray painted over every thing (badges, vents, fenders...) which includes the pioneer trim stickers, so I know he didn`t sand it down and use primer before spraying. (which is annoying) Would the pioneer trim down the side of the bed be a lost cause anyway? Will it be harder to sand because of the spray paint over the old clear coat? Whats the best way to remove trim stickers anyway? Any pointers or advice is greatly appreciated. This will be a learning experience for me.
Pete M Posted June 12, 2019 Posted June 12, 2019 holy cow what a train wreck the PO left for you. I'm not a painter (beyond rattle-can) so I'll avoid that aspect, but I can tell you that pioneer decals exist in the aftermarket. how good does this need to look in the end?
yxmj Posted June 12, 2019 Posted June 12, 2019 I had luck with this It should be available in your area https://www.amazon.ca/3M-Stripe-Wheel-Mandrel-Diameter/dp/B00063VT0G/ref=asc_df_B00063VT0G/?tag=googleshopc0c-20&linkCode=df0&hvadid=292938351042&hvpos=1o3&hvnetw=g&hvrand=13742113931482093752&hvpone=&hvptwo=&hvqmt=&hvdev=c&hvdvcmdl=&hvlocint=&hvlocphy=9001187&hvtargid=pla-451421021261&psc=1
Pete M Posted June 12, 2019 Posted June 12, 2019 what about those mobile media blasters? should strip it allllllll off
Smokeyyank Posted June 12, 2019 Posted June 12, 2019 Easiest and cheapest for removing any old stickers or decals is one of these https://www.amazon.com/Follex-ERW-Decal-Eraser-Wheel/dp/B00BMU9CEM Sanding is sanding, if it's just rattle can it's not going to give you a hard time. Depending on the condition of the clear will really be the tell on how difficult it will be to sand. Guessing since he sprayed over it it's probably almost non existent anyways. Make sure you're not just blasting away the old paint with 80 grit. You're going to create a bunch of swirls and then will need to use a heavy fill primer so your final paint doesn't look like sh*t. You should be building your sanding, i.e start with 220 and work up to 2k. There will be primer and bondo fills mixed in there as well. Aircraft remover is amazing at stripping paint and will take it to bare metal quick. But you need to be able to get it neutralized and sealed quick as well, if not you're going to have rust issues. A quality paint job is 90% in quality prep. Prep like crap, paint will look like crap. This is also going with a 1/2 stage. If your just going to monstaline it whole different process.
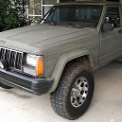
NHMJXJ Posted June 12, 2019 Posted June 12, 2019 Heat will remove the decals (even with paint over them, provided the PO didn't use rhinoliner). Then there's the 30 year old adhesive. I'm no chemical engineer, but I can tell you the adhesive definitely changes the paint under it. When I had my truck repainted the guy stripped the decals and prepped those areas before shooting the primer. '88 Pioneer decals removed, you can see that where they were, required special prep as well as more sanding.
NHMJXJ Posted June 12, 2019 Posted June 12, 2019 39 minutes ago, Smokeyyank said: A quality paint job is 90% in quality prep. Yup.
Ryno Posted June 12, 2019 Author Posted June 12, 2019 Pete M - I was thinking about using rattle cans actually, rustoleum primer and paint with a 2k spray max clear coat. Thats good to know that that aftermarket pioneer decals are around. I am mainly wanting to do this for rust protection, I don`t expect expert quality, especially from a 1st time DIY paint job. I guess my expectation is that it not look like a turd YXMJ - Thanks for the link, should be a handy tool! SmokeyYank - Thanks for the Tip. I`m not so sure the aircraft remover would be a good idea for me. As far prep goes, I plan on removing anything that can possible be removed and covering\taping what I can`t. I`ll be giving a bath with dawn dish soap before sanding down, then couple coats of primer, couple coats of paint and then clear coat. I`m thinking at least 2 coats of each, I might need more than that(?). What I am most unsure about is should I sand after every coat or just after each stage(after all primer coats, then after all paint coats and again after clear coat)? NHMJXJ - Thats good to know about the decals. I love that gray, its a sexy truck... almost makes me want to try that color...
Ryno Posted June 13, 2019 Author Posted June 13, 2019 I actually had no idea what the "monstaliner" was at first, but having googled it I know I`ve seen a few wranglers like that. I like the idea, just not sure I`d like it on mine. I think it would cost more than what I`m doing anyway. I will definitely take some before and after pictures when I start this, It might be a few weeks before I actually do this but I will definitely give updates
Jeep Driver Posted June 13, 2019 Posted June 13, 2019 1 hour ago, Ryno said: Pete M - I was thinking about using rattle cans actually, rustoleum primer and paint with a 2k spray max clear coat. Thats good to know that that aftermarket pioneer decals are around. I am mainly wanting to do this for rust protection, I don`t expect expert quality, especially from a 1st time DIY paint job. I guess my expectation is that it not look like a turd YXMJ - Thanks for the link, should be a handy tool! SmokeyYank - Thanks for the Tip. I`m not so sure the aircraft remover would be a good idea for me. As far prep goes, I plan on removing anything that can possible be removed and covering\taping what I can`t. I`ll be giving a bath with dawn dish soap before sanding down, then couple coats of primer, couple coats of paint and then clear coat. I`m thinking at least 2 coats of each, I might need more than that(?). What I am most unsure about is should I sand after every coat or just after each stage(after all primer coats, then after all paint coats and again after clear coat)? NHMJXJ - Thats good to know about the decals. I love that gray, its a sexy truck... almost makes me want to try that color... I'm going to give you some solid advise here- Get to know your local automotive paint supplier, make friends, visit often. Yes, the answer is heat, heat removes the decals..........however, since someone committed an EVIL........who knows what it will take now. NO rattle cans, you'll make a mess of it. Yes, start will 80 grit........you'll have body work, you'll prime, filler and primer need the scratches to bond. 2K primer, multiple coats, at least four. Base/clear- depending on color and coverage- at least two wet coats base and up to 5 wet coats clear. Between primer and base- sand to 320 and wet sand to 400, no higher. No sanding between coats, once prepped for paint.........all wet coats. Cut-n-buff........then you'll be getting into the 1500 to 5000 and beyond grits. If you're serious about this you'll strip the entire truck......remove the bed and doors....etc........ I'm doing a tri-coat and my costs for materials in the end will be close to $1800. For base/clear you'll be around $1200.........just guessing if you're going on the cheap.
Dzimm Posted June 13, 2019 Posted June 13, 2019 I had the same issue with my blue truck. I didn't want to spend an arm and a leg on paint and it was already a rattlecan disaster like yours so I did everything myself and rattle caned it afterwards for a couple hundred dollars all in. In my 97+ build thread (link below) you will find the posts about paint, I believe on page 2. As for the decals, I used a flap disk to take them off. Was the easiest thing I found that worked and I had to do a ton of sanding anyways so it was easier to repair the flap disk marks in the factory paint than it was to deal with pealing the decals. Even with heat I could only peal about half inch pieces. It all comes down to what you want to spend on it and what you want it to look like. Do it "right" and you'll spend thousands of dollars, do it wrong and it'll look bad. Contrary to popular belief, you can get a decent looking rattle can job if you take your time, prep properly, and spray as you would a real spray gun. It won't be a show quality finish, but it won't look bad either. It's all in the prep and make sure you clear with an automotive grade clear coat. I painted mine 2 years ago and still looks like a relatively fresh paint job. Just whatever you do, don't rattlecan flat black because it will show everything no matter what you do.
kroyusa Posted June 13, 2019 Posted June 13, 2019 Last summer I rattle canned the family boat, 1987 Starcraft 18'6" Superfisherman. Materials: 3M eraser wheel for all stickers - $44 (used about half of it) (8) cans Navy Rustoleum Gloss Protective Enamel - $32 ($3.88/can, caught a sale at Menards) (10) cans White Rustoleum Gloss Protective Enamel - $40 (2) cans Regal Red Rustoleum Protective Enamel - $8 (2) cans Silver Rustoleum Metallic Enamel - $9 (12) cans SprayMax 2K Glamour Coat Clear - $192 (local Automotive Paint Supply had special going @ $15.70/can) (2) cans SprayMax 2K Epoxy Primer - $32 (2) cans Rustoleum Filler Primer - $8 Misc - $200 for Respirator mask, tape, sandpaper, masking paper, tack rags, Prepsol, Box-O-Rags, Evercoat Lightweight Filler... Total - $569.00 Process: Wheeled off the stickers Sanded areas needing body work with 80 grit Applied Epoxy Primer to bare metal spots Sanded whole boat with 220 grit Sprayed Filler Primer on areas looking low or where factory base coat looked thin Put Lightweight Filler where it looked like it was needed and sanded with 80 grit then 220 grit (this was longest step as I had to do a lot of the spots 2-3x to get level) Made sure any plastic filler had primer on it Sanded whole boat with 400 grit Sprayed the color in 2 coats - 1st coat light then 2nd coat heavy. Let it sit for 3 days Sprayed clear in 2 heavy coats 2nd pic is color without clear Putting on the color is the trickiest, the Spraymax clear flows great. I tried one of those spray can trigger handles but it was hard to control the flow. Once I learned to keep my finger from going past the front of the spray nozzle the sputtering and dripping stopped. Definitely practice with a can of Rustoleum to get the feel. Used boat all last summer and even towed it back 300 miles to where we keep it and it still looks great.
tugalo Posted June 13, 2019 Posted June 13, 2019 i decided to rattle can mine, the existing paint was pretty solid, so i scuffed it with 320 grit. Then i went to Tractor Supply and bought some of their "Implement Paint" made for farm equipment. it goes on smoother and covers better than any rattle can i have ever tried, came out great. i intend to re-spray the horizontal surfaces this fall and then clear coat.
Smokeyyank Posted June 13, 2019 Posted June 13, 2019 15 hours ago, Ryno said: What I am most unsure about is should I sand after every coat or just after each stage(after all primer coats, then after all paint coats and again after clear coat)? If I was attempting a decent rattle can job, I'd sand with 220 (possibly lower depending on how well the 220 was doing) really just enough to scuff off the old junk and have a smooth surface. I'd completely skip body work if I was rattle canning because If I'm going through that much trouble I'm doing the rest of the paint correctly. Feel it would be like building a bad @$$ race car and putting some chrome cholo spokes on it. But I digress...... Lay down a good amount of primer, filling primer first 220-400, then sand, then more filling primer, sand again 400-800, base primer, block sand with 1000-2000. Once it was prepped dedicate a clean space to spray color ( you can make a DIY booth, really just need some plastic to go around and wet the floor to control dust) clean the surface with a tackcloth and tar remover, paint it light to medium coats building up to total 4-6 coats, If you have any runs you can wetsand but if you're laying down light coats you should hopefully avoid that. Let it dry, go back over with tackcloth, lay down clear in light to medium coats building as you go. Honestly, I'd do proper prep and a single stage paint if you really want it to look nice AND last. Rattle can while not terrible just isn't going to last. And spraying with a HVLP gun is a lot easier. https://www.eastwood.com/paints/automotive-finishes/colors/single-stage-urethane.html Single stage is a lot more forgiving than a standard 2 stage and will hold up better than rattle can. Just my 2 cents
Smokeyyank Posted June 13, 2019 Posted June 13, 2019 17 hours ago, NHMJXJ said: Yup. That's a sexy, great looking truck!
ComancheFan Posted June 13, 2019 Posted June 13, 2019 It sounds like your tying to do this on the cheap. Spending $1200 on top tier paint with perfect color match isn’t going to help you. Try and look into the Nason paint line. It should be about $500 to 2k prime base and clear. And make sure you have a decent paint gun with good clean air. Don’t buy a harbor freight gun to save money they just don’t spray right, and if your learning it’s going to be near impossible go get a decent finish with one. If your painting without a booth there will be dust that will land in the paint I would stick with a neutral solid color.
Jeep Driver Posted June 14, 2019 Posted June 14, 2019 7 hours ago, ComancheFan said: It sounds like your tying to do this on the cheap. Spending $1200 on top tier paint with perfect color match isn’t going to help you. Try and look into the Nason paint line. It should be about $500 to 2k prime base and clear. And make sure you have a decent paint gun with good clean air. Don’t buy a harbor freight gun to save money they just don’t spray right, and if your learning it’s going to be near impossible go get a decent finish with one. If your painting without a booth there will be dust that will land in the paint I would stick with a neutral solid color. $1200 is hardly 'top tear', $500 wouldn't buy you one gallon of clear. I probably have close to 200 hours in body work so far.......so........... Unless your truck becomes your full-time job, you'll be working one panel at a time and in doing so you'll consume much more material. So far I've used one gallon of body work primer (lacquer) and two gallons of Upol 2K, that's about $260 just in primer. If you are not going to strip it down, built it up, block it out..........Why bother? I posted a dollar amount for a reason- What you guys leave out- Sundries, such as tape, paper, plastic, filler, spreaders, a filler palette, sand paper (a bunch), sanding blocks (several), DA (air or electric, I have both), lacquer thinner for cleaning, hardener, a couple (few) gallons of reducer, spot filler, lent-free rags, tack cloth, respirator, stud welder, body hammer and dollies, degreaser, and whatever else I can't think of at the moment. Gun and compressor are a given. Costs add up, there will be mistakes along the way and that will cost you too. There will be things that will need to be replaced or repaired along the way.......screws, bolts, door seals...etc.. The unforeseen expenses. Badges that need attention, decals that need to be replaced and so forth. Got door hinges that are sprung? bent? need welding? pins? Window guides and seals that need replaced? Now's the time to take care of it. Undercoating if your are going to address your frame appearance and give it a finished look. Water leaks? I just had my windshield removed on Tuesday, besides the fact it needed to be replaced I wanted to make certain that the channel was rust-free, clean, primed, painted, ready for new glass, I also want the rubber trim. Now is the time. Why not rattle can? The Rustoleum primer OP mentioned is not sandable, can you sand it? sure, but it's not sandable. It's meant to be used wet on wet, good for small parts, finish after flash, chemical bond. It's not meant for a full body paint. Can you get sandable primer in a can? sure, but you'll never get enough high build be make it worth using. And it will not have the sealing properties of a 2K. Even automotive grade rattle can clears will yellow over time and will never harden enough to offer long term protection or UV fade. And there is no way you will achieve a uniform finish with rattle cans, no matter how much you lie to yourself. Why did I bother to post? Quality matters to me, quality matters to my customers, quality matters. My effort matters, my time matters, my money matters. On a personal level- I have zero tolerance for laziness and apathy, if you are going to make an effort- make it count. Will I be successful? Time will tell, but if not, it won't be for a lack diligence.
Jeep Driver Posted June 14, 2019 Posted June 14, 2019 On 6/12/2019 at 5:45 PM, NHMJXJ said: Yup. You have a beautiful truck. I can tell by your posts that you have good taste and a demand for a high quality end product, your XJ is just as nice, IIRC. Thanks for the inspiration.
Jeep Driver Posted June 14, 2019 Posted June 14, 2019 A short fun clip to inspire you- Now, if you want to see what the higher grits are for, how it's used, polishing-
NHMJXJ Posted June 15, 2019 Posted June 15, 2019 On 6/13/2019 at 11:29 AM, Smokeyyank said: That's a sexy, great looking truck! On 6/13/2019 at 8:20 PM, Jeep Driver said: You have a beautiful truck. You, gentlemen, have excellent taste in motor vehicles. I wasn't fishing for compliments, but I appreciate the nod, thanks. I posted the pic to illustrate SmokeyYank's statement about prep. Mine was not an expensive paint job. The outcome was the result of quality prep.
Ryno Posted July 11, 2019 Author Posted July 11, 2019 I appreciate all the input on this, this project is on delay until I get my overheating issues solved

Recommended Posts
Create an account or sign in to comment
You need to be a member in order to leave a comment
Create an account
Sign up for a new account in our community. It's easy!
Register a new accountSign in
Already have an account? Sign in here.
Sign In Now