STERLING STINGER Posted March 9, 2010 Posted March 9, 2010 mmmmmmm info tastes good :brows: more please :popcorn:
HOrnbrod Posted April 24, 2010 Posted April 24, 2010 GM Long Slip Yoke LWB Frame SWB Frame Metric Ton 3+2 Spring Specs Metric Ton 4+1 Spring Specs Image Not Found LWB Factory Roll Bar Image Not Found
mfpdm Posted May 6, 2010 Posted May 6, 2010 Only difference between the 4.0 and 2.5 sending unit assemblies. The 4.0 has a slot that the upper fuel pump bracket tab fits in.
kastein Posted May 6, 2010 Posted May 6, 2010 If it's a TBI 2.5 instead of MPFI, the pump will only put out 14-15psi btw.
Geonovast Posted May 6, 2010 Posted May 6, 2010 If it's a TBI 2.5 instead of MPFI, the pump will only put out 14-15psi btw. Correct... 91+ 2.5 and 4.0 pumps are the same.
mfpdm Posted May 6, 2010 Posted May 6, 2010 If it's a TBI 2.5 instead of MPFI, the pump will only put out 14-15psi btw. Correct... 91+ 2.5 and 4.0 pumps are the same. I live in a Renix era world. :D Off topic, your new avatar cracks me up. Looks like the kid from the online stock trading commercials. :yes: :cheers:
kastein Posted May 6, 2010 Posted May 6, 2010 If it's a TBI 2.5 instead of MPFI, the pump will only put out 14-15psi btw. Correct... 91+ 2.5 and 4.0 pumps are the same. I live in a Renix era world. :D Off topic, your new avatar cracks me up. Looks like the kid from the online stock trading commercials. :yes: :cheers: Yep, just figured I'd save some poor sap from the annoyance and headscratching that results from swapping a new engine in and having it run like crap because the fuel pump isn't feeding it enough, right off the bat :hmm: :thumbsup:
Geonovast Posted May 6, 2010 Posted May 6, 2010 Off topic, your new avatar cracks me up. Looks like the kid from the online stock trading commercials. :yes: :cheers: Yeah, I slapped the hat on her, and she liked it so much I had to take a picture. I'd love to comment on your avatar... but.. :shake:
johnj92131 Posted May 12, 2010 Posted May 12, 2010 Just found this thread and it is great! Can some of you post the stock position for the bottle jack, lug nut wrench and spare tire winch tool? My 91 base model had only bare sheet metal at the back of the cab. Found a good rear cab cover at a salvage yard. BUT not sure how to mate it to the back of the cab and keep the bottle jack in place. Help Please!
maddzz1 Posted June 17, 2010 Author Posted June 17, 2010 Open on left, trac lok on right ..........pic posted by Correy (genovast)
kastein Posted June 18, 2010 Posted June 18, 2010 I just learned that actually... opened up the d35 someone gave me for spare parts and went "huh... that isn't a normal carrier!" Now I'm tempted to keep my d35 and stick the trak-loc in it instead of upgrading to the 8.25 that I have waiting :(
Pete M Posted June 18, 2010 Posted June 18, 2010 the stock posi sucks and should not be considered a reason to retain a Dana 35. :thumbsup:
kastein Posted June 18, 2010 Posted June 18, 2010 Excellent... that was the persuasion I needed :cheers: It shall join the two d30 carriers I have sitting on my desk as decoration.
comanche12 Posted October 7, 2010 Posted October 7, 2010 connector No. locations Connector C100: Left Of Master Cylinder On Dash Connector C101: Above Master Cylinder Connector C102: Behind LH Headlamp Connector C103: Next To RH Shock Tower Connector C104: Next To RH Shock Tower Connector C105: Behind Battery Connector C106: Next To RH Shock Tower Connector C107: Next To RH Shock Tower Connector C108: In Front Of Washer Bottle Connector C109: Next To RH Shock Tower Connector C110: RH Rear Of Rocker Cover Connector C111: RH Rear Of Rocker Cover Connector C112: RH Rear Of Rocker Cover Connector C113: RH Rear Of Rocker Cover Connector C114: RH Rear Of Rocker Cover Connector C115: Under Dash To Right Of Steering Column Connector C116: Above Master Cylinder Connector C117: In Front Of Washer Bottle Connector C118: Under LH Side Of I/P Behind Kick Panel Connector C119: Under LH Side Of I/P Behind Kick Panel Connector C120: Behind A/C Mode Select Switch Connector C121: Under LH Side Of I/P Behind Kick Panel Connector C122: Under RH Side Of I/P Behind Kick Panel Connector C123: Under RH Side Of I/P Behind Kick Panel Connector C124: Under LH Side Of I/P Behind Kick Panel Connector C125: Under LH Side Of I/P At Kick Panel Connector C126: Behind LH Rear Inner Fender Panel Connector C127: Behind LH Rear Inner Fender Panel Connector C128: Under RH Side Of I/P At Kick Panel Connector C129: Behind RH Kick Panel Connector C130: Under LH Side Of I/P At Kick Panel Connector C131: Under LH Side Of I/P At Kick Panel Connector C132: Under LH Side Of I/P At Kick Panel Connector C133: Under LH Side Of I/P At Kick Panel Connector C134: Under RH Side Of I/P At Kick Panel Connector C135: Under RH Side Of I/P At Kick Panel Connector C136: Under RH Side Of I/P At Kick Panel Connector C137: Under RH Side Of I/P At Kick Panel Connector C138: Under Front Seat Connector C139: LH Rear Inner Fender Panel Connector C140: Behind LH Rear Inner Fender Panel Connector C141: Behind LH Rear Inner Fender Panel Connector C142: Behind LH Rear Inner Fender Panel Connector C143: Behind LH Rear Inner Fender Panel Connector C144: Behind LH Rear Inner Fender Panel Connector C145: Behind LH Rear Inner Fender Panel Connector C146: Behind LH Rear Inner Fender Panel Connector C147: Behind RH Rear Inner Fender Panel Connector C148: In Console Connector C149: In LH Side Of Liftgate Connector C150: In LH Side Of Liftgate Connector C151: In LH Side Of Liftgate Connector C152: Behind A/C Mode Switch Connector C153: Near Cargo Lamp Connector C154: Above Transfer Case Connector C155: Behind RH Kick Panel Connector C156: Under I/P On Steering Column Connector C157: Below LH Side Of I/P Above Parking Brake Connector C158: Rear Center Of Cab Under Carpet Connector C159: Behind LH Rear Tail Lamp Assembly Connector C160: Behind LH Rear Inner Fender Panel Connector C161: At Rear Bumper Connector C162: At Rear Bumper Connector C168: Top Of Washer Bottle Connector C169: Below Washer Bottle Connector C170: LH Side Of Cowl Panel Grille Connector C171: To Left Of Steering Column Connector C172: In Driver's Seatbelt Buckle Connector C173: Under RH Front Seat Connector C174: Under LH Front Seat Connector C175: Behind RH Headlamp Connector C176: On Left Of Steering Column Connector C177: LH Side Of I/P Next To Light Switch Connector C178: LH Side Of I/P Next To Light Switch Connector C179: Behind RH Side Of I/P Connector C180: At Speaker Connector C181: At Speaker Connector C182: At Speaker Connector C183: At Speaker Connector C184: At Speaker Connector C185: At Speaker Connector C186: In Center Of I/P Connector C187: In Center Of I/P Connector C188: Below I/P Behind Defogger Relay Connector C189: In LH Side Of Console Connector C190: Under LH Side Of I/P At Kick Panel Connector C191: Under RH Side Of I/P At Kick Panel Connector C192: Taped To Harness Above Fuse Block Connector C193: Behind Center Of I/P Below Lighter Connector C194: On I/P To Right Of Steering Column Connector C195: Below Washer Bottle Connector C196: Center Of Liftgate Connector C197: Center Of Liftgate Connector C198: On I/P To Right Of Steering Column Connector C199: In Driver's Seatbelt Buckle Connector C200: Under I/P To Right Of Steering Column COMANCHE Connector C100: In LH Dash Panel Forward Of Fuse Panel Connector C101: Behind LH Headlamps Connector C103: RH Side Rear Of Engine Connector C108: Near A/C Compressor Connector C109 (Diesel Engine): Near Lower Center RH Inner Fender Panel Connector C109 (Gasoline Engine): Near A/C Compressor Connector C112: Behind Battery Near Starter Relay Connector C115: Taped To Engine Harness Behind Cruise Servo Connector C119: LH Side Of Engine Near Glow Plugs Connector C120: LH Side Of Engine Near Glow Plugs Connector C200: Under LH Side Of I/P Behind LH Kick Panel Connector C202: Under LH Side Of I/P Behind LH Kick Panel Connector C203: Under LH Side Of I/P Near Ignition Switch Connector C204: Behind Mode Select Switch Connector C205: Under RH Side Of I/P Behind Kick Panel Connector C207: Under I/P Above Brake Pedal On Steering Column Connector C209: Under RH Side Of I/P At Kick Panel Connector C210: Near RH Door Jamb Switch Connector C211: To Left Of Steering Column Connector C314: In RH Side Of Liftgate Connector C315: In LH Side Of Liftgate Connector C402: Under LH Side Of I/P At Kick Panel Connector C404: Under RH Side Of I/P At Kick Panel
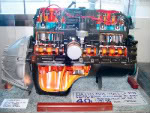
maddzz1 Posted March 19, 2011 Author Posted March 19, 2011 Shows back of engine without tranny attached. You can see the rear freeze plug where coolant would leak(top one) and the other freeze plug (lower one) where oil would leak if it went bad.
BlueMoon Posted March 26, 2011 Posted March 26, 2011 I for one can't thank each of you who have contributed all these great schemes and photos. I am not new to wrench turning, but I am to Comanches and all these vacuum lines. Mine ran fine, till a few weeks ago. I started it and it was chugging and fuming...couldn't even get it out the driveway. I shut it off and let it sit as I had to the airport to attend a family member's funeral. Once I returned, about two weeks later I tried it again and it turned over but would not start. I've been taking with some other great folks here and trying there suggestions, but still a no-go. I could really use some pics of things like the cps. It's supposed to be on the driver's side of the bell housing, but for the life of me I cannot find anything there. Also which is best manual for these buggies...? Looks like I'm running out of room on this...so thanks again...Ron
BlueMoon Posted March 29, 2011 Posted March 29, 2011 Howdy all, I thought this site might be of benefit. It shows numerous photos and diagnostics of the sensors for our jeeps: http://www.lunghd.com/Tech_Articles/Eng ... ostics.htm I hope it helps some folks on here. Regards, Ron
BlueMoon Posted March 29, 2011 Posted March 29, 2011 Here's another site I thought might be of benefit to those of us with cps problems and includes diagnostics, locations, etc. http://gojeep.willyshotrod.com/HowtoCPSchange.htm I hope it helps anyone here. Regards, Ron

Recommended Posts
Create an account or sign in to comment
You need to be a member in order to leave a comment
Create an account
Sign up for a new account in our community. It's easy!
Register a new accountSign in
Already have an account? Sign in here.
Sign In Now