

DirtyComanche
-
Posts
7945 -
Joined
-
Last visited
-
Days Won
11
Content Type
Profiles
Forums
Gallery
Everything posted by DirtyComanche
-
Renix upgraded alternator
DirtyComanche replied to Knucklehead97's topic in MJ Tech: Modification and Repairs
The Renix isn't actually a 1 wire setup, not that it really matters since it isn't doing anything more than a 1 wire. You can wire a Renix alt to function as a 1 wire, and a 1 wire would function the same in a Renix. That alternator is the same mount pattern BUT it won't technically bolt in since the small ear is threaded for oh, I dunno, some sort of M8 thread probably. The Renix one is just an 8mm straight hole and the bracket is threaded. You can just blow the threads out of that alternator with a drill bit if you want to though. Also, the housing on the back might be clocked differently. Typically GM alternators are something like 180* out of what the Renix one is. This should not matter as the Renix brackets do not pick up on the rear mount hole anyways. Cliff notes is it will fit and work but it might be a bit of screwing around. -
Sometimes the shuttle valve in the distribution block will shuttle one way or another and then fail to reset when you go to bleed it. Smack it with a screwdriver handle and see if it helps.
-
Does this school have a name? I'm all for buying random junk because I can. :rotf:
-
My 88 Comanche Restoration and Modification
DirtyComanche replied to RustInMyEye's topic in Member Projects: Your Comanches
You've made a ton more progress since I last checked this. :thumbsup: -
Group 34 Battery
DirtyComanche replied to DirtyComanche's topic in MJ Tech: Modification and Repairs
Sorry, I always assume everyone uses the 4.0L and forget the 2.5L exists. I should have specified it is a 4.0L application. Strokermjcomanche wins the cookie, this is a 34R battery. Conveniently the label does not indicate this, but comparing it to the 'exact' same battery in my JK and the posts are backwards. This is extremely annoying as I was hoping to use this battery since I already had it (came with a truck I bought), and it is the same the one in my JK and XJ (XJ has a totally different tray/battery location and stretched fenders, so I could not use it to compare to the MJ) other than the posts are reversed and it isn't going to fit any of the vehicles I own. Yay! I guess I better go buy another battery with my Cambodian Tire money. -
Group 34 Battery
DirtyComanche replied to DirtyComanche's topic in MJ Tech: Modification and Repairs
Looking at random interweb pictures leads me to believe that the later tray probably moves the battery towards the engine a bit, thus getting a little extra room for the posts. That said, I'm not sure. -
Odd brake light triggering?
DirtyComanche replied to That_Creepy_Guy_In_The_MJ's topic in MJ Tech: Modification and Repairs
Clean everything up and chase it down. Start with the easy stuff. -
Has anyone swapped to the larger group 34 battery? Apparently they are the factory size battery in 98+? XJs, and there is some straggler posts on the internet about trimming the earlier tray a bit and installing it. It fits in my tray okay, but the posts are switched vs the stock sized battery. So I can either run it with the posts forward, which means the negative looks like it is very close to the hood latch release, or I can run it with the posts back, which puts the positive very close to the internal structure in the hood. There is already a hole burned in the hood where the positive post would be, I'm guessing from somebody doing something similar before...? So I don't think that's a good idea. Anyone know what it looked like from the factory? Is the factory tray much different?
-
MJ revving too high on the highway ?
DirtyComanche replied to big66440's topic in MJ Tech: Modification and Repairs
In 1989? -
Odd brake light triggering?
DirtyComanche replied to That_Creepy_Guy_In_The_MJ's topic in MJ Tech: Modification and Repairs
IMHO, it's probably not the headgasket. I would check that there isn't any weeping of coolant from the usual suspects (radiator/heater hoses, freeze plugs, water pump, radiator, heater core, expansion bottle) and just clean the engine and change the valve cover gasket first. A cork gasket can be had for under $10, so it's a cheapy to try that. -
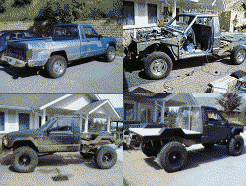
So I figured I better work on this since I don't have a truck to drive. Well, I bought a J-10 hoping it would be roadworthy with a week of evenings on it, and that turned out to not be the case... :rotf: So back to this. Anyways, I had to steal the A/C delete idler off this thing for my XJ because the A/C clutch seized up. It's getting hard to find Renix brackets at this point, and I couldn't find a HO with the A/C delete either. Also, the little idler had a bad bearing, and was not very trustworthy. So, gotta make something instead, which meant moving the alternator made more sense. Started by cutting out the one notched mount so bolts could be put in it from both sides: Image Not Found Then I made some brackets out of steel and slapped some paint on them: Image Not Found The smaller one is 1/8", and has a 1" standoff (1-1/8" total thickness). The larger is 3/16". That was more convenience in regards to material on hand than necessity. Rear bracket: Image Not Found The front 'ear' on the alternator takes a different sized bolt (I believe it is a M8, slightly smaller than the 3/8" hardware that normally bolts the A/C compressor on), so the existing hole had to be bushed. To do it over again I wouldn't cut out the bracket or bush the hole, I'd just drill the hole in the alternator out to 3/8" and use a single long bolt like the A/C compressor did. There needed to be a 3/8" spacer also, so that nut was used, which is kinda hack but this is revision 1. Front bracket: Image Not Found The stock A/C compressor bolt was used on the A/C mount. The bolt through the alternator is the stock attachment bolt for it, I just had to dig through my stuff to find a nut as it goes into a threaded bracket in the stock configuration. Blurry picture of belt routing: Image Not Found Sorry the picture sucks, my fone does that... Downside to this belt routing is there isn't a lot of contact on the fan pulley, I'm not worried about it right now but will keep an eye on it. I may go to electric fans down the road so it really won't matter if that is the case. Another slight issue is one of the bolt heads in the P/S pump bracket needed to be filed a little bit to ensure it didn't rub on the belt. Belt: Image Not Found 71" 6 rib. Truck in my shop, if you don't believe me: Image Not Found Of course the battery was completely dead from sitting. Actually, it was leaking too. So I baking soda'd everything and cleaned it up. The only other good batteries I had were larger, so I threw a group 34 in it. I didn't try to close the hood. Will it fit without shorting out or rubbing on stuff? It's too tall for the hold-down, but that's easy to fix...
-
Odd brake light triggering?
DirtyComanche replied to That_Creepy_Guy_In_The_MJ's topic in MJ Tech: Modification and Repairs
For the fuse issue you might be able to get a small pair of needlenose pliers into the receptacle to crimp the contacts a little tighter. Or try another brand of fuse, some have a bit thicker blades than others. Does it smell like burning antifreeze from the tailpipe then, or just sweet in the engine bay? If it's white smoke and burning out the tailpipe, might as well just order up a headgasket, intake gasket, valve cover gasket, tstat/gasket... -
nice 88 on ebay pulling in quite a few bids..CC Member possibly?
DirtyComanche replied to Newton's topic in The Pub
I spy at least a decent intake manifold, and a set of headers, a real distributor, and no evidence of smog equipment. If it's been tuned decently it's probably making a fair amount more torque than a Renix. I would predict total trans and rear end meltdown in short order with the right driver. They obviously did have some penchant for flair, as is evidence by all the fake braided hoses and crap, so it is hard to say if the mods are only skin deep. But as said, for that money I would hope not to be getting a BA-10/5 and a D35. If I was to do a SBC or any sort of GM swap and wanted a 5 speed, it would be a NV4500 without a second thought. Adapters are a waste of money when it already bolts up... -
Odd brake light triggering?
DirtyComanche replied to That_Creepy_Guy_In_The_MJ's topic in MJ Tech: Modification and Repairs
Buy some new bulbs. Check and clean the grounds. Clean corrosion out of the sockets. Report back if they're still screwy. -
nice 88 on ebay pulling in quite a few bids..CC Member possibly?
DirtyComanche replied to Newton's topic in The Pub
Anyone who swaps in a 350 and buys the adapter to mate it to a (hopefully) AX-15 is probably not smart enough to swap in a better rear axle... For all anyone knows they could have bolted that thing to the Peugeot though... -
That's one of those things I'd like to have, one day...
-
8.8 clutch packs bad
DirtyComanche replied to Jackrabbit41's topic in MJ Tech: Modification and Repairs
Maybe but I'd like to stay LSD How about a Truetrac or the clones of them? I think Powertrax makes a helical gear LSD now for not too much. Even a Truetrac can be had for a decent price if you know a dealer. I preach upgrades over repairs. But if you want to do it cheap, I'd just go to the boneyard and find a lower mile Exploder and pull the carrier out of it and steal the clutch packs. Clutch LSDs to me are pretty much a waste of time and money. Something like this? https://m.summitracing.com/parts/dtl-913a561 and could I instal this myself or does everything have to be set up again and shimmed? Yeah, that one. The Powertrax clone is this one: http://www.rustysoffroad.com/powertrax-grip-pro-ford-8-8.html (I wouldn't buy it from them and a better price can be had if you look around) Unfortunately it does require a partial gear setup as it replaces the carrier. Basically measure current backlash, and shim this one to be the same. You would also need a new set of carrier bearings and a shim kit. If you're paying a gear place to do it they should not charge a lot, as it is much quicker to do this than a full gear setup. Disclaimer, I've never installed one in an 8.8, nor done any gear setup work or similar on an 8.8, and therefore I am not aware if there is any nuances or issues with doing a carrier swap in the 8.8. -
What price do you see Comanche's going for on CL in your area?
DirtyComanche replied to ScrapHybrid's topic in The Pub
There is a couple for sale on the BCJC for under $2000. I saw one in Alberta for $4000, IIRC, that I thought about getting, but it turned out it was just a cheap repaint rather than a good one (would rather pay more for a good job). Normally they seem to be $1000-3000 around here for something that's anywhere from horrible to okay. -
8.8 clutch packs bad
DirtyComanche replied to Jackrabbit41's topic in MJ Tech: Modification and Repairs
Maybe but I'd like to stay LSD How about a Truetrac or the clones of them? I think Powertrax makes a helical gear LSD now for not too much. Even a Truetrac can be had for a decent price if you know a dealer. I preach upgrades over repairs. But if you want to do it cheap, I'd just go to the boneyard and find a lower mile Exploder and pull the carrier out of it and steal the clutch packs. Clutch LSDs to me are pretty much a waste of time and money. -
8.8 clutch packs bad
DirtyComanche replied to Jackrabbit41's topic in MJ Tech: Modification and Repairs
Buy a locker instead....???? :dunno: -
The thermostat only controls engine operating temperature when the cooling system has not reached saturation. The frontal area of a XJ/MJ chassis is minimal, to say the least, which is where the problem really lies. Short of really hacking things up you won't actually get a much bigger radiator in, as if you move it back and make it taller it has to become narrower to fit between the frame rails. I'm not saying it's impossible, or it won't work, but I am saying it is an issue with many swaps. I honestly have zero use for any Dodge/Chrysler engine or management system, so I am biased, and I am saying that despite owning multiple Dodge/Jeep/Chrysler products. I would hands down go GM. Something aluminum ideally; there's a somewhat rare 5.3L used in Trailblazers? that is all aluminum. Or the more powerful LS1/6/2/3/4/7/9/LSA/L76/92 options. Being all aluminum is helpful in the weight department, and more importantly in the thermal management department. Plus the GM EFI can actually be made to run standalone for very little money and with minimal effort or compromises; that is simply not the case with the majority of the Dodge/Chrysler/Fiat junk. Hell, I'd swap that silly I5 out of the Canyon/Colorado in.
-
The problem isn't getting the engine to fit. It's getting it to cool adequately.
-
Hmm, well into the 12s. Yeah, she works. Honestly, 'cleaned up' the MJ is a lot faster than people want to give 'er credit for.
-
Well, to close the saga I wound up getting one with a key from the big truck wrecker. Which was a whole story in itself, since they're a very weird bunch to deal with at the best of times. I dropped the one without a key off at the locksmith, and after a couple days of them not looking at it I got the hint that they really didn't want to touch it. Really didn't expect it to be so hard, but that's how it goes.
-
Rough Country Long Arm Install
DirtyComanche replied to joester1908's topic in MJ Tech: Modification and Repairs
Done right, whatever. Most people can't nail a 100% penetration butt weld in pipe/tube without an internal sleeve though, but it may not matter since most control arms are made thick (1/4" wall or more) entirely for denting and bending (from rock contact) resistance. Personally I'd put a sleeve inside or out of it. I don't know what he did specifically, but it's quite possibly fine. It probably would have been cleaner and easier to buy some new threaded tube inserts, cut the arms down at the frame end, and then install the new inserts.