

Gojira94
-
Posts
718 -
Joined
-
Last visited
Content Type
Profiles
Forums
Gallery
Everything posted by Gojira94
-

I don't think that's piston slap. (shiny oil)
Gojira94 replied to brucecooner's topic in MJ Tech: Modification and Repairs
I'm going to concur that something's hurt that's not easily remedied. If you were my neighbor I'd be over in a minute... The part that sounds to you like a misfire and lifter chatter: You might want to pull the valve cover off and look for a loose rocker arm (nut is tight but there's slack at the rocker tip/ pushrod). That would be an immediate giveaway that you might have a wiped cam lobe/ lifter. Any debris from that would quickly find its way to the bearings. -
Not to nose this thread into the weeds, but wasn’t there someone at some point on or associated with this forum that was making switch panel overlays? Be nice to be able to put together panels that have the OE appearance.
-
Running lights INOP
Gojira94 replied to thejeepmanwithcrocs's topic in MJ Tech: Modification and Repairs
No need to pull the dash cluster. The lower panel, maybe, but I've managed to do it with it in place though its a bit more difficult. If you do remove the lower panel, there are visible screws holding it, plus one behind the ash tray. On the very ends, there is one at each end going straight up as well. -
Running lights INOP
Gojira94 replied to thejeepmanwithcrocs's topic in MJ Tech: Modification and Repairs
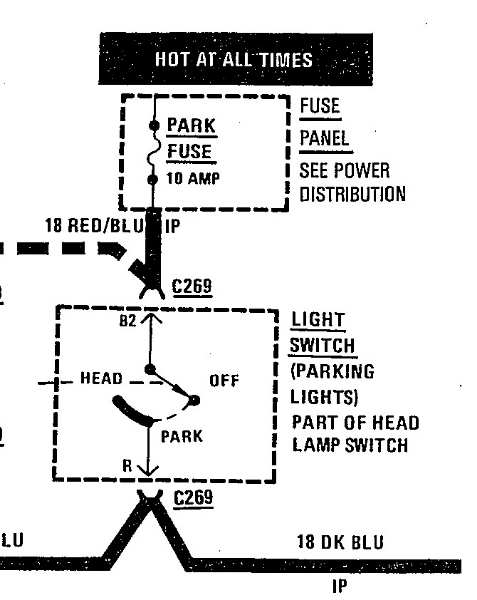
Try pulling the headlamp switch and testing for continuity from B2 to R with the switch in the park/ running lights position and the headlamps on position. I bet you get OL at the park position.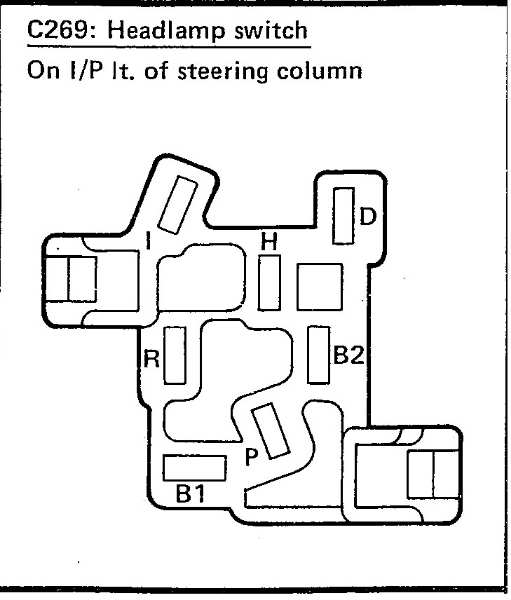
-
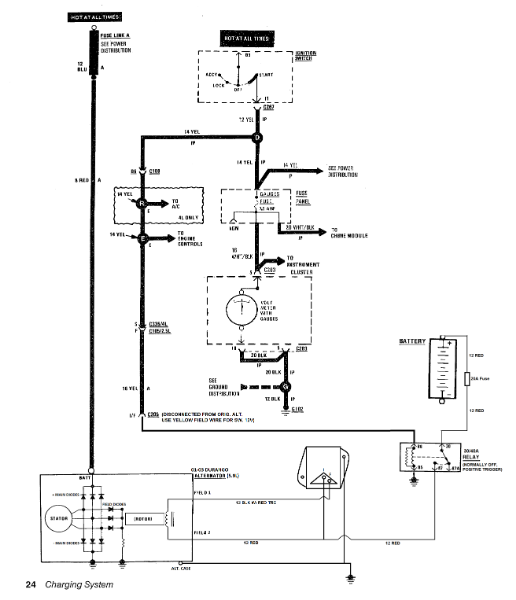
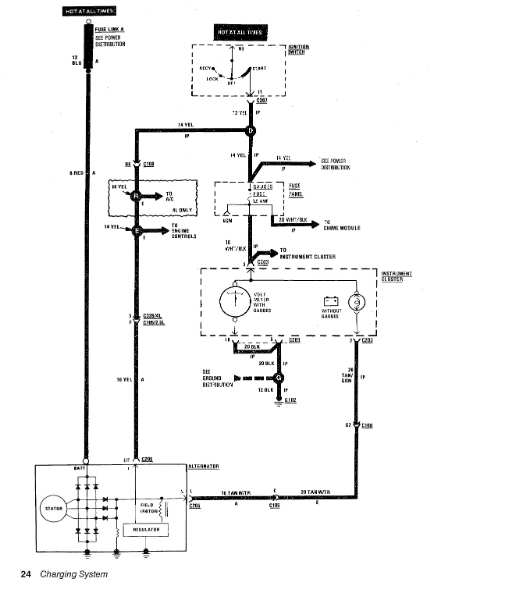
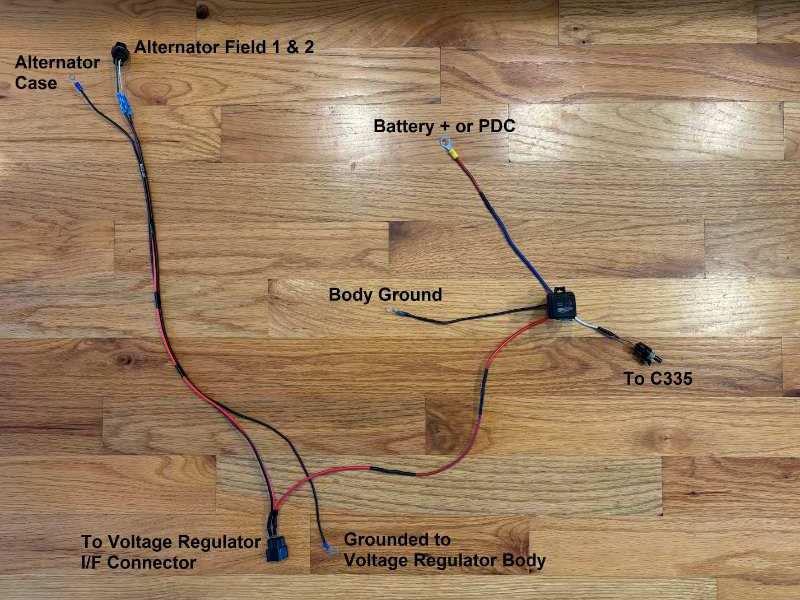
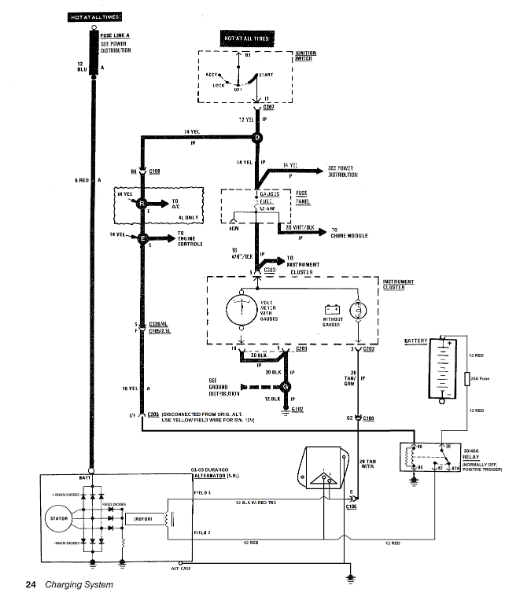
The physical compatibility and arrangements for this has been well covered but I wanted mostly to cover the electrical part of the swap. And if you do it, you may have all lights pulsing at idle. I did, and here's how I fixed it, thanks to one of Nick's friends... For stock alternator location, passenger side of engine block: There are plenty of 5.9L Durango alternator swap guides out there, mostly for 91 and up. Those don't require a bracketry change, as the alternator case mounting holes are the same, just a larger case. Those require some shaving and cutting to accommodate the larger case, and that's well covered on the internet. For 87-90 Renix Jeeps equipped with a CS-130 case alternator, the brackets are entirely incompatible. This will require swapping to the 91-98 alternator brackets and likely a belt change. For top mount relocation, on non-A/C equipped jeeps: 87-90 will require swapping to a later 91-98 A/C compressor mounting bracket for most top mount conversions. No one I've seen makes anything to mount the later alternators on a Renix A/C bracket. 91-92 MJ & 91-98 XJ already have the later A/C bracket, ready to go. I got a USA-made top mount alternator adapter kit from SpeedShop505, but they're not making this as of Feb. 2026. Plenty of other copies out there. Belt change is required. =========================================================== Larger Images of Electrical Diagrams here: ---> Durango Alt Wiring Electrical: From this (p.24 1988 Electrical Manual): To this: Complete external voltage regulator harness example: Harness Explanation: All lights pulsing at idle - common issue when doing this swap! The yellow field wire on the original alternator connector is usually the indicated switched 12V source. However, it comes all the way from the ignition switch, through Splice D, through bulkhead C100, through Splice R if you have A/C, through Splice E, through connector C335, and finally to C205 at the alternator. This is a run of about 10-11 feet! Plenty of noise and voltage drop opportunities. @NickInTimeFilms and a buddy of his did this swap in a YouTube video: https://www.youtube.com/watch?v=YUcMPrCoRiI This 89 XJ already has the 91-98 A/C compressor bracket due to a previous HO-era A/C swap, and they're ditching that in the video, but that's not the point. The wiring is (11:24 - 18:12). In the comments someone asked if the lights pulsed at idle, and @tylermus replied that he'd added a relay next to the battery to eliminate the issue. So that's why I did this, and it worked great. There also needs to be a ground wire from the regulator body to body ground. I added a large ground on the passenger side to mirror the one on the driver's side fender well (G106), so I tied into that. The 20A fuse between the relay and battery is optional, I did without. I unplugged C335 and tucked away the side for the alternator harness. Rather than cut anything, I headed to the local boneyard looking for 88-94 Chevy TBI V8 trucks. It's the brown wire connector you unplug when setting the distributor base timing on those trucks. On the firewall under the PDC cover if the truck still has it. I got the Field wire 1&2 connector from a random Jeep/ Chrysler vehicle a while back, don't recall exactly which (easy to find). External Regulator kit is from Alternator Man / alternatorparts.com, kit ERCK. Setup and explanation video from the Alternator Man himself here: https://www.youtube.com/watch?v=utXjxwPAcHk ========================================================= One more note: if you have a "Standard"/ dummy instrument cluster, you'll need to figure out how to wire the Lamp wire. I'll look into it and update this thread with how-to when I have time. UPDATE: I'm 90+% certain this is correct for trucks with the "Standard"/ indicator light cluster.
-
February 2026 - The Basket Case MJ
Gojira94 replied to 89 MJ's topic in Comanche of the Month (MJOTM)
Thanks! I'm a little jealous you have 2 MJs lol. They've both come a long way. Thank you, sir! -
What radiator fits our fan switch?
Gojira94 replied to xjustinx's topic in MJ Tech: Modification and Repairs
I'm running a KoyoRad A1193. Autozone boxes it under their Duralast brand as A1193. It has the bung for the Renix temp switch. KoyoRad is a Japanese company, and it operates its own plants in China and Indonesia. Box says China but it's better quality than average. And getting it through a parts house with thousands of stores, with "limited Lifetime Warranty" is a generally safe bet if it fails. @Eagle_SX4 is right, though. You can still get genuine Mopar HO era switches for the thermostat housing and make a pretty straightforward wiring change. True Mopar versions of the Renix temp switch are nonexistent, though SMP, Wells and others make versions of it for parts house distribution under their own brands. I'm running a Duralast SW594 (Wells part) Renix switch and it closes at 195-200*F. -
February 2026 - The Basket Case MJ
Gojira94 replied to 89 MJ's topic in Comanche of the Month (MJOTM)
It wouldn't be complete without your work! Thanks! I saw it and had to have it, for reasons in the build thread... I'd say you're way ahead in some aspects. Wish I had your paint and welding skills! -
91-96 Clutch Master Issues and Maybe a Fix
Gojira94 replied to Gojira94's topic in MJ Tech: Modification and Repairs
So unfortunately one quick glance at the rod on the clutch master with the pedal all the way down tells me that there's not enough room for a coupling nut without raising the pedal height a crazy amount. So I'm going to try to 'shim' the plunger/ rod tip arrangement to eliminate all but about .5mm slack. We'll see how that goes. I am tempted to just pull the trigger on the LuK master and return the parts house master, but I do want to see if this will work... -
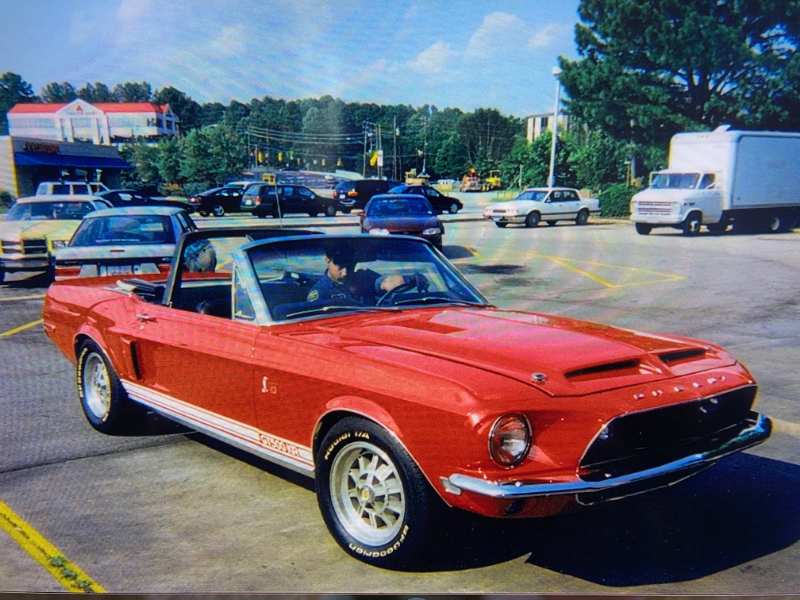
Here's another of those 318 1968 GT500KR. Pic is from 1999, my associate Ward "The Madman" Madsen is pulling it into the service bay. We worked at Goodyear Certified Auto Service Center #2356 next to Crabtree Valley Mall in Raleigh, NC. It's (still) owned by a rich (now retired) dentist. We were correcting an issue with the left leaf spring to level the rear stance. There was a lot of talent in that shop before Goodyear did away with it all and went "Just Tires."
-
BBK throttle body leaking shaft seals
Gojira94 replied to knever3's topic in MJ Tech: Modification and Repairs
Jeff at http://strokedjeep.com/ might be able to redo throttle shaft bushings/ bearings/ seals/ whatever on your BBK unit. If anyone can do it, he can. -
TLDR... I'm using a parts house version of the later master with .699" bore vs .688" on the earlier BA5/10, and AX15 with CSC. It works fine with a CSC AX15. However, I'm seeing some symptoms that have been widely reported with difficulty getting into 1st and reverse "when warmed up." Some swear by the LuK LMC206 as fixing the issue, but I have some suspicions as to why. Here's what I see going on with the parts house unit: the pushrod has a fair amount of slack between its retainer under the circlip to the piston's cup, so about 3/16" of pedal travel is lost before the plunger moves, and the piston is just a hair short of full travel moving fluid. My guess is the LMC206 has less slack in it. Masters from O'Reilly and Autozone are the same. Advance seems to have quit carrying a house brand, only offers the LMC206. Napa re-boxes and sells the LMC206 as NCF 72206. O'Reilly and Autozone master are etched with either "2055 18099" or "2055 19199." These are the ones in question... The fix: cut and thread the pushrod for a coupling nut. And keep that adjustable pushrod for re-use regardless of future master changes. Nice to be able to adjust clutch engagement as the disc wears away, too. I also just did clutch hydraulics on my 2003 Accord. It has an adjustable rod to dial in the correct length. I wish AMC and Chrysler had made them that way originally. I'm also considering adding a PEEK M2 washer between the pushrod and piston for good measure. I have plenty other things to work on with my rig at the moment but I'm going to see if my neighbor has a left hand thread die set and try this at the earliest opportunity. /end rant
-
Thanks! It almost doesn’t feel real yet. I took another short trip to the grocery store gas station in front of my neighborhood (no plate, no registration). Put $20 in it. A lot of firsts for me and this MJ are lining up.
-
I just drove it for the first time ever, around my neighborhood. Running and driving is silky smooth. It's still a ways away from finished. Bugs to work out - the temp and oil pressure gauges are pegged. Oil pressure gauge sweeps at key on, temp does not, both gauges worked fine some months back when I was tuning and making engine running adjustments. No big. Right fender liner still needs to go in, lots of clear coat correction and repair, little things. No tool exists to measure the width of my smile today...

-
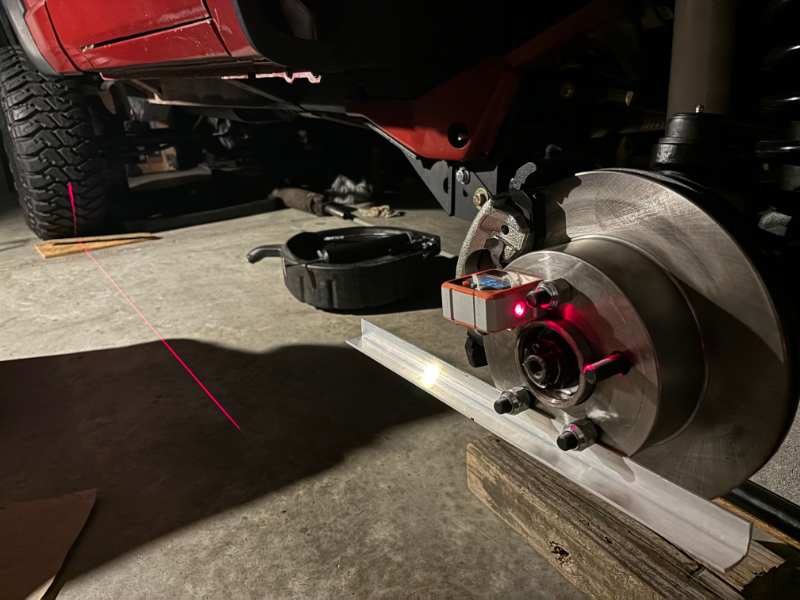
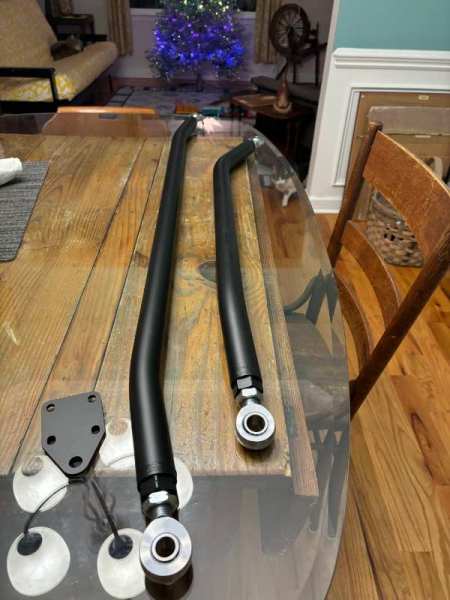
Homebrew toe setup - flip some spare 1/2" - 20 lug nuts around to hold the toe measurement bars with the rotors snug. Angle aluminum tends to be more true than steel angle iron and it's lighter. Frequently check they're level when making adjustments and re-measuring. Shoot for 1/16" less up front for about .5* toe-in. I used a laser angle finder and started with the beam at centerline of the rear tires and moved each side outward equally until I got the measurement I wanted. Then measured center to center on the knuckles and transferred that to the tie rod. Close enough to get it to my buddy's alignment shop.
-
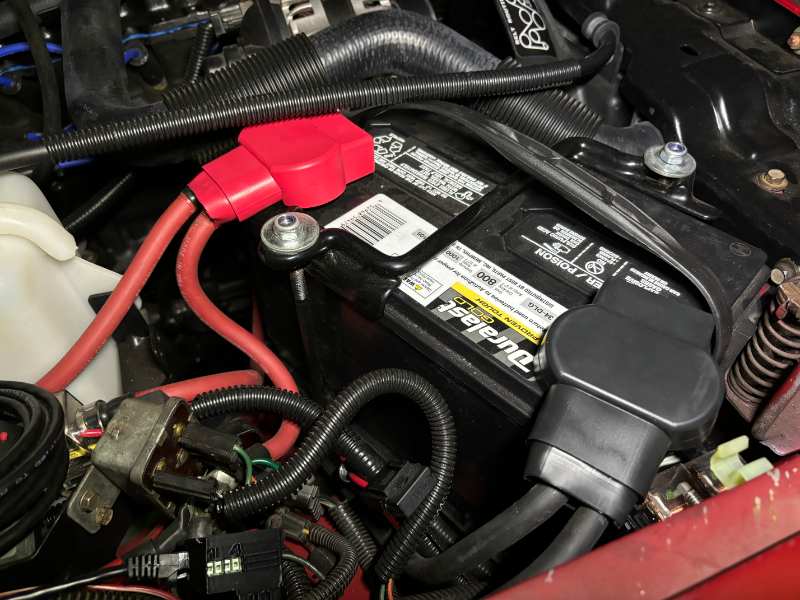
So I basically took from Thanksgiving through New Year's off from my own projects. I did do brakes and motor mounts and tires/ alignment on my wife's XC70 but mostly left my tools in the box for a while. Basically kept the MJ battery charged and looked at it now and then. Now getting back to things to get her rolling under her own power. Covers for the milspec terminals (Fastronix, made in USA, $13.87 shipped):
-
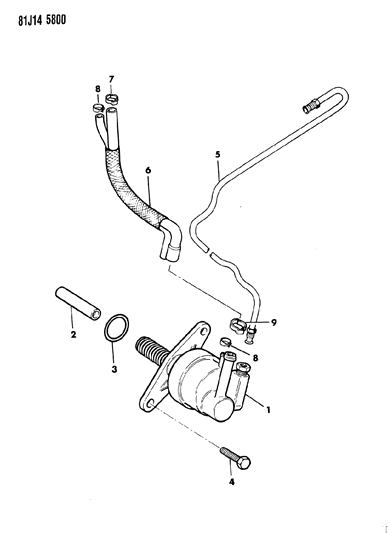
Welcome to the forum. Hopefully someone with a 86/ 2.8 MJ can offer some feedback as well. If you're referring to #5 in the diagram you might try the usual PB Blaster on the fitting and some gentle taps with a brass hammer first. If you don't have flare nut wrenches you can pick those up for about $15 apiece at your local parts store. You can determine the size with standard combo wrenches first. Or are you battling #6? On those you'll need to pry open the metal collars #8 / #9 that secure them to the pump before you can slide them off.
-
86 2.8 serpentine belt question
Gojira94 replied to ratrapp's topic in MJ Tech: Modification and Repairs
All accessories on the Jeep 2.8 setup are set up for CW rotation. The early 90s 2.8 S-10 with serpentine setup has CCW rotation on the water pump, which would mean swapping out the timing cover as well (water routing shape on the inside of the cover). Would require a swap to a CS130 case alt., PS pump moves down. Hardest part, maybe the deal killer, would be trying to place the compressor. S10s used the Harrison R4 'pancake' compressor and almost no other compressor would fit in the S10 location for it. S10 accessory = bad option mostly due to AC compressor difficulties unless swapping for an R4/ custom hoses for it. The 93-95 Camaro L32 3.4 also does CCW rotation of the WP, which would need the L32 or S10 2.8 cover and water pump, everything else CW rotation. Only accessory relocation for that would be the compressor (extend wires for AC, swap to CS130 case alt., probably swap to a Sanden R series compressor, custom AC hoses, different radiator hoses). No simple/ cheap options, I agree, for now just get those belts tight enough -
Clutch Slave FUBAR or not?
Gojira94 replied to Gojira94's topic in MJ Tech: Modification and Repairs
One tip I'll share (not at all new to the world) is when pulling the trans (any trans/ any car), is once you have the transmission supported and pull the crossmember, droop the trans about 3" vertical from where it would be on the crossmember. This eases access to the upper bellhousing bolts. I use a string of wobble extensions at the socket end and an 18" 1/2" extension at the ratchet/ breaker bar end for about 3 - 3 1/2 feet of curved reach. Here's the important part - before you try to separate the trans with the driveline drooped a bit, support the engine at this temporary angle at the front of the oil pan or crank pulley so it doesn't rock forward and up when you separate the trans and push the bellhousing up into the tunnel. That's a moment when you may have somewhat tenuous control over a heavy mass of metal in motion, so keeping still things still saves some headaches. If you're doing something quick, you can leave things where they are. If you're going to need more than an hour or so, relieve the tension on the engine mounts by moving the engine back to its normal angle and support it while you do trans work. And then put the tilt back on it when you're ready to reinstall the trans. -
That's a 'High Line' cluster earlier than 87-88, so if your MJ is an 86, it's probably the original. The noise and behavior seems to indicate a hitch with the tenths mile position on the barrel inside the speedo. It could be as simple as cleaning and lubricating the barrel to relieve the sticky end at the tenths position. I will say it's NOT super simple and great care would need to be taken while working with it. You'll have to get into it to find out what's going on though. Member @boxyjeep has significant experience with all the variants of clusters from 84-96, repairs, and also sells some electric speedo conversion kits and a good video of the differences and changes in clusters here: Jeep Cherokee XJ Gauge Cluster Repair Guide Another video of how to extract and work with the barrel here: How to Calibrate Renix Gauge Cluster After Full Gauge Cluster Swap
-
The Comanche has failed me
Gojira94 replied to hgeranium's topic in MJ Tech: Modification and Repairs
I've found 2 things from doing quite a few lock rings of this type- sometimes the o-ring is just a hair too big and won't seal properly because it comes out of round once you seat the SU top plate and start tapping the lock ring into place (and you can't see what it's doing behind the SU top plate). Second, I like to lightly smear the o-ring with Vaseline or even Chapstick to keep it in place and oriented and settling into the groove properly while things go together. Helps to prevent leaks you can't see but can certainly smell. -
Clutch Slave FUBAR or not?
Gojira94 replied to Gojira94's topic in MJ Tech: Modification and Repairs
Ahhh, ok. You meant during your conversion. Understood. I had some success yesterday. I’ve got more than enough clearance underneath and a trans attachment for my 3-ton jack. i separated the trans just enough to get the slave out. I popped off the bleed line with an old fork/ wrench clutch tool. I got the bleed fitting off, cleaned the threads up and dug out a brake bleeder of suitable size from my toolbox. I’m satisfied enough with it to give it an go and try to bleed it before I put it all back together or look for another slave. All i need from this one is to last until next summer. By then I should be in a position to do the conversion like you did. -
Clutch Slave FUBAR or not?
Gojira94 replied to Gojira94's topic in MJ Tech: Modification and Repairs
You were changing it while you were replacing the slave, or doing the whole clutch job? I had the luxury of installing mine (3/4") on the floor of my garage before stabbing in the engine/ trans together. The real shame is I gave away a complete clutch setup including flywheel and slave to a local wheeler to get it all out of my way. It was a 93 YJ setup with all new LuK parts (<1000 miles). I could have robbed the bleed line off of that slave. Oh well. At least I'll have a spare. If I eventually need to replace the one inbound now, I can swap the line from that one over to the bad one I have now, with new EPDM o-rings for good measure. I had 15 minutes during my lunch break to get started pulling everything (WFH job 1 most days). I got both shafts out, shifter and exhaust head pipe pulled. Almost not fair, this rig doesn't have anything that's damaged, jacked up or have rusted fasteners anymore. -
Clutch Slave FUBAR or not?
Gojira94 replied to Gojira94's topic in MJ Tech: Modification and Repairs
Not right now. I can replace an internal slave on one of these in about 1.5 hrs, with the most of that being fiddling with the transfer case nuts. I'd very much like to do the conversion but another $800 on the MJ just isn't doable any time soon. My wife's XC70 just took $900 with another $300 coming soon. -
Clutch Slave FUBAR or not?
Gojira94 replied to Gojira94's topic in MJ Tech: Modification and Repairs
I was finally getting ready to actually use the clutch for the first time. This was the last thing it needed to run and drive. It hasn't moved under its own power since 2017, according to the NC Emissions Inspection Unit. I can't get the bleeder/ fitting off the bleed line, and it's bending and very not happy. Slave is trash, I'm calling it and yanking the drivetrain. Looking for another slave now.