Gojira94
-
Posts
718 -
Joined
-
Last visited
Content Type
Profiles
Forums
Gallery
Everything posted by Gojira94
-
https://strokedjeep.com/
-
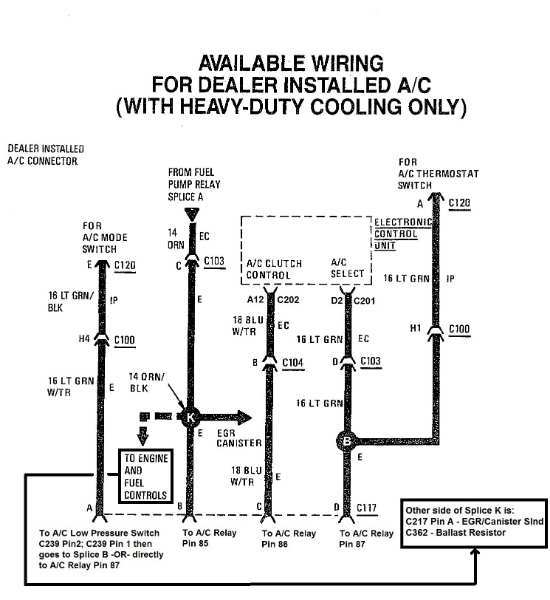
Appears not. Following up @ghetdjc320's comments you'll likely have to scab onto the A/C connectors dash harness connector(s) and pass them through a firewall grommet to create the connections to AC Request --> AC Clutch Relay, and Low Pressure Switch. The AC Select stays inside and goes to the Thermo Switch at the evaporator. Working on getting you some decent resolution diagram screens from Mitchell. I suppose it's possible the equivalent of bulkhead connector C100 has the wires in it from the heater harness connector for some of the AC functions, but I'm skeptical. Once you get into the dash you'll know more from looking at those dash harness to heater control connectors.
-
Did they provide a 'dealer install' connector in 91? If so, that's not super hard. There is a distinct difference in the heater-only A/C dash harness and the one for A/C-equipped. If you get the box, control panel and harness you're most of the way there. PM'd you a couple of wiring diagram images for 91 MJ.
-

Weird exhaust Popping when decelerating
Gojira94 replied to Big_Mark's topic in MJ Tech: Modification and Repairs
I got mine from here https://www.ebay.com/itm/283645389229 Dimar Motorsports. Unfortunately they’re out of stock at the moment. Injector-Rehab has some in the 190-200cc @ 3 bar for our jeeps but they want $175 a set (ouch). They say they’d be yellow, black or blue depending on stock. I’m not familiar with what Bosch number the blue ones would be but I’m curious. https://injector-rehab.com/product/87-98-jeep-4-0-upgrade-19lb-set-6-copy/ -
Weird exhaust Popping when decelerating
Gojira94 replied to Big_Mark's topic in MJ Tech: Modification and Repairs
Those 703s are the Dodge Neon injectors that were initially popular some years ago. They really are too fat for Renix or even HO outside of race classes. The orange ones are 0280155700 or 746 knock-offs. Sometimes they work out ok-ish but actual flow and matching between sets will be off and inconsistent. If you’re not opposed to spending $120 - $140 on a properly refurbished set from Ksuspensionfab or another reputable and trusted seller you can have a whole lot better. The 0280155700 part number would be ideal but they are very scarce these days. A set of 0280155746 would be acceptable but they’re just a tad fat. But the Renix computer can adjust the long term fuel trim to compensate. I’m running a set of 0280155702 and they’re great. They’re in between the 700 and 746 and easily managed by my 429 Renix ECU. -
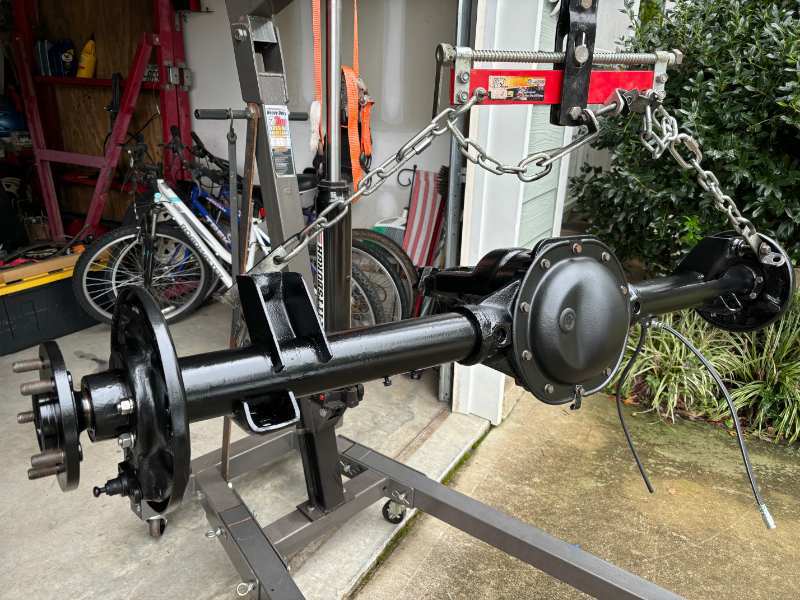
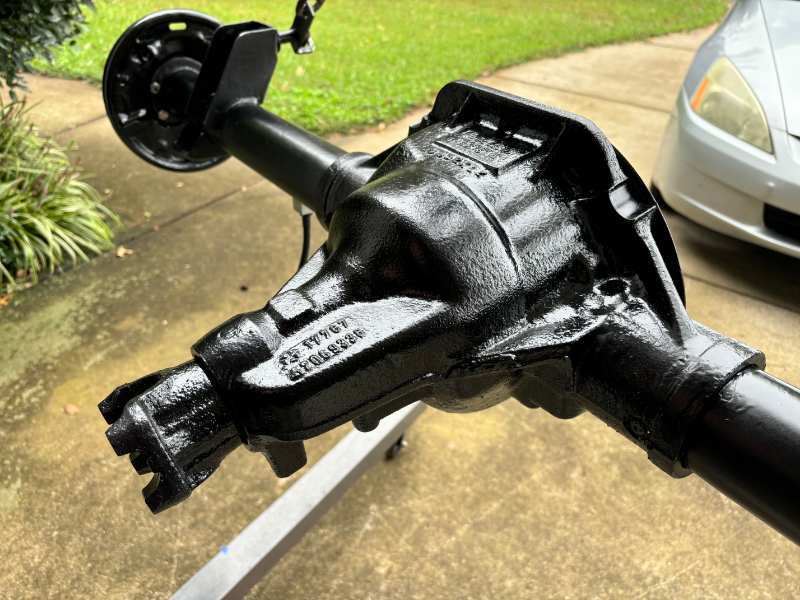
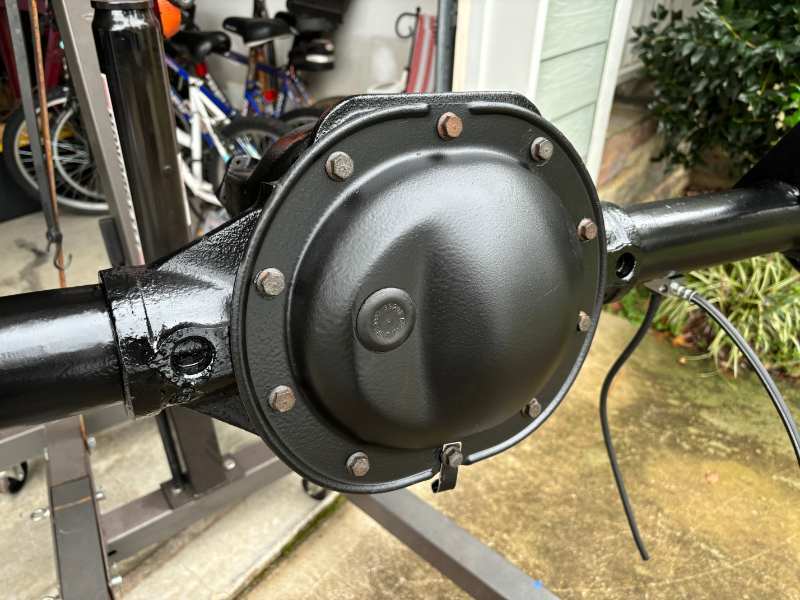
For this one I used a pretty basic Rustoleum spray enamel. Since this rig will see a considerable amount of salt exposure I wanted something easy to maintain with readily available inexpensive paint. Any rust that creeps in in the future would be easy to address and then re-coat. The longest bit of work was peening the nodular iron center section to get all the rust layer off down to clean metal. I normally wouldn't bother coating the yoke but I thought it would be a good idea given its environment.
-
I'd say so! She's pretty excited and I'm happy for her.
-
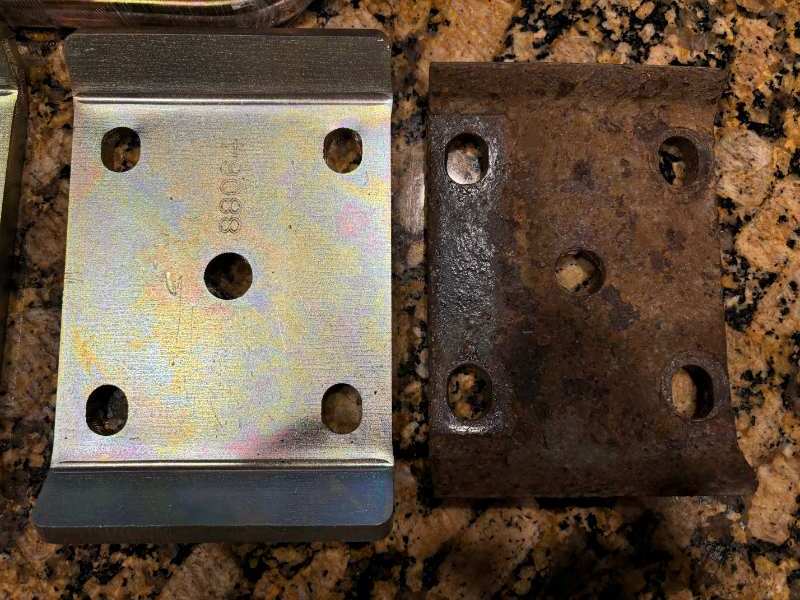
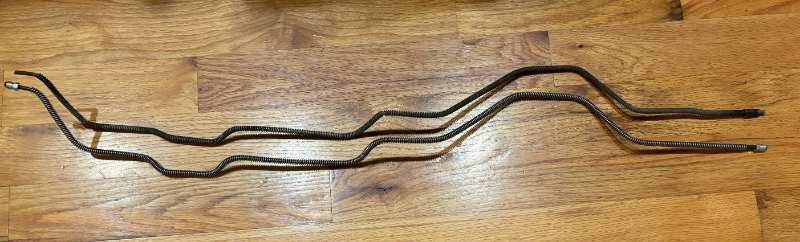
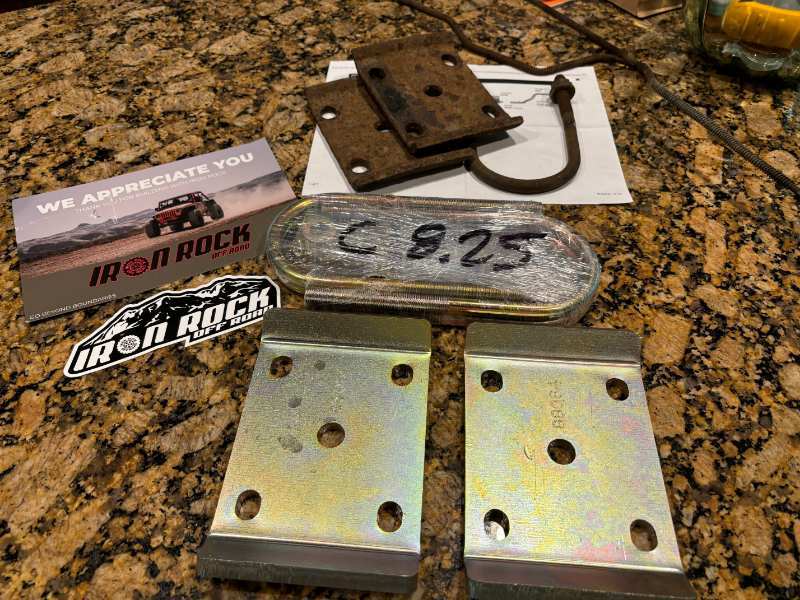
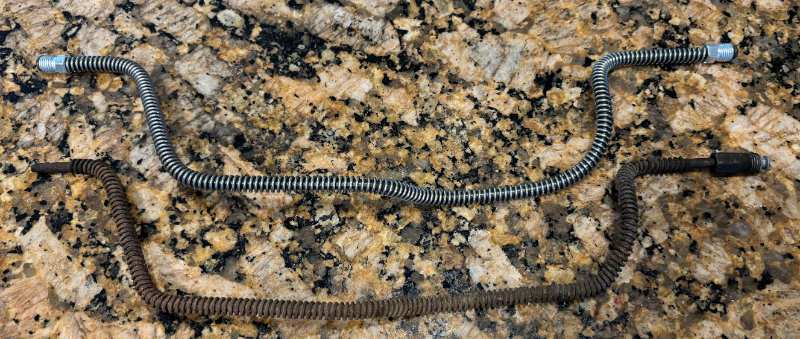
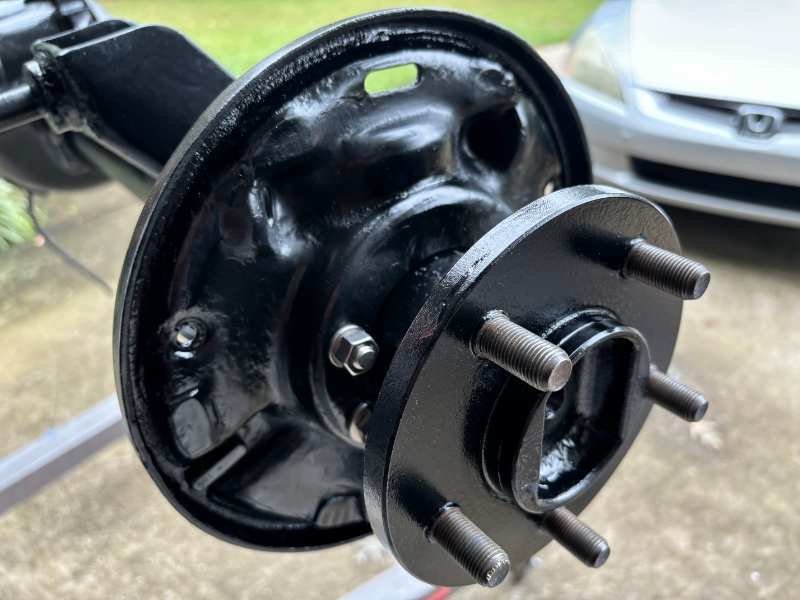
New brake lines made from AGS PAC-325 roll left over from the MJ (Poly Armor Coated 3/16") with Stop Shop gravel guard. I can see I'd like to replace the other lines on the Jeep in the next 6 months as well. New Iron Rock Offroad plates and u-bolts, the most expensive part of the axle swap ($119 with shipping). Front sway bar links rattle they're so bad. I have a new pair each for stock XJ/MJ, TJ and V8 ZJ. I'll see which is the best fit for the 3" lift that's on it. Track bar has a tiny bit of wiggle, so does the drag link, so those are on the short list. Next spring, Core 4x4 arms. There should be a number of minor issues/ fixes I can address before then.
-
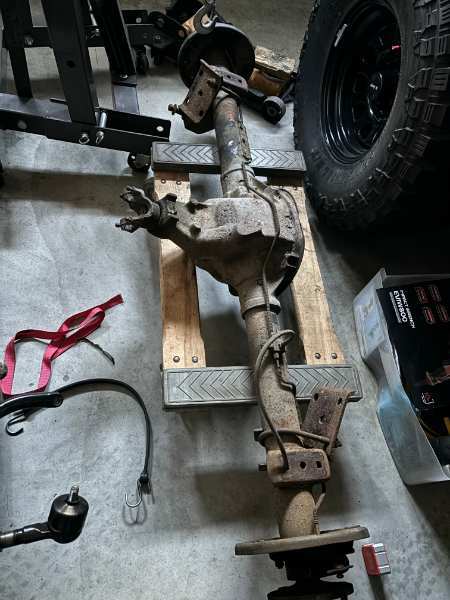
Labor Day weekend a nearby LKQ yard had a 2000 XJ with a 29-spline Chrysler 8.25 under it. Everything was 1/2 off that weekend so I scooped it up for $100. I put about 30 hours into it last week from Sunday-Sunday and got it redone... Everything but the wheel studs, plus all new brake hardware and parking brake cables. Just need to assemble the brakes. If the 9" drums on the D35 are decent I'll re-use them, or just replace them if not. Backlash is a pitch perfect 6.5/1000ths, pattern is excellent.
-
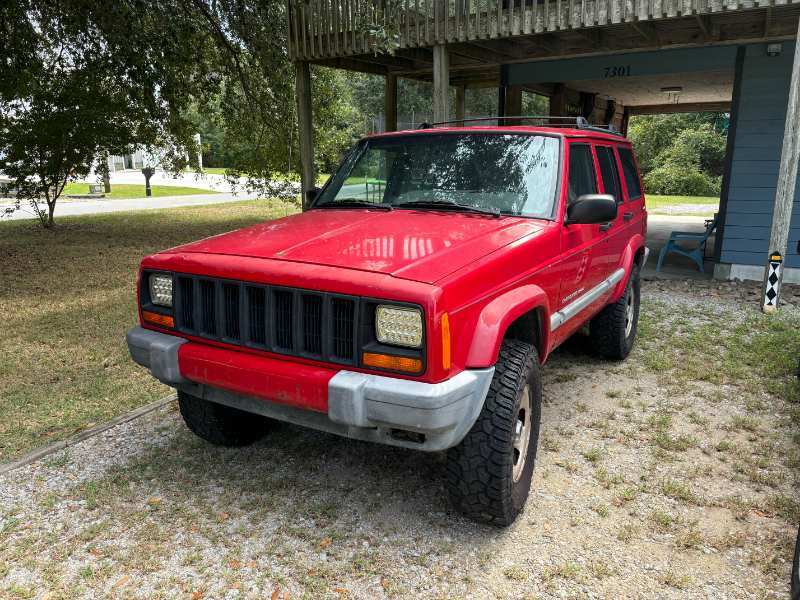
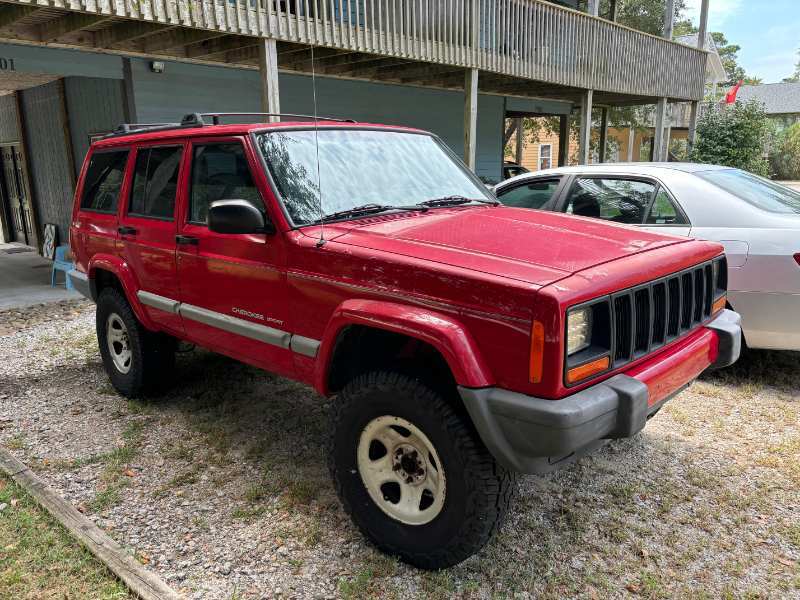
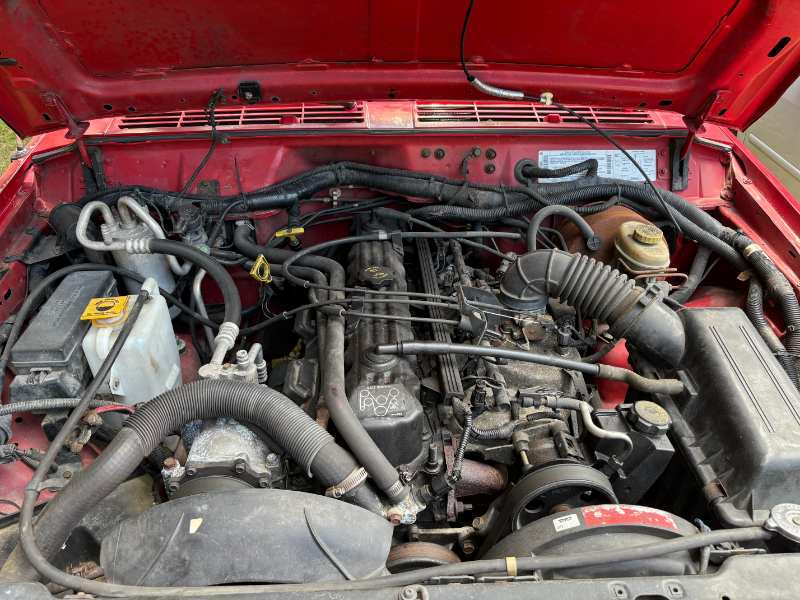
A family member has been wanting something to drive on the beach during the fall/ winter months, when it's allowed by permit. She's sent me a multitude of FB Marketplace ads for everything under the sun other than something Jeep. One or two I was willing to look at but they sold quicker than I could get there to look them over. I'd said a few times "you just need to find a used Cherokee, it would be perfect." Her response every time was "Jeeps are junk." Then she drove my MJ back toward the end of August... and maybe Jeeps aren't junk after all. 2001 XJ Sport 4WD/ AW4 with a blown up Dana 35 - $1000.00. Engine was replaced in 2016, probably due to a cracked head/ ensuing issues.
-
I really like that you put original flares back on it. Just classier IMO. Gorgeous truck!
-
how many miles on your truck's factory engine?
Gojira94 replied to Pete M's topic in MJ Tech: Modification and Repairs
Original 2.5L... I contacted my state's Emissions Inspection Unit a while back to find out the last recorded mileage. Truck was last state inspected for safety only in 2017. At that time it had 267,142 miles. Got parked up not long after that and was never fired again. Towed to where I bought it from in 2021, and then towed to my house in 2022. It never moved after that, other than when it went 30 feet from the engine bay to a trailer. A guy came and got it to rebuild and put in a father-daughter XJ project in 2022. -
Weird exhaust Popping when decelerating
Gojira94 replied to Big_Mark's topic in MJ Tech: Modification and Repairs
You can probably get a part number from the side of the injector body. Bosch EV6 (skinny style) will start with 0 280 on one side and possibly an OEM (like Ford) part number on the opposite. Same with the EV1 (fat style). Hopefully zooming in with a smartphone camera will do the trick without having to pull any injectors. -
I got them from Dimar Motorsports through Ebay: https://www.ebay.com/itm/283645389229 Currently $126.00 Couldn't be happier with them.
-
Beware of knockoffs, especially on Amazon and EBay. The 700 and 746 likely haven’t been manufactured new for 20 years. There are a few outfits that sell reman/ flow matched sets, which would be what you want. Both 700 and 746 have been scarce for a while. I got a rebuilt set of these, they work great: 0280155702 | EV6 | Long | Jetronic |4-hole | 200cc/min | 16 Ohm (very dark grey)
-
Weird exhaust Popping when decelerating
Gojira94 replied to Big_Mark's topic in MJ Tech: Modification and Repairs
Our computers do have acceleration enrichment and deceleration enleanment routines. If the truck is running, the computer is working, and it hasn't changed. Foot off the gas, it's trying to reduce fuel and adding a little timing at the same time, as MAP is decreasing. Can you post the part number on one of the injectors? I can tell you if it's a good fit, or good and fat. -
Good quality/fitting door locks?
Gojira94 replied to OzarkGuy's topic in MJ Tech: Modification and Repairs
Comes with gaskets.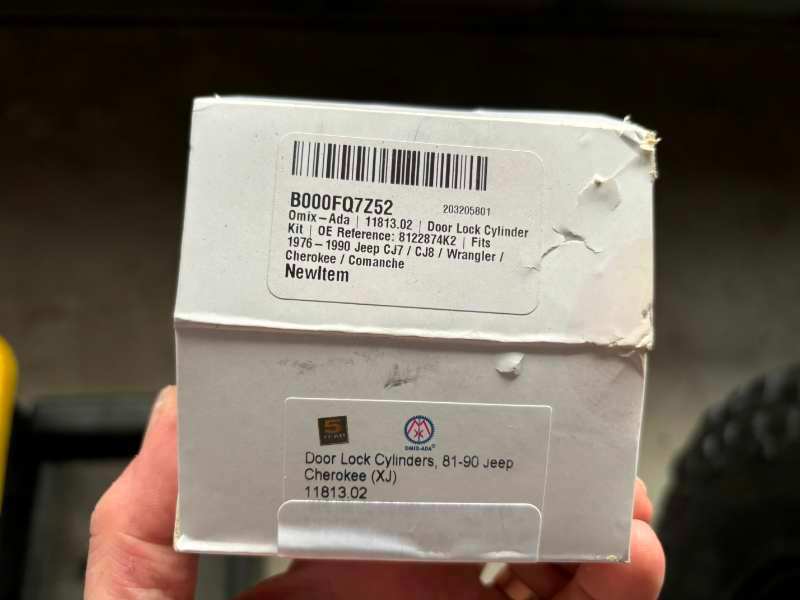
-
"Beavis, this is the coolest thing I have ever seen..." Price point is about what I would have expected. Very nicely crafted piece.
-
1986 2.5L to 3.4L: Amateur Hour
Gojira94 replied to FigurativeGarbage's topic in Member Projects: Your Comanches
You said you'd rather avoid tuning if possible, but there is a flag in the V8 and V6 F-Body calibrations that enables or disables all configured parameters for auto trans. This screen shot is from TunerPro RT, showing a factory calibration for a '94 LT1/ auto. With TunerPro, the L32 V6 datastream definitions (.adx) for logging are easy to find, but the .bin definition files (.xdf) are a bit harder to come by. TunerCat is a good product, I wouldn't hesitate to recommend it if you decided to pursue some edits in your PCM calibration to solve some issues. Point being you can do things that would remove some headaches.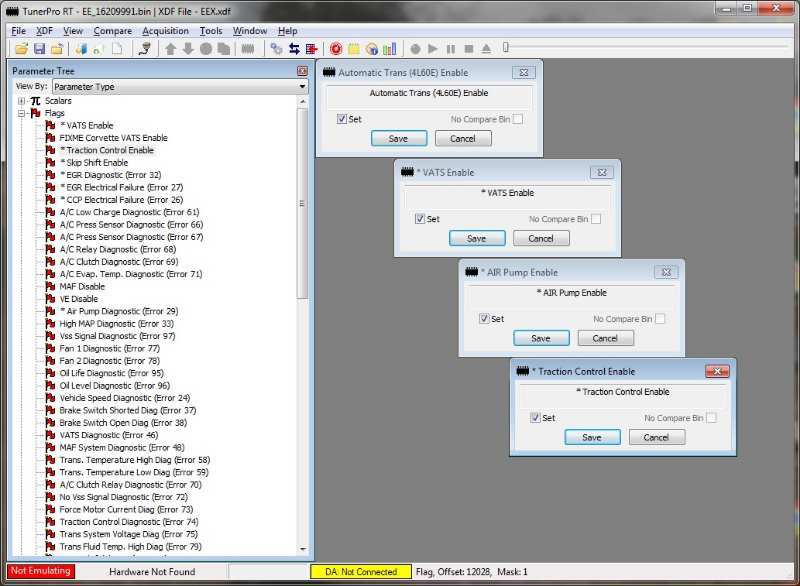
-
Adding 94-96 XJ A/C to 87-90 MJ - Slow Thread
Gojira94 replied to Gojira94's topic in MJ Tech: DIY Projects and Write-Ups
The receiver-drier part number is the same for years 94-96, 4797002. If you have an HO-era set of engine mount brackets, you'll have this stud to mount it: 87-93 this may be exactly the same, as the receiver-drier is located in more or less the same place. Heck, the bracket may be the same from 87-01, I just don't have an older one for reference...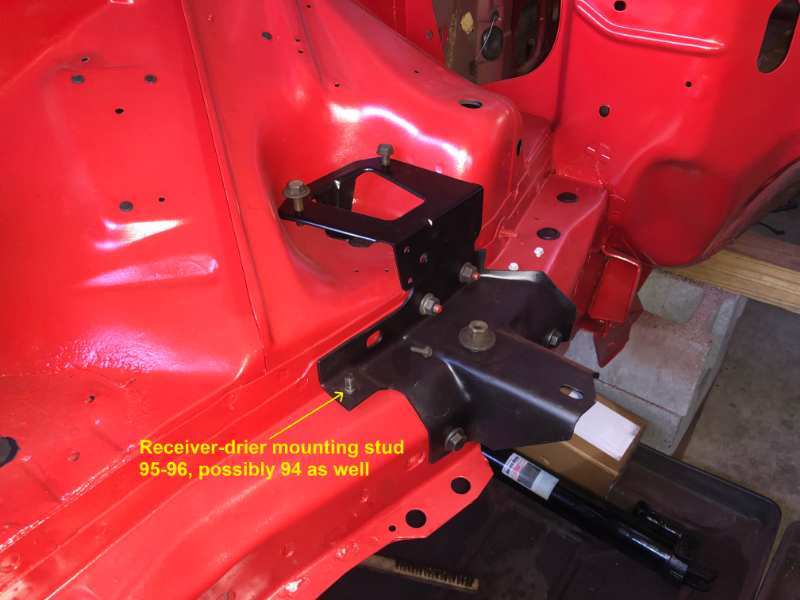
-
Adding 94-96 XJ A/C to 87-90 MJ - Slow Thread
Gojira94 replied to Gojira94's topic in MJ Tech: DIY Projects and Write-Ups
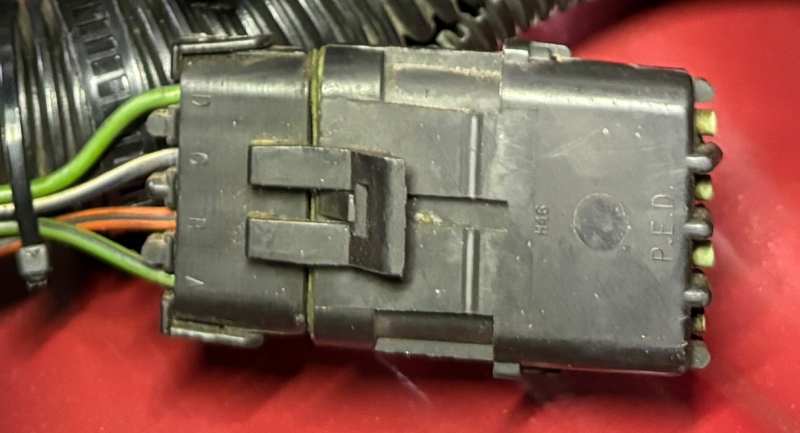
I should go back and explain the source of this connector that will be going into the Dealer Installed A/C connector: I took both sides of C109 from one of the roughest 88 XJs I've seen in the boneyard in quite a while. I took a pin out of one side to add the missing pin C on my C109. I used the other side to make this. These colors do NOT match what would have been on the Dealer harness or have any meaning whatsoever. They're just the right AWG in the right places and attached to the right things. The Dealer Installed A/C pins' AWG (engine harness side) for C117 are as follows: D - 16AWG - LT GRN C - 18AWG - BLU W/TRC B - 14AWG - ORN/BLK A - 16AWG - LT GRN W/TRC On my homemade connector in the first picture above, I swapped the orange and blue/black pins on B / C, as the blue/black is 18AWG on C109. The orange w/ trace wire on my pin B is 16AWG, not 14AWG per the wiring manuals. That should be no issue, as its job/ current draw is simply to energize a relay on pin 85 (150-200mA). 16AWG has a capacity of 10-13A continuous, short duration up to 15-18A, so a minute fraction of that is fine. 200mA is 1.5% - 2% load vs a wire capacity of 10-13A continuous. Speaking of wire gauge and load, the wire to the compressor will technically only need to be 16AWG as well. The 87-90 Sanden SD-508 draws 2.5A - 4.0A, and the 96 SD-709 draws 3.5A - 4.5A. However, I'll be making the long wire runs for low pressure switch and compressor with 14AWG anyway against voltage drop on runs of more than 7 feet.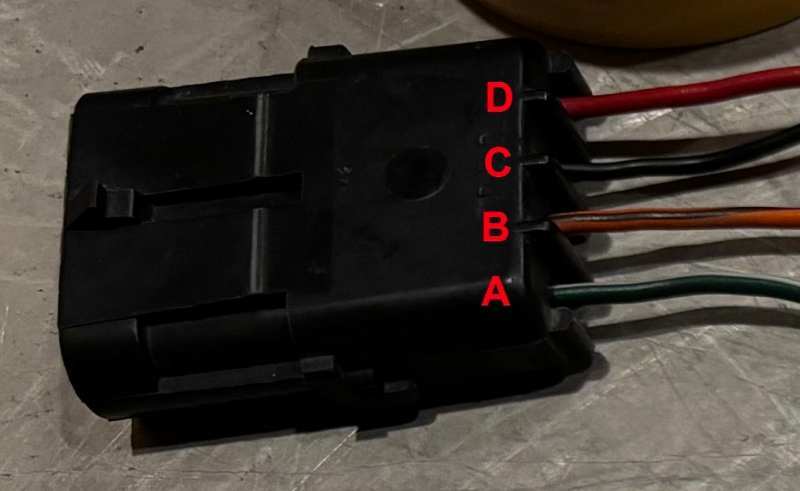
-
Adding 94-96 XJ A/C to 87-90 MJ - Slow Thread
Gojira94 replied to Gojira94's topic in MJ Tech: DIY Projects and Write-Ups
Diode, cooling fan and compressor clutch wiring: I did not have the Heavy Duty Cooling option, so I wired in a relay for fan control, copying the factory setup. I'm already using a Renix-era radiator mounted temp switch. To get switched 12V for the relay like factory I tapped into the 14AWG yellow wire from C100 pin B6, behind the LH headlamp. The yellow wire from the diode/ temp switch connector assembly (C243 Pin B) will go here. I'm replacing the temp switch connector I originally installed with the one in the diode harness I harvested. Diode pin B to cooling fan relay pin 85: The remaining diode pin A will be tied to A/C Clutch Relay pin 30 with a short section of wire along the LH inner fender (since I'm situating the A/C Clutch relay very close to the Dealer Installed A/C connector). At the end shown in the picture below left, I'm splicing a wire over to a second splice near power distribution, along the RH inner fender, joining C109 pin C and a single wire for compressor C309: So the section of my harness going across the nose of the rig behind the header panel will have 3 wires in it - 1 orange wire to feed a splice on the other side for C109 pin C and compressor C309, plus 2 green wires for the pressure switch connector C239.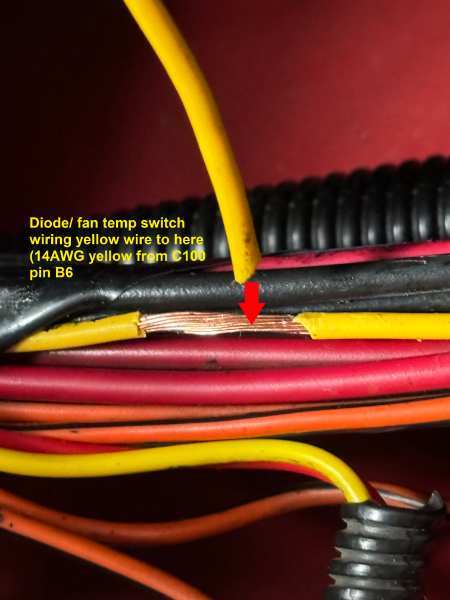
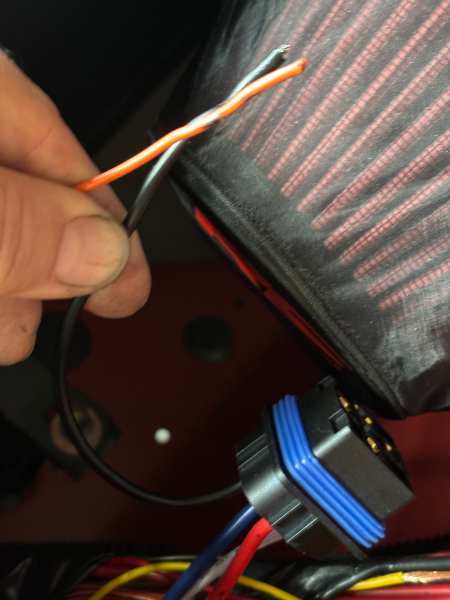
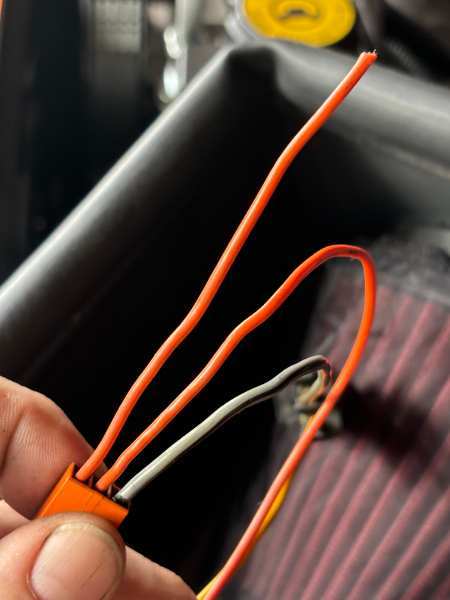
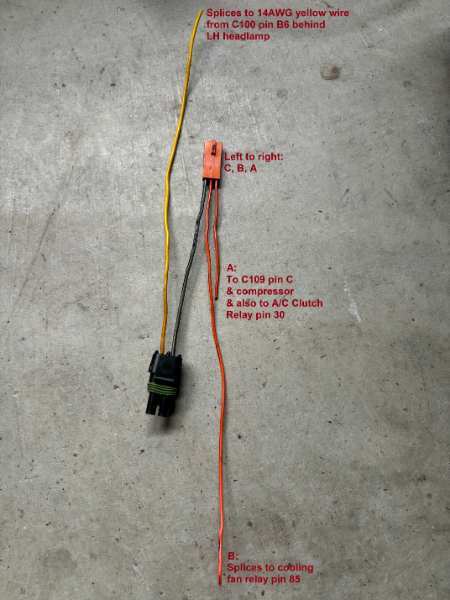
-
Adding 94-96 XJ A/C to 87-90 MJ - Slow Thread
Gojira94 replied to Gojira94's topic in MJ Tech: DIY Projects and Write-Ups
Making the harness - first steps. The assumption is that the relay will be mounted on the inner fender well immediately aft of the washer bottle, or strapped to the engine harness with the Dealer Installed A/C connector. Since I've done the 97-01 washer tank conversion, I'm mounting on the inner fender well. 5-pin relay is as follows: 85 - to pin B of Dealer Installed A/C connector 86 - to pin C of Dealer Installed A/C connector 87 - to pin D of Dealer Installed A/C connector 87a - directly to G106, tucked into engine harness loom 30 - join diode pin A behind LH headlamp assembly, extend through engine harness to C109 pin C and compressor clutch connector C309 To handle the A/C low pressure switch connection, the Dealer Installed A/C connector pin A needs to run to C239 pin 2, at the switch on the receiver-drier. Low pressure switch pin 1 needs to run back to the A/C relay on pin 87. Since I'm running a 1996-copy plumbing setup, my drier will be just below and outboard of the compressor. That means running a wire to, and back from this location, or tying C239 pin 1 into the LT GRN wire just upstream of C103 (upstream = in the direction of C100) for the return path to relay pin 87. The same applies if you're running an earlier setup, the length of wires needed to make the run(s) will be the only difference.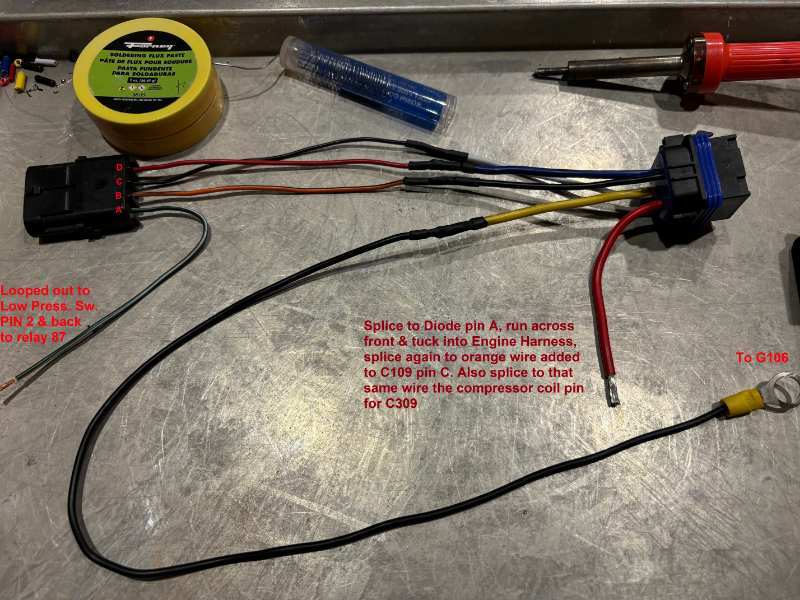
-
Adding 94-96 XJ A/C to 87-90 MJ - Slow Thread
Gojira94 replied to Gojira94's topic in MJ Tech: DIY Projects and Write-Ups
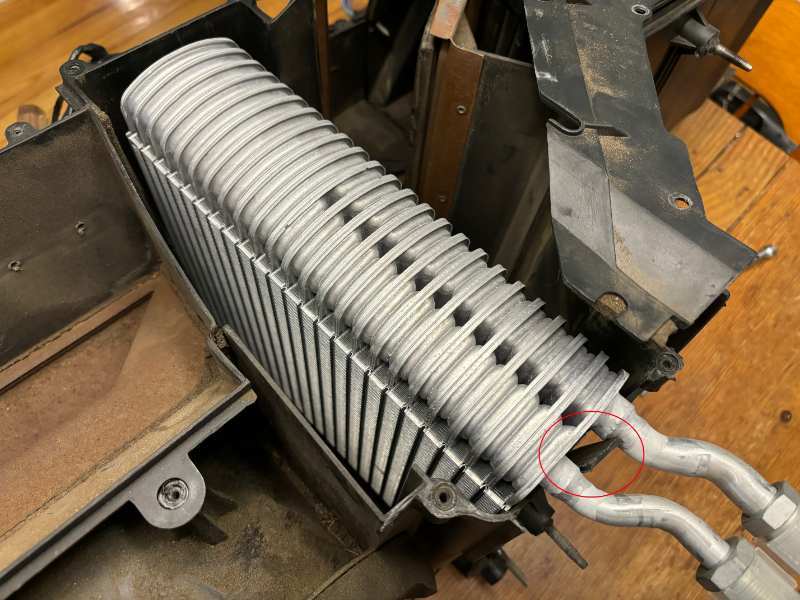
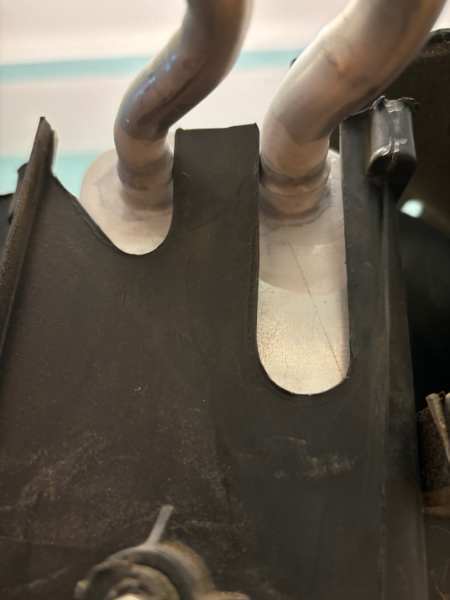
This is the spot that needs to be stretched just a bit for a 94-96 evaporator: Then the fitment is pretty good. But the evaporator lines may need some room on the firewall side of the box. I trimmed a bit: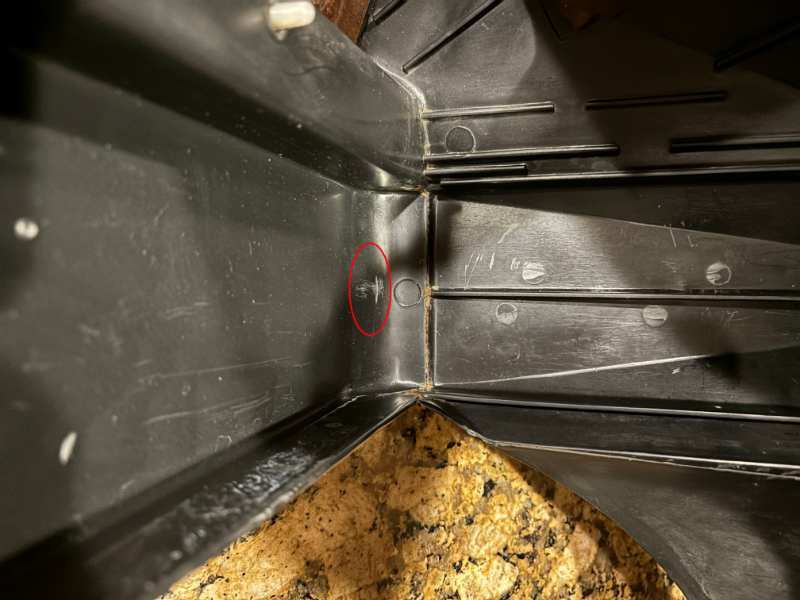
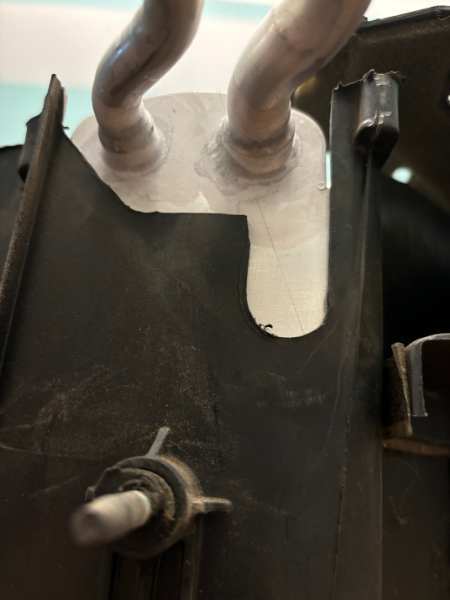
-
Adding 94-96 XJ A/C to 87-90 MJ - Slow Thread
Gojira94 replied to Gojira94's topic in MJ Tech: DIY Projects and Write-Ups
Yessir, and thank you! I am indeed aiming for a 94.5-96 year setup with native R134a. Since I'm fortunate to have the Dealer-Install connector on my Engine Harness, the only hurdles are: massaging the 96 evaporator into the Renix HVAC box. The rear bottom corner of the HVAC box (opposite from firewall side) has a radius and needs to be squared a bit for that end to sit low enough. Unmodified it's about 1/4" too high on that end. I used a heat gun and a long socket extension as a finger to make the clearance, so that's done. Make a {relay/ AC clutch turn-on/ low pressure switch/ fan diode} harness for the system. Interesting that dealer installed systems had a harness that looks like it locates the relay somewhere near the dealer harness connector near the factory washer tank, most likely. The compressor coil grounds through the compressor body/ A/C bracket on the engine, so that's the ultimate destination for pin 30 for the relay setup. I already have the diode and its 3 wires. I also already made and installed a factory clone of the fan relay and switch setup during the original build. I will have to run a wire from the diode C245 pin A, making a splice to go to C109 pin C, relay pin 30 and the 96 version of C309 at the compressor. I made an updated diagram for the dealer installed connector for the 4.0, as I realized the ones in all the manuals are for a 2.5: