
Gojira94
-
Posts
718 -
Joined
-
Last visited
Content Type
Profiles
Forums
Gallery
Everything posted by Gojira94
-
If you have Prime, this is a fun little show from around 2017. A couple of English guys buying cars for under 1000 pounds and re-selling with a 5-day turnaround. Season 1, Episode 3 1993 Volvo 480 SE (Renix Volvo) Punchline delivered at 19:30...
-

MayDay!! - Hard Accel Killed Idle
Gojira94 replied to AnotherOldJeepGuy's topic in MJ Tech: Modification and Repairs
In general, no. We're having you go through and check things to work backward to the cause. At a high level, running rich on an EFI system has 3 causes: 1) too much fuel pressure or faulty injectors leaking/ delivering more fuel than designed/ intended 2) extra air getting in somewhere that's not accounted for by the computer - the O2 sensor then sees a lean condition and the computer commands more fuel to compensate 3) Inadequate spark to burn the fuel delivered -
MayDay!! - Hard Accel Killed Idle
Gojira94 replied to AnotherOldJeepGuy's topic in MJ Tech: Modification and Repairs
One more thing - pull the distributor cap if you haven't yet. Leave the wires on it, and have a look at the rotor and the cap contacts. And try to rotate the rotor by hand. It should have a really tiny bit of wiggle to it but not a lot. -
MayDay!! - Hard Accel Killed Idle
Gojira94 replied to AnotherOldJeepGuy's topic in MJ Tech: Modification and Repairs
Fuel pressure is fine, not an issue. A piece of hose and a bolt is a time-honored method of plugging a vacuum port lol. I'd say leave that in place for now while troubleshooting continues. There are plenty of places for vacuum lines to crack near the vacuum tank and the check valves may not be healthy enough to hold vacuum. Once the issue is solved, you'll want to investigate and patch up any other other vacuum line breaks, and see if the vacuum tank still holds. Maybe even get cruise control back... Meantime, I think you're on the right track to try to confirm a cracked exhaust manifold. And the O2 sensor may be dead or contributing to the issue if it's commanding more fuel if it's seeing what it thinks is a lean condition from cracked manifold. When you turn the key on prior to engine start, do you see the 'Check Engine' lamp light up during the lamp check? I wonder if the bulb might be burned out and would otherwise be illuminated. I'm willing to loan you my REM, I don't have any immediate need for it. PM me with info and I'll mail it to you. I'm still concerned about verifying spark/ spark timing. More so with the distributor indexing than anything else. The coil and module are working, at least. The coil can be tested for primary and secondary resistance easily enough with a meter while the module would require a DRB II. -
MayDay!! - Hard Accel Killed Idle
Gojira94 replied to AnotherOldJeepGuy's topic in MJ Tech: Modification and Repairs
Maybe disconnect the battery briefly before you drive, just to clear out the short and long-term fuel trims. Let it start from scratch figuring out fueling... -
If you're assembling everything off-vehicle you might try using the vent valve holes to sight-in locating the return pipe/ rubber foot into the raised round locator for it inside the tank. If you're on that for sure, you may need to slightly tweak your assembly to get it to line up. Usually once you get the foot in place you have a decent amount of wiggle to get the top plate lined up.
-
MayDay!! - Hard Accel Killed Idle
Gojira94 replied to AnotherOldJeepGuy's topic in MJ Tech: Modification and Repairs
My concern is there's a vacuum leak somewhere on the other end of that hose you pulled, and isolating the engine from that with a cap might make a difference. You'd temporarily lose HVAC controls (defrost-only mode) and any hope of cruise control working but it will help diagnosing driveability by eliminating a family of potential vacuum leaks. We do expect the fittings on the manifold themselves to be pulling vacuum. The idea is to work the throttle with that fitting capped. If it takes throttle and doesn't pop/ bog/ want to stall, then we're getting somewhere. -
MayDay!! - Hard Accel Killed Idle
Gojira94 replied to AnotherOldJeepGuy's topic in MJ Tech: Modification and Repairs
Let's take a stab at something that's been bugging me. The main vacuum feed for HVAC, CAD, cruise and vacuum tank. Anything downstream of that could introduce a really big vacuum leak you wouldn't detect spritzing water or starting fluid around the intake. Put a vacuum cap on the fitting circled in red and see if it makes a huge difference. Call it a 'slaps forehead and exclaims "I coulda had a V8!" moment.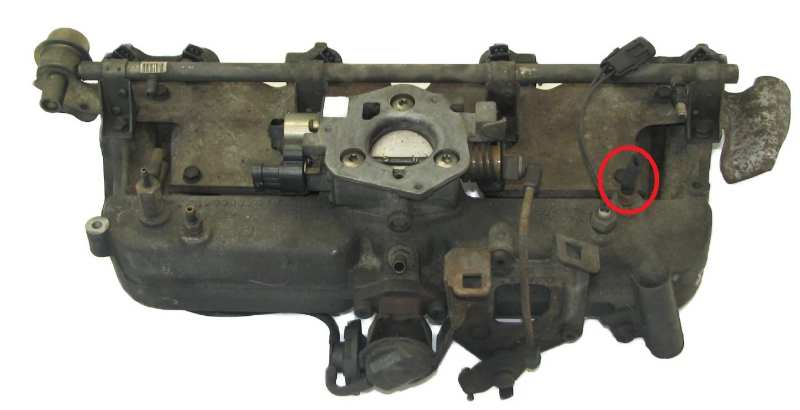
-
MayDay!! - Hard Accel Killed Idle
Gojira94 replied to AnotherOldJeepGuy's topic in MJ Tech: Modification and Repairs
Poor fuel mileage, hesitation or backfire/ pop on acceleration, lack of crisp throttle response, sooty/ fouled spark plugs, shortened O2 sensor life, fuel poisoning of the converter, running cooler (or hotter) than normal, fuel contamination of the oil (washes the rings, accelerates cylinder wear), dramatic increase in HCs and raw fuel smell in the exhaust, to name a few... -
MayDay!! - Hard Accel Killed Idle
Gojira94 replied to AnotherOldJeepGuy's topic in MJ Tech: Modification and Repairs
That's for lower pressure, 4-12psi (carbs). This one ($29.99) would work: https://www.harborfreight.com/fuel-injection-pump-tester-58760.html -
MayDay!! - Hard Accel Killed Idle
Gojira94 replied to AnotherOldJeepGuy's topic in MJ Tech: Modification and Repairs
If the oil was getting heavily fuel contaminated, the dipstick would stink of raw gas. Sounds like you're ok there, so you likely don't have an 'internal' fuel leak making it dangerously rich. However, I agree with Porquer that the plugs show very rich/ sooty, with the ceramic insulator completely blackened. I'd still go ahead and see what your fuel pressure is with the ballast resistor both hooked up and bypassed, it's just good to know. Bad news is you're definitely over-fueling, likely something with an exhaust leak near the O2 sensor as stated previously. The increased loudness, even after a muffler change, indicates either your exhaust manifold is indeed cracked where you can't see it, or possibly the donut gasket to the downpipe is blown. Hard to say for sure on marginally ok spark timing possibly adding to the mix of woes, but let's set that aside for the moment until we know more about fuel/air. -
Thanks! I've already determined everything from switch to 'Speed Control Regulator' connector is good. Haven't tested the servo or regulator themselves yet.
-
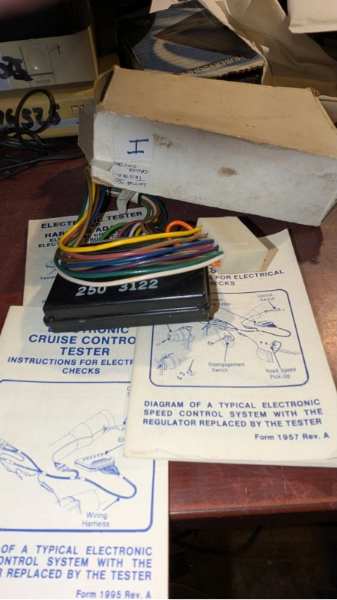
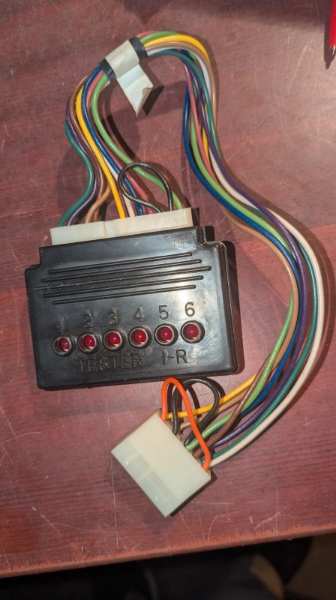
Yes! I saw a fuller description in another listing that was asking $325.00 for one: "Used Dana Electronic Cruise Control Tester. The Part #250-3122. This tester will test the cruise control and speed control. The tester comes with Harness Adapter. Dana Electronic cruise control tester, for systems supplied to car makers and aftermarket installation companies. Dana was the supplier of choice for several car manufactures, including Ford. They also supplied cruise control systems for aftermarket installations at many specialty shops and dealers. This electronics tester facilitates the testing of Dana systems with ease. The tester allows for proper calibration of the low speed setting as well as the accuracy. This tool is used with OBD 1 era and legacy cars."
-
1977 CJ-7 "Brown Betty"
Gojira94 replied to watchamakalit's topic in Member Projects: Other Cool Stuff
I really wanted a CJ when I was a kid in the 70s-early 80s. There's an EBay seller here in NC that has 258 and V8 NOS sealed in AMC/Jeep box cruise kits. Saw them when I was looking for a tester. Pricey, but here's one: https://www.ebay.com/itm/127844355284 -
I'm hoping the documentation will reveal what other vehicles are covered with the harness adapter, that will be interesting to know!
-
I just scored one on Ebay. $15.00 + $7.50 shipping Part #250-3122 / 59C-02425 / AM PC-1-R I'll do a writeup with it after it arrives, since I just started diagnosing a non-functional cruise system. I strongly suspect it's my brake switch adjustment but I saw this and thought it would add vintage fun to the equation.
-
MayDay!! - Hard Accel Killed Idle
Gojira94 replied to AnotherOldJeepGuy's topic in MJ Tech: Modification and Repairs
You should be able to rent a fuel pressure checker from your local parts house and return it for a full refund afterward. And... more homework if you're up to it... 1) Pull the oil dipstick and see how it smells. If it smells like raw fuel and the oil feels thin, we'll want to know that. 2) Pull the plugs and see if any look/ smell different from the rest. "Good" will have a white to light tan ceramic insulator, light deposit on the ground strap, possibly with a slight color change about 1/2 way up, very light and even black around the end where the threads are and clean center electrode. Some evidence of age-related oil deposits may be expected and not that big of a deal at the moment. 3) consider Cruiser54's distributor indexing tip at some point. Marginally set/ unknown ignition timing can compound driveability issues. -
Not Another Firebird Thread
Gojira94 replied to Tactical Bacon's topic in Member Projects: Other Cool Stuff
And you can have that dash for free. I’ll get some pics of it as soon as I can. -
Not Another Firebird Thread
Gojira94 replied to Tactical Bacon's topic in Member Projects: Other Cool Stuff
Oh right, dash and upper cover are different after 96… the dash is from a 94 or 95. -
MayDay!! - Hard Accel Killed Idle
Gojira94 replied to AnotherOldJeepGuy's topic in MJ Tech: Modification and Repairs
Check fuel pressure at the Schrader valve. Idling with the FPR vacuum attached it should be 31psi, minimum 28. With vacuum off the FPR and vacuum line capped with your thumb it should read 39psi, minimum 35-36. If you still have the fuel pump ballast resistor hooked up, make a shunt from 1/4” male spade connectors and a bit of 14ga or minimum 16ga to bypass it and see if your pressures improve after the test above. If they’re really low, the pump may be dying or the plumbing inside the tank may have an issue that’s weakening fuel flow. -
MayDay!! - Hard Accel Killed Idle
Gojira94 replied to AnotherOldJeepGuy's topic in MJ Tech: Modification and Repairs
More information gained, that's a good thing. I wouldn't worry too much about EGR for the moment. It's a closed cycle system and has no vacuum leaks, confirmed. The TPS finding is more telling. Potentiometers can develop dead spots and errant output. If you have a DVOM, you can check what it's doing - @NickInTimeFilms to the rescue again: -
MayDay!! - Hard Accel Killed Idle
Gojira94 replied to AnotherOldJeepGuy's topic in MJ Tech: Modification and Repairs
Yes, pull the vacuum line off of what you have in your pic and plug the line with your thumb.. Try it not running first, just in case it's leaking. If it is, the excess fuel would be drawn into the intake manifold by vacuum. -
MayDay!! - Hard Accel Killed Idle
Gojira94 replied to AnotherOldJeepGuy's topic in MJ Tech: Modification and Repairs
I think I'm in agreement with @Eagle_SX4 that you're over-fueling somehow. Whether cracked exhaust manifold with O2 seeing what it thinks is lean and adding fuel, or less likely but possible ruptured diaphragm in the fuel pressure regulator. If you pull the vacuum line off the FPR and plug it with your thumb (the line, not the regulator itself) normal response would be a dip in RPM/ slight bog as it started to chew on more fuel at 39-ish psi instead of 31-ish at idle. If there's no change, that would be a clue. If you are and have been over-fueling during all this adventure, the plugs would show evidence of fouling/ heavy soot and might even be a little wet. If over-fueling ends up being a big part of the issue, new plugs would be in order once the issue is solved. Not to give you more homework, but what kind of shape is the rest of your secondary ignition in (wires, cap, rotor)? Weak ignition parts exacerbate over-fueling conditions. -
MayDay!! - Hard Accel Killed Idle
Gojira94 replied to AnotherOldJeepGuy's topic in MJ Tech: Modification and Repairs
EGR operates at part-throttle conditions. Closed at idle and WOT. and that pop does sound like a backfire. Does the exhaust smell a little richer than it used to? And if you have someone do a quick rev like that for you while you stand at the tailpipe, do you hear it there? -
Not Another Firebird Thread
Gojira94 replied to Tactical Bacon's topic in Member Projects: Other Cool Stuff
I absolutely LOVE 4th Gen F-Bodies. I still have a few small and obscure parts that MIGHT help you out with ones missing/ destroyed. You can have any/ all of it for price of shipping. None of it large or heavy so shipping wold be cheap. I also have a complete (lower/ main) dash you're welcome to. Some idiot put 4 screw holes in it to hold a tach light but no other blemishes. At one time I had 2 94 Formulas. Green one was to replace the 93 I sold during hard times, with 62,000 miles. I still have that one with 77,000 miles on it. It's highly modified, stock-looking green M6 hardtop. The other was a red A4 hardtop that I was building a drag car out of. That project got de-funded when my girlfriend got pregnant and we got married in 2011, but I couldn't have asked for a better trade there! One piece I have that you might really like is an LS1 F-body ram air setup. It's been a long time since I was in the LTx/LSx scene daily and I don't recall the exact steps needed to use the LS1 induction on an LT1 ram air hood but it's not much. Give you a functional ram air setup for that hood... and if Cookeville isn't too far from you, you can hit up Volunteer Muffler for some true duals if you're in the mood for long tube headers to make it worth it.