Parei_doll_ia
-
Posts
200 -
Joined
-
Last visited
Content Type
Profiles
Forums
Gallery
Everything posted by Parei_doll_ia
-
Grabber Blue Eliminator
Parei_doll_ia replied to Parei_doll_ia's topic in Member Projects: Your Comanches
Yup, with a few mods/enclosure, etc. Mostly to reliably print ABS. Still haven't tried nylon though -
Grabber Blue Eliminator
Parei_doll_ia replied to Parei_doll_ia's topic in Member Projects: Your Comanches
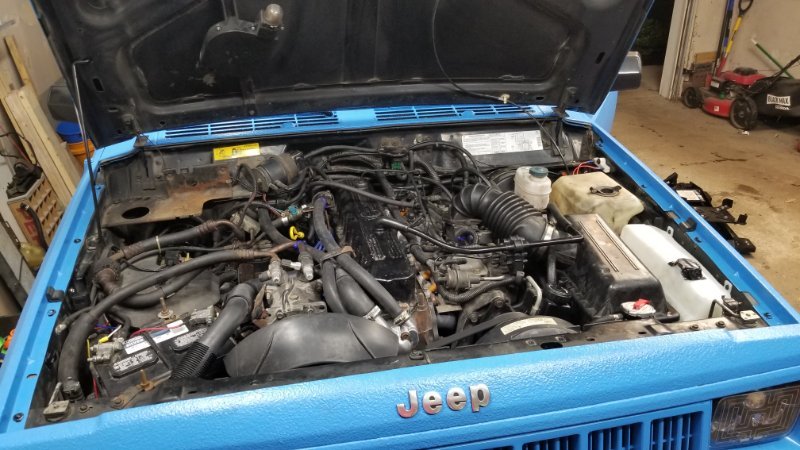
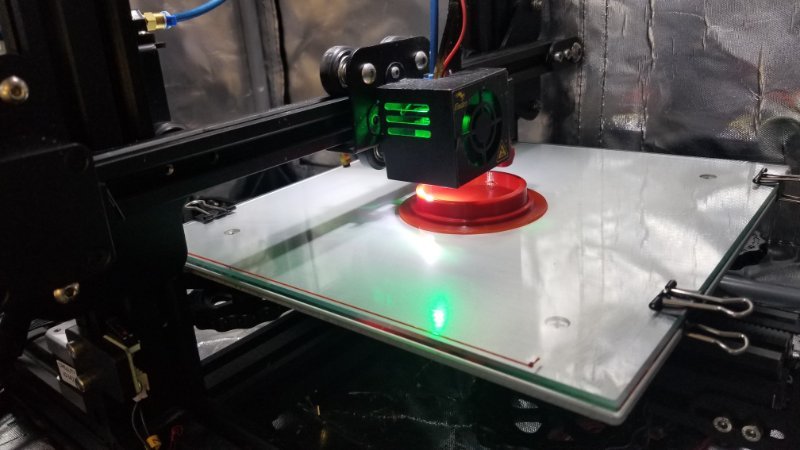
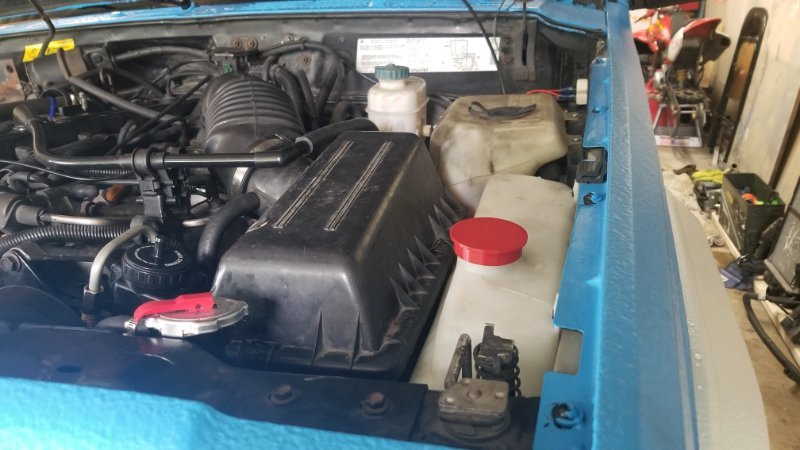
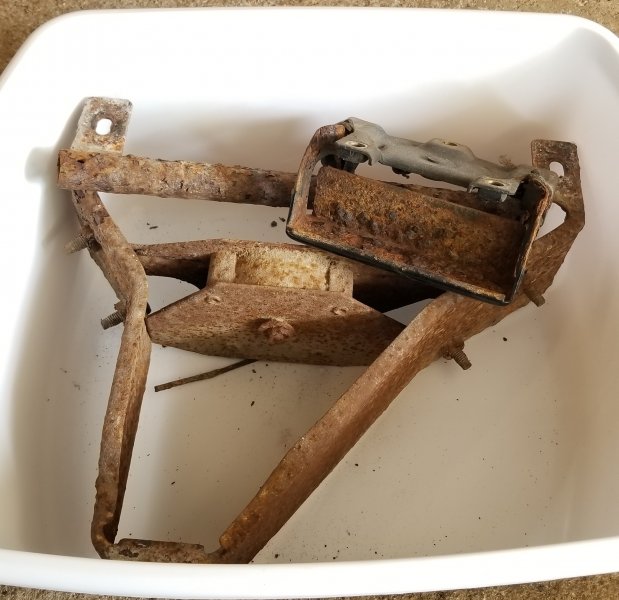
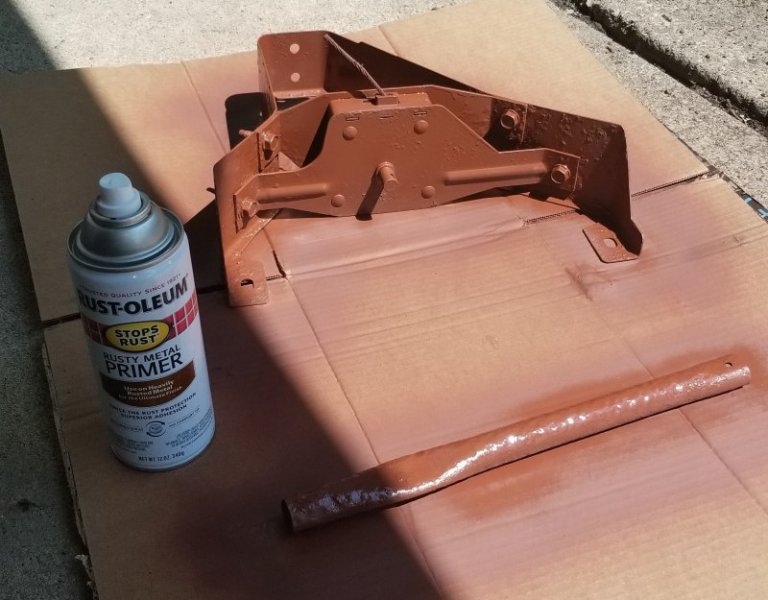
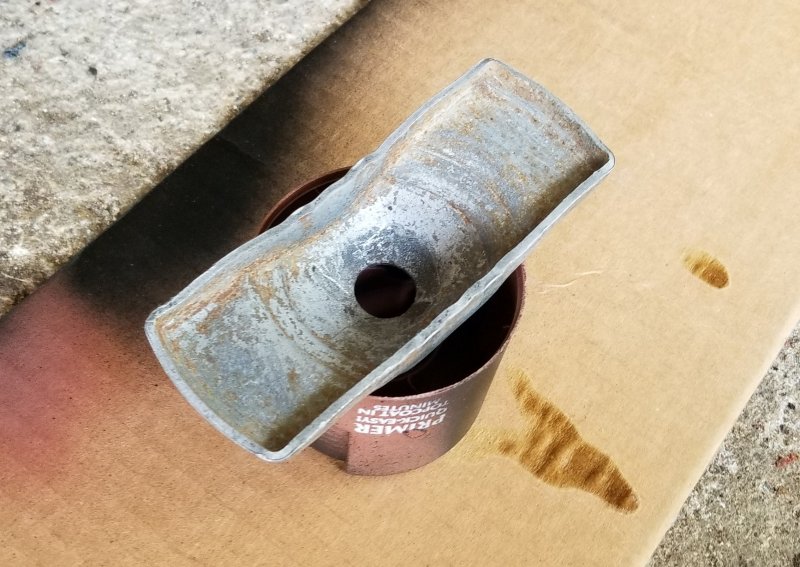
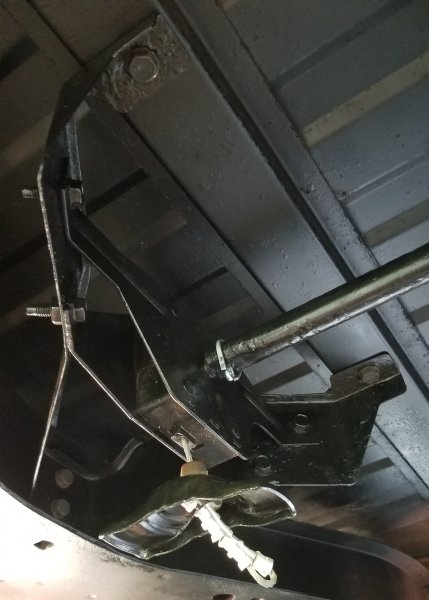
This month's project: the entire cooling system, O2 sensor, engine/trans mounts, trans cooler lines, and the PS lines. I switched it to an open system with a CSF 2671 radiator, Flowkooler pump, and a 2.5L reservoir. I spent a good week flushing everything out, starting with some Blue Devil stuff from the parts store, then I put some Evaporust in and drove the truck for a couple days. That stuff came out black, and I was getting chunks out while flushing. Once I got towards the end I realized that running it with straight water was just flash rusting it, and took everything apart. I relocated the fuel pump resistor and EGR solenoid to behind the washer reservoir, and removed the fan relay in order to fit the res (and the radiator doesn't have a bung for the switch). It's a tight fit, but I finally found an orientation for the rectangular plug that made it fit. The fan is now controlled by my REM, with a relay next to the battery. There are no caps anywhere to be found on the internet for the 2.5 res, so I spent maybe 5 minutes in Solidworks to recreate one and printed it out. Before it pretty much always ran over 210-220 on the REM, now it sits right at 195 [After driving it it did not]. Next is putting the Viair 450C that I have on a portable setup for airing up my car's tires for autocross on the now unused shelf where the reservoir used to be. [Won't fit]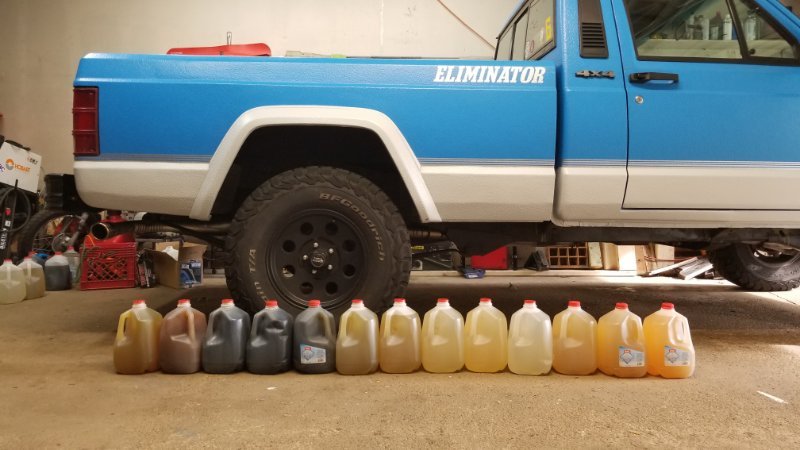
-
Bed liner paint job.
Parei_doll_ia replied to WVpioneer_88's topic in MJ Tech: Modification and Repairs
Monstaliner, body shops wanted too much for normal paint and I did it myself without a compressor.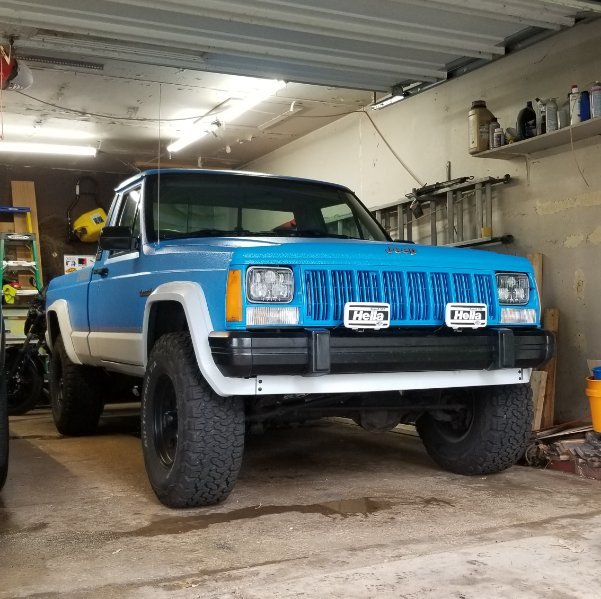
-
Where to Locate Air Compressor..
Parei_doll_ia replied to GrizzzzBear's topic in MJ Tech: Modification and Repairs
I have a Viair 450c that I've had bolted to a plate to be portable for autocross use (with my car), and I'm planning on putting it on the shelf where the closed coolant reservoir is once I put the new rad/2.5L reservoir in soon. I'll probably have to put the tank under the fwd part of the bed above the muffler. -
I found a stock radio in the JY a while back and put it back in, then I found a Chaos AD cassette on ebay for pretty cheap. This song kind of relates to current events:
-
Exhaust Manifold Stud Size
Parei_doll_ia replied to WahooSteeler's topic in MJ Tech: Modification and Repairs
Good luck getting it out. I broke an extractor and ended up spending 6 hours grinding the one by #1 out with a Dremel and then using a helicoil. -
Windscreen replacement
Parei_doll_ia replied to Aussiemj's topic in MJ Tech: Modification and Repairs
I put the 94+ rubber in, but I didn't realize that the old channels are deeper. The guy who installed my glass was talking about it while he installed it, he put a larger bead under it so it's less noticeable, but does still look like the trim is somewhat sunken in. There should be enough room with the pins, but a couple of mine had to be removed anyways bc of rust. Have them just remove it one day, fix the rust properly (there more than likely will be rust) then call them to install later. -
How loud is your MJ?
Parei_doll_ia replied to Far McKon's topic in MJ Tech: Modification and Repairs
Before I fixed the rust- very loud, mostly from where the windshield channel rusted on the bottom and bad floor repairs from the PO. After- pretty quiet, not as quiet as my VW but good for a Jeep. I have a Flowmaster delta 70 with a resonator in it that helps too. Take the carpet out and look for holes. -
91+ has a different output shaft, you would need a 91+ transfer case
-
5.25" BS is equal to a +32mm offset on a 7" wheel. Offset is just the number normally used on the car side of things
-
Hood light repair?
Parei_doll_ia replied to eaglescout526's topic in MJ Tech: Modification and Repairs
It's a pretty simple mechanism, I've done it a couple times because it keeps getting stuck. I replaced the rivets with small bolts. I just don't pull it out anymore. -
Grabber Blue Eliminator
Parei_doll_ia replied to Parei_doll_ia's topic in Member Projects: Your Comanches
Thanks. Yeah, I just haven't had time to deal with them yet. CC worked after I bought the truck, but then quit a couple weeks after I put a WJ booster in. They're not high on my priorities though. I was the same way about using bedliner, but wasn't about to spend 8-10k for a paintjob, and I figured it's way better than a Macco job. -
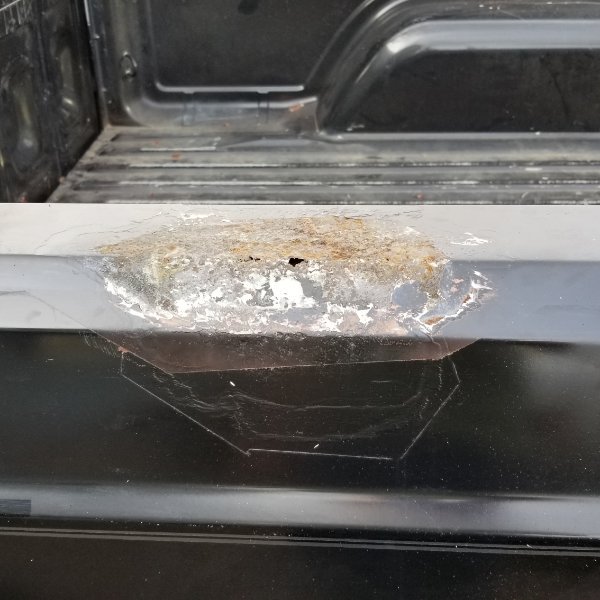
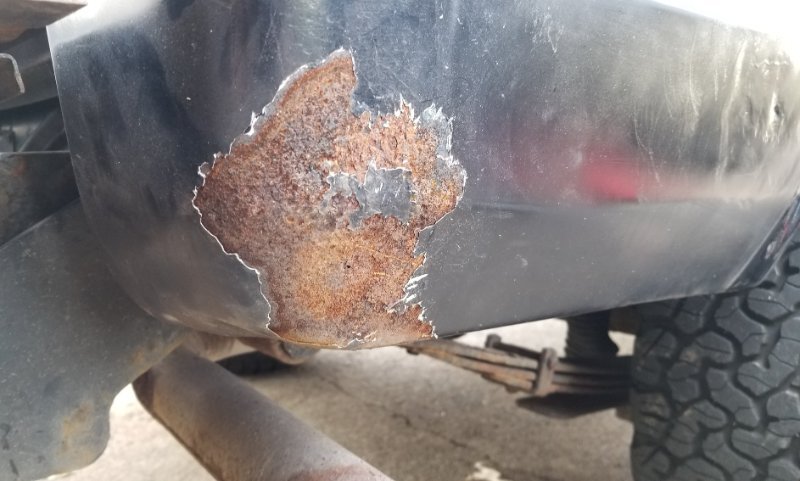
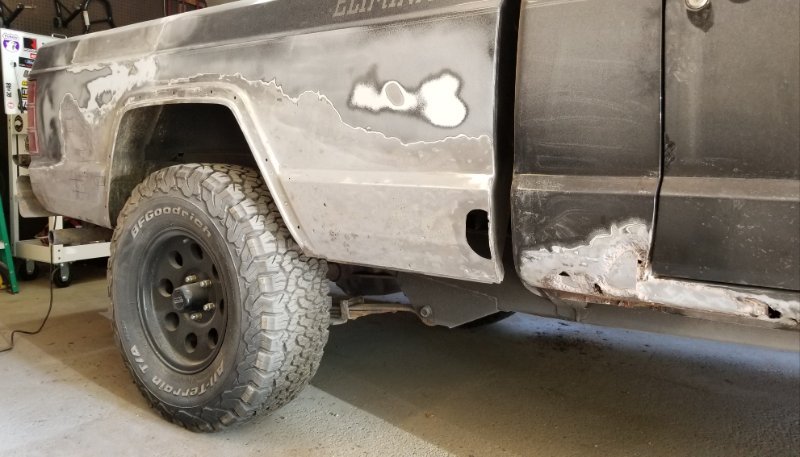
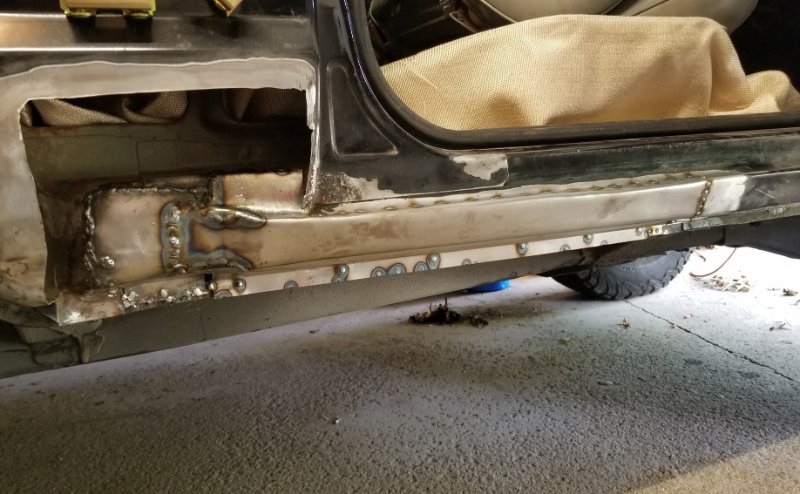
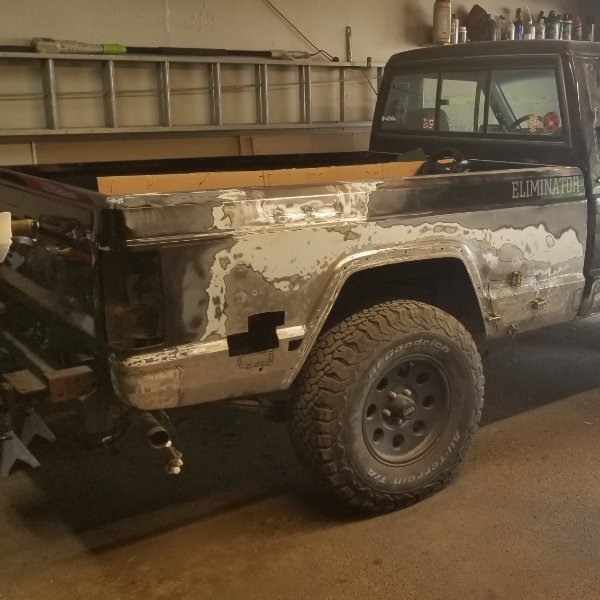
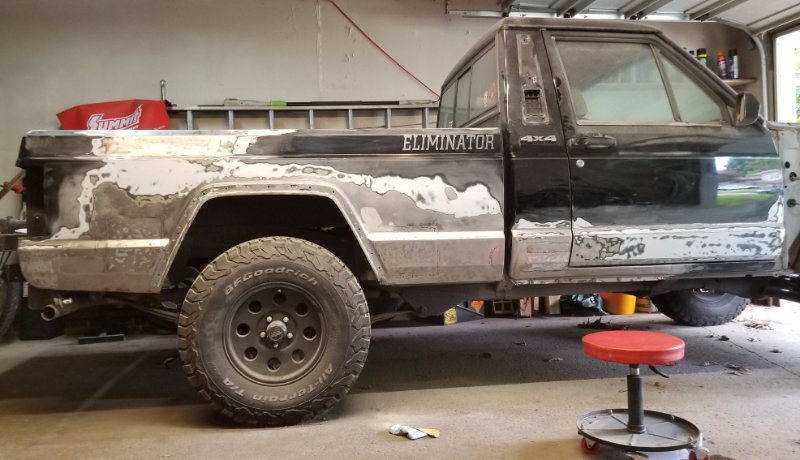
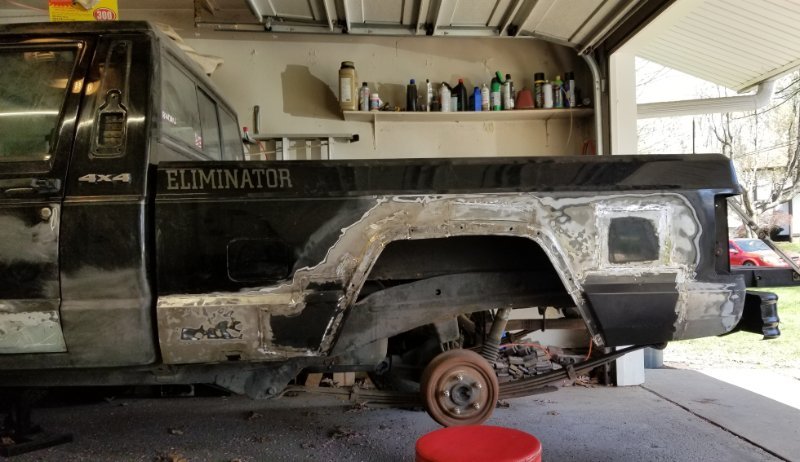
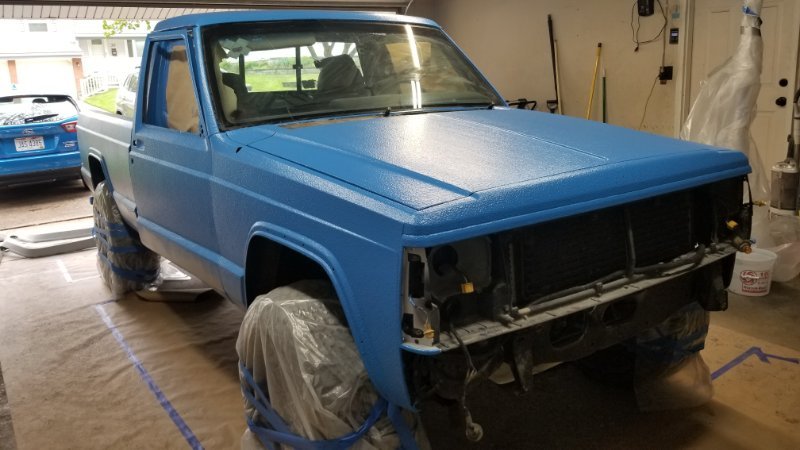
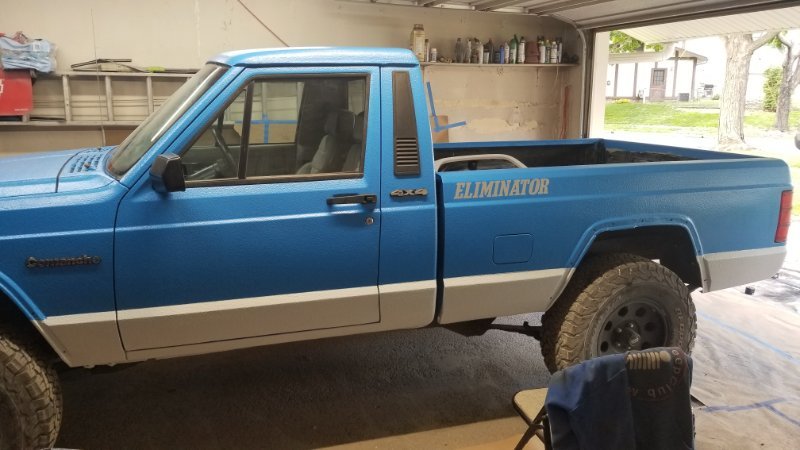
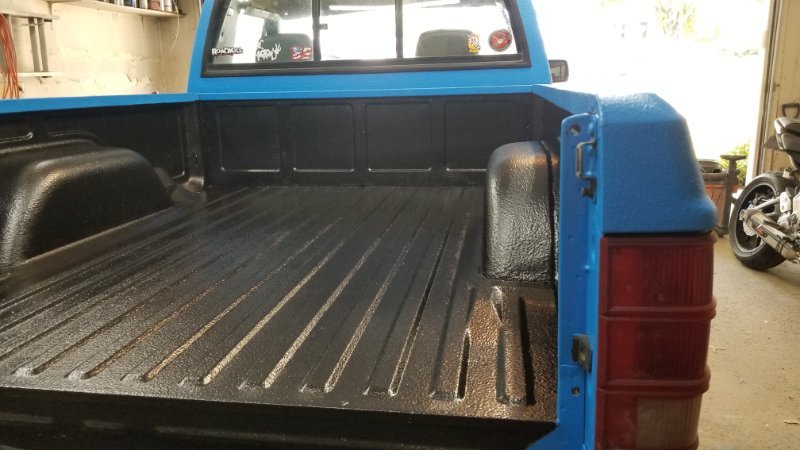
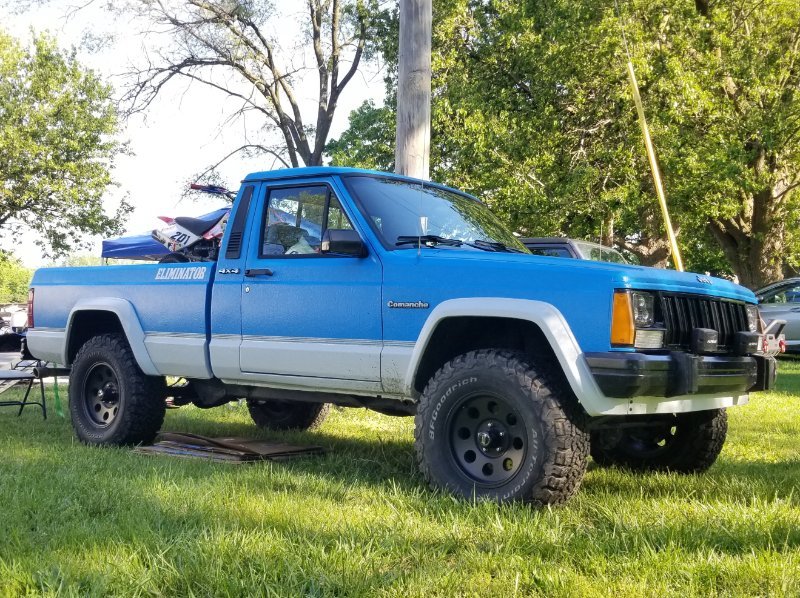
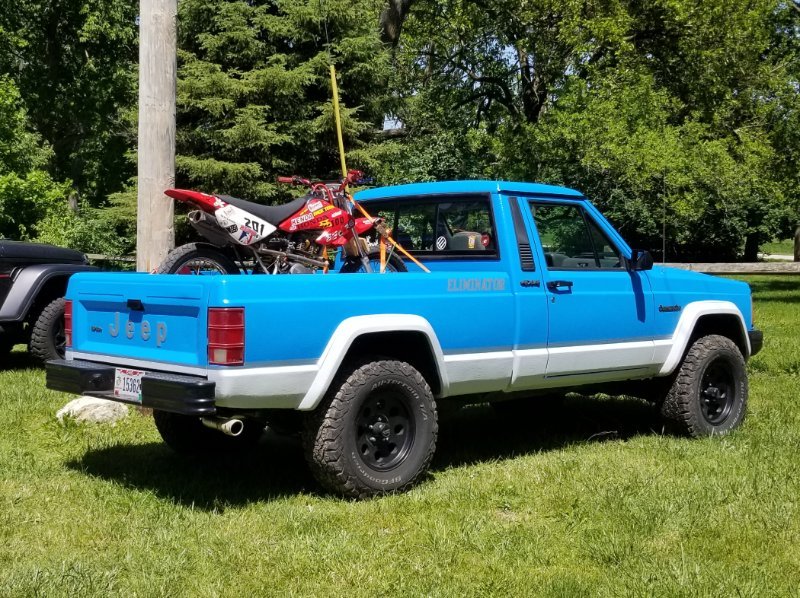
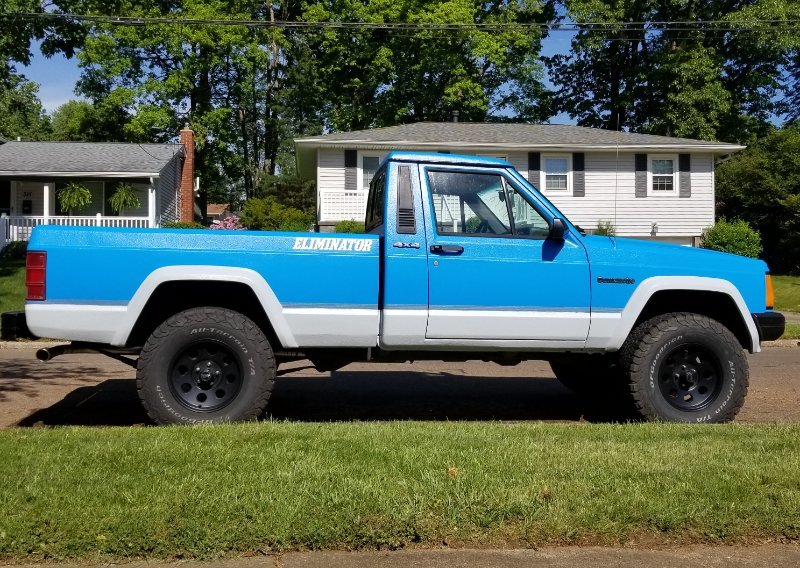
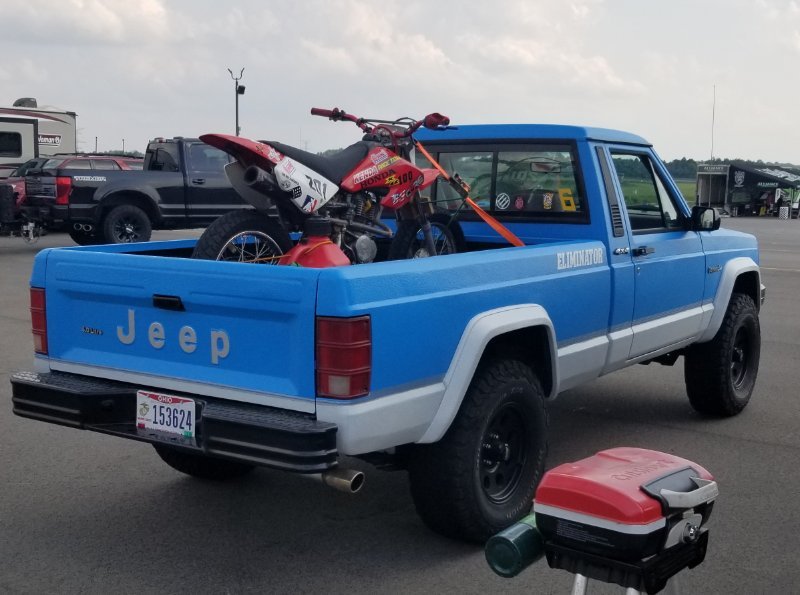
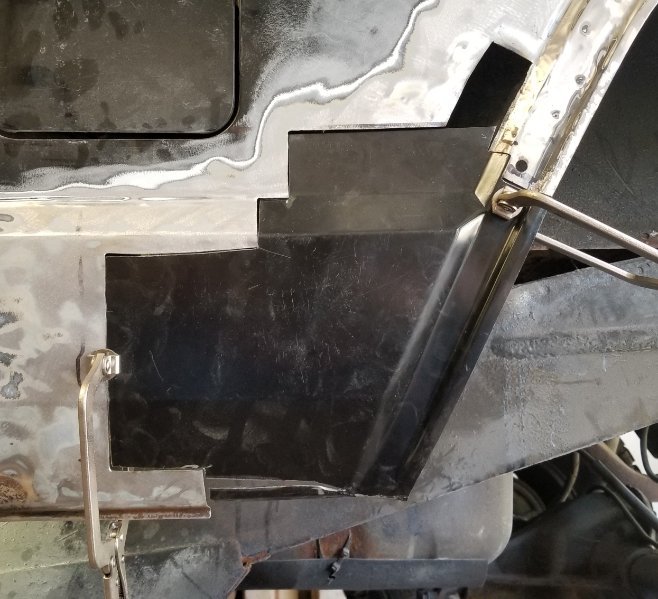
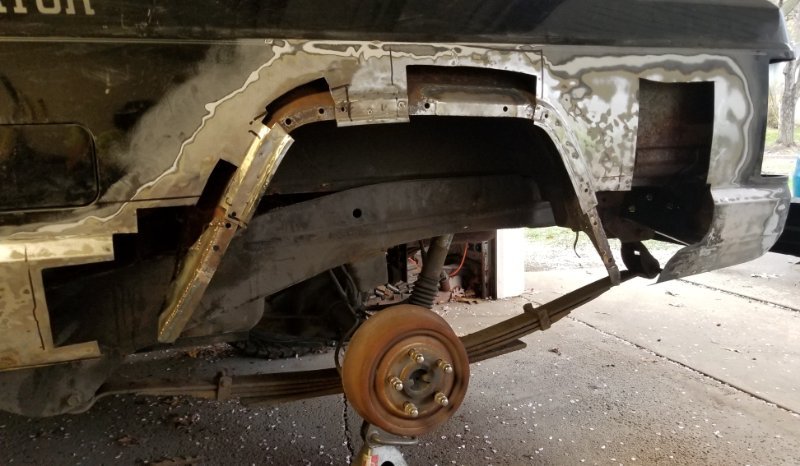
I finally finished this a month ago, but here's some pictures from replacing the rust in my MJ. The body count stands at 7 XJs, 1 MJ. It didn't look too bad before I started, but I had bought a TDI to replace the MJ for daily duty, and decided to start tackling the rust during quarantine. Taking the paint and bondo off, but mostly bondo: I started with the bed rail, and the spots in the bedside and the rocker. Summit only had a driver side rocker for an XJ, so I cut it up to make it work, and replaced what I needed to. I found a 89 in the Pullapart in Indy last summer, so I drove 6 hours there to cut parts out of it. Was able to get enough to work out the cab corner and the bed corner. Got the passenger side done, then the floors. I started to get rid of the bondo on the driver side just before winter started. Once it got warm again, I fixed the driver side. I couldn't find a Comanche wheel arch anywhere, but I was able to make 2 XJ quarter panels work by pie cutting the angled part from the passenger panel and making it flat for the fwd driver side. It is narrower, but I was able to make the fender fit with some persuasion. I also fabricated some pieces of the inner fender on this side. Got everything done, and started doing some of the bodywork, along with JY fenders I found that were mint. About this time was when I started going around to body shops and they all wanted way more than I was prepared to spend. They probably didn't want to deal with it. This brought me to the idea of bedlining it. The good thing about bedliner is that it hides a lot, so I really only went to 120/180 grit to get the bodywork close enough. I rolled Monstaliner's primer on shortly after this, then color matched jamb paint. Then I started with Grabber, since tintable Monstaliner has a specific dry/recoat time and it worked out better than starting with the bed like I was planning to. Then it was the Gray Matter stripe along the bottom and the Eliminator stickers once it dried for a few days. I put the 4 pinstripes a little lower than they're supposed to to help hide the little bit of a jagged line that I got when I pulled off the tape. The tintable stuff dries very fast compared to the black and it makes it hard to get a clean line with the extra time rolling takes compared to spraying. I would definitely spray if I were to do this again, but I didn't have the compressor for it. Then finally the bed after a week or two. And now it's done, until I decide to do the axles. Honestly now that it's done, I like the bedliner better. (And I was tired of only owning black vehicles) I'm also not going to sell this now, as that was originally my plan since I graduate this coming May, and I can only move 1 vehicle. I'll just move across the country in a 32 year old Jeep with cc and ac that doesn't work.


-
It might pick up some data, but it could also be formatted differently from the Renix and the REM won't know what it's saying. The connector is probably a parts bin connector that AMC put on everything. Isn't the Eagle a computer controlled carb?
-
Still in operation as a CJD dealer now, as far as I know it's the same spot. I moved away a few years ago, but maybe I can find what their Jeep Eagle sticker looked like
-
Homemade spring perches
Parei_doll_ia replied to krustyballer16's topic in MJ Tech: Modification and Repairs
Wouldn't be too hard to do, download Fusion 360, make a drawing with the plate flat (not bent), save it as a .dxf and send it to a laser shop -
Motor Mounts running worse.
Parei_doll_ia replied to JStone's topic in MJ Tech: Modification and Repairs
This got me thinking, because my motor mounts are old and I was thinking about the brown dog ones. Rockauto has these polyurethane ones in the performance section, has anyone ever tried them? Seems to me like it could be a good middle ground between stock mounts and the hard mounts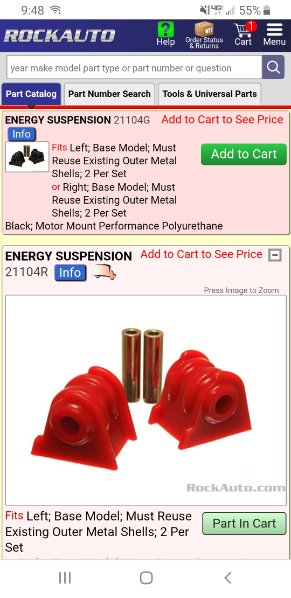
-
Interesting little bit that I didn't know, I used to live in that area so I know exactly where that dealer is. Some of the old receipts I have make more sense too, it must've been shared by 2 families down there for a little bit, possibly a time share.
-
Yeah it seems like it's that way. I might just do the rear when I do the 8.8, then measure and make the front level, since I want to replace the front axle with a single piece d30 anyways. I'm not even sure when I'm going to do any of this, I just had to spend $2k on my TDI for a new clutch/dmf because the extra torque started making it chatter under WOT, right as I was buying the parts to do the timing belt.
-
Ok. So they'll both sit at the same height? Wasn't sure if the spring rates were different
-
I want to do an 8.8 swap at some point in the future, and my springs are pretty rusty and 1 of them sags a little so I've been looking for new ones. General Spring has 2 options for us, 3/1 1280lb capacity, and 3/2 1700 lb capacity. Would the 1700lb one be what a 4x4 would have? I have a 1990 4x4 Eliminator, not sure which one would be right for me. I'm keeping it spring under and don't want to go above 3'' of lift.
-
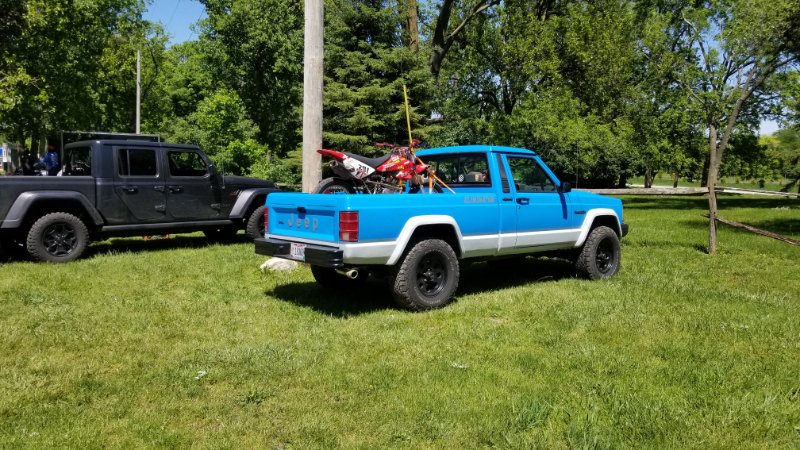
1990 Comanche Eliminator 4x4 4.0L RENIX / AW4 / NP231 / d30 / d35 / SWB Build date: 1-90 Current Location: Akron Ohio Status: Just finished restoring. I cut up 7 XJs and 1 MJ in the Pullapart yards to get enough metal. Notes: Bedlined with Monstaliner because bodywork would have cost more than the truck was worth. I used Grrrrabber Blue and Gray Matter. Now that it's done I think I like it better though, I just keep on buying black vehicles for some reason. (The MJ, my Golf, and my FZ-07 were ALL black) Truck was flat towed from Detroit to Florida by original owner every year, 150k showing. Dome lights were broken, so I took some out of a MK5 Golf since they fit the same hole. WJ booster/master cyl, looks like a 2'' lift, I put on Rusty's LCAs to fit 31s without rubbing. Pacesetter headers, 4 hole injectors, Flowmaster Deltaflow 70, JWS headlights. A Ford 8.8 and d30 with a 1 piece axle are probably coming sometime in the future. Current owner: Me
-
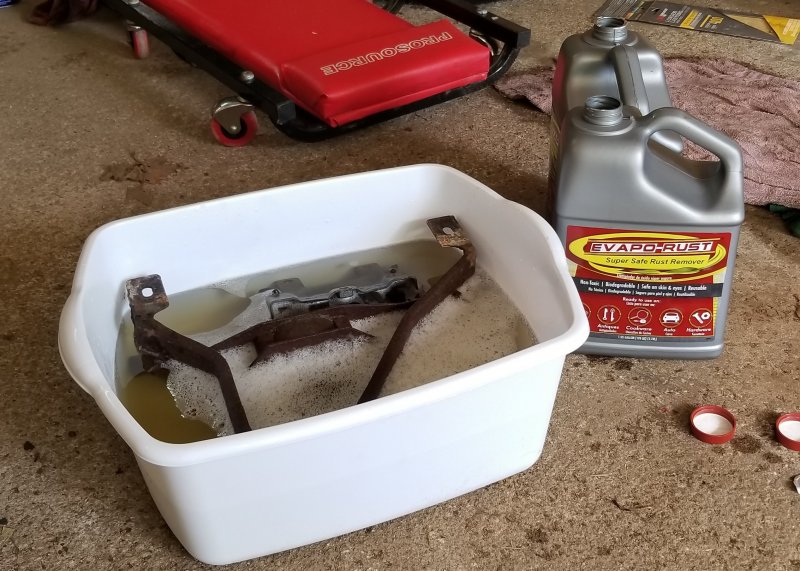
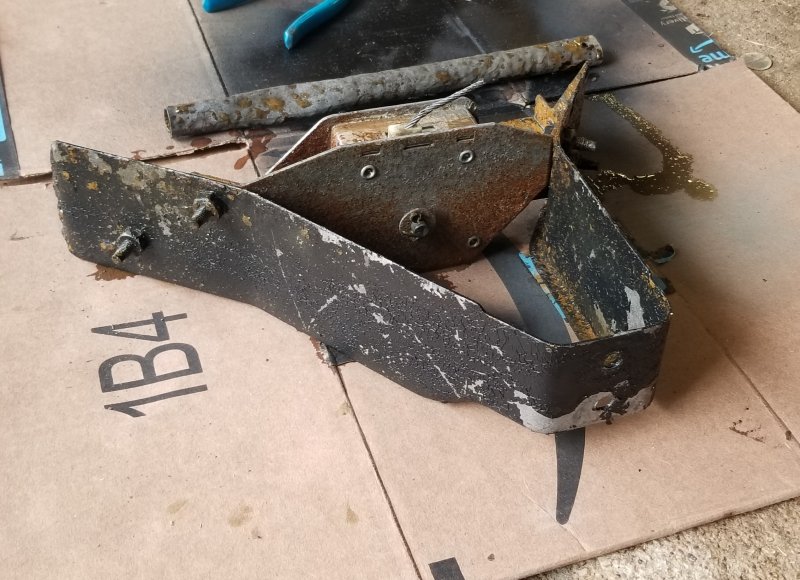
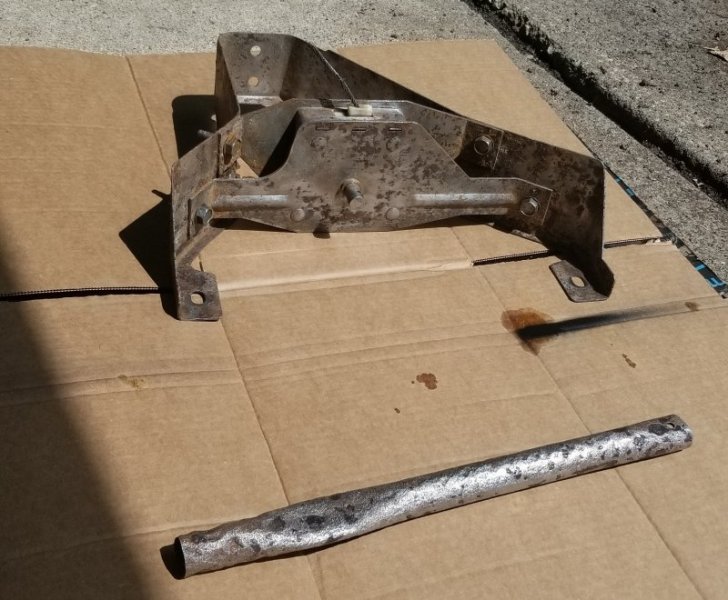
My MJ is decently rust free for being from Detroit, but the rust it has is mostly concentrated to the back half of the truck. I decided to start with the spare tire carrier and tailgate handle, since they were easily removable and the cable must have broke at some point before I bought the Jeep. I was able to fit them in an 18 quart wash bucket, and filled it with 2 gallons of Evapo-Rust. I've used this stuff before, it's non-toxic and given enough time to chooch, will dissolve all the rust away chemically. From what I've been able to find, it is a chelate, which is a large molecule containing a ligand that is attracted to iron, and pulls the iron out into a sulfur solution. The attraction is only strong enough to pull iron from oxide however, leaving the base metal intact, clean and rust free. (Forewarning, it will also remove any sort of zinc/oxide coating or bluing from a part, if you want to keep that coating) 2 gallons covered enough of the carrier to do about 3/4 at once, I just flipped about 24 hours after I put them in. The stuff will last as long until it turns dark black and smells like dirt. After about 3 days, I pulled them out and only the hardened areas were left, which were mostly solid still, so I'm not worrying about them. If I had scraped the part first, I might have been able to dissolve these too, but I forgot. 3 days later, this thing actually still had paint on it! At this point, I manually scraped and sanded it down, then painted with some rusty metal primer I found at Tractor Supply, then with black paint. Since the cable broke, I was missing the bracket that holds the tire up, so a trip to the junkyard to pull one from a Dakota and doing the same thing to that solved that problem. To attach it, I picked up some 1/8 inch ferrules and fender washers from TSC, and used a swaging tool to crimp them to the cable. It installed much easier than it came out after some rust removal and painting under the bed, and looks much better. All I need to do now it put the spare back under, but mine doesn't hold air, and I'm finding out they weren't meant to be serviceable, so no one will touch it. I'm thinking about getting a full size 31x10.5 spare, and supporting it with ratchet straps if it will fit.
-
There's a good table with Ultimate/Yeild Strength and Young's Modulus for all sorts of materials on https://www.engineeringtoolbox.com/young-modulus-d_417.html
-
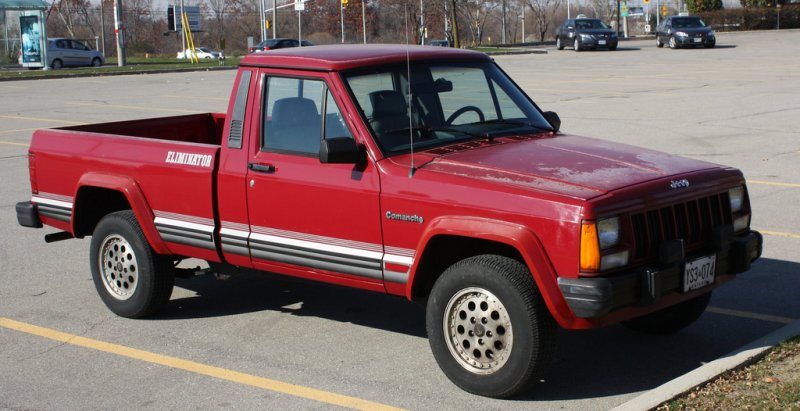
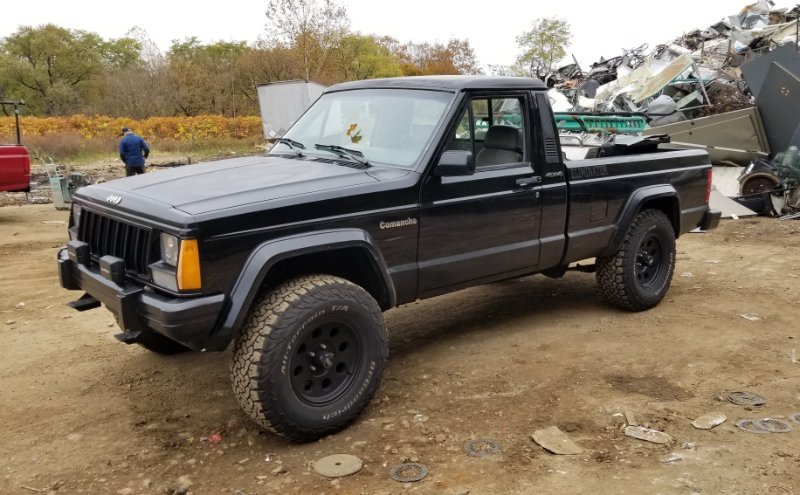
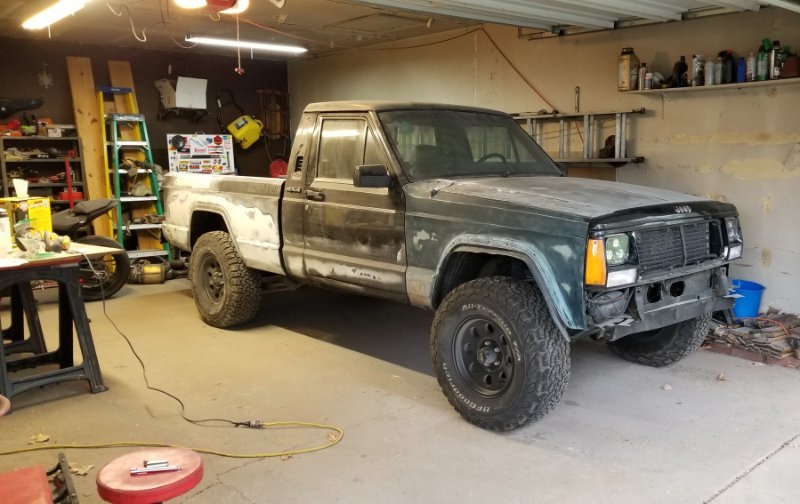
I sold my JK a couple weeks ago, and just picked up this black '90 Eliminator. It was owned by an older guy for most of its life and towed behind an RV, so not a whole lot of rust, but it had a cheap paint job done some years ago and it is fading/chipping. There's a few spots of rust coming through the paint, and I want to take it to a good body shop here to get it all fixed up. Looking at other Eliminators, though, the 1st gen styles all have stripes along the running boards like the one below, and mine doesn't. Are the black ones supposed to have this stripe, or was that left out the last time mine was painted? Mine's in fairly good shape so my goal is to restore it and make make it look as original as possible, just with 31x10.5s. ^Image from google for reference
.jpg.7dbf870a4ada632017d791e9213a1986.jpg)