

ghetdjc320
-
Posts
5212 -
Joined
-
Last visited
-
Days Won
1
Content Type
Profiles
Forums
Gallery
Everything posted by ghetdjc320
-

Squirrelly Dan: Coheed's 86 Custom
ghetdjc320 replied to coheed's topic in Member Projects: Your Comanches
Looking great! One suggestion while you still have things apart, get the seam sealer out of that vertical back cab seam and treat those areas. There is one seam under each lower corner of the back glass. They run from the glass to the floor. The factory’s cheap seam sealer was applied to the inside and sometimes to the outside groove. I’ve deleted that seam and welded it shut on both my MJ’s. They are horrible water trapping spots.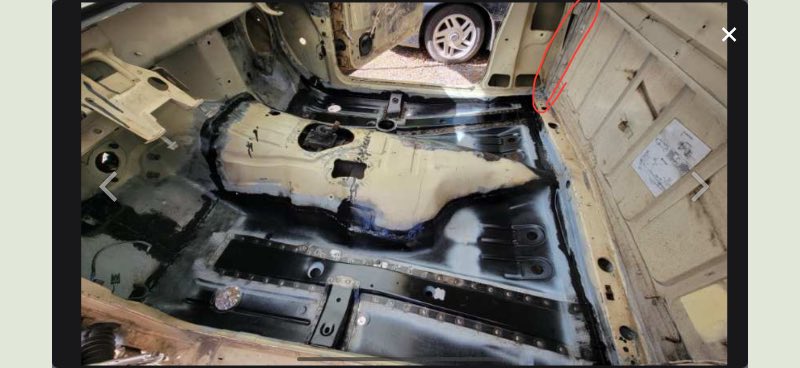
-
Looking good! That was a lot of down time for some spacers
-
If you’re going to remove your floor pans, you can access the inside of the channel for repair. The frame “cap” inside the cab is a significant integral part of the structural integrity. So if you incorporate a flange to repair the frame rail, be sure you can get weld penetration from that top cap all the way to your new piece. If the rust isn’t that bad though, you may be able to just get away with some patching, especially in light of the frame plating you intend to do. Just depends on where exactly the problem spots are and how extensive the hidden rust may be.
-
Brake line fitting sizes
ghetdjc320 replied to InTacosWeTrust's topic in MJ Tech: Modification and Repairs
This thread may help with some answers. MC bore size only needs to change when you need more fluid to drive larger/multiple piston calipers. -
NOS chrome bumper
ghetdjc320 replied to fiatslug87's topic in Craigslist/Marketplace/eBay... i.e. Not Your Stuff
Remember “Brock’s oem imports” on eBay? If that guys had this thing he’d list it for 20k . Seems like a good price when you consider to an aftermarket bumper runs close to a grand. -
It’s the resistance reading that the fuel level sender sends to the gauge. Renix era jeeps from 90- read about 85-100 ohms when full and 0 when empty. HO era from 91+ read 0 ohms as full and 100 ohms as empty. Basically the opposite sweep between the two sending units.
-
MTS can send you the correct gauge sweep sending unit. There are only two gauge sender sweeps, 90- & 91+
-
MTS is a company that makes sending units and related parts. https://www.mtscompany.com/lockrings.htm
-
Just get it below the sending unit which should be anything less than about 2/3 tank
-
Brake line fitting sizes
ghetdjc320 replied to InTacosWeTrust's topic in MJ Tech: Modification and Repairs
OMG, the more I watch the worse it gets -
Brake line fitting sizes
ghetdjc320 replied to InTacosWeTrust's topic in MJ Tech: Modification and Repairs
This video is the epitome of brake misinformation Not sure where to even begin… First, don’t mount your booster sideways . Second, that is not how you bench bleed . Third, almost everything he says about braking is incorrect. Don’t mean to be harsh but… oh boy… On a serious note, a dual diaphragm booster increases the vacuum assist and helps increase line pressure. All of this is relative to the master cylinder bore to caliper piston sizes. Matching the right size mc bore to the caliper piston area is what really provides good braking power. -
A new lock ring and gasket are probably in order. Pretty simple swap, just make sure to keep the area clean so dirt doesn’t get in the tank when you remove the old gasket. MTS carries the parts you need among others. Part numbers GMLR-1 for the locking ring and GMOR-1 for the gasket
-
Brake system upgrade for 89 Comanche
ghetdjc320 replied to comanche_chris's topic in MJ Tech: Modification and Repairs
That’s a bag full of parts . If your removing your 89 knuckles, post them up for sale. They are compatible with big brake setups and are nice upgrades for the 90+ knuckles. You can get the passenger side bracket for the Wilwood prop valve that fits well.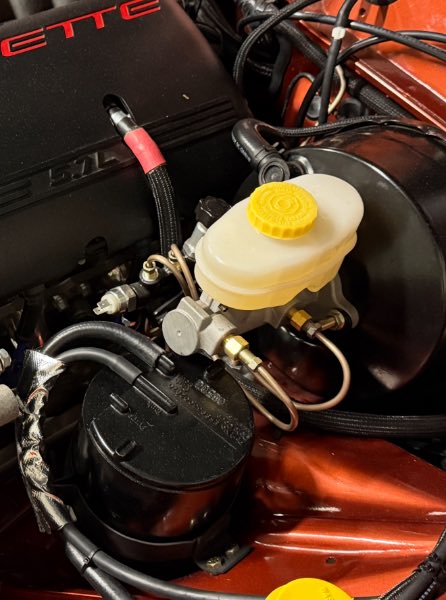
-
You’re in a tough spot with this rig without shelling out some coin and fixing some items if you want a driver.
-
The number of leaves doesn’t set the lift height. It’s the free arch and spring rate that set ride height. The GS springs provide a mild lift around 2” on most applications. When you run them SOA on a on a larger tubed axle, you’ll get plenty of lift. I’d say you’re looking at at around 7”.
-
Are you going to run those GS springs SOA? I ran the GS 4 leaf pack SOA on a Dana 35 with stock MJ shackles and was sitting at 7” of lift (which never settled) over stock 4wd specs. GS springs have a nice free arch which which provides a mild lift when run SUA, but will require either stock MJ shackles or longer such as JKS or Core. SOA will be sitting pretty tall. Do you have a slip yoke eliminator installed on your transfer case? I don’t see a slip yoke in the driveshaft itself. The reason I mention this is that, when you shorten your wheelbase by moving the hangers back to stock position, your already steep driveshaft angle will get worse. I had some quite terrible driveshaft vibes when first going SOA on the GS springs until installing an SYE. Again I’d suggest considering going back to SUA with the gs springs
-
Adjustable track bar options for 0 lift?
ghetdjc320 replied to EdJarHead's topic in MJ Tech: Modification and Repairs
How are you measuring the axle offset? -
Brake line fitting sizes
ghetdjc320 replied to InTacosWeTrust's topic in MJ Tech: Modification and Repairs
All the prop valve fitting are 3/8-24 inverted flare iirc (or possibly one of them is 7/16). What you can do is get some short premade nicopp lines with the correct fitting for the prop valve then use adapters for the master cylinder side. The metric bubble flare adapters can be purchased at most auto parts stores. They will have the m10 or m12 bubble flare on one end and a 3/8-24 inverted flare on the other.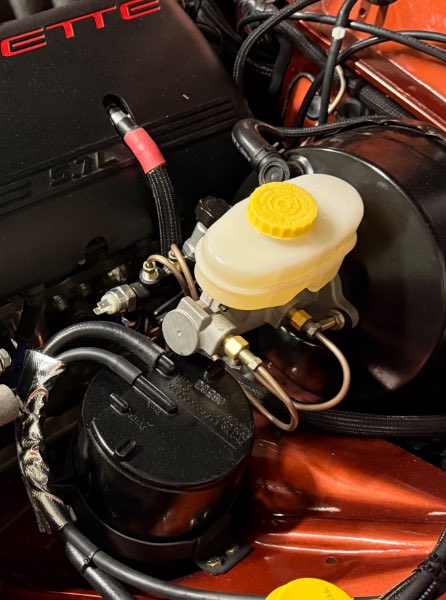
-
XJ shackles will rotate your pinion angle down toward the ground a bit. That may cause driveshaft vibes
-
You could measure the springs and see if they could possibly be flipped to correct the wheelbase. As for the quantity of leaves, there are no overload springs in that pack. The design of the pack you have using multiple thin leaves is a great spring design but you’ll likely have issues if you remove a couple of springs as there aren’t really any supplementary springs in that design
-
I’ve been using this blower motor for several years and it works excellent. Also has less current draw than stock. I don’t recall the numbers but iirc, it was about 30% lower amp draw with at least equal if not higher airflow.
-
Project “Tomahawk”
ghetdjc320 replied to ghetdjc320's topic in MJ Hardcore Tech: Epic Journeys to Greatness
I used the Joying 6.2” single din head unit. Can’t say enough good things about that unit. @Limeyjeeper was the one who first suggested it. Seems like very good quality unit. Unfortunately, I don’t see it listed on Joying’s site anymore though the 7” single DIN *may* fit -
One other thing I forgot to mention, if you’re going to be doing any work on the rear suspension, start dousing those spring and shackle bolts in PB blaster for the next few days. The bolt shoulders tend to get rusted to the bushing sleeves.
-
I will say, staying spring over and removing leaves may give you a pretty good recipe for axle wrap. Base the lift around the tire size you have/want. With your wheel openings already trimmed, you could probably run a 33 with little issue on General Spring replacement 4 leaf packs and maybe a 3” front lift coil. If you want to stay SOA, you’re really not going to get less than about 5” of lift on stock springs, especially with your 8.25 axle tubes. Here is a possible route for you to go if you want to get back to a lower lift and correct geometry: GS 4 leaf packs 3” front lift coils Stock MJ or JKS shackles (XJ shackles can limit your spring flex if you go SUA) New front spring hangers (something like this may work but double check your measurements: https://www.ruffstuffspecialties.com/R1133.html Also grab some new shock mounting tabs and SUA perches from ruff stuff. Based on your other posts, you can grab a pair of passenger side bed repair panels if you want to restore the factory flare mounts (this will limit your tire size down to about 31’s or maybe 32’s depending on wheel offset and tire width) With this setup you can run off the shelf ZJ steering, no control arm drop brackets, no dropped pitman arms, stock ball joints, stockish brakes, adjustable track bar and you’ll have a nice handling and performing rig. It will cost a bit but still represent a great value depending on your end goals. Just remember to start with tire size and let that dictate what you need. There is a nice video from DPG off-road about trimming your wheel well openings that actually looks decent and performs well