


ghetdjc320
-
Posts
5079 -
Joined
-
Last visited
-
Days Won
1
Content Type
Profiles
Forums
Gallery
Everything posted by ghetdjc320
-
That’s the same wheel I had in my YJ. I picked up one as well from an MJ but the horn button didn’t have the little “rivets”. Was the rivet horn button exclusive to a particular trim?
-
I forgot the name of the yard but it’s in Ft. Smith Arkansas
-

Project “Tomahawk”
ghetdjc320 replied to ghetdjc320's topic in MJ Hardcore Tech: Epic Journeys to Greatness
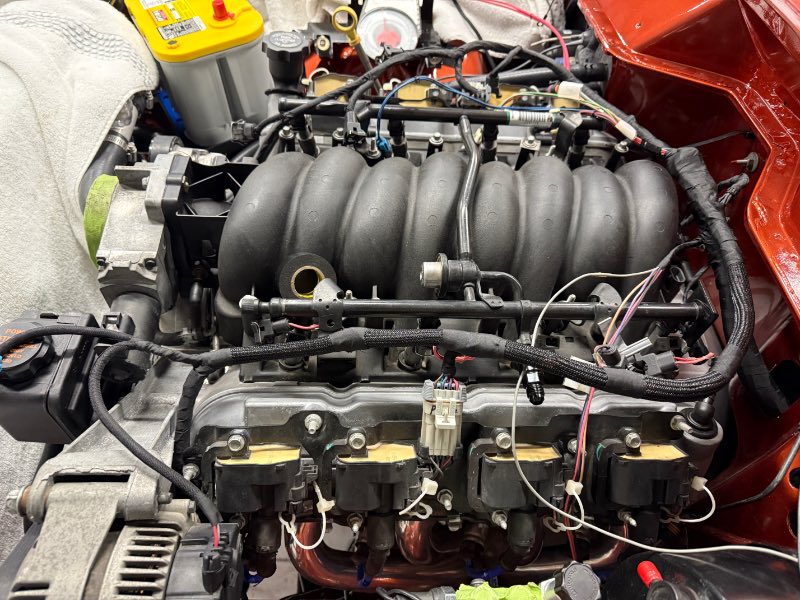
Was able to source a NOS 04 LS6 valley cover which has the pcv built into the cover itself. This has much less oil exposure and keeps a cleaner intake. Also eliminates all the pcv hoses that circle the manifold. May do a catch can a well but perhaps down the road as it’s a simple bolt on. -
Project “Tomahawk”
ghetdjc320 replied to ghetdjc320's topic in MJ Hardcore Tech: Epic Journeys to Greatness
Interesting tidbit of info, the Corvette LS programming in the ecu’s monitor the oil pressure in the data stream and use a nice 5v reference sensor. So I’ll keep the corvettes oil pressure sensor connected and run the Jeep gauge sender off of the oil cooler ports using an adapter. I don’t believe the corvette programming actually uses the data for tuning purposes but I’d like to leave it there for reference and perhaps data logging -
Project “Tomahawk”
ghetdjc320 replied to ghetdjc320's topic in MJ Hardcore Tech: Epic Journeys to Greatness
Modified the SFR crossmember/skid for the swap. The shorter length of the drivetrain does make it tricky to get some items lined up properly. But with enough modification and adjustments it works out nicely. On the sfr crossmember, I removed a section for the transmission mount, then I cut a custom piece from 1/4” plate and welded that in. Then I mocked it up and drilled out the mounting holes for the Novak tranny mount. Made a pair of flag nuts to make it easier to service later. Had to add a nutsert to the MJ frame hole for the factory tcase skid. The sfr unit uses that same factory mounting position. Everything aligned nicely. Need to add a 1/4” spacer to the transmission mount but it’s otherwise all finished. Started on engine wiring as well and got about a third of the way through. I’m keeping the ECU, TAC module, fuse block and relays all under the dash inside the cab. The engine bay looks much cleaner this way. Routing cabling and planning it all out takes time but is very rewarding.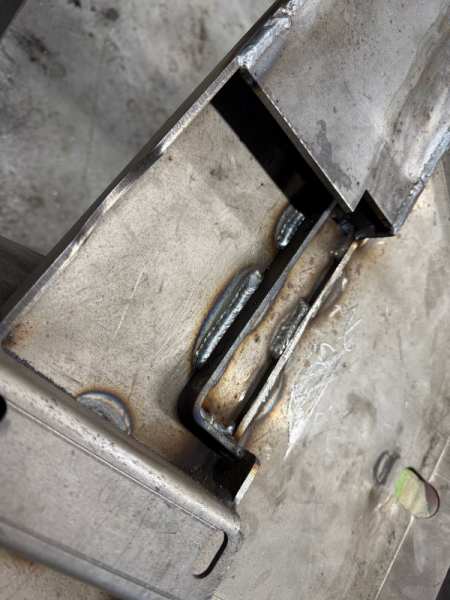

-
My experience was just the opposite, gained a solid 2.5” lift with the 1250 springs. But this was on springs from 2019. Keep in mind, the spring rate doesn’t ultimately determine lift. 1700lb springs simply have a 1700lb rated load capacity. The free arch is another factor on the lift. When last I saw, the free arch of the 1250 and 1700 were the same. But perhaps they have updated that since. General Spring posts on here once in a blue moon and it’s been difficult to nail down the exact springs that are currently available for our trucks. So far the spring packs that have been reported on are: General spring 4 leaf 1250 spring 5 leaf 1700 spring 5 leaf “military wrap” metric tons Hells Creek lift spring pack for sua Rustys lift spring pack for sua & various add a leaf setups and designs from other manufacturers mostly based around XJ leafs.
-
Project “Tomahawk”
ghetdjc320 replied to ghetdjc320's topic in MJ Hardcore Tech: Epic Journeys to Greatness
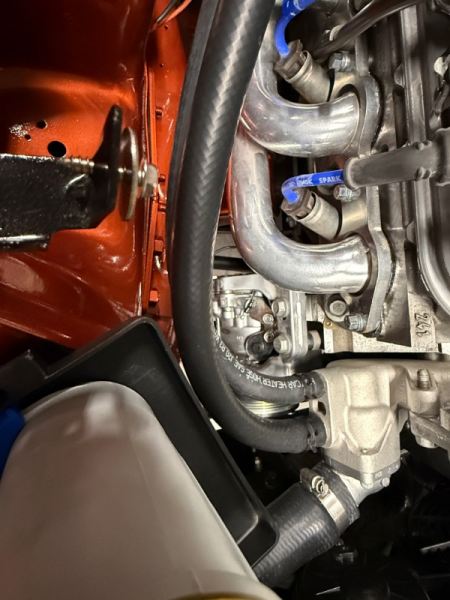
Slight mods to the ps reservoir bracket to gain some additional clearance. Lowered the reservoir by 3/8" and moved it back towards the throttle body by 5/16". also shaved off 3/16 from the outer edge. May not seem like much but gave me 5/8 more clearance overall between the fans and the reservoir. I also dug up the maf sensor and can confirm that it is for 3.5" tubing. The OD measures out to 3.6". To reduce turbulence and get the best readings, I'm going to mount the MAF about 2" back from the filter then try to keep a pretty straight shot of at least 12" back to the TB where it will use a 3.5-4" bending reducer. The goal is to use plastic or carbon fiber tubing to reduce heat absorption in the tub itself. Also made a small wire frame for the intake area and will try to fab some sort of heat shield and duct. I did look at doing the camaro -2 spacing on the puller to use the holley low mount setup. But I would have lost almost and in of clearance between the radiator and belt drive. And, all the kits that mount the alternator down low on the drivers side of the block tend to use the small case style which I don't want to run. The corvette reservoir location is also quite ideal from the standpoint of fluid delivery to the PS pump.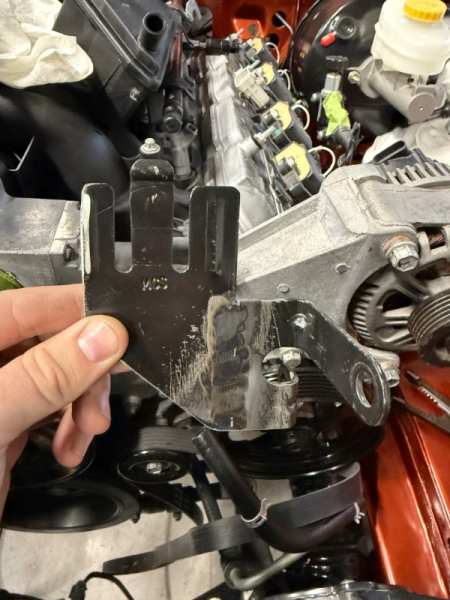
-
Any cover that has a threaded fill plug will be a bit thicker. For Dana 35’s that’s mostly 89 and earlier. 8.25 and 8.8 covers are thin. The rodeo and passport Dana 44’s have a nice finned aluminum cover that is quite thick and very strong due to the ribbing. All the Dana 30’s I’ve had use the same cover and seem like the same thickness. A diff guard will be a nice upgrade though if you’re hitting the axles that hard.
-
00-01 XJ Cast Iron exhaust manifold swap
ghetdjc320 replied to 89 MJ's topic in MJ Tech: Modification and Repairs
The banks and all the knock off copies really gave 4.0 headers a bad rep. That and missing the exhaust hanger near the crossmember. Too much weight and running lean can lead to stress cracks quick. If all the hangers are in place and the engine is not running lean, the stock manifold with the bellow tubes work just fine. Obviously they aren’t the best for performance though. -
00-01 XJ Cast Iron exhaust manifold swap
ghetdjc320 replied to 89 MJ's topic in MJ Tech: Modification and Repairs
I’ve had the best success with the Gibson silver ceramic header. Never warped, cracked or deformed in any way. -
Bosch fuel pump in mts sender
ghetdjc320 replied to camjeep3's topic in MJ Tech: Modification and Repairs
You don’t have to run an oem strainer with that pump. Just use whatever will fit the pump and has an offset mount. I just opened up a few boxes and found one that worked well. -
Dielectric Grease as Belt Treatment
ghetdjc320 replied to AnotherOldJeepGuy's topic in MJ Tech: Modification and Repairs
Seems like moral of the story is, don't use dielectric grease on your belt -
Dana has an economy line (SVL iirc) that can be difficult if not impossible to get an ideal pattern on. Same goes for Yukons “USA standard gear”. They will all work though
-
87 MJ didn’t come with an ax15 but it may have been swapped. BA10 was the standard behind the 4.0 up to around 89
-
Project “Tomahawk”
ghetdjc320 replied to ghetdjc320's topic in MJ Hardcore Tech: Epic Journeys to Greatness
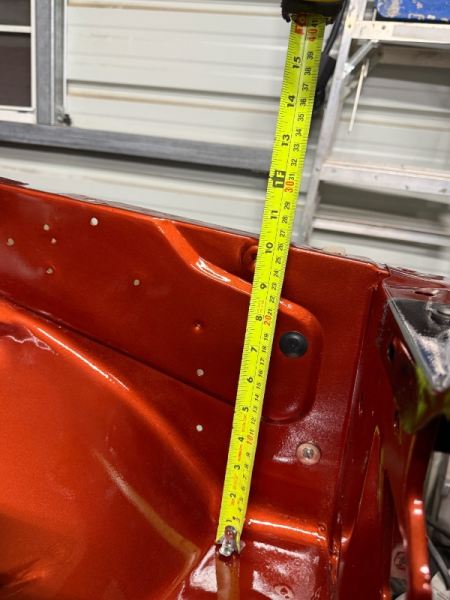
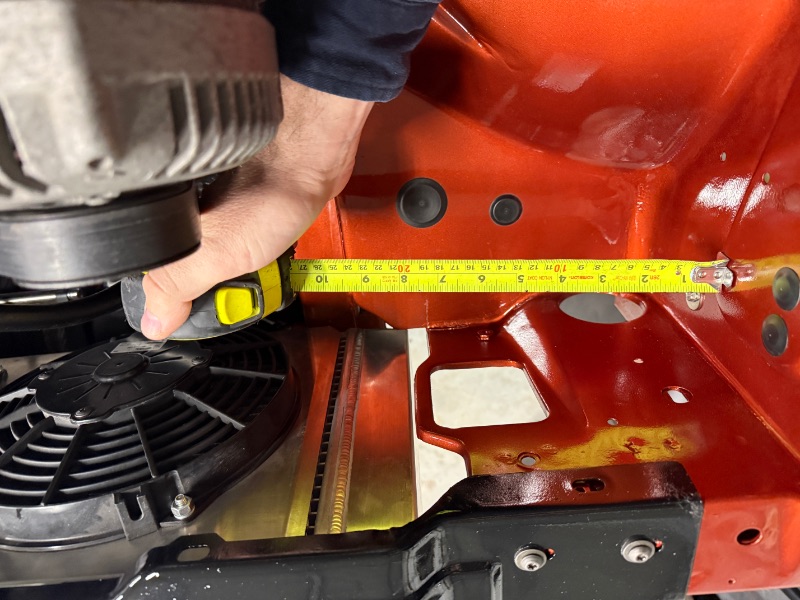
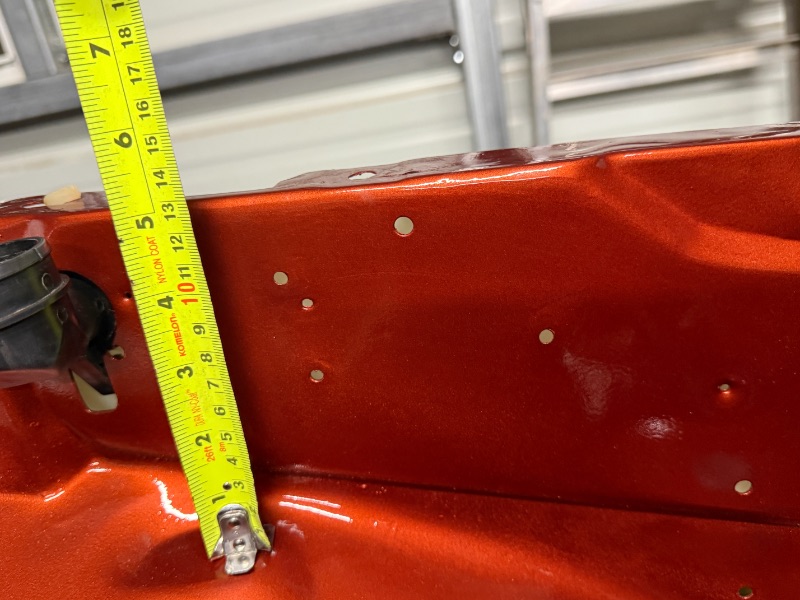
Generated a 3D file for the air intake area Also took some measurement pictures 1741998033_Airintake.zip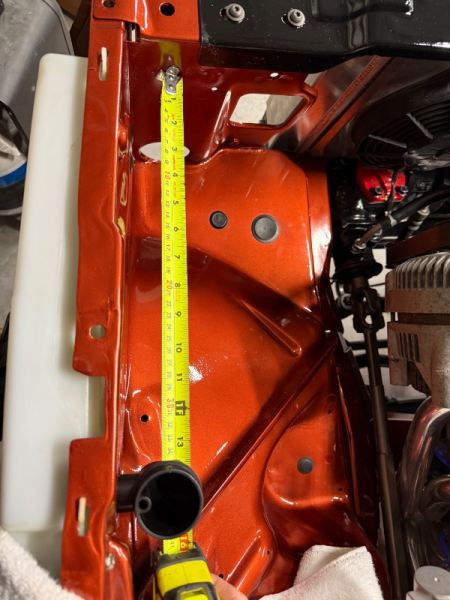
-
Project “Tomahawk”
ghetdjc320 replied to ghetdjc320's topic in MJ Hardcore Tech: Epic Journeys to Greatness
This particular maf that came with my c5 engine is made specifically for 3.5" tube afaik. The c5 has the over the radiator oval design on the intake that necks back to a 3.5" tubing then the maf then the filter. I'd love to do something very custom here but the 3.5" tubing looks to be the best bet overall. I am thinking along the lines of a custom airbox though or perhaps even custom intake routing. I'll have to take a closer look at it and see what may work. I do like though that there is plenty of room around the engine for airflow. -
Project “Tomahawk”
ghetdjc320 replied to ghetdjc320's topic in MJ Hardcore Tech: Epic Journeys to Greatness
Just went out to double check and I have right at 4” of clearance at the pinch point between the ps reservoir and the fan shroud. I’m thinking the 3.5 will fit perfectly with a bit of clearance all around -
Project “Tomahawk”
ghetdjc320 replied to ghetdjc320's topic in MJ Hardcore Tech: Epic Journeys to Greatness
I was surprised how much oil accumulates in the intake. I always run a catch can on my watercraft but they are supercharged. Hadn’t seen a NA engine need one. Looking at a nice clean option if I can find one. Chase bays has a nice kit as does improved racing -
Project “Tomahawk”
ghetdjc320 replied to ghetdjc320's topic in MJ Hardcore Tech: Epic Journeys to Greatness
I had thought about flipping the TB but it’s a 3 bolt. My plan is to build similar to the design @USN_JeepMJ used but with carbon fiber tubing for less heat absorption. Also, after cleaning out that ls6 intake manifold, I believe a catch can is in order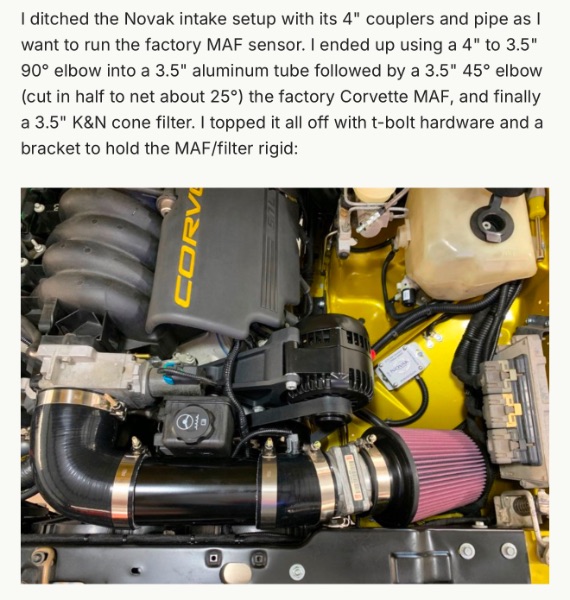
-
Rear 35 chromoly shafts?
ghetdjc320 replied to jeepmjga's topic in MJ Tech: Modification and Repairs
You can get 1541 shafts on rock auto for a temp fix. That must have been quite the event to break a chromo shaft. -
Project “Tomahawk”
ghetdjc320 replied to ghetdjc320's topic in MJ Hardcore Tech: Epic Journeys to Greatness
Nice clearance all around here. The air intake is the tricky part

-
Dielectric Grease as Belt Treatment
ghetdjc320 replied to AnotherOldJeepGuy's topic in MJ Tech: Modification and Repairs
Seems like using a touch can help . It’s mostly silicone so it may condition the belt somewhat but will increase slipping if you have too much on it. -
Dielectric Grease as Belt Treatment
ghetdjc320 replied to AnotherOldJeepGuy's topic in MJ Tech: Modification and Repairs
Why not a bit of belt dressing? It worth it though to remove the belt and clean out the grooves on all your pulleys. -
Project “Tomahawk”
ghetdjc320 replied to ghetdjc320's topic in MJ Hardcore Tech: Epic Journeys to Greatness
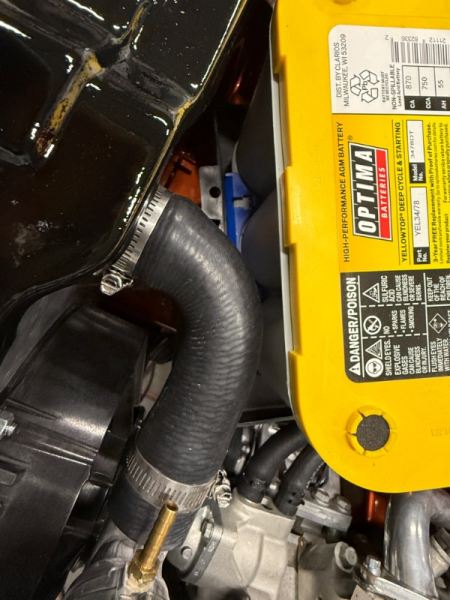
Just a few build notes on this swap so far: The LS2 (c6 corvette) water pump is a nice swap and saves a lot of room between the engine and radiator. I'm also quite pleased with the 3/8npt to 1/8npt reducer that allows me to run the stock jeep gauge sender for temp. The stock threads in the head are metric and about the size of an m10 bolt. There are adapters that fit the threads and give you a 1/8npt female side but do not allow the sensor probe to fit properly. Drilling and tapping to 3/8npt gives plenty of material for the jeep sensor to thread into and actually allows the probe to reach the coolant stream. Also upgraded to the LS2 ps puller which is a nice steel unit vs the plastic ls1 unit. the puller also has holes that allow you to access all the power steering pump bolts making removal much easier. I have noticed that the corvette parts do seem like top shelf components so ive tried to stick with all genuine GM corvette stuff as much as possible and tried to avoid as many custom parts under the hood as practical for easier servicing down the road. -
Bosch fuel pump in mts sender
ghetdjc320 replied to camjeep3's topic in MJ Tech: Modification and Repairs
Yes, the turbine style pump is superior to the old rotary vane style