


ghetdjc320
-
Posts
5079 -
Joined
-
Last visited
-
Days Won
1
Content Type
Profiles
Forums
Gallery
Everything posted by ghetdjc320
-

Rear spring build questions
ghetdjc320 replied to dbkirkp's topic in MJ Tech: Modification and Repairs
First thing I’ll mention here is I’d recommend chucking that TJ axle. They are a low pinion Dana 30 and not up to big tires. The high pinion Dana 30 was found in XJs, MJs and YJs. I know you didn’t ask about it but try to find another axle. The 8.25 is a great axle too. Are you swapping it just to change gear ratios? Regarding the control arm drop brackets, although they can technically be used with that lift height it’s definitely not necessary and quite a bit of work. The RE 4.5” springs net about an inch less on the mj. I run their 5.5” springs and get about 4.5. Soa will give you about 5.5” but can vary depending on the leaf pack you use. What I’d recommend is let us know what you are wanting out of your truck. What size tires are you wanting to run and what engine and transmission are you running now. -
Brake upgrade for 1986 4X4
ghetdjc320 replied to vamprobozombie's topic in MJ Tech: Modification and Repairs
Do you recall if all mj years had the same firewall pattern for the booster? I know the one on my 91 is 3 3/8” square. Only thing I know that changed was the booster to pedal connection and brake light switch on the pre HO’s. -
Brake upgrade for 1986 4X4
ghetdjc320 replied to vamprobozombie's topic in MJ Tech: Modification and Repairs
The Wilwood kit is a nice setup (planning on running myself soon) but not needed unless your running 33”+ tires or are towing or racing. Being you have an 86 do you know what rear axle you have? There are rear disk kits available for all the different models but there are some differences. Try to identify both the axle model and year. The master cylinder will need to be selected AFTER your braking system is selected since you need to leverag the right hydraulic ratio. You caliper piston sizes and count will determine what size MC is needed. 9 times out of 10 you’ll keep the stock size or be within a 1/16” of the stock bore unless upgrading to larger axles/brakes. Check out the DIY section regarding brake mods. There are several helpful posts there that can shed some light and help you get started -
Turn Signals Not working
ghetdjc320 replied to LiamTuck's topic in MJ Tech: Modification and Repairs
Here is a link to that thread: https://comancheclub.com/topic/48463-cruisers-mostly-renix-tips/ -
Turn Signals Not working
ghetdjc320 replied to LiamTuck's topic in MJ Tech: Modification and Repairs
Pull all your turn and tail light bulbs and carefully inspect the bulbs and sockets. This is a very frequent issue and you will find several tips in the diy section. You’ll also find tips regarding the pre HO (91) model MJs under @cruiser54’s signature. -
Caliper Bracket Bolt?
ghetdjc320 replied to 2-87Comanches's topic in MJ Tech: Modification and Repairs
What year knuckle? The pre 90’s are completely different -
The door jamb switches are a ground trigger.
-
Let’s discuss taillights
ghetdjc320 replied to ghetdjc320's topic in MJ Tech: Modification and Repairs
Looking good. Only thing that looks off to me is the reverse light. I notice some red peaking though in that area. @Dzimm I see an opportunity for the housings to be reproduced! -
The outer retainer for the locking ring is welded to the tank but the sending unit is not welded to the tank. If it is welded to the tank then an utter moron did that. As @Dzimm mentioned, it’s more likely that your mechanic didn’t notice the actual locking ring. Another common area for gas leaks is around that locking ring and seal. Especially if it only leaks badly when full or over 1/2 tank.
-
Let’s discuss taillights
ghetdjc320 replied to ghetdjc320's topic in MJ Tech: Modification and Repairs
Can you send a link to their posts? -
Yep I agree. Those are the floor courtesy lights
-
Turn signals (or blinky bits)
ghetdjc320 replied to Jesse J's topic in MJ Tech: Modification and Repairs
Yep. If I looked at Jeeps and compared the time spent actually riding/driving vs the time and money spent wrenching, we would probably be better off renting a Jeep for $100/hr -
Turn signals (or blinky bits)
ghetdjc320 replied to Jesse J's topic in MJ Tech: Modification and Repairs
Lol, electrical can be almost therapeutic if you take your time and work through the issues. Every problem on a 30+ yo Jeep is finicky though. They will drain your wallet then spit you out with bloody knuckles. Two days ago I went to work on my e brake to rebuild it. Seems like a fairly easy task right? Simple cheap Sunday afternoon kind of job? Nope! Two broken cobalt drill bits, broken tap and several nasty cuts later and the whole assembly is scattered in the back of the bed as scrap metal. I’ll have to redo it all. Probably will have $100+ in a “simple” fix plus many hours. -
Turn signals (or blinky bits)
ghetdjc320 replied to Jesse J's topic in MJ Tech: Modification and Repairs
And weatherproof butt connectors. Home Depot has a fair amount of them at a good price if there is one close by. I have a commercial account at our local Napa (yep there’s Napas out here on Guam) but the prices for those connectors are quite high. A good crimper goes a long way also. -
Turn signals (or blinky bits)
ghetdjc320 replied to Jesse J's topic in MJ Tech: Modification and Repairs
I had the same issue. Once I replaced all the tail light sockets and bulbs the problem was solved. A bad bulb or socket will backfead power from the brake lights to the parking lights and dash indicators. Sounds bizarre but they are all interconnected. For the sockets, if you can get new oem that’s great but a quick to the electrical section in your local auto parts store will reveal the Dorman part numbers that fit. You’ll need the 4 tail/turn signal sockets and the 2 reverse signal ones. New bulbs are a must as well and don’t go LEDs except maybe the reverse lights if you want. -
Good tips. I’ve always use a bit finer grit before primer. 320 before primer and 400 before base coat. Comes out great that way and has plenty of bite. I use 120 pre bedliner though
-
Good tips. I’ve always use a bit finer grit before primer. 320 before primer and 400 before base coat. Comes out great that way and has plenty of bite. I use 120 pre bedliner though
-
Turn signals (or blinky bits)
ghetdjc320 replied to Jesse J's topic in MJ Tech: Modification and Repairs
When splicing in the new connectors, be sure to at least use weatherproof butt splices that have a built in heat shrink. Soldering the connections and adding heat shrink is even better. Just don’t use the generic butt connectors as they do not seal up and they will get nasty with all the stuff the tires sling on them. -
Turn signals (or blinky bits)
ghetdjc320 replied to Jesse J's topic in MJ Tech: Modification and Repairs
Those sockets are your problem for sure. Just replace all of them while you have it out. I had all kind of lighting problems until I replaced them. Also, make sure to add some bulb grease (aka dialectic grease) when installing new bulbs. -
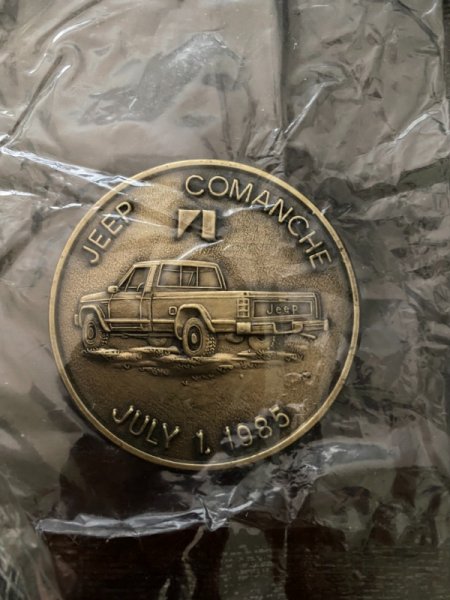
Another Coin on eBay
ghetdjc320 replied to sammisox's topic in Craigslist/eBay... i.e. Not Your Stuff
NOS coin just arrived today. the original plastic is not perfectly sealed so I’m going to take it out of the plastic and put it in a coin holder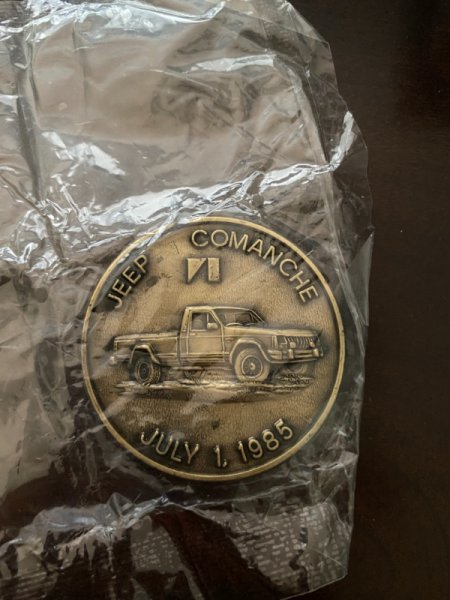
-
how to center the rear axle
ghetdjc320 replied to omega_rugal's topic in MJ Tech: Modification and Repairs
YJs had rear track bars -
Aw4 shifting/slipping problems
ghetdjc320 replied to Joshua_A's topic in MJ Tech: Modification and Repairs
On my 91 that's where it is -
Leaf Spring Anti-squeak Pads
ghetdjc320 replied to AZJeff's topic in MJ Tech: Modification and Repairs
I’d hesitate to do that. He could damage that leaf fairly easily -
Leaf Spring Anti-squeak Pads
ghetdjc320 replied to AZJeff's topic in MJ Tech: Modification and Repairs
The ones under the main leaf will not become accessible by jacking up the truck. The ones beneath that may open up if you jack it up pretty high from the from or bumper. Otherwise just jack it up a bit and remove the leaf pack and reinstall one side at a time. Easy to do in the driveway -
1991 Eliminator Resto-Mod
ghetdjc320 replied to ghetdjc320's topic in Member Projects: Your Comanches
Just pulled the trigger on a new cr Laurence rear slider window. My original slider leaks and I just can’t have that in the tropics. The seals are shot around the slider and by the time I pull the window to disassemble the slider I might as well just get a new one.