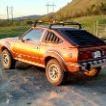
Eagle_SX4 Posted May 17, 2023 Posted May 17, 2023 Thought I would start a build thread on my Eagle. I bought it on Dec 7, 2018 and was a 12 hour round trip drive to pick it up. At the time it was the only SX4 I had ever seen come up for sale and it had the 4.0 and 5 speed. It did not run but I wasn't going to pass it up. Here it is on the trailer on the way home. Soon after I got it home I re-wire the starter relay and started it up. (P.O. had crossed some wires when he changed it and could not figure out what was wrong). I then did a tune up on it and got it registered. The first big thing I did was replace the factory tach (it was dead) with an after market one. I cutt the housing of the tachometer flush with the face of the gauge and used a thick dvd case as a place fille. And used some plumber tape to hold it in to the gauge cluster. Still working great after 4 years. Hooked it up to the factory wiring.
acfortier Posted May 17, 2023 Posted May 17, 2023 Cool! I just bought a cluster w/ tach for mine, have yet to hook it up. Sounds like they were flaky, at best, but I like your replacement! Will keep that in mind. Did someone swap in the 4.0 from somewhere? I've thought about doing a swap. Or did you mean to write 4.2?
Eagle_SX4 Posted May 17, 2023 Author Posted May 17, 2023 Before I could do much driving around I needed to fix the broken off dipstick tube. I ordered a new tube for a Cherokee. I had to get creative with the dipstick because when you swap a 4.0 into an Eagle you need to use the 4.2 liter oil pan which is only 5 quarts not 6 like the Cherokee. So I drained the oil and filled it up with 5 quarts and used a universal dipstick and marked it and cut it off to the proper length. The next thing I did was install a sound system. This Eagle did not have any speakers or radio in it. I think that it had am radio and a single speaker under the dash somewhere when it left the factory. That was all gone by the time I got it. So I ran new wire for all for all 4, 6.5" speakers and got a radio installed.
Eagle_SX4 Posted May 17, 2023 Author Posted May 17, 2023 Yes the previous owner swapped in a 4.0 out of a '92 Wrangler and kept all the original v-belt accessories and carb set up on it. If you didn't know it was a 4.0 you would guess it was a 4.2 with a aluminum valve cover.
Eagle_SX4 Posted May 17, 2023 Author Posted May 17, 2023 Next I got the factory fog lights working had to replace the relay plug because the housing had melted at some point. I drove it for couple months with out doing much then I lucked out and was at a junkyard with dad looking for the rear glass for his wagon and came across a 1989 Grand Wagoneer with the NP229 transfer case sitting in the passenger foot well. So I pick that up rebuilt it and swapped it in. Now I have locked 2 low and still functions exactly the same as the NP129 I pulled out. I added a shifter for 2 low next to the transmission shifter.
Eagle_SX4 Posted May 17, 2023 Author Posted May 17, 2023 Next was to replace the brake booster and master cylinder and add a clutch master reservoir. The reservoir is one for a 2nd gen Honda CR-V. About as close of a replacement for a factory reservoir as I can find. And used a inverted flare fitting to connect it to the master cylinder with some 1/4 inch fuel line. This happened in June of 2020. In July 2020 finally fixed my broken seat. Used some angle iron to fix the twisted and broken seat frame.
Eagle_SX4 Posted May 17, 2023 Author Posted May 17, 2023 That same month I started getting the parts together to regear from 2.35 to 3.54. I found a 2.72 front axle in a junk yard and regeared it and replaced all the seals, bearings and repainted it. About this same time I finally tore in to the dash to replace the heater core. Just like the XJ/MJ's you need to pull the dash off the fire wall to get the heater box out to replace the heater core.
Eagle_SX4 Posted May 17, 2023 Author Posted May 17, 2023 Not much happened over the next 8 months until my power steering pump pulley wore a hole through the steering pump pressure line. Replaced both the line and pulley. (March, 2021) April 2021 replaced my clutch master cylinder with a new one that came with the car when I bought it. May 2021 installed a third brake light under the window. Came out of a 2001 Saturn L200. It is only taped in place. It keeps falling down. I need to figure out a better way to mount it.
Eagle_SX4 Posted May 17, 2023 Author Posted May 17, 2023 Sept 2021 just having some fun up in the mountains Nov 2021 installed a trailer hitch from a Xj Cherokee. Made some custom bolt plates similar to the rails used on a Cherokee to install the trailer hitch. Had to drill new holes in the hitch and matching holes in the frame. Works great for my bike rack.
Eagle_SX4 Posted May 17, 2023 Author Posted May 17, 2023 May 2022 Finally got around to regearing the car. For the back axle I got a Dana 35 out of a 2001 Cherokee. It already had 3.54 gears in it. I put a Detroit True Trac limited slip differential into it. The only thing needed to make the Cherokee axle fit in to the eagle is to cut the shock mounts off the axle and move them to the opposite side of the axle and weld them back on. At the same time I also put in some Cherokee 2 inch full length add a leafs. To help the sagging rear springs.
Eagle_SX4 Posted May 18, 2023 Author Posted May 18, 2023 It has been running great since I regeared the axles and the limited slip diff is fantastic. Now it's time for fuel injection!! I got started with the swap last weekend and am still working on it but so far I have swapped out the intake manifold, replaced the harmonic damper with a crank position unit from Hesco. It uses the later style crank position sensor. The reason I am using it instead of the one that would mount on the bell housing is because I am still have the factory Borg Warner T5 4x4 trans in it. If it ever has a catastrophic failure I will put in the extra AX15 I have and move the crank position sensor back to the bell housing. Also I have installed the fuel injectors and fuel rail also replaced the intake manifold gasket. I dropped the gas tank and am going to swap an XJ gas tank into it so I can use the XJ pump and sending unit. (Not sure if the sending unit will work with my gas gauge but I will figure that out later). Tonight I started to make the new fuel lines and got the return line bent up and tried to bend up the pressure line but it got kinked so I need to get a better bender. Also the air filter I am going to run is an in line filter from Spectre. Still Need to make a mounting bracket for it. I also got the throttle cable working. Turns out the '92 wrangler 4.0 throttle cable is almost a bolt in fit for the Eagle. Had to modify the mounting bracket a little on the intake manifold so it would be closer the the throttle body. It now works great.
Eagle_SX4 Posted May 20, 2023 Author Posted May 20, 2023 Started working on the gas tank tonight. Since I am switching to an XJ tank I decided to also use and xj filler neck in the stock location behind the license plate. I bought a new one but it was way to long so I cut almost 3 inches out of it and welded it back together(still need to pressure test it). I got it mounted with the factory bracket.
Eagle_SX4 Posted May 24, 2023 Author Posted May 24, 2023 Right now I am trying to sort out the wire harness. From the schematics I have been able to find I should be able to make this a stand alone fuel system with the only wires I need to hook up to the Eagle's wiring being the battery positive, ground and a switched ignition source. The engine harness I have is out of a 92 Cherokee. I was wondering if anyone has a diagram of the bulkhead connection on the firewall for the 91-92 High output 4.0?
Pete M Posted May 24, 2023 Posted May 24, 2023 4 hours ago, Eagle_SX4 said: I was wondering if anyone has a diagram of the bulkhead connection on the firewall for the 91-92 High output 4.0? you should post that up in Tech so more eyeballs will see it.
Eagle_SX4 Posted May 27, 2023 Author Posted May 27, 2023 Got the gas tank welded up today and the filler neck has been moved to back. I pressurized it and after some lots of grinding welded it is sealed and should be good to go. Now it is time for paint. Got some new vent valves and seals ordered should get those next week and then the gas tank will be done.
Eagle_SX4 Posted June 8, 2023 Author Posted June 8, 2023 Progress is slower than I would like but still moving forward. Got the gas tank painted and installed. I also got all the fuel lines plumbed. Got the speed sensor installed. Need to run some wires to it. Got the crank position wires extended because I got the CPS relocation kit from hesco which moves the crank position senor to the harmonic damper. It uses a factory crank position sensor for the 95-early 96 4.0 auto trans, with a custom bracket that mounts to the oil pan bolts. With a machined harmonic damper to replicate the flywheel tone ring.
GrandBoost98 Posted June 8, 2023 Posted June 8, 2023 Awesome build! Theres a SX4 for sale locally that my wife actually has been showing interest in
Eagle_SX4 Posted June 8, 2023 Author Posted June 8, 2023 Yeah I think the SX4's were the best looking body style of the Eagles. Wagon 4 door sedan 2 door sedan 2 door kamback 2 door convertible SX4
Eagle_SX4 Posted June 10, 2023 Author Posted June 10, 2023 It Runs!!! Not very well but it does run and I drove it around the block. Seems to idle fine but bogs down when I hit the gas. I will be troubleshooting tomorrow. Just glad I was able to sort out all the wiring.

Recommended Posts
Create an account or sign in to comment
You need to be a member in order to leave a comment
Create an account
Sign up for a new account in our community. It's easy!
Register a new accountSign in
Already have an account? Sign in here.
Sign In Now