MiNi Beast Posted September 27, 2009 Posted September 27, 2009 So can you drive it where ever, or only under x amount of mile? you can drive as much as you want. but like Brent said, it can't be driven in Jan. dude that's awesome. I'm so moving to WI. :shake:
reson46 Posted September 27, 2009 Posted September 27, 2009 What's the deal with January? Does it get so cold there that the DMV doesn't want anybody leaving their houses in January? Willy
500 MJ Posted September 27, 2009 Author Posted September 27, 2009 I don't know what the deal is. I would imagine that they did that so the plate is still restricted somewhat so everybody doesnt go out and get them. Good thing that they restricted the plate in the least likely month of the year that anyone would be out driving their car... :banana: You can buy a $30 plate to get you around though in January. Say you are moving and you'd rather drive your car than tow it to your new house... http://www.dot.wisconsin.gov/drivers/ve ... bbyist.htm
Automan2164 Posted September 27, 2009 Posted September 27, 2009 Nice, I just run Fire fighter plates on everything, but the way that goes, its expensive, to the tune of $110 a year for each vehicle. :fs1: But $20 of that goes to the Illinois FF fund, so I really don't mind too much. Rob L. :cheers:
buddy208 Posted October 2, 2009 Posted October 2, 2009 how did you wire up the tail lights to the dash cause when i have the turn signal on and hit the brakes both turn signals go off.
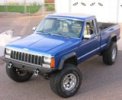
COMANCHE45 Posted October 2, 2009 Posted October 2, 2009 NICE TRUCK!!! :bowdown: Hey man, what's that rack lookin thing attached to your roll bar in the back?/ :huh???:
CWLONGSHOT Posted October 4, 2009 Posted October 4, 2009 how did you wire up the tail lights to the dash cause when i have the turn signal on and hit the brakes both turn signals go off. You have a short in the wires. Check your grounds!!! CW
500 MJ Posted October 9, 2009 Author Posted October 9, 2009 NICE TRUCK!!! :bowdown: Hey man, what's that rack lookin thing attached to your roll bar in the back?/ :huh???: That is my "Canoe Rack" which is usually used to carry long lengths of lumber more often than my canoe. I had it on when I stored the truck last and didn't get the chance to take it off (it and the roll bar are fully removable in 30 mins) before I took the trip... Now its off of the truck, along with the roll bar.
COMANCHE45 Posted October 13, 2009 Posted October 13, 2009 COOL!!! I would REALLY appreciate some close up pics!! :brows: You can send to motormn45@hotmail.com if easier.
500 MJ Posted October 17, 2009 Author Posted October 17, 2009 Close up pics of what specifically? The rack, the roll bar or the mounting points. I didn't use any stock parts when I made this setup. Everything is aftermarket.
COMANCHE45 Posted October 19, 2009 Posted October 19, 2009 The rack and roll bar. I just picked a roll bar a few ago and need to mod to fit and mount spare tire.
500 MJ Posted October 20, 2009 Author Posted October 20, 2009 Well, I did some digging and came up with these pics from back before paint and bedliner: This is my spare tire mount and tool rack. I've also added some grease gun clamps above the hi-lift so I can mount my full-size shovel above it. The actual mount for the tire is an old 8.25 axle-shaft that was bent and headed for the scrapper. It got cut off and then the inside of a 2" box tube was filed down to accept it snugly before I welded it on. If you use one, cut it off with an angle grinder, sawzall blades aren't hard enough. :brows: One of how everything sits in the bed. I did away with the Gerry can holder. I thought that space could be better used by keeping it open and I was right... I took this right after I drove home from the body shop to get my bedliner sprayed. In this one you can see the mounting pads I made and welded to the bed for my roll-bar to bolt to. Simple pieces of plate with nuts welded on the back and then they got welded to the bed of the truck. They work wonderfully! Out of everything done to the truck so far, I am most pleased with this one. :nuts: Right after paint, you can kinda see how it all bolts in the truck, 16 3/8" bolts... Good shots of the tool and tire rack. Now onto the canoe rack: The whole reason for building this into the roll-bar was to keep it completely independent from the rear hitch. As you can see from this pic, I've got a bike rack I put in there from time to time and I also wanted to be able to haul a trailer while still having the rack on. I kept it pretty simple. It bolts into the bases for the roll bar and bolts into the light mounts on the roll bar. The back of the rack is not welded in one formation. I welded bolts onto the "vertical" pieces and then drilled holes in the top portion for them to go into, nuts go on the bolts and hold it in place. This makes it easier to take in and out and also allows the rack to flex much more than welds would. Shot this one when I was painting it (also have my first attempt at a steering box brace in there). Again pretty basic layout... I hope that helps. :dunno: I've taken all of the stuff out of the truck for the winter now. Its all broken down into its pieces and stood up in the corner of my apartment right now...another thing I'm glad I did in designing the canoe rack especially. It all folds up and lays flat against the wall thanks to the bolts in the rear section. The roll bar comes apart into five pieces and stores nicely, more of a show bar than of any structural use for this reason... If you don't have a welder or a buddy with one, its time to make friends. Welders are pretty much a must if you want to do any serious fabrication work like I did. Good Luck!
MancheKid86 Posted October 20, 2009 Posted October 20, 2009 love the canoe wrack, would of came in handy when i went camping, it was a gong show, i had have my hand propped out the window because the canoe was falling off!
reson46 Posted October 20, 2009 Posted October 20, 2009 What kind of clamp are you using to hold that axe on? Thanks, Willy
COMANCHE45 Posted October 20, 2009 Posted October 20, 2009 DANG!!! That's nice work and thanks for the ideas that I just stole!!
500 MJ Posted October 20, 2009 Author Posted October 20, 2009 What kind of clamp are you using to hold that axe on? Thanks, Willy That is a grease gun clamp. They have them for sale here at the farm supply stores (Tractor Supply Co, etc.). They usually sell for about $5 each. They work nice but you have to make sure whatever you put in them fits tightly. I started out using pipe insulation like its shown in the pic, but then had to move to wrapping it in a chunk of rubber to make the fit tight. I did the same kinda thing for my shovel...
reson46 Posted October 20, 2009 Posted October 20, 2009 That is a grease gun clamp. They have them for sale here at the farm supply stores (Tractor Supply Co, etc.). They usually sell for about $5 each. They work nice but you have to make sure whatever you put in them fits tightly. I started out using pipe insulation like its shown in the pic, but then had to move to wrapping it in a chunk of rubber to make the fit tight. I did the same kinda thing for my shovel... I miss TSC. :shake: I'll have to see if I can find those somewhere around here. Our local farm supply chain, Del's, is owned by TSC but doesn't have anywhere near the selection of cool stuff. Willy
CWLONGSHOT Posted October 21, 2009 Posted October 21, 2009 That is a grease gun clamp. They have them for sale here at the farm supply stores (Tractor Supply Co, etc.). They usually sell for about $5 each. They work nice but you have to make sure whatever you put in them fits tightly. I started out using pipe insulation like its shown in the pic, but then had to move to wrapping it in a chunk of rubber to make the fit tight. I did the same kinda thing for my shovel... I miss TSC. :shake: I'll have to see if I can find those somewhere around here. Our local farm supply chain, Del's, is owned by TSC but doesn't have anywhere near the selection of cool stuff. Willy I have known about TSC for some time, but never went, until last month. Now I have been three times since!! Your correct GREAT, GREATY stuff there!!! :D :brows: I just bolted my shovel in as its not used allot but really hand when needed. I would have liked a quicker dismount. I always have a hatchet, but would like a axe but no good way to store it. (Chain saw better yet but not practical for all the time carry when wheeling.) Gotta look at these clamps. CW
snowboard3r411 Posted October 24, 2009 Posted October 24, 2009 this thing is beautiful good job man :cheers:
bermsurfer230 Posted November 7, 2009 Posted November 7, 2009 Man, everytime I see your MJ I'm reminded of all my ideas and plans! However, finances disagree :fs1: How are those Geolanders holding up? New tires are coming soon I think, and it seems you've had those for summer for some time. Just getting a... long term review, if you will :cheers: Great job again! It's great to see a quality MJ instead of my DD :thumbsup:
500 MJ Posted November 7, 2009 Author Posted November 7, 2009 They are holding up good. The truck is no longer what I consider my daily driver now because I have the '90 2wd on the road to fill that role. The tires have seen two long trips so far this summer. Once for the move from Michigan to Wisconsin and another for the trip I took over labor day weekend. Tread wear is quite good. When I bought the tires and rims they supposedly had 5000 miles on them. By now I've at least put that many more miles on them, I'm probably somewhere in the 12,000 - 15,000 mile range now. I've got the brand new spare in the bed and comparing the tires to that one they have about 1/8" wear on them, hardly anything for a tread depth that is about 5/8" deep at its shallowest point when they are new. They haven't gotten any louder since when I got them that I can tell. Road manners are still very good. I had them re-balanced about a year ago now (the rims don't have an outer lip to mount wheel weights on so I have to use sticky weights, the only thing I don't like about the rims). A really remarkable thing to note is that since I have gotten the tires, already mounted on the wheels, I have not added ANY air to them. I don't know if this is because of the tires or the rims or the guy who mounted them, but they are holding air 100%. I haven't even had to air down to get traction, although I've never been in a REALLY tight spot with them yet that the tires were at fault. I've had them on rocks, sand, mud, over downed trees, through shallow streams and very light dustings of snow (summer tires). The performed good enough for me to be satisfied on each of those surfaces. Water puddles aren't a problem with hydroplaning (probably because of the tread depth). One area that I have noticed some wear is on the edge of the tread where the tread transitions into the sidewall. The rocks have shredded them a bit in this area, little stuff though, 1/8" chunks missing at most. Overall I am really satisfied with the deal that I got on these puppies and how they are performing for me. I consider them to be right up there with the BFG All-Terrain, just maybe a bit louder on the road. Hope that helps. - Brent
MancheKid86 Posted November 7, 2009 Posted November 7, 2009 are you going to rotate your spare tire in? (the reason why i ask this is out jeep unlimited has spare tired that was supposed to be rotated in, it wasnt so now we cannot use it as a spare since there is too much difference in the tire wear)
500 MJ Posted November 7, 2009 Author Posted November 7, 2009 I've thought about that. I still am thinking about it. I don't know. :roll: I'd like to take the wheels off this winter and polish them up. Maybe that will be my chance to figure out what I want to do. I do see your point though, makes lots of sense.
MiNi Beast Posted November 8, 2009 Posted November 8, 2009 yep got a new set of tires before by just buying up all the fullsize spares from them grand cherokees. :yes:
500 MJ Posted January 11, 2010 Author Posted January 11, 2010 So I've made a move. The truck is put away for the winter but that doesn't mean I'm not working on it...in some way. I've spoken in the past about future upgrades including OX lockers in the front and rear of the truck and I've finally gotten the first step toward this dream accomplished. I want to keep the truck as drive-able as I could during the process of getting the lockers installed so I decided to take a step back and buy another Dana 30 as my first step. This would allow me to build the axle I want, however long it takes me to do it in. The axle I got was from a '96 XJ so it did have the larger U-Joint shafts and there is no CAD on it. It was geared at 3.55 and came for the most part complete. It might look like it is pretty good shape but let me tell you guys it has led a rough life to this point. After getting it home I realized that there would be nothing I was going to save off of this thing except the housing and brake calipers... I took all of the steering linkage off before Christmas and gave it away to the scrap bin at the city recycling drop off. A few other parts went with it. Then it sat in the back of my truck until I went back home to Michigan for the Holidays. Once I got home my Dad and I ripped it down the rest of the way and found it to actually be in all-right shape once all of the grease and worn parts were gone. Ball joints were a bear to get out of the C's. No Ball Joint removal tool was going to touch them so we resorted to big hammers and heat, finally got 'em out. Took it into town to pressure wash it and with the help of some industrial toilet bowl cleaner it came out pretty nice. Part of the upgrades I want to do to this axle include the JCR Offroad 1-ton Over the Knuckle steering upgrade. To install this it is required to trim the front of the coil buckets and remove the stock sway bar links. I did just that and finished cleaning it up a bit more with the flap wheel and then primed the axle. Now that I've got a good base point I can build off of this one as time allows and have a completely rebuilt front end for the truck when I am done. Ball Joints were the first thing to go back on the axle because I figured I would need my Dad's help and his shop to put them back in. I put MOOG ones in and they went in really well. Like I said, this is going to take me some time to do, as I get money I'll be getting parts. Thats where I stopped for now. The axle is back in WI with me now laying on the floor of my warm apartment - another reason why it was crucial to clean this thing up! I'll keep you guys posted on what parts I'm getting and as they go back on the axle.

Recommended Posts
Create an account or sign in to comment
You need to be a member in order to leave a comment
Create an account
Sign up for a new account in our community. It's easy!
Register a new accountSign in
Already have an account? Sign in here.
Sign In Now