earl*t Posted March 25, 2013 Author Posted March 25, 2013 I picked up the front fender liners this week, new OEMs from local dealership. Also ordered replacement door lock cylinders which should be in first of the week and will allow completion of the doors. I also found the solution, here, to a problem that's plagued me for months. In my ignorance, I installed the brake calipers on the opposite sides than they were engineered for. DON'T DO THIS. The brakes will not bleed properly, no matter how many quarts of brake fluid up push through the system. Today's project was to remove the windshield washer reservoir from a Cherokee bound for scrap. Snow set in before the extraction was completed. I moved the Eliminator outside, for the first time in a few years, to free up a garage bay.
COFFMAN Posted March 25, 2013 Posted March 25, 2013 Awesome job, truck looks great, The hood looks out of place. Would look heaps better at my place lol
earl*t Posted March 25, 2013 Author Posted March 25, 2013 Thanks Coffman. I'm afraid I'd have to agree. It would look better in Australia.
buffalob Posted March 25, 2013 Posted March 25, 2013 the photos are superb your truck looks incredible...what are you trying to do earl, make me jump out of the window? All kiddin aside man, She looks great. I can't wait to get mine back and catch up to you.
buffalob Posted March 25, 2013 Posted March 25, 2013 You do understand we live in a one story house and there is a foot of snow on the ground to boot right? As such I will only further injure my pride..... the photos are superb your truck looks incredible...what are you trying to do earl, make me jump out of the window? All kiddin aside man, She looks great. I can't wait to get mine back and catch up to you.
earl*t Posted March 25, 2013 Author Posted March 25, 2013 :rotf:The snow moved in here yesterday evening. Woke up to 10" this AM. I had expected the lock cylinders today. My buddy at the dealership checked tracking and parts shipped from Milwaukee. Expected ETA now is Tuesday or Wednesday. I have a long weekend coming up but have a honey-do project pending. The Eliminator will wait.
earl*t Posted March 27, 2013 Author Posted March 27, 2013 Buddy from the dealership called with news of the arrival of door cylinder locks. :clapping: Immediately after work I made a B-line to said dealership. I was surprised by the small plastic bag full of parts. :hmm: I was informed that the tumblers need to be set and assembled after measuring the key by the "one" guy at the dealership capable of preforming the task. :huh???: Oh yea, and would I please call ahead when I return with the key. :thwak: I know... I could have saved myself a lot of hassle and money had I gone a simpler route. :shake: I had gone the Rock Auto route with less than favorable results, "again". At the end of the day, it's all good. At least I'm one step closer to reaching the goal.
earl*t Posted March 30, 2013 Author Posted March 30, 2013 Made some progress today tying up a few loose ends, mostly simple projects, moving toward completion. My immediate goal is to have my truck ready to attend the Bantam show on Father's Day weekend. The big ticket item is Line X, followed by a new exhaust and window tint. Back to today's items which include finish transferring and installing the hood latch hardware. Fastened with a couple pop rivets. The nearly 25 year old plastic fasteners are extremely brittle. In an effort to avoid damage, I used a heat gun to make the plastic more pliable. Interior I'm really glad I left myself some bread crumbs. This was removed long ago.
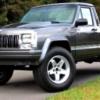
earl*t Posted March 31, 2013 Author Posted March 31, 2013 Tire fitment, P255/70R17 with 3" lift, no spacers.
88mjgilley Posted April 1, 2013 Posted April 1, 2013 wow this is one beautiful MJ i wish i had the space and patience to do a build like this
buffalob Posted April 1, 2013 Posted April 1, 2013 Whoa Earl....I are humbled by yer greatness. She is really looking spectacular.
Biotex Posted April 1, 2013 Posted April 1, 2013 Impressive! I can appreciate all the hard work and attention to detail. Keep the updates coming.... :thumbsup:
earl*t Posted April 1, 2013 Author Posted April 1, 2013 Thanks guys. I'm very pleased with how the project is coming along too! wow this is one beautiful MJ i wish i had the space and patience to do a build like this As for space, one bay of my two car garage has been occupied by the build for over three years and doubled as a paint booth. For shorter periods of time, the entire space was utilized jockeying parts and sharing its intended purpose of actually being a garage for the DD ( Cherokee ). There was a brief period of time ( months ) when the Eliminator, minus both bumpers, resided in my 12' X 16' out building during which time my painter friend did an unbelievable, to me, reconstruction/repair on his companions car. From this completely jacked rear end....using this...to arrive here...Notice the addition of the air compressor and associated filtration added to my shop tools. And then there was this little job.During these projects, mine sat idle. I'm not at all complaining. My truck never left my property and I was glad to be able to help my neighbor. He was actually like the son I never had. I'm trying to stay on topic, this "all" relates to space and patience. For the past several months, Project Guilty Pleasure has rested in the other bay and presently is not a roller. During this span of time, I had the opportunity to go to college and earn my associate's degree, something I should have done as a young man. My maturing grey matter and diminished retention capacity made that three year process incredibly time consuming. Throw in another little diversion...that filled every weekend last summer. So I would say I had to learn to be patient. Even though our community's shared passion seems at times to be all consuming, it's important to keep perspective. Remember the ancient proverb, "Patience is a virtue".
earl*t Posted April 2, 2013 Author Posted April 2, 2013 Today's update isn't much for most of you, as a matter of fact it's probably as elementary as it gets. However, it's part of my journey.Prior to starting this resto/mod (an unfamiliar term to me until my painter friend introduced it to me and shared that my direction for the build fell into that category), I had some ideas that I believed would create a simple but nice looking truck, but there was much I didn't have. My automotive experience was limited to no more than routine maintenance tasks such as oil changes and occasionally changing brake pads. I had zero auto body experience. Electrical was and still is a mystical art form to me, and my tool arsenal included basic hand tools and tool box. I'm embarrassed to admit that I was oblivious to the Comanche's existence until not that many years ago. As a teen, a neighbor bought a used FSJ and I thought that was the only pick-up Jeep every manufactured. I purchased my first well used 1988 Cherokee sometime in the late 90's, had a friend put a 3" lift on for me, added 32" BFGs, and I was hooked by it's beefy, rugged appearance. I was fascinated to learn that model was produced in a pick-up version and the search was on. That's when I found, what a friend recently referred to as a cult, ComancheClub.com. Well, I guess I drank the kool-aid. I digress, back to today's topic.I received the call yesterday that my door lock cylinders had been assembled and ready for pick up at the dealership. The install was much more difficult than the removal primarily due to the rod re-connection.This access provided the easiest to make the final connection to the "ell" shaped rod. The small black clips are where the rod is first inserted and then clipped in for secure fitment. It took several unsuccessful attempts until I realized the side access.The cylinder is held in place by a tension clip that slides into the cylinder. With the lock installed, next was the door handle with mechanism. Connection to the rod/clip exercise is essentially the same thru an oval-ized access hole.This keeper is plastic, as opposed to the metal keeper on the lock cylinder, and caution must be exercised to prevent breakage.I would also strongly recommend using a light lubricant on the mounting threads of the handle and tighten carefully. Why? Let's just say, "experience".Use proper tool for removal...and installation. ( 1/4" nut driver with 10 mm socket )Fortunately, a replacement was removed from Project Guilty Pleasure. It's been painted and will be ready for install tomorrow. I also secured a quote for the Line X bed liner. As soon as the side glass is in place, permitting travel, the bed will be coated.
earl*t Posted April 7, 2013 Author Posted April 7, 2013 What a tedious day! More detail work. I reinstalled the donor door handle as well as driver side handle and lock cylinder. My paint and body guy dismantled the doors months ago. It took me all afternoon to reassemble one.New replacement inner belt weather strip seals, outer panel flange, and glass channel weather strip. I decided to replace the vent windows with fixed units also from Project Guilty Pleasure. I think they provide a much cleaner look. The AC works fine negating the need for vent windows.After a challenging afternoon of installing and then removing window components and then reinstalling several times because of improper sequence, this was my progress after several hours.I'll need to get longer screws to compensate for the thickness of the reupholstered door panels. At least the other door should go much smoother.
earl*t Posted April 8, 2013 Author Posted April 8, 2013 Just finished with the passenger side door glass and trim. I still need to reinstall the door panel, armrest, and connect rods on lock and latch assembly. :)
buffalob Posted April 8, 2013 Posted April 8, 2013 Your door panels look great... Oh and I need not ask why you reccomend lube on the threads of (BRAND NEW) door handles....already knew the answer to that one. (I am not looking forward to re-installation of the door locks either btw.this will be my firrst time...blush) The handles I have done several times. I find it best done with multiple tools run through the access hole you mention, one arm crammed into the door from inside to locate said tool, either a small child or dwarf to peer into the hole While standing on a kitchen stool I have so the wife can get into the truck, as she stands on the lawn pointing and laughing for effect, mix in hand cramps and loud swearing to suit.... then snap off the stud as you showed in your photo after the rod is finally though that glorified hunk of plasic retainer...still have not found the screwdriver thrown over the fence. While I can't neccesarily reccomend this method to everybody, It has always worked for me.
earl*t Posted April 8, 2013 Author Posted April 8, 2013 Precisely! The lock cylinder installation is quite the same as handle installation. At least the clips aren't plastic. The door glass and associated hardware is even more fun. It goes something like this: The first step is to install the wing window. Use extreme care to prevent scratching the new paint on your truck and newly painted wing window trim. After inserting the wing window into place, secure it using the two screws on top edge of the door and the bolt at the bottom. The next step is to slide the door glass into place. This step requires removing the wing window because the door glass will not fit with the wing window in place. After the wing window has been removed, slide the door glass into the door. Next, reinstall the wing window following the aforementioned process tightening the two top screws and the bottom bolt. Now, remove the wing window...the glass will not fit into the door channels from the bottom much like it would not fit from the top. Reinstall the wing window tilting it into place while simultaneously protecting the brand new paint while employing the "one arm crammed into the door from the inside" method to insert the door glass into the wing window channel. Secure the wing window into place being sure to tighten the two screws on top and the bolt on the bottom. The subsequent step of course is to remove the bolt on the bottom of the wing window to reposition the two rods trapped under the bolt. Slide the rods up past the bolt and then reinstall the bottom bolt on the wing window. You are now ready to bolt the door glass to the mechanism that raises and lowers the window. This is accomplished by simply temporarily attaching the crank handle and rotate it until the assemble can be accessed inside the door. Line up bolt, attach spring washer, and screw on the shoulder bolt. Crank the window up to admire your handy work. Now you're ready to install the belt seals and the rubber seals. Crank down the window permitting access to the channels. Insert the "ell" shaped seal into the rearward channel and slide it down. It will not go all the way down, so crank the window glass up enough to employ the "one arm crammed into the door from the inside" method. Grasp and pull down from the bottom while pushing down from the top until the seal is in place. Next, crank the window down. Install the guide into the wing window channel in the same fashion, then the inner and outer seals next to the glass. The final step is to attach the metal trim strips around the glass on the outside. There are two methods. The first is to force the trim into the groove. This technique requires a soft tipped hammer to force the trim into the groove. It also requires assorted other tools to repair the resultant damage of the hammer. Forget about scratching the new paint. The other technique, and my preference, is to initially install the trim. In order to do this...first remove the wing window.
buffalob Posted April 9, 2013 Posted April 9, 2013 but did you use a small child... or a dwarf? The former will get you into hot water with child labor laws... btw the later prefer the term "little people" got a "cease and desist" from some attorney under retainer with their union...go figure. You are really makin' me look forward to the door reassembly bud...
earl*t Posted April 10, 2013 Author Posted April 10, 2013 Yesterday evening I took the Eliminator out for it's maiden voyage since reconstruction. The ride was just a short ten mile round trip for a fresh tank of fuel. It was for the most part uneventful with only a self inflicted overheating issue. I neglected to tighten the cap on the reservoir, added a little coolant and water and all seems fine. There are still a few minor issues to address. I'm shooting for next week on the Line-X.

Recommended Posts
Create an account or sign in to comment
You need to be a member in order to leave a comment
Create an account
Sign up for a new account in our community. It's easy!
Register a new accountSign in
Already have an account? Sign in here.
Sign In Now