
Limeyjeeper
-
Posts
930 -
Joined
-
Last visited
-
Days Won
6
Content Type
Profiles
Forums
Gallery
Everything posted by Limeyjeeper
-
Always something.... That is why I user Tristarr. Did an amazing job refurbing my stock unit.

-

Comanche Dawn
Limeyjeeper replied to Limeyjeeper's topic in MJ Hardcore Tech: Epic Journeys to Greatness
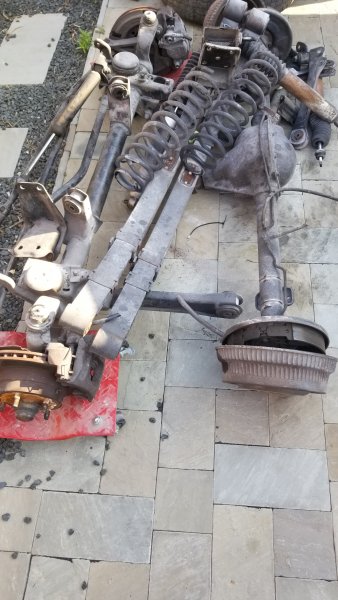
Pulled the axles out today. Getting delivery of the new ones in the morning courtesy of East Coast Gear Supply. Dana 44 in the back, Dana 30 sleeved in the front Truetrac lockers. Now the build can really start. Front axle is spoken for. Rest is going to the scrapyard tomorrow. Nobody wants a Dana 35!!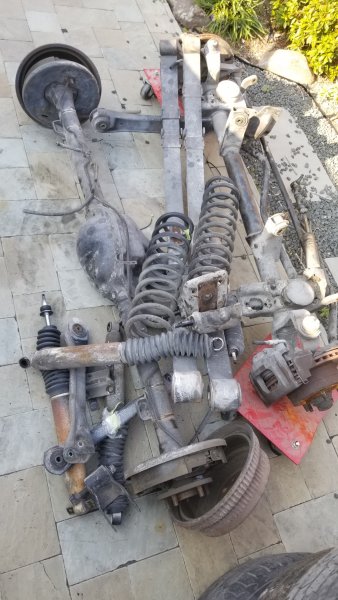
-
Reproduction Comanche Emblems
Limeyjeeper replied to carolinajeepman's topic in Vendors- members making products for MJs
Chevrolet Inferno Orange used on the Corvette and Camaro between 2010 and 2016. This color was replaced on the Corvette by Sebring Orange. Which is a tricolor which is very hard to match if you have to do any touch up or repair down the road. I was going to paint it that color but my body guy persuaded me not to. -
Poor man’s (kid’s) stroker
Limeyjeeper replied to 89 MJ's topic in MJ Tech: Modification and Repairs
The biggest issue is the no 6 lifter which has a habit of collapsing on a stroker. Normally caused by going with too heavy a spring rate. If you stay stock springs and cam and use oil with zddp such as Amsoil Z rod you will be ok. As Eagle said getting the quench and compression right are key. However it is extremely hard to build a stroker that will run fine on 87. All mine have needed at least 91 to perform. Expect to pay at least $2k for a stroker with all the machine work and parts. A poor mans stroker with new crankshaft, bored +060 block, 4.0 rods, new pistons will probably give you 220-230hp in the real world. I have a Mopar stroker in mine right now which is advertised at 215hp but is really more like 230hp. The highest HP stroker I ever did had a ported head, headers, intake, performance cam and I got about 265hp out of it. Expect your fuel consumption to increase significantly. As a minimum you will need, crankshaft, bearing set, new pistons +030 or +.060 bore, the block will need decking to get the right quench and CR. timing chain, cam bearings, gasket set. Good to get the rods balanced and cleaned up. New pins etc. I am sure there is more. Dino's page is by far the best. Strokers forum is ok but there can be a lot of confusing info on there. Dino's site is http://www.angelfire.com/my/fan/stroker.html -
Reproduction Comanche Emblems
Limeyjeeper replied to carolinajeepman's topic in Vendors- members making products for MJs
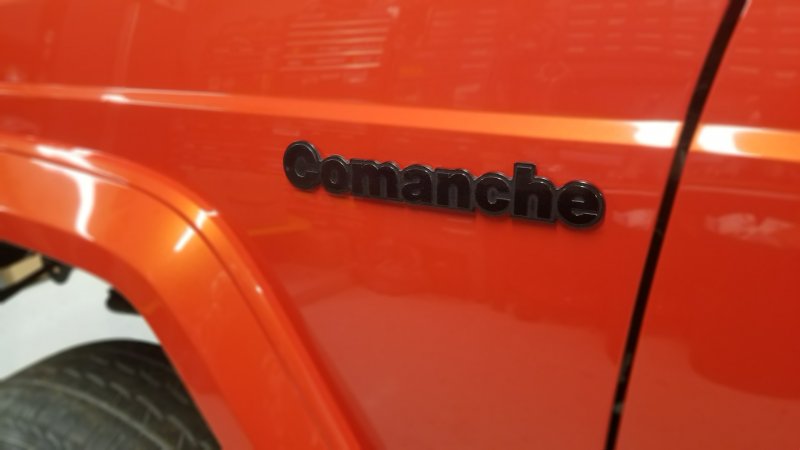
I got my emblems. These are very high quality exact replicas. I am very pleased with the accuracy and quality of the product. I would highly recommend them. Great work Carolinjeepman!! Here they are temporarily mounted to my MJ build. I will be painting them before final install.
-
Full console Yetti Cup holders !!!!
Limeyjeeper replied to Red Mistress's topic in MJ Tech: Modification and Repairs
I am in!! -
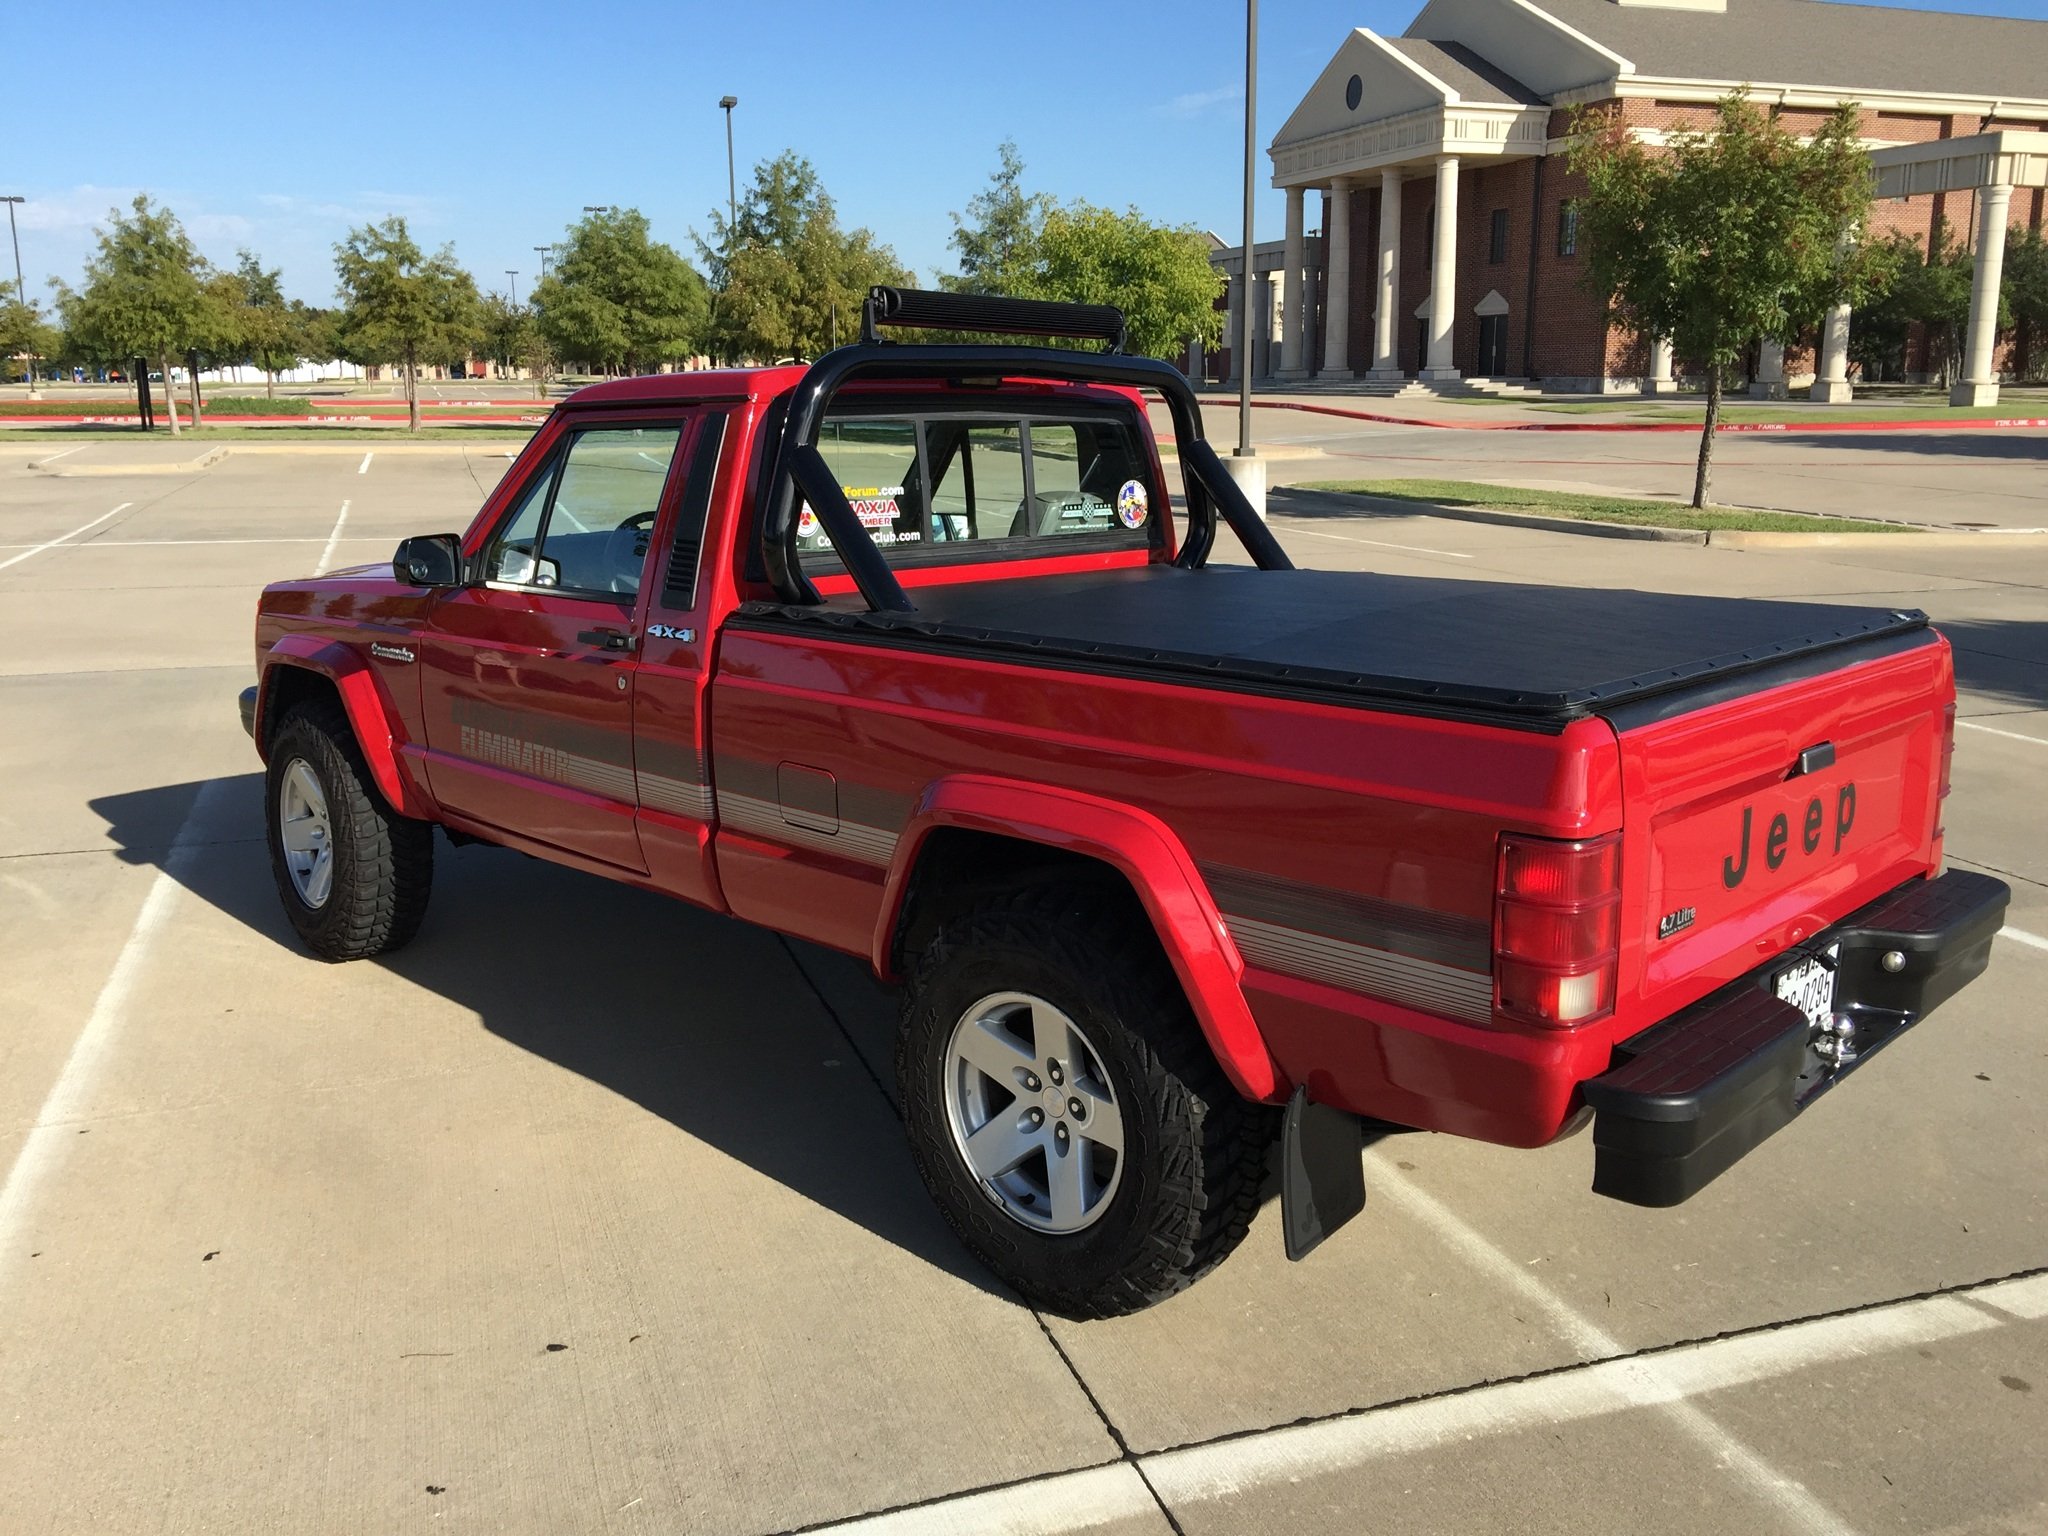
91 Eliminator 83K miles refresh with NOS parts
Limeyjeeper replied to Red Mistress's topic in Member Projects: Your Comanches
Great to hang out with you again -
Reproduction Comanche Emblems
Limeyjeeper replied to carolinajeepman's topic in Vendors- members making products for MJs
PM sent -
This is so tragic, I always thought she was the real deal, great fabricator, tenacious and a really nice person. https://jalopnik.com/fastest-woman-on-four-wheels-jessi-combs-killed-in-jet-1837654356 RIP young soul.
-
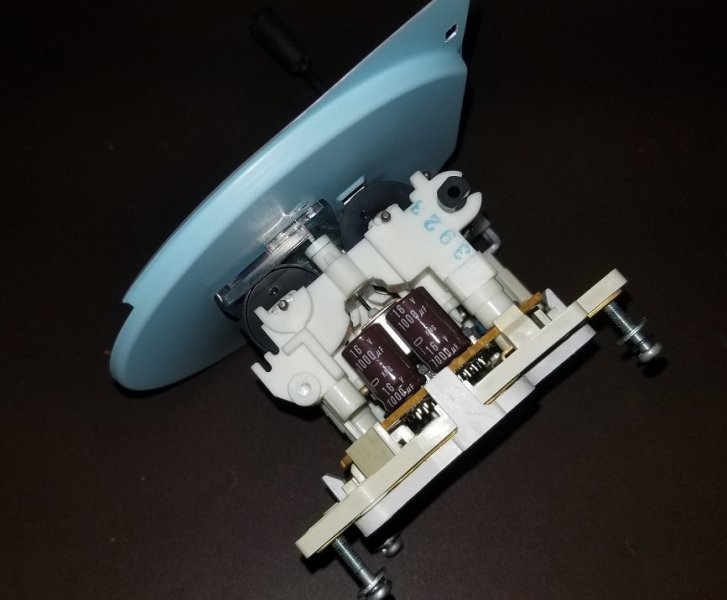
120 MPH Speedometer Upgrade
Limeyjeeper replied to flint54's topic in MJ Tech: DIY Projects and Write-Ups
I used a dremel with the rubber round sander attachment. Worked great. One point to note some 91 dashes like mine. Were not compatible. So I swapped the complete donor cluster. The early 91 had a different circuit board setup so even changing the white cover didn't help. So I had to find a 1993 US cluster and used that for the swap. See below for some pics of the differences. 91 US UK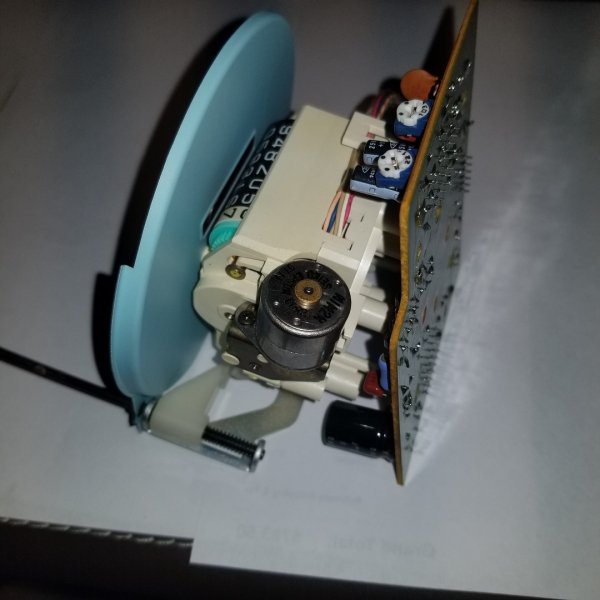
-
A surprisingly robust aftermarket exists for a vehicle that only had about 90,000 built. Places like Victoria British, Rimmer bros, the roadster factory to name a few. All body panels are available along with engine, trans, electrical etc. You can even buy a new chassis. Not much you can't find for these beautiful machines. Strong engines, decent trans, diffs are tricky to fix, weak rear hubs, bearing can go, difficult fix, body and chassis can rot if not looked after. Built between 69 and 76. 69 parts are the most difficult to source.
-
You 4.0 guys have been barking up the wrong tree.
Limeyjeeper replied to Jeep Driver's topic in The Pub
That is some serious power. I have done several strokers and even with a ported head never got much above 270hp. Looks like the Jeep FI system really holds this engine back. -
You will need a complete HO engine wiring harness, PDC and computer, including bracket, which will have to be matched to the 1989 dash harness, which is a lot of work. It is not plug and play. Been there. Just went through trying to splice an HO engine harness to a non HO dash harness, It is a major project. All the HO sensors, and plugs are different. It can be done but as jdog said a block swap would be easier.
-
Comanche Dawn
Limeyjeeper replied to Limeyjeeper's topic in MJ Hardcore Tech: Epic Journeys to Greatness
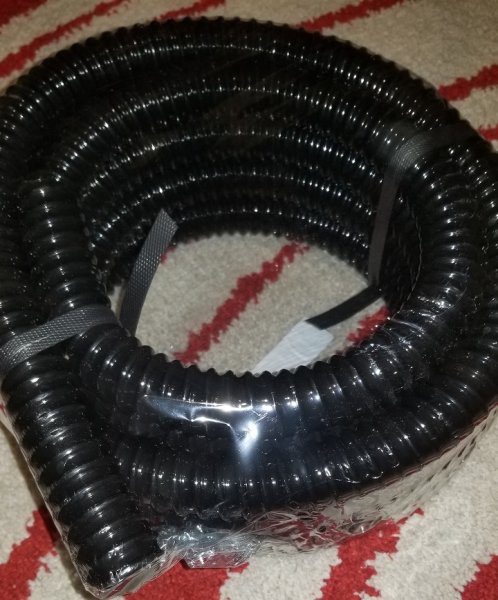
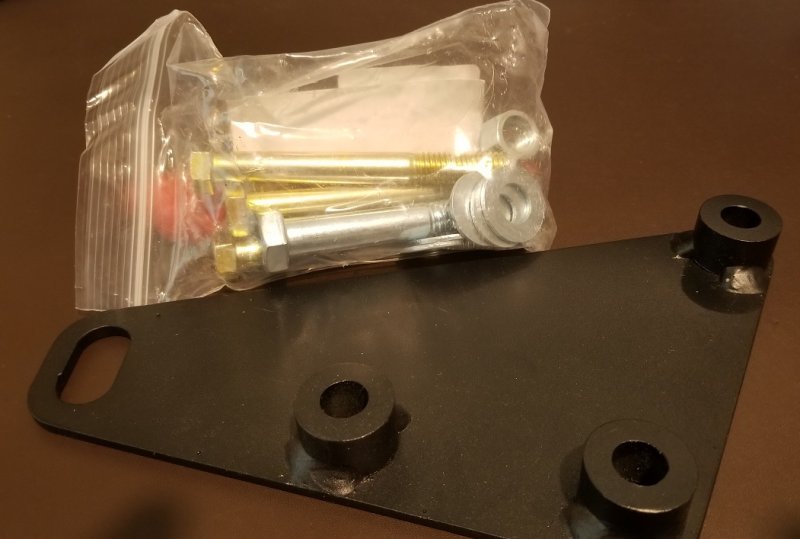
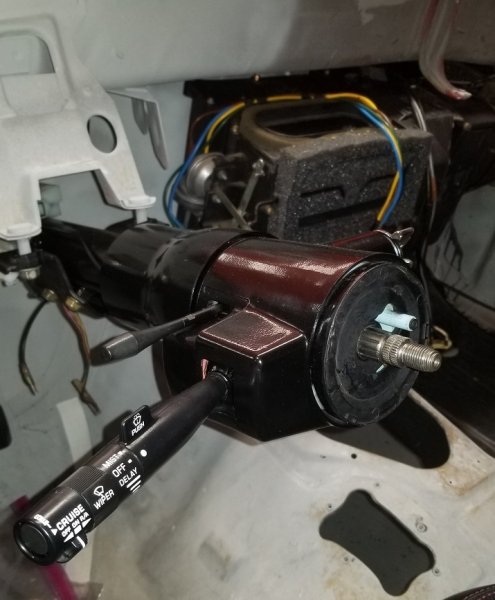
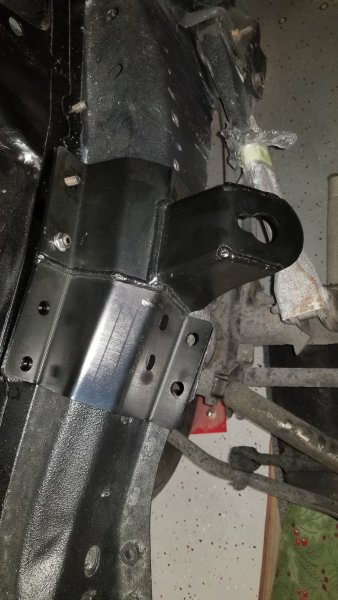
Haven't been able to spend much time on the Comanche. Had to deal with the infamous P0421 code on my LJ. Ended up replacing the CATs. All good now. Anyways, I managed to get the lines done for the brake MC, Front brakes and rear line Installed the refurbed steering column. Next job is to get the gearbox in. Got the JCR steering box bracket which along with the Boostwerks hidden winch mount should keep the gearbox in place. Got a replacement gearbox from RedHead Gears in Auburn, WA. Seems like a quality reman. I have a bunch of stuff at powdercoat. Waiting on the front axle so I can rebuild the front suspension and getting working steering. Need all that in place before I test fit the engine and make sure clearances are all good. Just for reference these lines have the following connections. All 3/16 tubing. Rear Master Cylinder (MC) to rear port on Proportioning Valve (PV) - M10 x 1.25 bubble flare to 1/2 20 double flare Front MC to Front top port on PV - M12 1.00 bubble flare to M10 x 1.25 double flare Rear PV to Front Drivers Caliper - 3/8 24 double flare Bottom rear PV to Front Passenger Caliper - 3/8 24 double flare Bottom front PV to Rear lines - 1/2 20 double flare 1996 Brake assembly fully plumbed Managed to test fit the heater box. Can confirm that a 1994 heater box fits an 1989 body. Also picked up some ducting on Amazon to replace the mangled ones out of the jeep. This is actually pond tubing for plumbing a water fountain. It is the right size (1" ID) and made of PVC by sealproof. It should work, seems flexible enough. Got the JCR Steering Box Bracket. Always good quality from those guys. Like the fact it comes with hardware Refurbed Steering column in place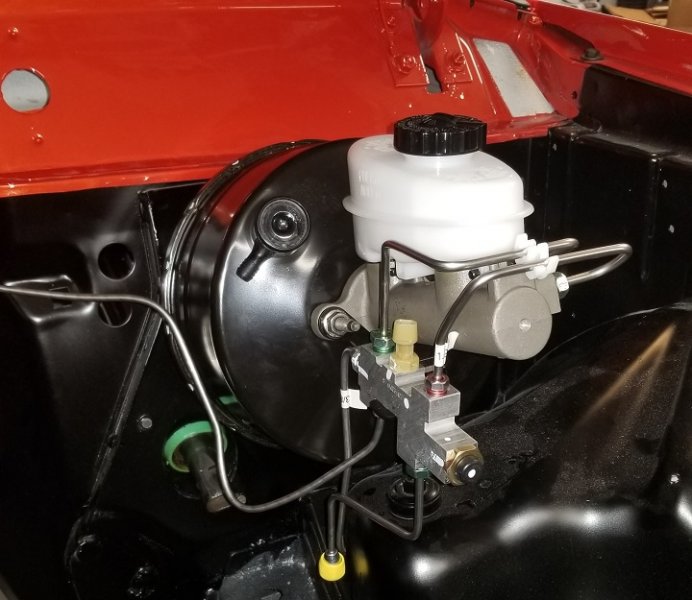

-
Very smart to go with the external Slave. Pete is correct - I misspoke, it is only the TJ AX15 you need to worry about an XJ or MJ trans should fit fine. Just checked they both have the same part no. The good news is that all external slave XJ and TJ Bell housings are the same.
-
You need a short input shaft 23 spline 231 to mate up to the AX15. This is the only one that will work out the box. Pre 1990 The AW4 uses a 21 spline shaft. It then went to a 23 spline shaft but is still a medium length. I have heard that you can use a medium shaft with an AX15 - maybe somebody can confirm. You will need to get an MJ specific AX15 or the TC clocking is wrong. You can drill an XJ case if you can't get an MJ one. The MJ AX15 clocks the TC about 10 degrees. Also be careful with pilot bearings.
-
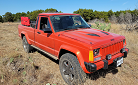
Comanche Dawn
Limeyjeeper replied to Limeyjeeper's topic in MJ Hardcore Tech: Epic Journeys to Greatness
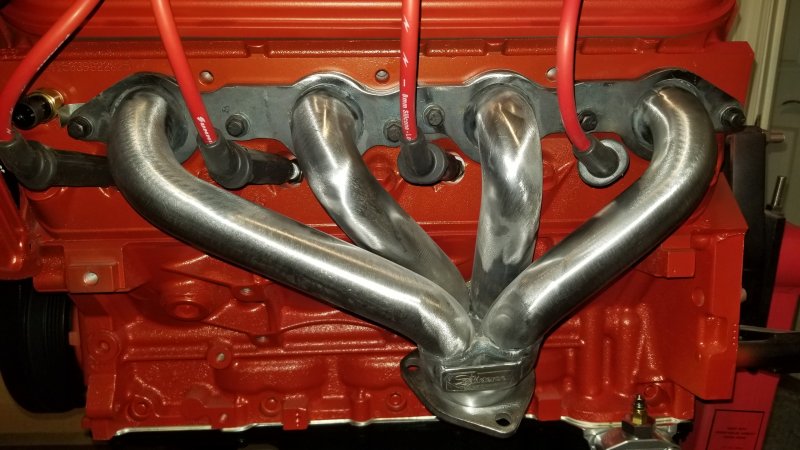
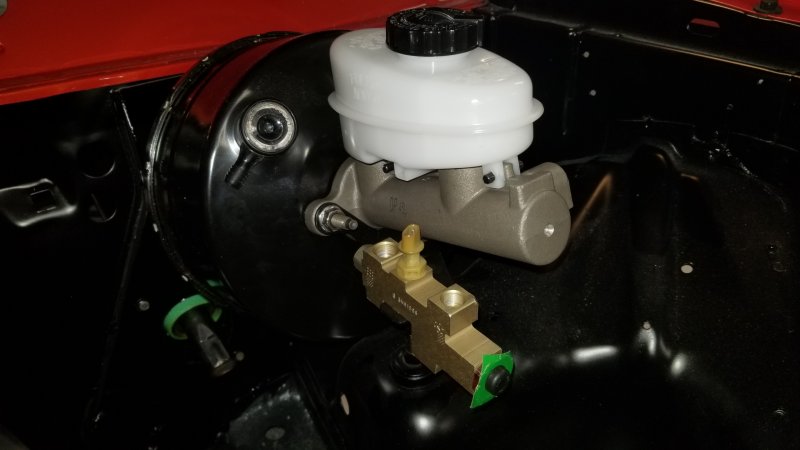
Novak Engine mounts going in Novak Exhaust headers are sweet (and expensive) they couldn't hug the block any closer. Off on Monday for black ceramic coating Also installed the (7+ Brake master and distribution block. Next the plumbing starts.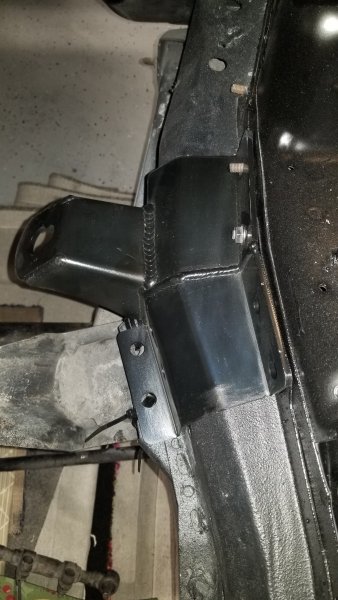
-
Comanche Dawn
Limeyjeeper replied to Limeyjeeper's topic in MJ Hardcore Tech: Epic Journeys to Greatness
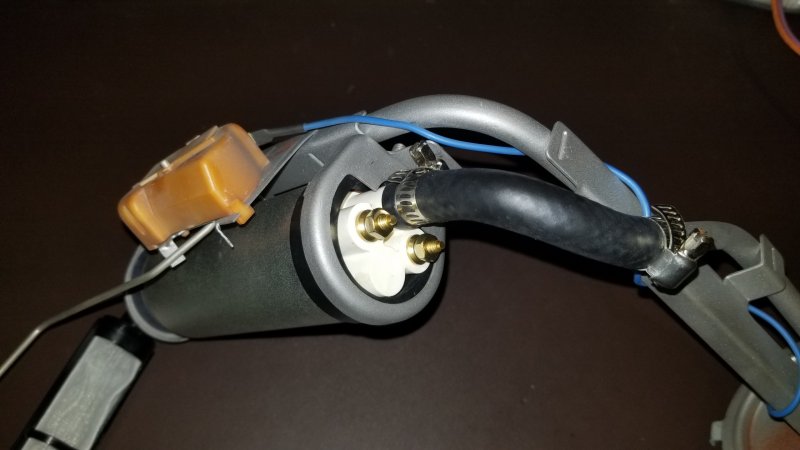
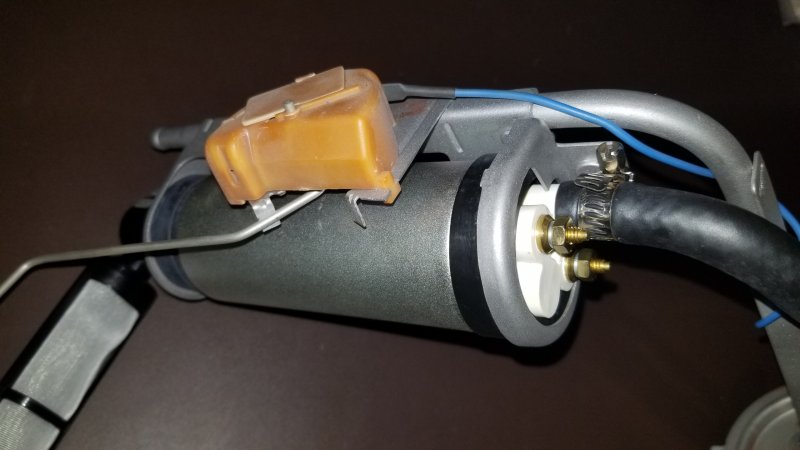
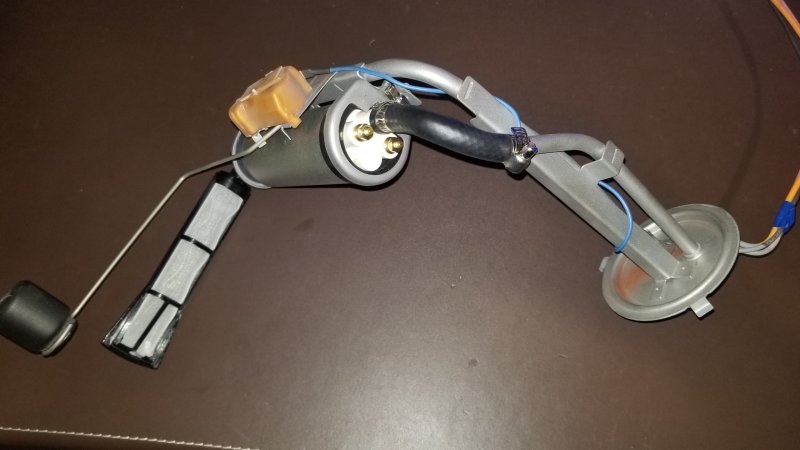
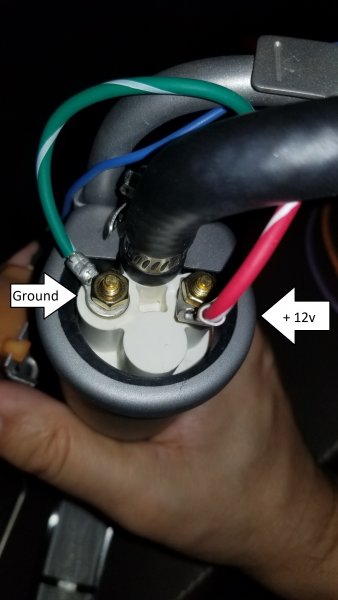
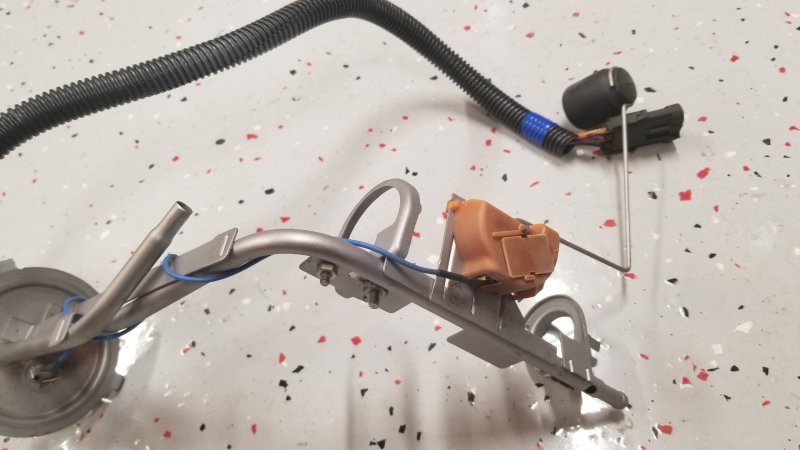
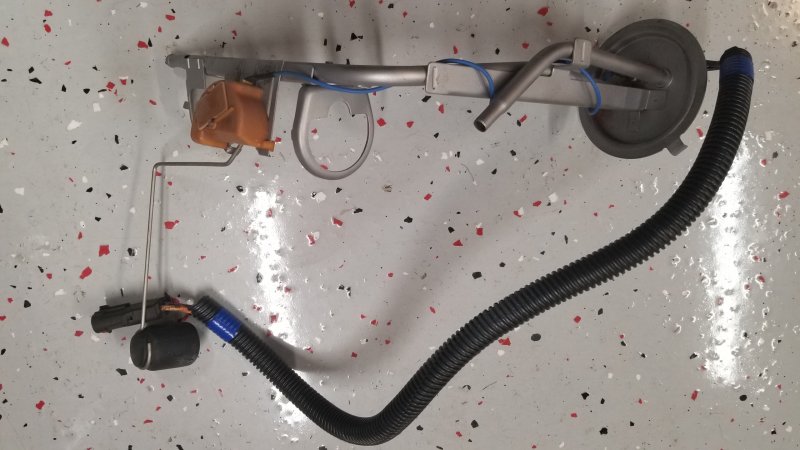
Mounted the Carter Fuel pump P90011 to the newly restored sending unit. It is a perfect fit. Some of their kits don't come with a strainer/filter if not supplied you can use Spectra Part No STR45. For those of you like me that were uncertain which pin on the Carter pump is +12v here are some pictures. I tested the pump using a 12v power supply to make 100% sure. Use TXL wire for the connection if your originals were nasty like mine. It is gasoline resistant.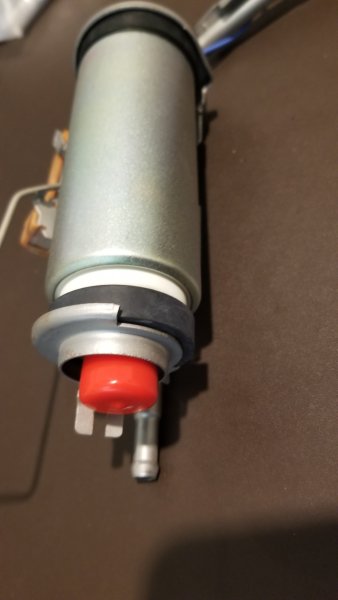
-
XJ Cruise Control Experts Needed
Limeyjeeper replied to AZJeff's topic in MJ Tech: Modification and Repairs
Any time, this is what the forum is for!! -
Comanche Dawn
Limeyjeeper replied to Limeyjeeper's topic in MJ Hardcore Tech: Epic Journeys to Greatness
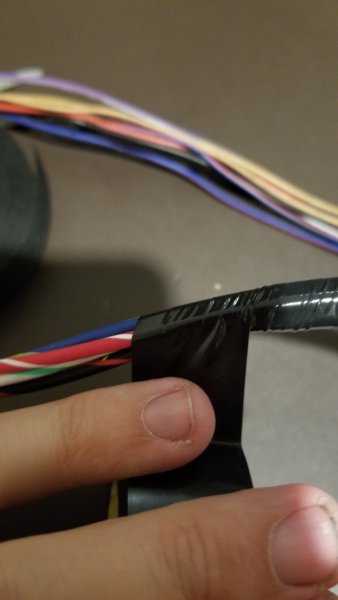
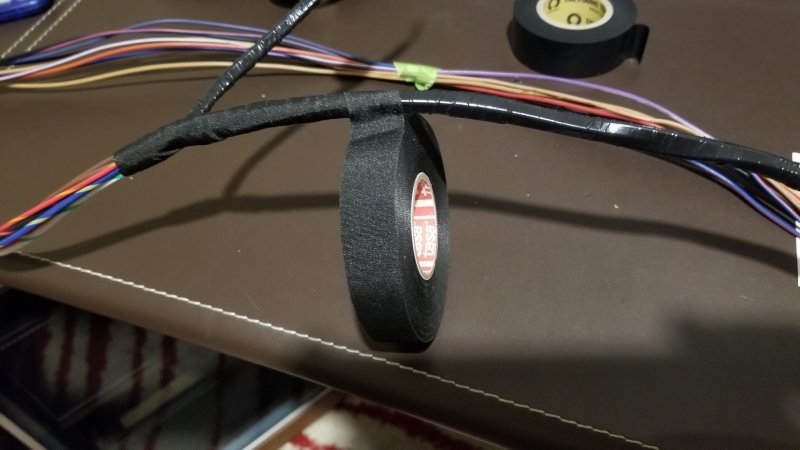
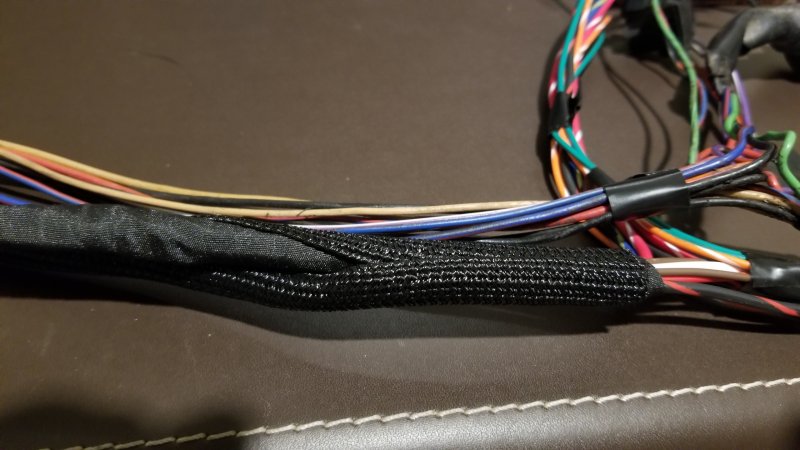
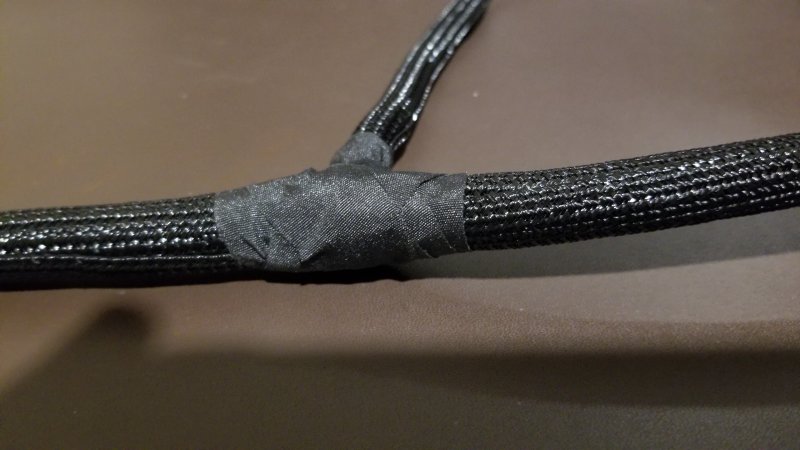
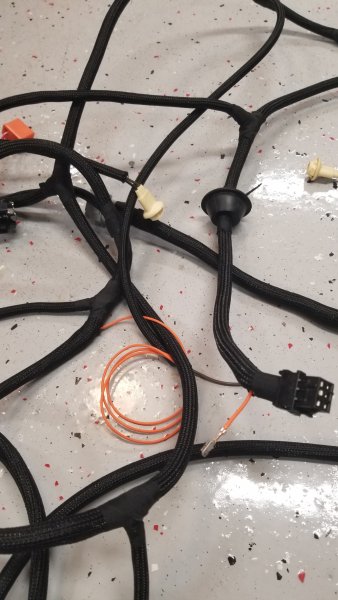
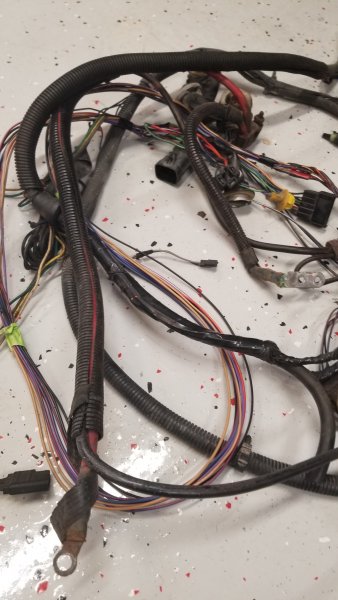
So here is a primer on building a long lasting wiring harness. You will need non adhesive Vinyl wiring harness wrapping tape and Tesa 51036 harness wrapping tape. The 51036 can handle higher temps (300F). I then sleeved the harness using Alex Tech high temp split braided sleeving. It can withstand upto 400F. The wire I used was TXL. This is the high temp wire you need for under the hood. You can get in on Ebay for about $20 for 25ft x 8 colors. So the first step is to tape the harness every 6 - 9" this keeps the bundle tight. Then wrap the vinyl tape around the harness as tightly as you can. Then wrap the harness using Tesa 51036 tape. Overlapping 50% on each turn. Then add the split sleeving Tape the joints Finished harness Old Harness This is not expensive. The connectors and sockets cost more than all the harness protection. The Tesa tape is about $4 a roll. I have used 2 rolls so far. The vinyl tape is about $3 a roll, still on my first roll. The Split Braid sleeving is the most expensive at about $15 for 25ft. You don't have to use it. I have done the front and rear lights, cab to rear harness, Fuel pump harness and the Transfer case harness. Hope this helps somebody tackling a harness project.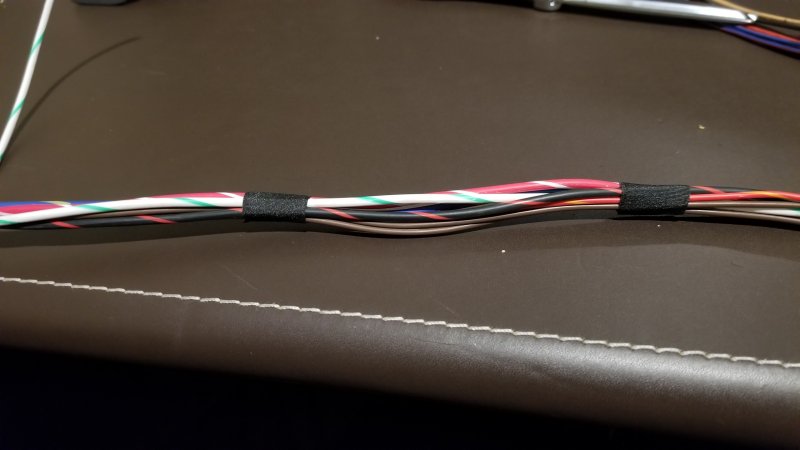
-
XJ Cruise Control Experts Needed
Limeyjeeper replied to AZJeff's topic in MJ Tech: Modification and Repairs
AZ Jeff See attached. 2001 XJ Speed Control Part Nos Switches.pdf 2001 XJ Speed Control Part Nos.pdf -
Comanche Dawn
Limeyjeeper replied to Limeyjeeper's topic in MJ Hardcore Tech: Epic Journeys to Greatness
Just a small family run business. Nicest of people. This is the kind of entrepreneurship that makes this country so wonderful. -
Comanche Dawn
Limeyjeeper replied to Limeyjeeper's topic in MJ Hardcore Tech: Epic Journeys to Greatness
Got the fuel sending unit back. Triststarr did an excellent job. $125 all in.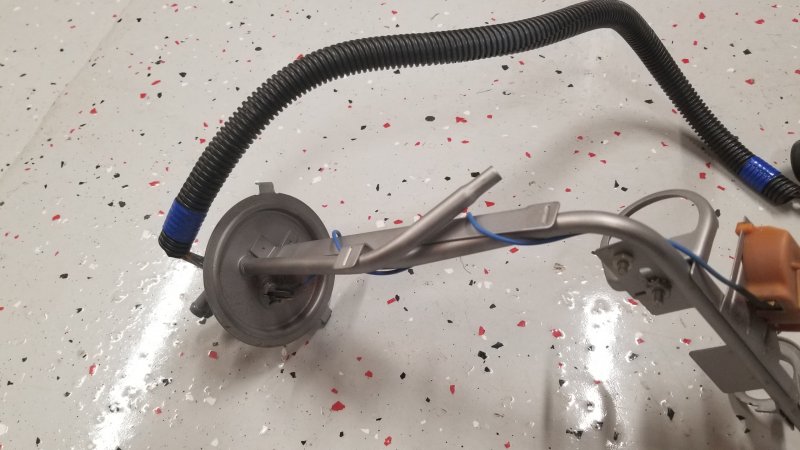
-
Comanche Dawn
Limeyjeeper replied to Limeyjeeper's topic in MJ Hardcore Tech: Epic Journeys to Greatness
Thanks Pete. Waiting on axles. Plan is to get suspension and lines done next. Then test fit engine, test fit harnesses to make sure everything is the right length, then interior, dash etc. -
Comanche Dawn
Limeyjeeper replied to Limeyjeeper's topic in MJ Hardcore Tech: Epic Journeys to Greatness
You never know. Stranger things have happened!!