Limeyjeeper
-
Posts
930 -
Joined
-
Last visited
-
Days Won
6
Content Type
Profiles
Forums
Gallery
Everything posted by Limeyjeeper
-

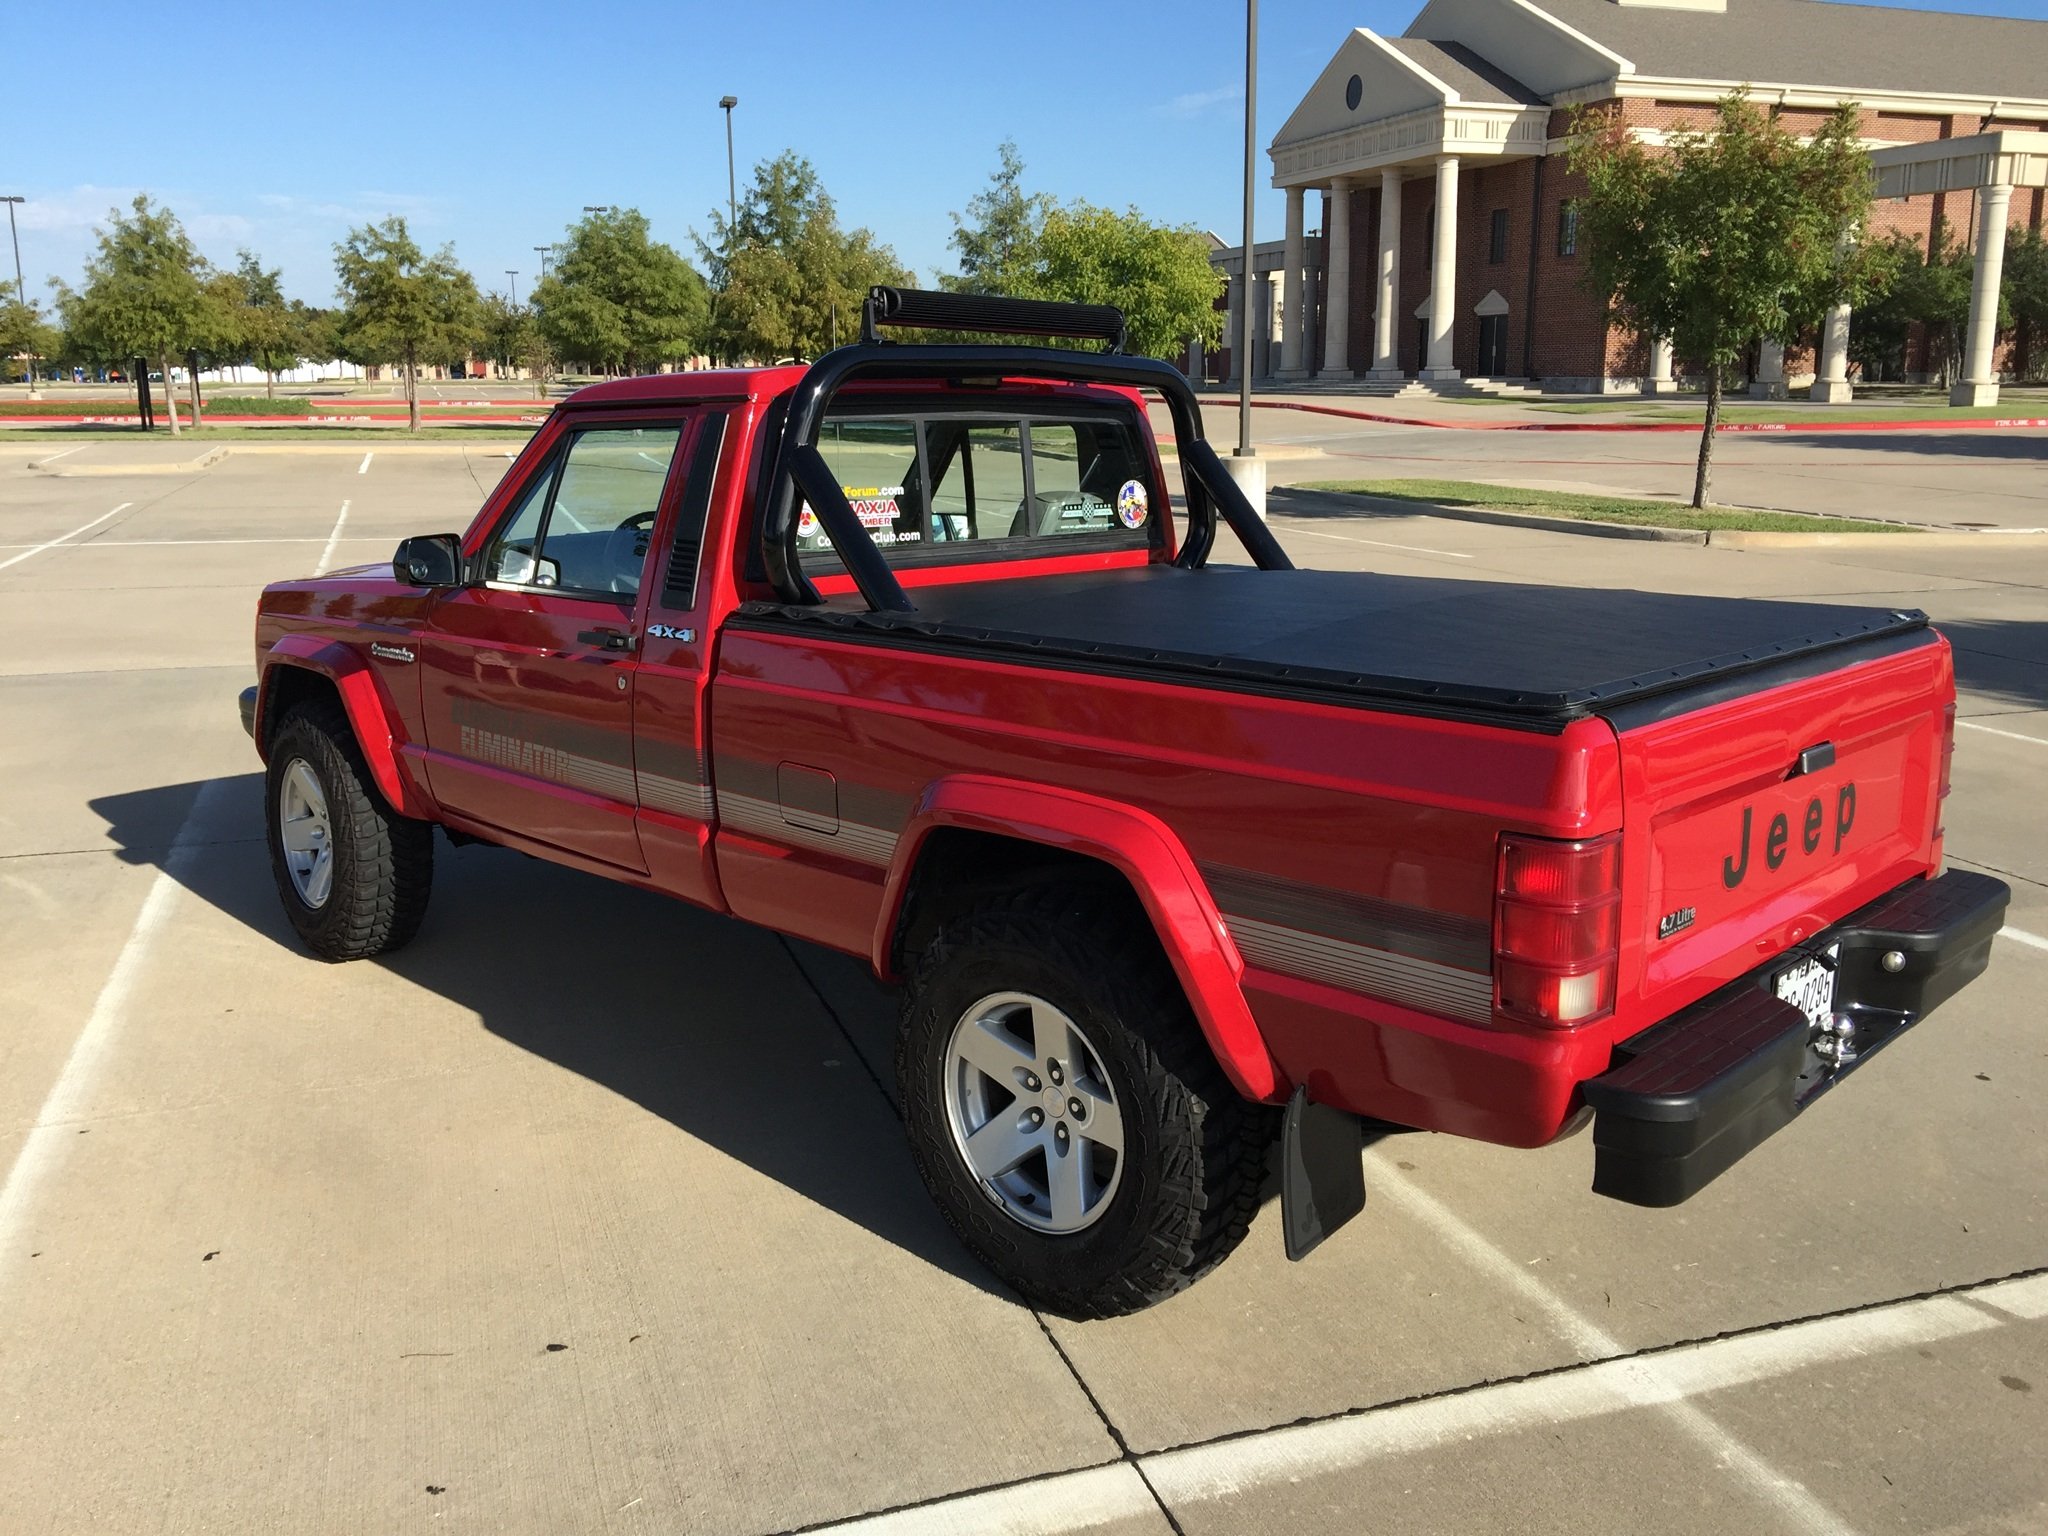
Comanche Dawn
Limeyjeeper replied to Limeyjeeper's topic in MJ Hardcore Tech: Epic Journeys to Greatness
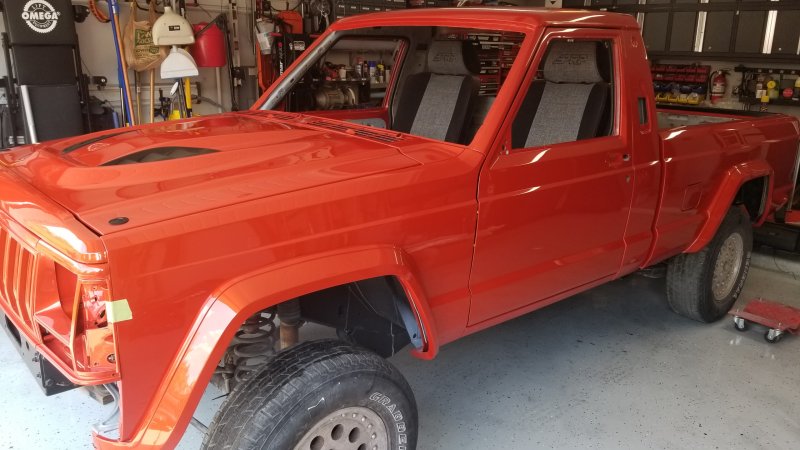
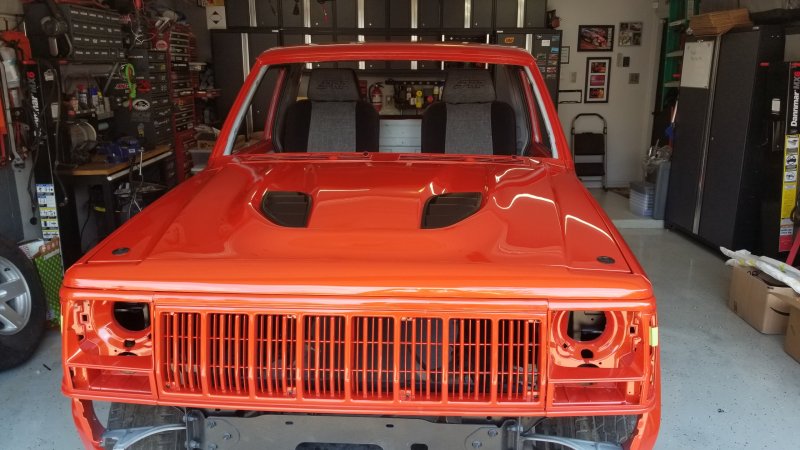
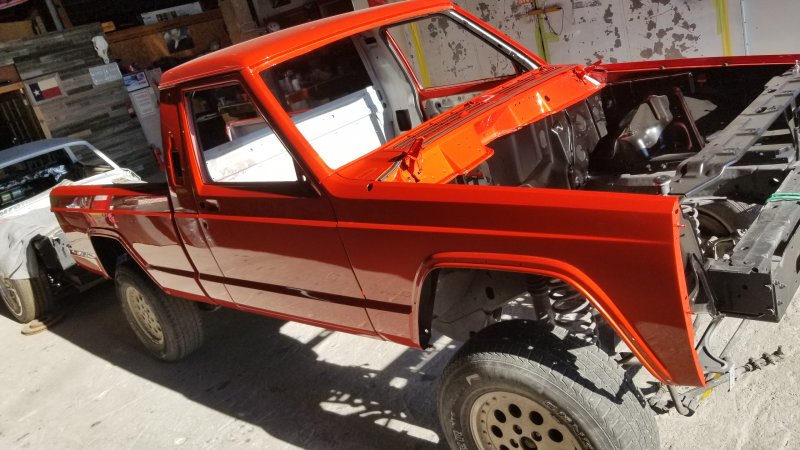
I had a terrible time finding somebody to do the work. No regular body shop would touch it. Ended up at a restoration shop. The body fixes and paint were over $10k. Insane amount of money I know, the body had hail damage. They put way over 100 hours into getting it right. PPG paint alone was $2k. Cost got completely out of control, but the body is so good it was worth it. (I keep telling myself) -
Comanche Dawn
Limeyjeeper replied to Limeyjeeper's topic in MJ Hardcore Tech: Epic Journeys to Greatness
Finally got her back from paint. Now the real work begins!!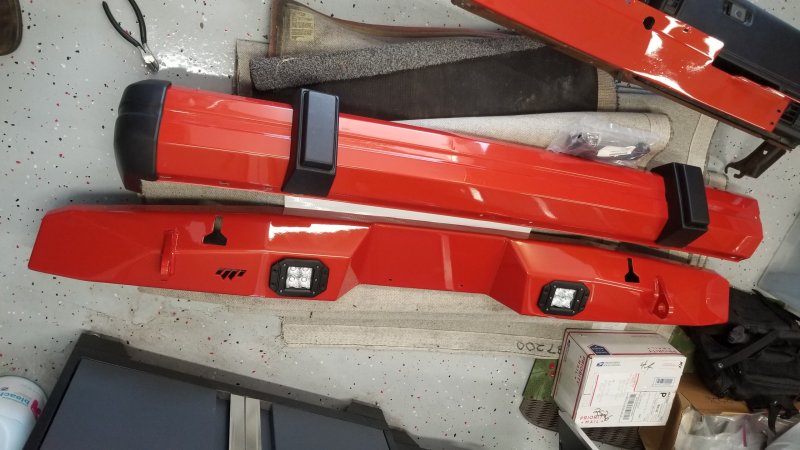
-
91 Eliminator 83K miles refresh with NOS parts
Limeyjeeper replied to Red Mistress's topic in Member Projects: Your Comanches
This is the switch plate out of my 1989. Just rediscovered it today.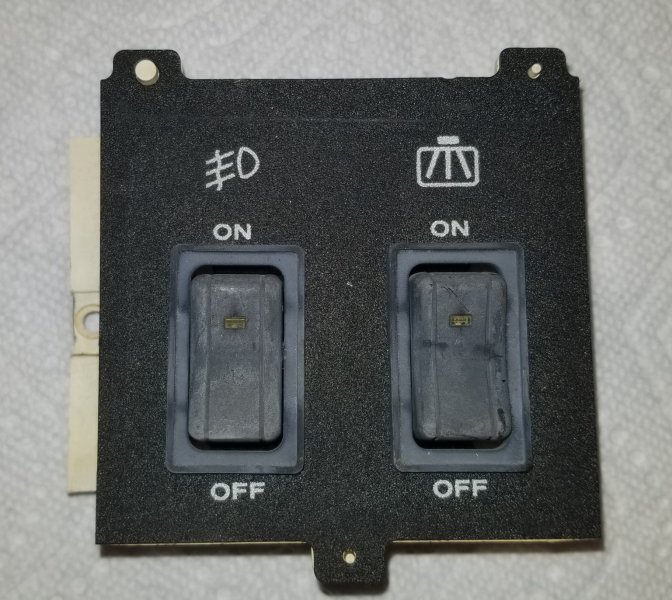
-
The truetrac is a great locker. They are surprisingly strong and quiet as they are a gear locker not a clutch locker. I am putting them front and back on my new build. The backing plates for the ZJ brakes will need some surgery. You have to change the spacing and fill the old holes with JB weld or a real weld. You will also need some preload spacers which you can get fro Teraflex https://teraflex.com/shop_items/528ffa7fead962f416e73011 The MJ Auto rear driveshaft is 1" shorter for the D44. You can get replacement plates and u bolts here:- https://www.rustysoffroad.com/rusty-s-u-bolt-plates-mj-comanche.html
-
Comanche Dawn
Limeyjeeper replied to Limeyjeeper's topic in MJ Hardcore Tech: Epic Journeys to Greatness
I agree. Mods can we move this to Epic Tech. It really belongs there. -
Comanche Dawn
Limeyjeeper replied to Limeyjeeper's topic in MJ Hardcore Tech: Epic Journeys to Greatness
Trying to accelerate the harness completion. Wifey thinks we actually need a kitchen table........ -
Comanche Dawn
Limeyjeeper replied to Limeyjeeper's topic in MJ Hardcore Tech: Epic Journeys to Greatness
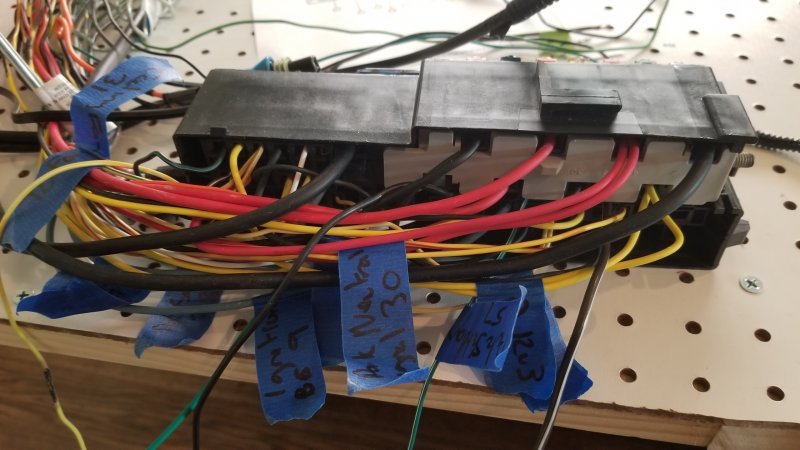
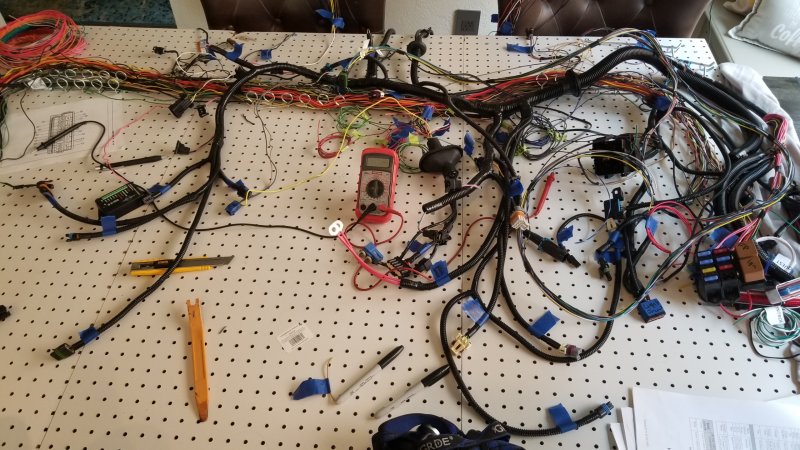
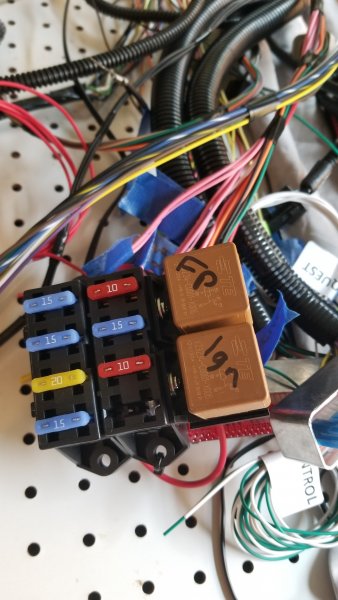
Waiting patiently for the Comanche to come back from paint. Should be this week. Engine is almost finished. Oil pump installed, Pan is on, steam lines almost done, valve and timing cover installed. Accessories mounted. Serpentine belt lines up perfectly. Once I get the body back the plan is to test fit the engine then temp install the harness and make whatever length adjustments needed to keep the wiring looking factory. Wiring harness is nearly done. All the changes and splices are done. Decided to remake the front headlight harness and bed to tail light harness. I am waiting on some connectors, should have them knocked out this week. The headlight harness is almost done. Everything tied back to the Jeep PDC. Added relays for fog lights and a second fan. Had to do some reconfiguring of the Jeep AC to bypass the pressure switch wiring. Going to be using the GM PCM to control the AC all I needed from the Jeep was the AC request. The GM PCM controls the inputs from the pressure sensor, controls the compressor, idle and both fans. So I added wiring for the GM pressure switch, fog lights, Cruise Control, winch controller, radar detector, and removed the Auto shutdown circuit and relay. Shutdown is controlled by the GM PCM. Added a indicator light for headlights, cruise control and Fulltime 4WD as I have an NP242 going in. Waiting on a replacement of a big order from Novak. FedEx managed to destroy the first one.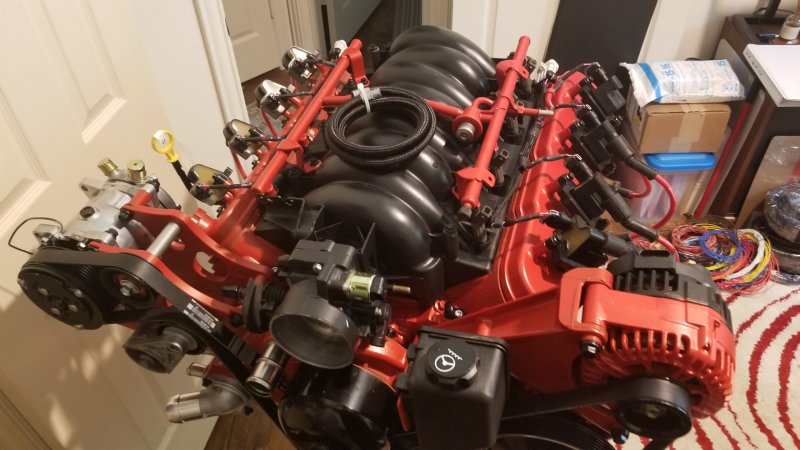
-
Floor pan plugs?
Limeyjeeper replied to Wounded_Fighter's topic in MJ Tech: Modification and Repairs
The Comanche has at least 12 different body plugs. These are the Part numbers I have found over the course of my rebuild Front body Plug .54" J4005015 Door Plug 2.25" 55002367 Floor Plug 1-1/2" J4004649 Floorpan Plug 2" (2) 4000499 Metal Floorpan Plugs (10) 55006578 Body Plugs (5) 55006579 Body Plug 4005792 Floor Plug 1 1/4" J4005792 Front Body Plug J4005015 Rocker Panel Plug 34201613 Door Latch Access Plug 55002368 Front Door ajar Body Plug J000377 -
Comanche Dawn
Limeyjeeper replied to Limeyjeeper's topic in MJ Hardcore Tech: Epic Journeys to Greatness
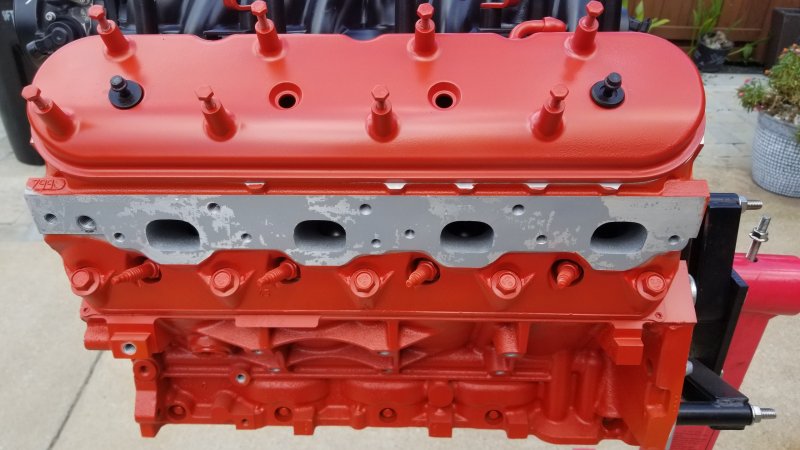
Finally had some time to paint the engine. Inferno orange and black. All Satin finish. Also got the AX15 from Novak. Has all the latest upgrades, so it should take a little longer to grenade it!!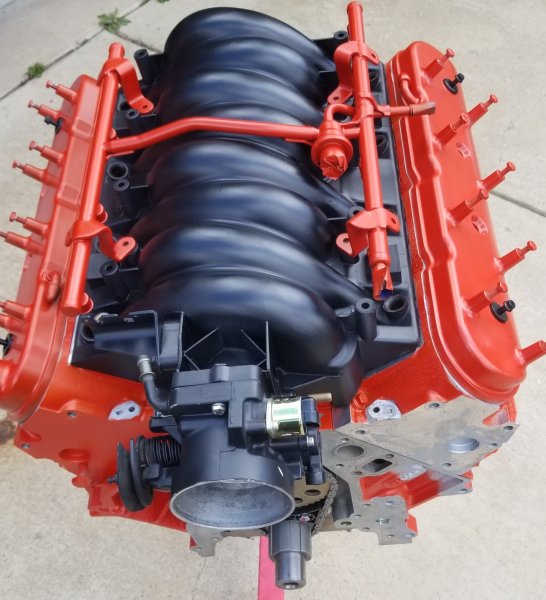

-
91 Eliminator 83K miles refresh with NOS parts
Limeyjeeper replied to Red Mistress's topic in Member Projects: Your Comanches
All the HO (ODB1) Comanches 91-92 had the open cooling system 86-90 Renix had the closed system. Horsepower went up to 190hp too. -
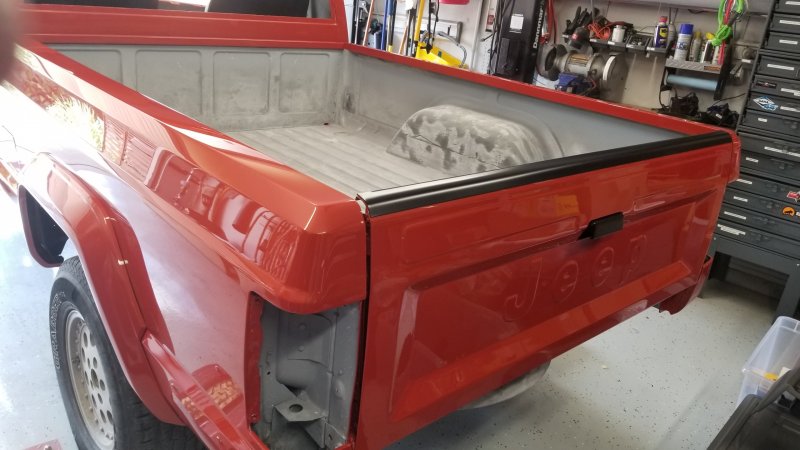
You can also get Comanche specific bed caps and bed side rails here, a bit pricey but exact fit... Bedside Rails http://www.qmisharp.com/products/products.asp?catID=2058 End Caps http://www.qmisharp.com/products/products.asp?catID=2070
-
Thoughts on gear ratios for highway use?
Limeyjeeper replied to Minuit's topic in MJ Tech: Modification and Repairs
This is a great calculator that will give you all the answers to your question http://www.grimmjeeper.com/gears.html -
Fuel pump and sending unit
Limeyjeeper replied to CarterD's topic in MJ Tech: Modification and Repairs
I got the url wrong it is www.tristarrradiator.com -
Fuel pump and sending unit
Limeyjeeper replied to CarterD's topic in MJ Tech: Modification and Repairs
There is a company called tristarr radiators that can refurbish your sending unit. They have a lot of experience with jeep senders. www.tristarradiator.com -
Comanche Dawn
Limeyjeeper replied to Limeyjeeper's topic in MJ Hardcore Tech: Epic Journeys to Greatness
The passenger side up near the cowl was too high. So we had to make a cut to push the edge down so it sat flush with the fender and the cowl. Couldnt grind the area where the hood hinges mounted because it would have lowered the whole side. The middle and drivers side aligned fine. Very annoying. I will get you pics in the next week or so. Hope this helps. -
A College Students V8 Comanche
Limeyjeeper replied to 88mjsally's topic in MJ Hardcore Tech: Epic Journeys to Greatness
It is great to see how far you have come on a limited budget. Great build! -
1991 Comanche full 1998 swap
Limeyjeeper replied to MJMOPARMAN's topic in Member Projects: Your Comanches
Very clean build. nice work!! -
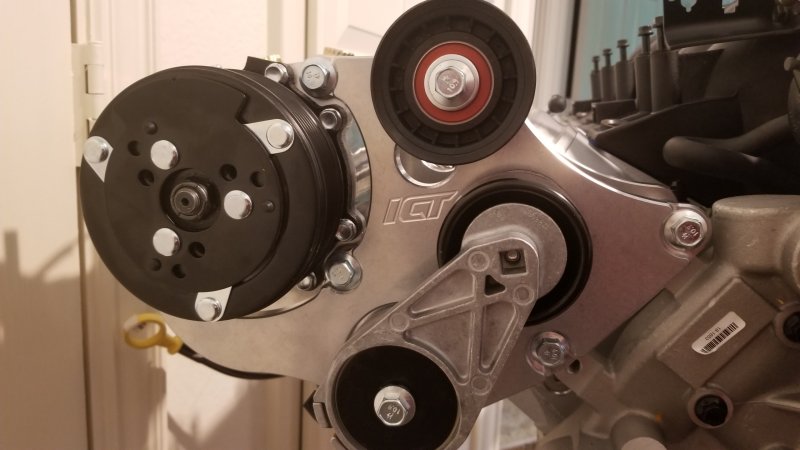
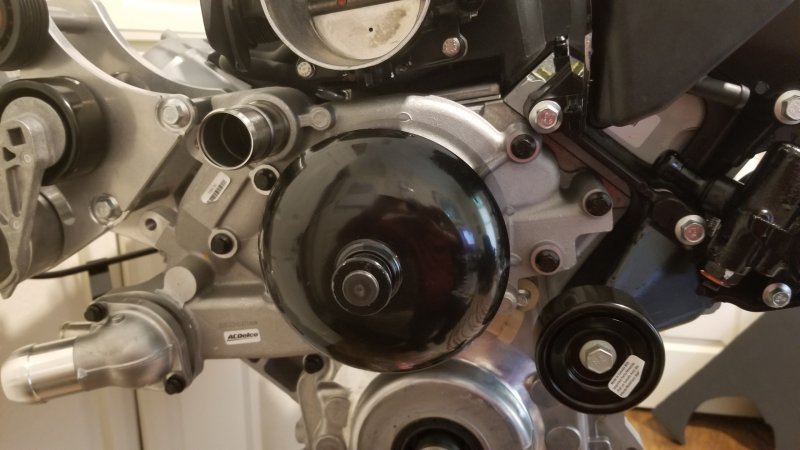
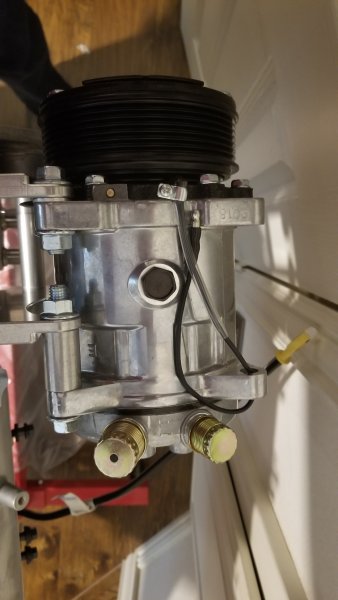
Comanche Dawn
Limeyjeeper replied to Limeyjeeper's topic in MJ Hardcore Tech: Epic Journeys to Greatness
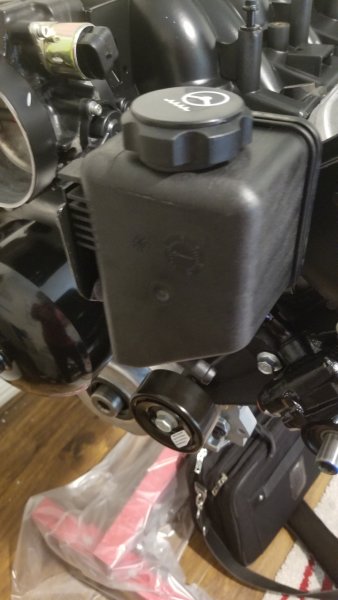
Here is a little primer on what accessory brackets and units are best suited to a Comanche LS 5.3 build. The truck accessory brackets don't work very well if you don't have a decent lift and don't want to cut your hood. I used the factory Corvette Alternator and PS Pump bracket (painted Satin black). It is GM part no 12578068. I also used the ICT billet Compressor bracket 551474-1. This kit comes with the belt tensioner and idler pulley. With this you need to use the Corvette Water Pump 19195105 I also used a Sanden 508 SDSH14 Compressor part no 340600 from Summit Racing. PS pump I used was the 36P1568 Corvette pump with a 12559885 pulley and reservoir and a 15907878 hose, you will also need a PS pump retainer bracket and a reservoir bracket P/No 12555222. The only item left is the Alternator. I am going to use the Corvette 150 amp Alternator Part No 3341399. You will also need a 1025K6 serpentine belt. Bolt wise I used 134-3201 - ARP for the Water pump 551201 - ICT Billet Alternator/PS Pump bracket bolts ICT Billet AC Bracket comes with all bolts and spacers. 134-7401 - ARP Thermostat housing bolts Hope this helps anybody mad enough to do this conversion. And yes my wife is letting me build the engine in my home office.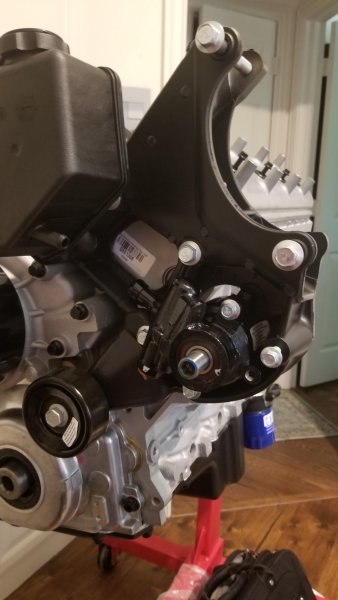
-
You will need a rear driveshaft. The 2WD and 4WD driveshafts are not the same length. 2WD is about 10" longer. Cherokee driveshafts are much shorter. Is the cherokee Manual or Auto? If Auto then that will add a lot of complication. You will need the crossmember and trans mount. plus the trans controller, harness etc etc. Not an easy swap.
-
Comanche Dawn
Limeyjeeper replied to Limeyjeeper's topic in MJ Hardcore Tech: Epic Journeys to Greatness
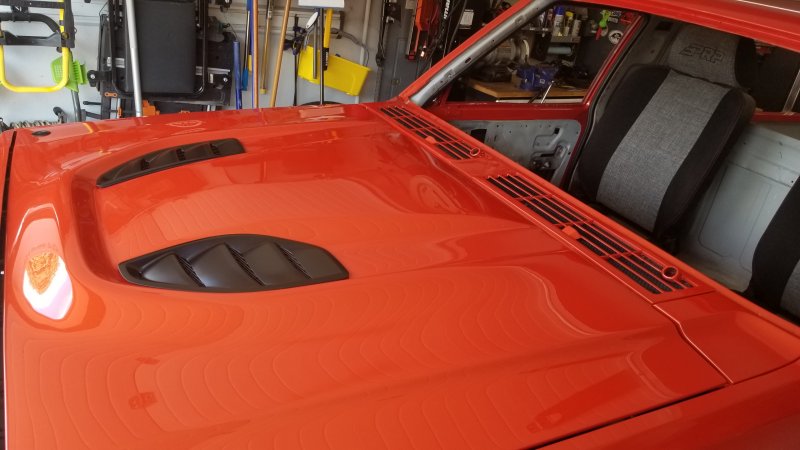
He buys the hood from Baja Fiber. I got mine from him as I live in Texas and it had a Baja Fiber sticker on it. Baja Fiber are the only manufacturer I know who makes this particular hood. -
Comanche Dawn
Limeyjeeper replied to Limeyjeeper's topic in MJ Hardcore Tech: Epic Journeys to Greatness
You can get the hood from Baja Fiber. You can Google them. Based out of CA -
Comanche Dawn
Limeyjeeper replied to Limeyjeeper's topic in MJ Hardcore Tech: Epic Journeys to Greatness
Had to share this. Baja fiber hood painted, cutouts for Rubicon 10th anniversary vents.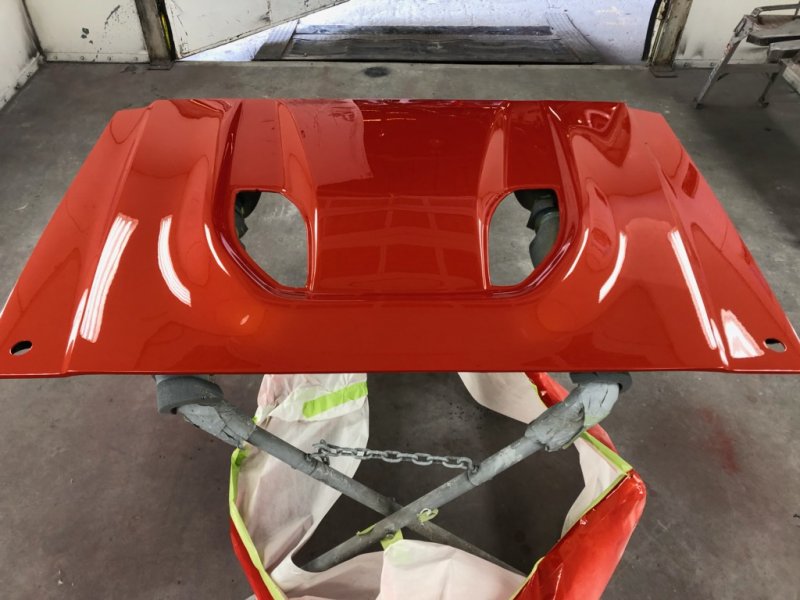
-
At risk of getting flamed you could use a Chrysler 8.25 with 29 spline shafts. They are everywhere at the junkyards as they were used in the XJ a lot. Not quite as strong as a 44 but better than a 35 by a good margin. Not as many locker options as the D44 but a lot cheaper.
-
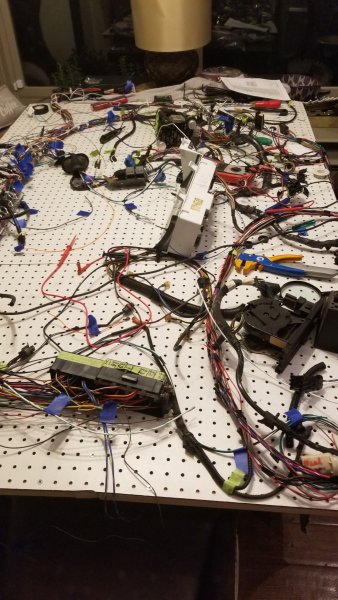
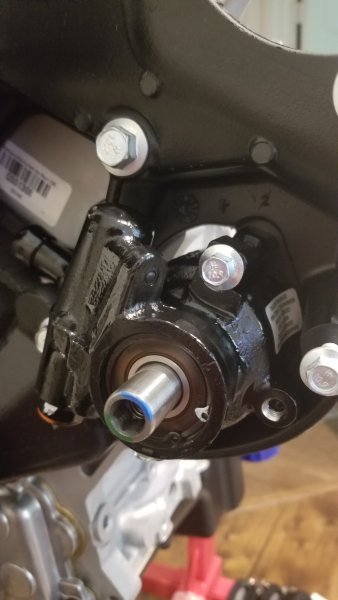
Comanche Dawn
Limeyjeeper replied to Limeyjeeper's topic in MJ Hardcore Tech: Epic Journeys to Greatness
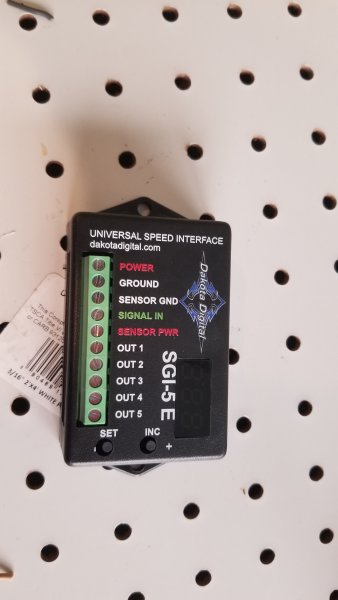
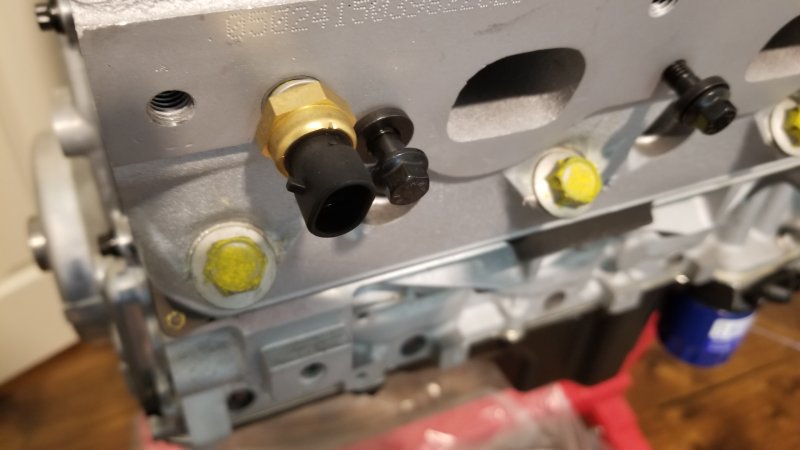
Spending most of my time on the engine. Learning the world of LS engines. Have to say it is an amazing platform. Using GM ECT and Jeep Oil pressure sensor. I am hoping the GM sensor works with the Jeep engine temp sensor. I am going to rig up a test as I have a spare gauge I can use. I had to source an Earls Straight 1/8" NPT Female to M16 x 1.5mm to be able to use the Jeep oil pressure sender unit as the block has an M16 hole and the jeep sensor is 1/8 NPT. not even close. See pic!! Heavily into the harness. I have got all the not needed jeep wiring out. Now to lay in the LS harness and get power to it. The GM PCM will controls the fans. I am going to repurpose the auto shutdown relay (Not needed in LS) to control the second fan. I will also be adding wiring for auxiliary lighting, radar detector, Winch controller. Wide band O2 and cruise control. Using the GM cruise control module, it will be integrated into the Jeep Cruise control switches on the Column. The GM cruise needs On/Off, Set/Coast, Resume/Accel, power, brake switch, and VSS feed. All these are available from the Jeep harness or the GM PCM and will be connected to the Cruise Control module. I am also going to connect the GM Cruise engaged status wire to the indicator cluster in the dash so I have an indicator when the cruise is engaged. The Jeep VSS (mounted in the transfer case) doesn't talk to the GM PCM so I am using using a Dakota Digital 8,000 PPM Sensor SEN01-1 with an SGH-5E to convert the GM AC sine wave signal to the Jeep square wave so I can run the Speedometer . You need to connect the GM PCM VSS signal input to Out 1 and the Dakota Digital VSS goes to VSS input. The GM PCM PPR needs to be set to 3 which gives 8,000 PPM. The GM PCM speedometer output will be connected to the Jeep Harness VSS wire going to the speedometer . I have a post 1990 cluster so it isn't a mechanical speedometer. If it was I wouldn't need the SGH-5E box. Novak has a nifty emulator to handle the tachometer. The Jeep PDC has had all its wires marked. It will replace the PDC that came with theLS harness. For those interested the PCM is a RED/Blue PCM Part no 12200411. I got the PCM with programming and the LS1 harness from PSI Conversions. High quality stuff.


-
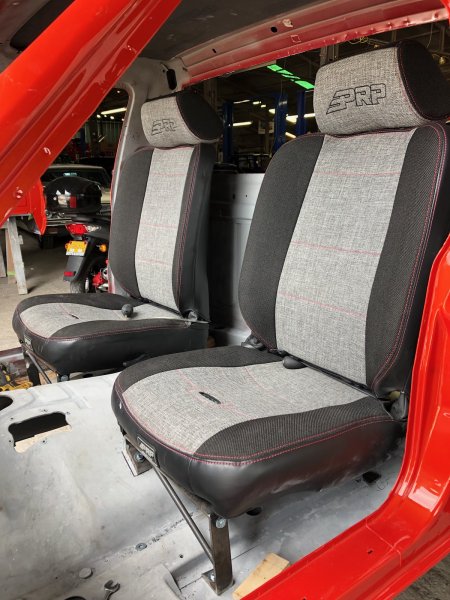
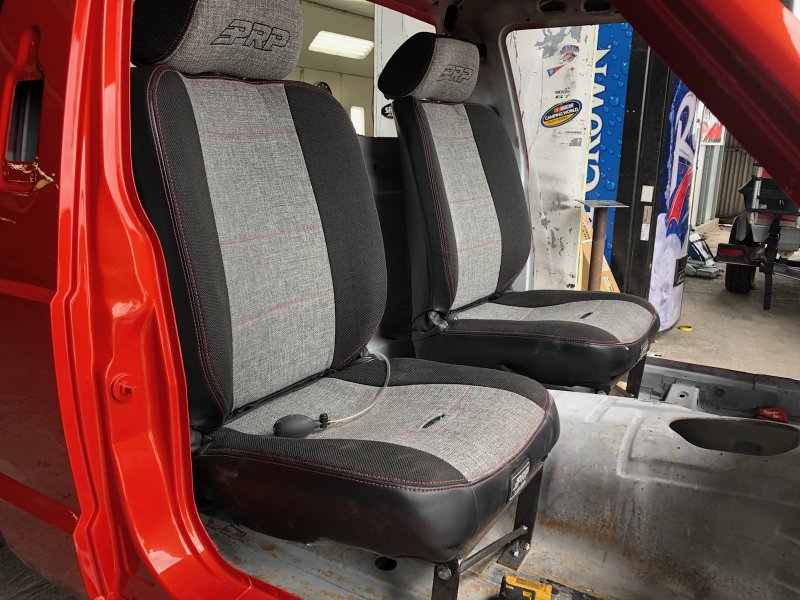
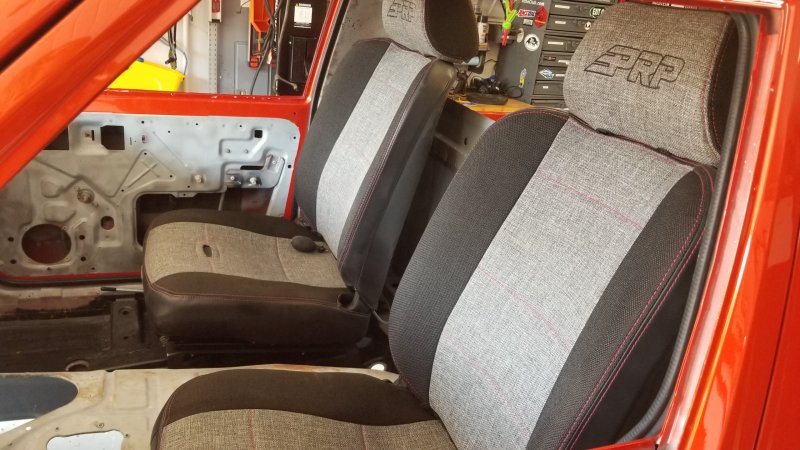
Comanche Dawn
Limeyjeeper replied to Limeyjeeper's topic in MJ Hardcore Tech: Epic Journeys to Greatness
Seats are in. Decided to make custom brackets. I am 6' 3" so we needed to get as much rear travel as possible. Dirtbound offroad bumper is painted. Hood is in paint this week.