AnotherOldJeepGuy
-
Posts
860 -
Joined
-
Last visited
Content Type
Profiles
Forums
Gallery
Everything posted by AnotherOldJeepGuy
-
 Thanks for the video @Airborne Janitor. Cool to see what is really in there. I am curious about a couple things and would like to hear the thoughts you and maybe the other experts on here might add just for fun. One, might a heat gun work to melt the glue and get it apart without cutting? The other thing is I am wondering how helpful it is to replace only 1 of the 4 "filters". I get that the filter you access easily may be the only one that is officially a "filter", but it seems if the other 3 "filter like" foam pieces are still dirty, cleaning 1 of 4 isn't doing a lot. Comments?
 -
Engine Idle Issues + some
AnotherOldJeepGuy replied to J33ps's topic in MJ Tech: Modification and Repairs
Some of my recent learning experience here which includes some pics that helped me locate and eventually check/tighten the manifold bolts... -
Cruise control switch/stalk, can't find one
AnotherOldJeepGuy replied to knever3's topic in MJ Tech: Modification and Repairs
OK, once I was able to sync up the two PDF files, and decode what colors in MY cable are (since they don't match) I repeated the continuity test and it was a 100% PASS. I remember my cruise switch was replaced under warranty once around 1995, and a second time in 2008, it is not a huge surprise that the wire colors might not match the factory part, especially given the second replacement was not done by a dealership. Unfortunately that means that if my switch is good, the failure is elsewhere. I may not go much farther down this rabbit hole since I don't take that many lengthy trips, which is really where the cruise was useful to me. But if I do decide to dive in, I'll pick up at this point. Thanks for the info up to this point.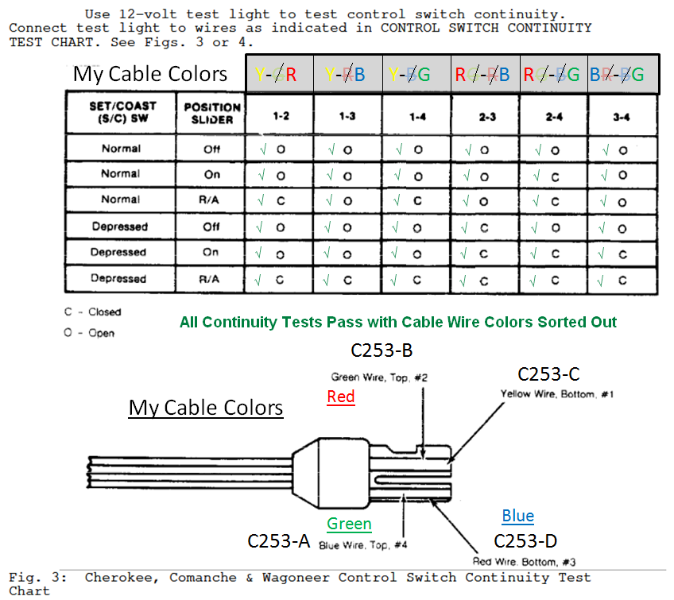
-
After you do that and if you want grossed out a bit longer, go clean out you shower and tub drains also.!
-
Cruise control switch/stalk, can't find one
AnotherOldJeepGuy replied to knever3's topic in MJ Tech: Modification and Repairs
Not all that late, it is a duplicate though. But 2 copies is much better than 0 copies . -
Comanche Headliners on Sale
AnotherOldJeepGuy replied to a1500ram's topic in Vendors- members making products for MJs
Nothing specific, and I can understand your preference. I just don't know what is involved in getting the old one out and the new one in , didn't want to buy something I was not able to install and end up setting in the garage. I'll take a look on YouTube and see if I can get an idea first from that instead. -
link for donating to help fund CC
AnotherOldJeepGuy replied to Pete M's topic in MJ Tech: Modification and Repairs
Glad to support. Please DM the address and I'll send a check. What do I put on the Payee line? -
Comanche Headliners on Sale
AnotherOldJeepGuy replied to a1500ram's topic in Vendors- members making products for MJs
Can you add a copy of the "How To Install" this headliner to the thread? -
I see posts from time to time that include images in the .HEIC format. For me at least, these are never viewable. Is there any way to add a viewer to the forum for this file type? If that is a bit out there, how else are these images viewable? In my case specifically, I browse with a Windows PC and sometimes on iPhone and cannot look at the .HEIC files on either.
-
Cruise control switch/stalk, can't find one
AnotherOldJeepGuy replied to knever3's topic in MJ Tech: Modification and Repairs
Thanks. That looks helpful. I have never been that good at automotive schematics, but perhaps not is the time to improve that skill and if I figure it out, I'll post the answer! -
Cruise control switch/stalk, can't find one
AnotherOldJeepGuy replied to knever3's topic in MJ Tech: Modification and Repairs
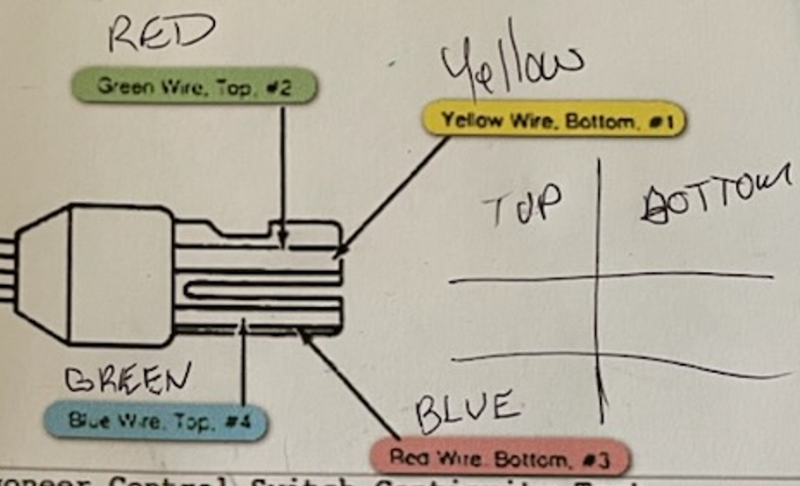
Well crap. Just got stopped dead in my tracks. Before I soldered my test switches to the wires, I decided to ohm out the wires in the cable to make sure they are connected and not broken along the way, and in doing so I discovered that the wire colors to pin assignments as noted in the PDF do not match my cable. With the cable connector oriented the same as show in Fig 3 I find the following: The top side top blade is identified as wire #2 (Green) but ohms out to the Red wire in my cable. The top side bottom blade is identified as wire #4 (Blue) but ohms out to the Green wire in my cable. The bottom side top blade is identified as wire #1 (Yellow) and this one matches my cable. The bottom side bottom blade is identified as wire #3 (Red) but ohms out to the Blue wire in my cable. I'm tempted to believe the pin numbers rather than the colors, but I have nothing to confirm that is the right answer. Anyone have any alternate detail to validate the pin numbers, or the colors, in some other way?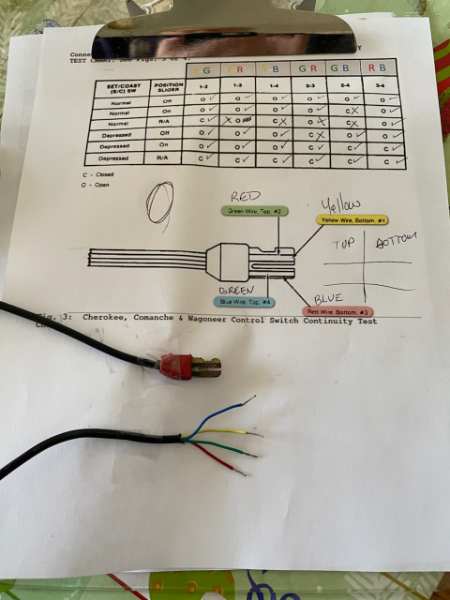
-
Cruise control switch/stalk, can't find one
AnotherOldJeepGuy replied to knever3's topic in MJ Tech: Modification and Repairs
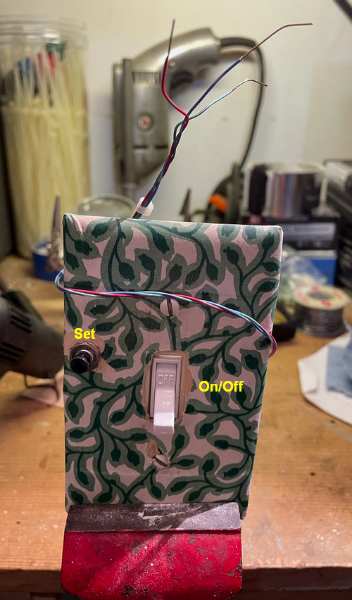
Here's the schematic and the test switch. It is not going to win any beauty contest, but if I interpreted the matrix correctly, and if my switch is the faulty component, I should be able to make cruise come on with this ugly switch, but I have a couple NCAAW March Madness games to watch first...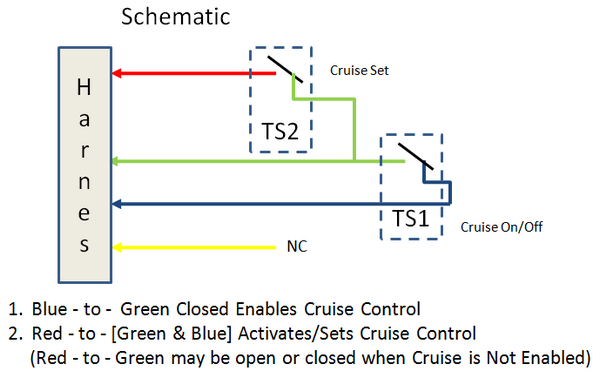
-
Cruise control switch/stalk, can't find one
AnotherOldJeepGuy replied to knever3's topic in MJ Tech: Modification and Repairs
Ah. Well the switch disconnected continuity test failed. The cells below in RED did not read the continuity expected. I am going to wait a day and repeat this test because some of the reading did jump a bit, so I'd like to see if I can get the same answer twice. Assuming I do repeat and come to the determination that the switch is bad, below is my test play to try and prove that if I did have a good switch, cruise would work, using a couple toggle switches. Leaving out Resume/Accel for test 1.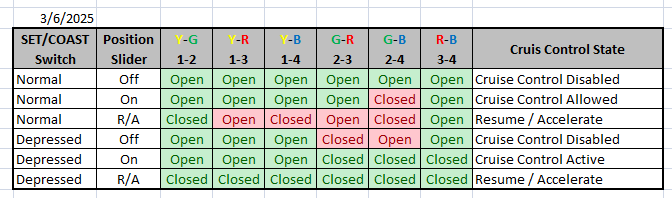
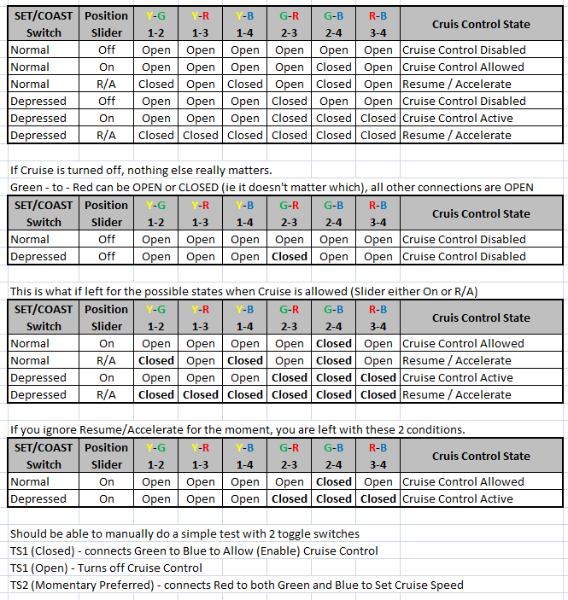
-
Cruise control switch/stalk, can't find one
AnotherOldJeepGuy replied to knever3's topic in MJ Tech: Modification and Repairs
Ah-ha, after staring at the PDF long enough it sunk in (I have much more in common with the turtle than the rabbit), it does have the continuity information to test the switch. I don't understand how one would go about testing this with a 12V test light since once the connector is unplugged there is no voltage, so that is a bit confusing . Nevertheless, it does seem to show the info to test the switch itself with an ohmmeter and I have colorized it for convenience.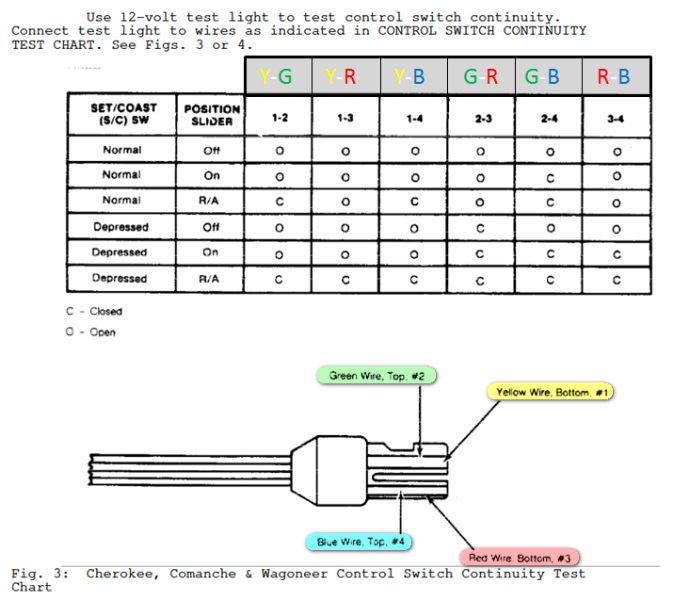
-
Cruise control switch/stalk, can't find one
AnotherOldJeepGuy replied to knever3's topic in MJ Tech: Modification and Repairs
That "a bit tricky" part is what scares me! -
Cruise control switch/stalk, can't find one
AnotherOldJeepGuy replied to knever3's topic in MJ Tech: Modification and Repairs
@pizzaman09noted this post, https://comancheclub.com/topic/54804-cruise-control-stalk-connector-connects-to-what-connector/ and in that post you get to a second link http://jeep-manual.ru/index.php?page=78 (not a secure website BTW) that goes over testing with special test equipment (Cruise Command System Tester (AM PC-1-R)), and also links to a PDF of very similar testing (perhaps the same, I didn't do an exhaustive A-B compare of the two). What I was proposing above was a simplified initial test, just testing the switch unit stand-alone as an elimination (or identification) of that part being good or bad. So I was hoping someone might be able to confirm and/or correct that part of my proposed test since I don't have the referenced test equipment. -
Cruise control switch/stalk, can't find one
AnotherOldJeepGuy replied to knever3's topic in MJ Tech: Modification and Repairs
Well that was a complete fail! Not a surprise really, but worth going for the Hail Mary first. So I can take a guess at what I might see if trying to test just the switch itself. There are 4 wires, I'll take a guess at what I might expect to see with a switch disconnected continuity test, and hope for a confirmation or correction from the experts Red (12V?) Reference for Continuity Test (Possibly 12V when Ignition Switch is ON and connected to harness) Blue (ON/OFF?) Open when OFF, Connected when ON Green (R/A?) Short when R/A Pressed (Momentary), Otherwise Open Yellow (Set?) Short with Set Pressed (Momentary), Otherwise Open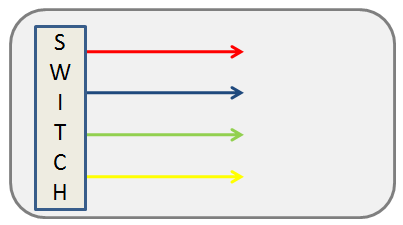
-
Cruise control switch/stalk, can't find one
AnotherOldJeepGuy replied to knever3's topic in MJ Tech: Modification and Repairs
Ready to road test to confirm functionality before attempting to snake it through the column. Pulling the wire through I could already tell it was tight, so that will be fun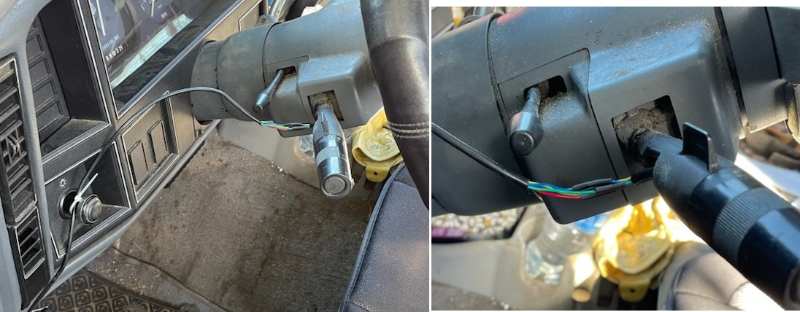
-
Ignition Switch not working properly
AnotherOldJeepGuy replied to knever3's topic in MJ Tech: Modification and Repairs
Originally my ACC position did turn on the radio. Then roughly 10yr back my truck would not start, and the shop replaced the ignition switch. From that point forward and still today, nothing happens when in ACC position. Unfortunately since I don't use ACC that much, it was quite some time from when that shop repair was done and beyond the repair warranty, so attempting a fix on my own is currently on the to-do list, but low priority. I don't remember if it was on during crank, I would assume no, but you know the risk of assumption... Please post your fix, I may copy it! -
At the risk of tempting fate , I have ran a few errands and other than the one time just after the first start-up after doing this last work, it is running and idling fine. Also not stalling on foot-off-accelerator decel. So for future reference, it would appear that the solution to stalling on decel in my specific case was either a) the new TPS, or b) cleaning TB / new TB gasket, or both a and b. The other work along the way I am sure was helpful to the overall health of the engine, but the stalling went away with a or b. Thanks again for the assists through the process!
-
I watched the video of this, and it clearly provides a huge amount of data. My hesitation is I don't know that I would know what to do with all this great data, and I am guessing that the local community college does not offer a course. But I will think on it a bit longer
-
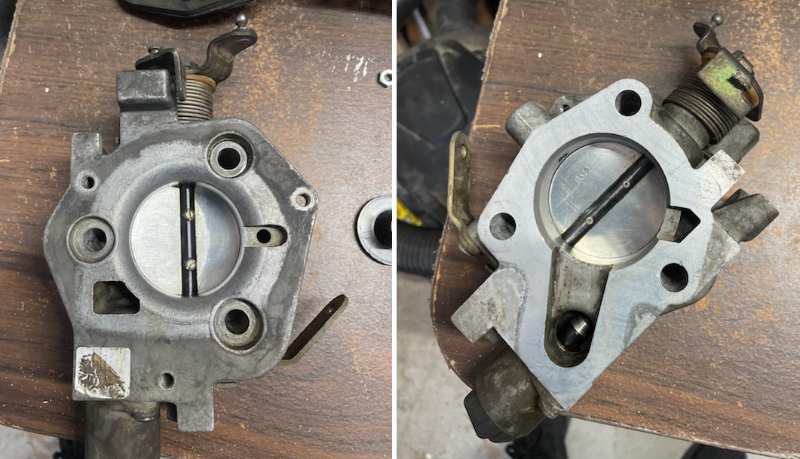
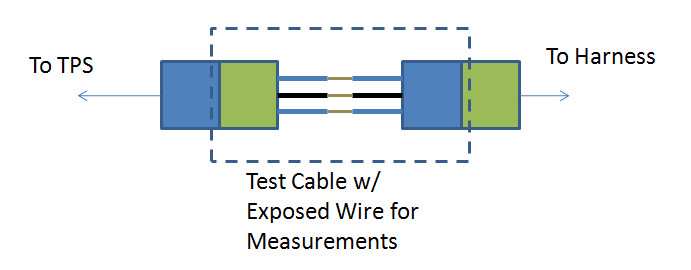
I definitely would assume the TPS reading was useless and one would think that would make things bad overall in at least some way. But oddly it ran fine and, with the experimental nut in place, came to a calm idle without stalling. Regardless, I did remove the TB and clean it (took about a hour to get it this clean) then reinstalled it with a new gasket, and with the TPS installed so that it was actually sensing the throttle. However the leads on my multi-meter are too fat to probe live as shown in the post from Cruiser, so as a starting point I positioned it roughly in the center of the adjustment. The only way to probe it I can see, with my equipment, is to expose the wires by removing a small amount of the insulation. Not ready to do that on my brand new TPS yet. I guess I could build a small test cable that I could insert at the existing connection with exposed probe points. If I knew the connector part numbers I might be more interested in this approach rather than cutting into my cables. But I don't know the connector part numbers..... Or I might just see if I can find some leads skinny enough to probe the cable as is per the Cruiser instructions. So bottom line, and acknowledging that I have not yet stepped through any calibration, with today's task complete, and, with the test nut removed, the engine is not running as smooth as it was before the effort. It didn't stall yet, but it does idle a bit more rough. I did check that I put everything back in place :) Question is, with the work done today, does this require another ECU relearn cycle?
-
Cruise control switch/stalk, can't find one
AnotherOldJeepGuy replied to knever3's topic in MJ Tech: Modification and Repairs
Great! Good to know I am messing with the right thing, and that just pulling isn't going to do it! If the other end is just flopping around in the column, it would seem I can just pull it on out the bottom, since I can't see it from the top anyway there's not a how lot advantage to leaving it in there. -
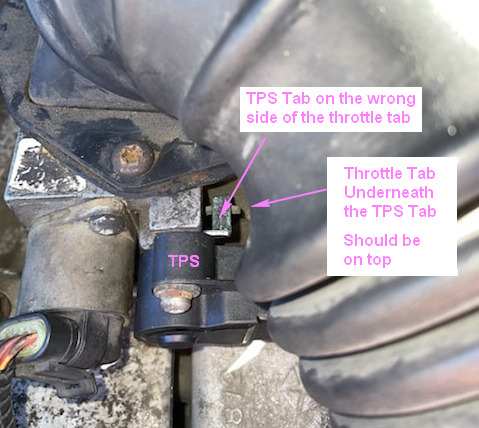
Well, here is a find that I'll post for the benefit of others with similar experience as I have. What I am calling the TPS Tab needs to be on the other side of what I am calling the Throttle Tab. As I have the new one installed, the TPS is doing nothing. In my pending TB removal and cleaning, most likely tomorrow, I will correct this before attempting the calibration in the Cruiser post referenced. Just another step along the learning curve.
-
Cruise control switch/stalk, can't find one
AnotherOldJeepGuy replied to knever3's topic in MJ Tech: Modification and Repairs
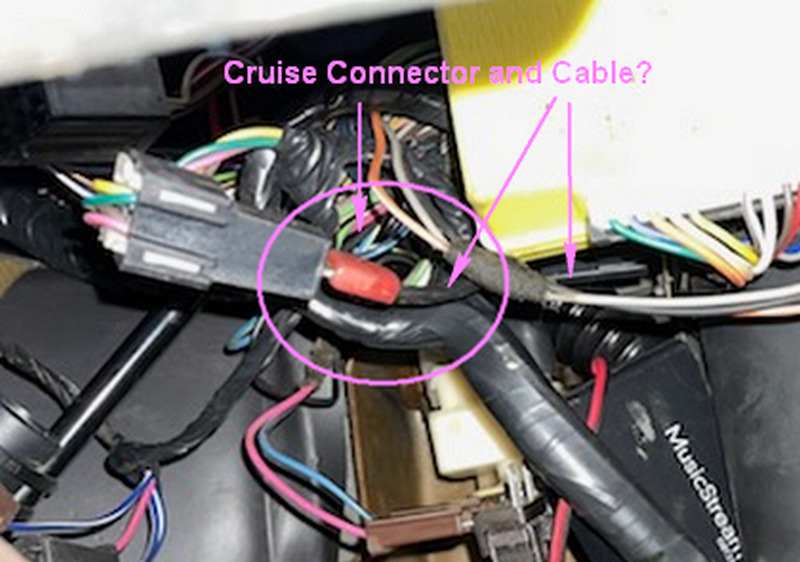
Would you say this is the end/connection at the other end of my broken/cut wire? Does it just pull out or is there a latching of some kind to look for?