AnotherOldJeepGuy
-
Posts
817 -
Joined
-
Last visited
Content Type
Profiles
Forums
Gallery
Everything posted by AnotherOldJeepGuy
-

Bench seat head rest upgrade
AnotherOldJeepGuy replied to Muncher's topic in MJ Tech: Modification and Repairs
Sounds almost too easy! -
Make a Comanche more garage friendly?
AnotherOldJeepGuy replied to NC Tom's topic in MJ Tech: Modification and Repairs
I usually park in the sun with windows up for a while to make sure the plastic is nice and warm. Of course once the crack has started that might not help. If the crack is clean you might glue it back together with E6000, that stuff is really strong and retains some flexibility. I hunted down cure times since that is not on the packaging and found something about 72 hours for maximum, so I generally let it set for 3 days. -
Bench seat head rest upgrade
AnotherOldJeepGuy replied to Muncher's topic in MJ Tech: Modification and Repairs
There appears to be an end-to-end zipper across the bottom of my bench seat. So it appears there exist at least a chance I could repair this without removing the seat back, just only the cover, that's TBD. It's on the list anyway! -
blow-by or something else
AnotherOldJeepGuy replied to watchamakalit's topic in MJ Tech: Modification and Repairs
Thanks for the education @pizzaman09 and @AZJeff! I suspect my 230k miles has landed my Jeep somewhat out of the "as designed" condition! I don't see the "real fix" getting done in my lifetime , I think I will monitor the filter and see if the new line I recently installed was of any benefit before going any farther. -
blow-by or something else
AnotherOldJeepGuy replied to watchamakalit's topic in MJ Tech: Modification and Repairs
So my educational quota is a bit behind on this, what is essentially the difference with this part compared to the original? -
blow-by or something else
AnotherOldJeepGuy replied to watchamakalit's topic in MJ Tech: Modification and Repairs
Mine was fragile enough that I failed to get it off in one piece to clean, but it is still available at Napa and doesn't cost much. https://www.napaonline.com/en/p/NOE7151365 -
Bench seat head rest upgrade
AnotherOldJeepGuy replied to Muncher's topic in MJ Tech: Modification and Repairs
Thanks, that sounds doable. I was afraid I was going to have to cut the cover off and sew it back together and that didn't sound too promising. I don't have any welding gear anymore but maybe I can bolt in a brace and give it some extra support with JB-Weld. -
Bench seat head rest upgrade
AnotherOldJeepGuy replied to Muncher's topic in MJ Tech: Modification and Repairs
So what are the basic steps to removing the seat back, getting to the skeleton, and then putting it back together since mine seems to have recently broken something inside in this general area (from @Eagle_SX4 pic earlier in this thread). Knowing nothing about it, it seems like a lot of upholstery sewing skills and equipment might be needed to put it back together, assuming you know how to get it apart in a condition that allows it to be usefully put back together. Something appears to be broken in the area indicated, I know because pushing down in that area is met with a very noticeable clunk, however the seat back currently looks perfect so apparently the foam is holding the shape with at rest.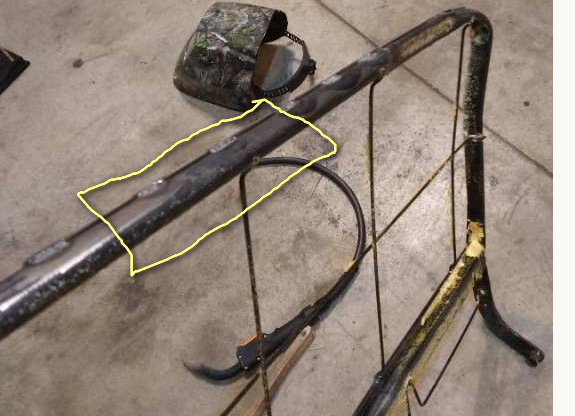
-
A place to start.. https://comancheclub.com/topic/74577-diagnosing-engine-overheating/?do=findComment&comment=780774 [Paragraph 2 - cap leak]
-
Once you are done with it, if I am understanding correctly you don't intend to use it in the end, I'd wouldn't mind being the next owner of this item if you are interested in passing it on when you don't need it anymore. I'd like to eventually add gauges to my 1990 that currently just has lights....
-
Thanks, glad to see this post! I am pretty sure mine is going to need replaced sometime soon. I replaced the thermal resistor block about 6 months ago when I lost all but high speed. With the new resistor block I got back all 4 speeds, but lately I have to switch to high, or high-1 to get it started, then I can dial it down and still get the slower speeds. And sometime the fan gets a little noisy for a while when I start it, but not that often (yet)! So, it's on the list.
-
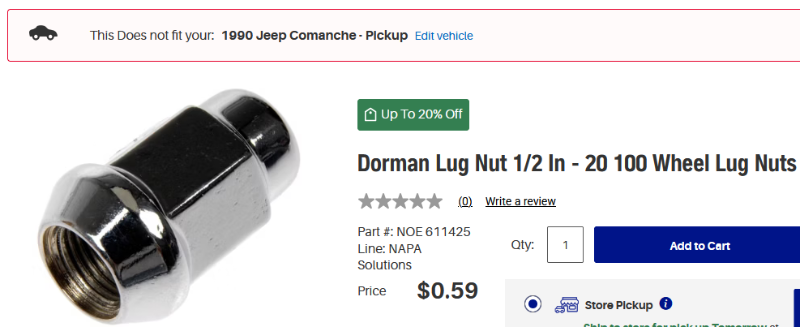
NAPA's website doesn't think this fits, but I am guessing the expertise here is more accurate than that of the NAPA website!
-
Got it, thanks!
-
Searching for "4.5 1/2" seems to overwhelmingly return lug nuts sized "1/2-20". Is this the same thing?
-
Mornin' Stellantis, time to dust off the Jeep Comanche
AnotherOldJeepGuy replied to Salvagedcircuit's topic in The Pub
Yeah, it's a fantasy rather than hope! -
Mornin' Stellantis, time to dust off the Jeep Comanche
AnotherOldJeepGuy replied to Salvagedcircuit's topic in The Pub
True, I should have said "I am holding out for the a new 2-door Gladiator with a Comanche sized bed." -
Mornin' Stellantis, time to dust off the Jeep Comanche
AnotherOldJeepGuy replied to Salvagedcircuit's topic in The Pub
I am holding out for the 2-door Gladiator with a Comanche sized bed. Granted, I anticipate a wait most likely longer than I have.... -
I sure wish my 1990 looked as good as yours! I assume you must have gotten it repainted. I did ask a shop once if they would quote a repaint and they said they would not touch it, apparently way too much prep work would be needed..
-
Round 2 was a success! Starts with shifter in either Park or Neutral. And to revisit the thread title, Park=Park, Neutral=Neutral, etc once more! The difference from Round 1 to Round 2 was I pulled the lock out farther, and made sure I could move the cable part on the transmission side in and out of the other side before I put things back together. As always the expertise here is invaluable! Thanks again @Gojira94!
-
Looks like I will head out to pull it apart again and pull the clip out farther, and see if it appears to be adjustable before remounting the bracket.
-
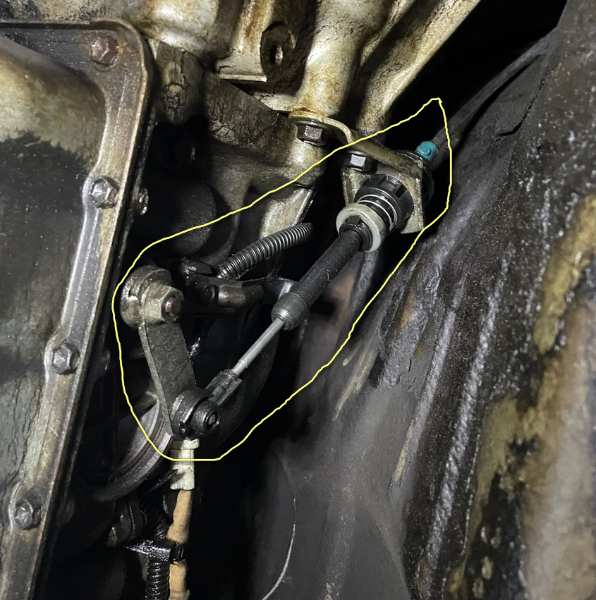
Round 1 was a failure. I was not able to get the U shaped locking thing loose without removing the bolts from the cable bracket and disconnecting the at the transfer case lever so I could get to the locking clip. While I had the cable disconnected I did manually move the shift lever at the transfer case into the Park position, and at the point the truck did start. So if I can get the cable correct it seems like that would fix things. With the cable disconnected and the bracket loose I could get to the lock and pull it out (well pry it out). I pulled it out about 1/2 inch then reassembled everything, connecting at the collar with the lever at the far location (Park), then pushed the lock back in, but the end result was that nothing changed. How far out do I need to pull the lock piece, it 1/2 inch enough? What is too much? If I accidentally pull it out all the way, does the assembly fall apart, making the job more difficult? I can repeat what I did with the lock out farther, I just don't want to get to a point that I have to hire a tow truck to take it in for repair if I pull the lock out too far and things blow up on me!
-
Thanks @Gojira94, I appreciate the details and time. I think you are saying once I disengage the locking "U" piece I push from the collar in the direction of the red arrow until is is snug, or more snug than it is with the shifter in Park, then snap the "U" shaped lock piece back in. That's what I'll attempt once it dries out a little more outside from this morning rain.
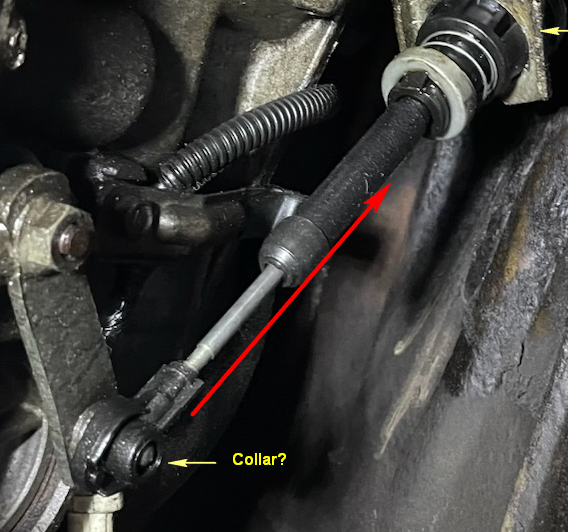
-
Just trying to confirm I understand what you are saying.. Kinda hope I am wrong as I have interpreted where the adjustment is, since if it is where I have it marked in the pic, can't see it to adjust it
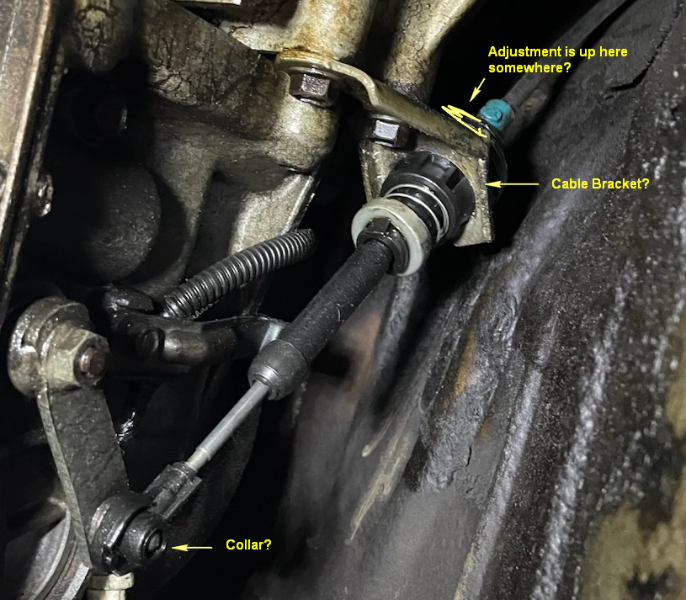
-
Hmm, well that would tweak the adjustment. I didn't hit anything or run over anything recently that would have been able to bend metal though. The metal doesn't look deformed in person although I can see that the picture angle could be interpreted as if it was. I'm hoping there is some way to adjust the length. Later today after the storms move out I'm going to see if I can get it disconnected and move the transmission switch through all the gears to try and determine there isn't a problem in there, and then maybe I can find out if the cable is adjustable and how. About 2 hours of YouTube hunting and found no examples that look like the cable I have, and I hate to start prying things that I don't know how they come apart, too many odds against me that something will break, but, it's that or go to the transmission shop for an adjustment there.
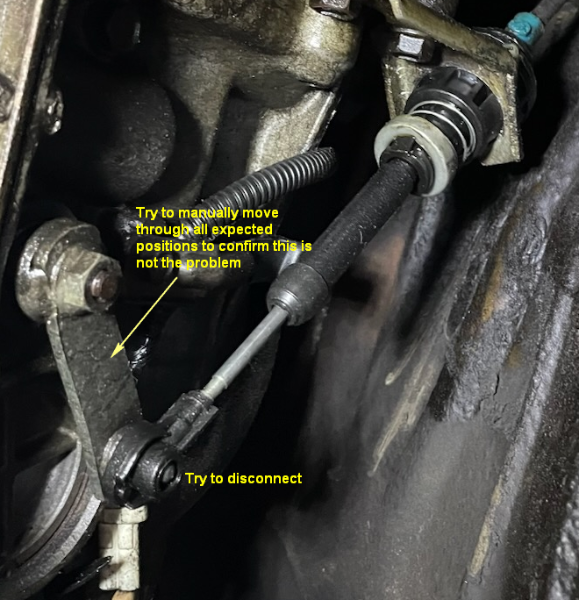
-
Mine is on the column. I think this is the linkage in question, correct? I don't see anything that would appear to be damaged. Weird that it just all of a sudden went out of adjustment if that is the problem, but I guess today was as good as any.