

AnotherOldJeepGuy
-
Posts
860 -
Joined
-
Last visited
Content Type
Profiles
Forums
Gallery
Everything posted by AnotherOldJeepGuy
-
 Great! These are not outrageous, but they are not exactly cheap either
 -
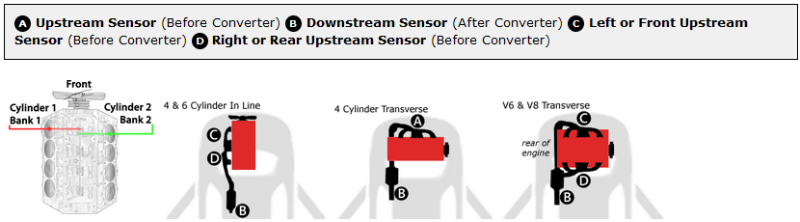
I looked at Rock Auto for the O2 Sensor. and I see the information below. This forum conversation seems to be talking about a single sensor, is there more than one I need to replace in my quest to" stop the stall"?

-
New water pump and belt in Aug 2021, so about 3.5 years. I put on a very small amount of dielectric grease in 2 places on rib side and 2 on flat side. Actually got a bit worse. I then did the water spray test and it went quiet for about a minute then I shut down, I'm sure that is very temporary.
-
The only why not at the moment is that I have dielectric grease and I don't have belt dressing. So if there is precedent in using that, I might as well go that way first. I'll put the version of remove and clean on the to-do list.
-
I have read several time, and I thought at least once on this forum that you can use a small amount of dielectric grease to treat squeaky belts. I even thought I had followed a thread that mentioned it, and maybe even participated, but although I can't seem to find it today. My belt does squeak. Not all the time, but often. If I hit it with a little water the squeak changes and that I also have read is a sign the squeak is a more likely the belt itself rather than some other part. So since I can't find this info again, I guess I need to start this thread and risk repeats. If someone knows the link to the post(s) that already cover this, just direct me to it! Otherwise, if using a bit of dielectric grease can be useful here, about how much and where should I apply it? Groove side only, flat side only, or both? Thanks
-
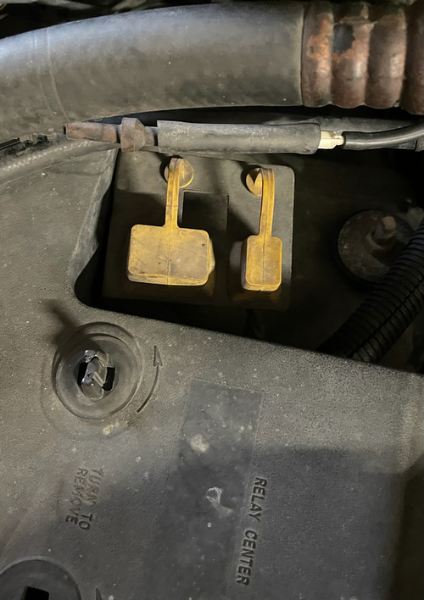
Thanks for the second on the O2S and the FSM doc. The Jeep is running better today. I have had it out on several short drives and for the most part the rough running is not there although it has returned momentarily a couple times on acceleration from a stop. It does still stall when I come to a stop unless I maintain he rpm manually. If I gradually work the rpms down I can get to the point where I am no longer engaging the accelerator, and once I get to that point it doesn't then stall, it is only on the quick rpm reduction where that happens. There is a diagnostic connector of some kind. Clearly not OBD2. Pretty sure the local auto parts store won't be able to connect to theses. What does it take to get to this diag info?
-
Well that is something I have not yet replaced, so might as well do it next!
-
I had a new Throttle Pos Sensor, so I put it in just in case. No change here (so I'll just probably put the old one back in, or I'll just keep it for a spare). I also repeated the water test from last Saturday, which indicated a leak in the front and back of the intake mating surface at the top side. On that day I tightened only 2 bolts up front and that eliminated the rpm loss when water was applied up there. I waited until today to tighten others when I had the fuel rail out. With what I tightened today I repeated the water test and there was no rpm change anywhere I applied water. I added on spraying up from underneath and no rpm change there either. So it would appear that the leaks are either closed, or at least now so small that the water test can't find it. That seems to be a step in the right direction at least.
-
I'll hold off on the plug test yet. The rough running only started with I pulled the injectors to replace a leaky one, and when that was out also tighten intake bolts that might be loose. I don't disagree that a compression test and a spark plug test might be worthwhile, but nothing I did was on that side of the engine, so for the moment (and particularly since I don't have anything to test the compression with anyway) I want to spend a bit more time on the driver side of the engine for the moment, but I'll put that on the list!
-
Ah I was assuming 1 injector per cylinder and expecting if two were not working I would hear something. But I think you are saying the ECU will use what it has available to get the RPM it wants, and I might not be able to hear a lot of difference. Quite frustrating!
-
Well my shade tree mechanic degree is not cutting it. Seems like any time I touch anything, I go backwards! The new injector is, call it position 1-6 from front to back, is at position 4. So I disconnected it. I really could not tell a noticeable sound difference when I started up. So my first though, that injector isn't working. But, then I ALSO unplugged position 3 and started. I still cannot really hear a difference. I'm not taking it around the block, but I would surely have expected to hear a change of some kind with 2 of 6 injectors unplugged. Should I expect to notice a difference with 2 of 6 injectors not providing fuel?
-
A computer reset doesn't seem to have made any difference this time, not a big surprise since it was really already reset. Short test drive, very rough. The only thing I KNOW is different is 1 new injector and a few manifold bolts being tighter. I am going to disconnect the electric connection to the new injector and see if anything changes, maybe I got a bad new injector. If that doesn't prove useful, I guess I'll disconnect each of the others 1 at a time to see if I learn anything that way.
-
I was generating my new post while you were answering.... I did not see those but I'll look again.
-
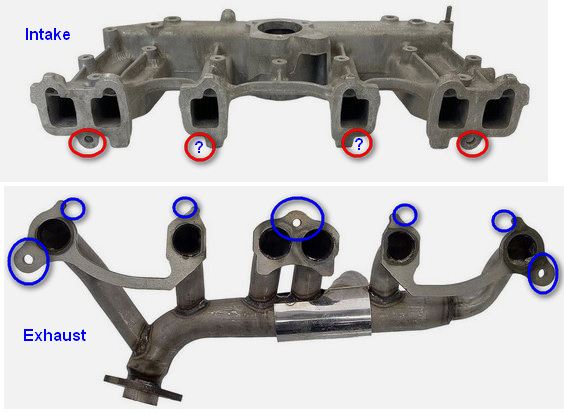
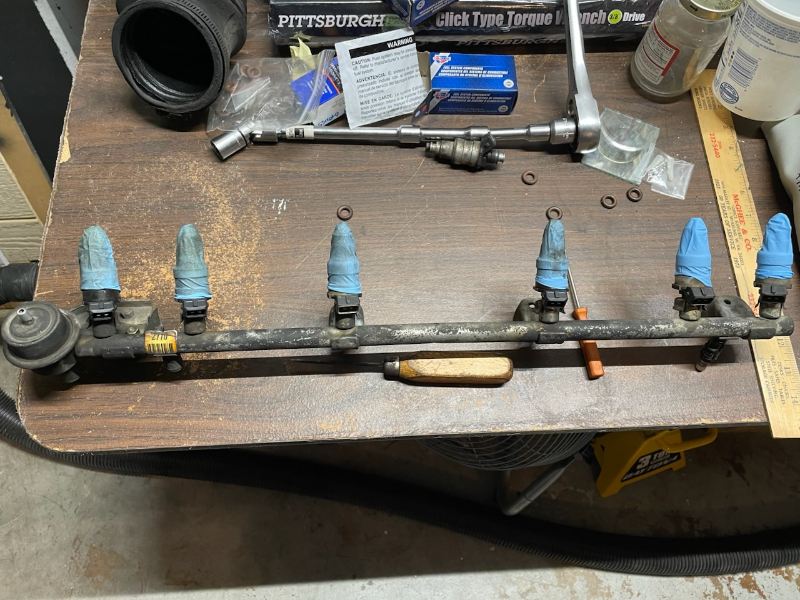
Got the injectors out and the leaky one replaced. While I had the fuel rail out I was able to get to the bolts circled in blue. So in total this round and the last I have checked 7 and 5 of them were loose enough that I could tighten them. The ones in red I could not reach from the top. The 2 circles with "?" are ones I am guessing might be there. Don't know yet if I fixed my leaky injector issue or not, it didn't leak on initial start up, but it was not leaking 100% of the time. As for stalling, it still did. Question: I replaced some hoses previously, and after doing so the engine ran a little rough. The fix was to reset the computer by leaving the battery disconnected overnight. It is running a little rough after this work. I'll assume for the moment it isn't the new injector cause if that wasn't working I think it would be more rough that I am seeing. So the question here is, did tightening these bolts put me in the condition where I need to reset the computer again? Note that for the 3 hours or so while I did this work the battery was already disconnected. Still, I am not sure what I might have don't here that would make the idle rough other than the computer needs reset "more". Oh might as well share my "protect the injectors while being maneuvered for install" method. Fingers cut out of used gloves fit pretty well over them...
-
Although the water test did show a change after tightening the two up front that were loose, the stalling did not improve. Hoping to get to the injector leak today, so maybe a few others can be snugged.
-
Radio Comes on Late After Start
AnotherOldJeepGuy replied to Keyav8r's topic in MJ Tech: Modification and Repairs
I would probably monitor the voltage to the radio when the situation occurs. If the voltage comes up immediately but the delay is there, the problem would more likely be the radio itself. I would monitor this voltage as close to the radio as you can get to, and for the ground connection to your meter I would do the same, probably that would be the metal case of the radio which I assume is connected to ground although I don't know that is always the case (no pun intended). Alternatively, if you see the delay in the voltage itself, ie the voltage does not show up at first, and when it does the radio comes right on, then you should be able to rule out the radio and look elsewhere. -
Need simple advice on door jamb switch
AnotherOldJeepGuy replied to jtdesigns's topic in MJ Tech: Modification and Repairs
From reading this thread, the passenger side is just 1/2 of the driver side. So if you don't find the passenger side, seems like you could probably use the same switch, just only use two of the 4 contacts. You can use an ohm meter to find two connections that are closed (connected, 0-ohms) before you depress the switch and open (disconnected, infinite ohms) when you press it. If there are only 3 contacts on the driver side switch, then I would assume it uses a common ground connection. The determination of which 2 contacts to use would be the same. -
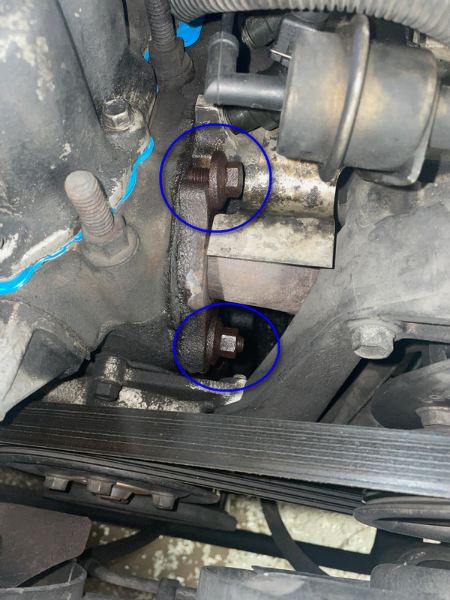
These two were very loose. The top one I could wiggle the washer by hand. The washers didn't wiggle by hand for the others I could reach from the top without disassembling things. I was afraid that turning either was going to be a problem since they have been there for so long, but I let penetrating oil soak in for only about 5 min and they turned easily. After tightening just these two I tried the water again and there was no rpm loss in this area, which was the worse area I had seen earlier. Water towards the back effected rpm slightly but not as much as here. I will be pulling the injectors in the near future because I have one leaking, at that time I'll see if the others along the top will tighten also. In the mean time I'll see if the stalling has improved, seems like that is likely to be a yes, but will see how the next couple days go.
-
The shotgun approach was much more successful diagnostics. My spray bottle just was not shooting out enough water. With the hose, and the hose was not really on that strong more of a strong mist, the reaction was there almost immediately. Spray on the plug side didn't seem to have any effect, but spray on the injector side caused the rpms to drop quickly. I only sprayed from the top. There was some drop with spray near the back but in this case the biggest reaction was near the front. I sprayed primarily in a line from front to back just where the intake connects as best I could aim there anyway. Significant rpm drop, which did quickly cure itself when I took the spray away. So it would seem there is some leakage there. In fact I believe that if I held the mist at a particular front point for a bit longer I would probably have caused a stall. It does make some logical sense that the front is worse, and overall that this symptom appeared after a couple attempts to clean out years of old oil sludge. It seems possible that I just got lucky and "cleaned" enough of to expose small leaks that was previously clogged with said sludge. In any case, it seems that the bolt tightening suggested by @pizzaman09 could be the answer. Or it could be that 35 year old gaskets have run their course. I am not convinced my ESM degree (Enhanced Shad-tree Mechanic degree) is sufficient to replace both intake and head gaskets. Although I think I saw somewhere it is really 1 common gasket, I don't know that makes it any more likely my degree is enough! At least not until I get my car back from the shop so that I don't end up with zero transportation if I delve into this repair. Alternately, holding the rpms up enough to not stall is pretty easy. So I get why the water, if it got in to the air/fuel mix in the intake would bring down the rpms. Water doesn't explode at all the same as gas. But other than Jethro Bodine , I don't think anyone really believes you can use water for fuel. So the reason the leak is causing the stall is not water which was a diagnostic tool, it's air. Is it just that the extra air is throwing off the mix, or is there more to it than that? If the leak was a hose instead, would that have been doing the same thing or something different?
-
Got out my handy spray bottle full of water and proceeded to soak down every hose I could see, no change in engine rpm or sound. I also sprayed what I could from the top of the intake and header mating points with same results. I didn't climb under and try from that side yet. I used my spray bottle because I had good control of what I was spraying. I may try the hose next which will be a lot more water and not very well focused, so more of a shotgun than a rifle, but if I do get a response maybe I'll learn something new at that point.
-
Well since I do already have water I'll try that first. I don't know that I have any setup to allow introducing pressurized smoke, that's an interesting suggestion but I'll just hope for water working..
-
Interesting. I used up all my brake cleaner spray recently but will pick up a new can and give that a try.
-
Eventhough the scenario from @pizzaman09 does fit the symptoms, I have not gotten to the point yet that I can dig in deep enough to check for loosened intake bolts. In the mean time, does the soapy water test work for vacuum lines? I have yet to find any visual sign of a breach anywhere. And I doubt I'd be able to hear a small vacuum leak with the engine running, or even not running for that matter. I figured if there was a small leak I could not see, the soapy water test might find it so I brushed all the hoses and joints I could get to with soapy water while running and no bubbles seen anywhere. I understand that vacuum sucks, but it seams if the vacuum is not sealed, maybe it would be able to blow a soap bubble? If I can't see or hear a leak, it's pretty difficult to know where to fix it
-
1997 Avalon, Brake Flush, ABS Light On
AnotherOldJeepGuy replied to AnotherOldJeepGuy's topic in The Pub
As soon as I get the chance I am going to look at everything I can see from underneath for anything suspicious. If I don't see anything I am considering just disconnection what I can get to and cleaning it, and even try pulling and reinstalling the existing sensors, although if I can't get the sensors out easily I may not go to that step just yet. Worth noting that once the codes are cleared it does take some time for the ABS light to fire again, it's not instant failure. -
1997 Avalon, Brake Flush, ABS Light On
AnotherOldJeepGuy replied to AnotherOldJeepGuy's topic in The Pub
Sure seems like it has to be a common "something"! Ah, I didn't think of it that way but I see what you are saying. Any past experience with "negative logic"? I still can't get past in my mind that 3 of 4 bearings, tone wheels, or fill in the blank, would all go out at the same time after all 4 being good since 1997! So what I mean by negative logic here would be a problem with left front, the only one NOT failing, actually being the real cause? Just wondering is anyone has actually seen such a condition....