


jamcomanche
-
Posts
54 -
Joined
-
Last visited
Content Type
Profiles
Forums
Gallery
Everything posted by jamcomanche
-
2.5 Aluminum Valve Cover - Air Inlet Fitting?
jamcomanche replied to jamcomanche's topic in MJ Tech: Modification and Repairs
I think I found it. Interchange Part Number: 53030591, DOR47056, 630-1093, 47056 @eaglescout526 these aren't mopar part numbers, but are they enough to help you find one? -
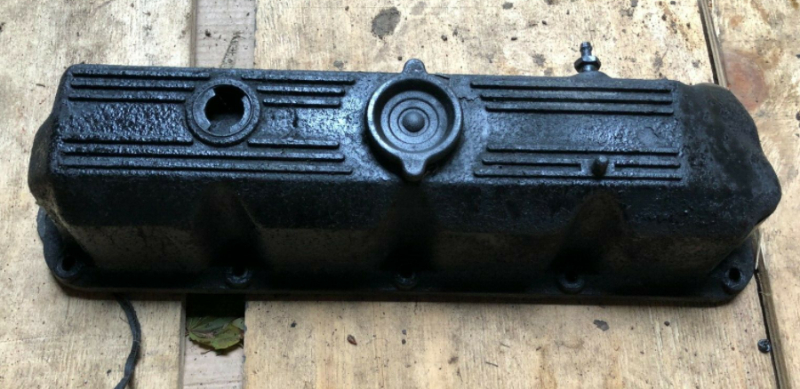
I managed to pick up an Aluminum Valve cover from a 90s YJ but I've noticed that the air inlet looks like it takes a twist-on fitting. It's different from some of the others I've seen on here that take a regular grommet. The only elbow fittings I'm finding that twist on like this are all labeled as being for the 4.0. Also, I can't find any threads on here that go over how to convert the PCV and Breather over to work with these. Any help is appreciated.
-
Thanks! Now I just need to figure out how to make the bigger sender fit. I can't use the same fitting I have now. Does everybody just get their Mopar parts from the stealership? All the Mopar sites online I've managed to find only sell parts going back to 1994.
-
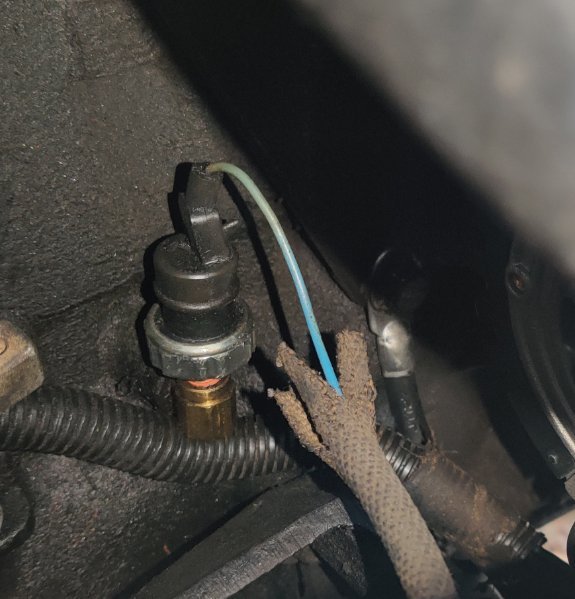
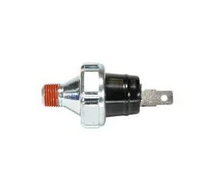
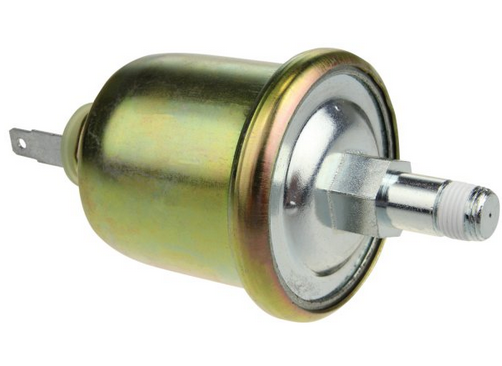
@eaglescout526 I've had an issue where my oil pressure gauge is pegged out to the right since I bought the Jeep. I bought a new single blade Oil Pressure switch to replace what was in it, but that did not fix the issue. I read somewhere on here that I should have 2 Oil Pressure Sensors, but I can only find one to the right of the distributor on my engine. I don't see one of the larger gauge senders anywhere, or even a place to put it. I noticed on Rock Auto, they list two different types of senders. A "Light" Sender like the one above, or a "Gauge" sender like the one here: Do I need to swap the smaller sender over to this one? If so, I barely have any room for it. As it is, I had to put a 90 degree fitting in the block just so I could put the smaller sender on. Otherwise the motor mount was in the way.
-
I'm really just here to vent so don't mind me. My jeep had the wrong alternator on it when I bought it and the serpentine belt was squeaking like crazy from misalignment. My truck has AC and the non-AC alternator pulley sticks out about 1/4" farther than the pulley matched with AC. I shopped around but wanted one quick and bought a valucraft reman CS130 from Autozone. It looked real clean when it came in. Installed nice and easy, and was charging great for a couple of weeks. One day, I heard what sounded a lot like maybe a leaf had been sucked into the blower motor. Thing was though, the blower wasnt running. The noise got louder with higher RPM. It sounded like something was being flung around inside of a tin can. I couldn't figure out what it was for the life of me and then it stopped. Days went by and then I heard it again. Except this time, I noticed that my battery voltage had started to drop on the dash. It would sit at around 13-14v usually, but it was down to about 10-11. I went out and bought a tester and checked the battery and alternator. Confirmed the alternator was charging low and then noticed these little red shards of metal scattered around the engine bay. After some time with a flashlight and squinting my eyes a lot, I realized that the centrifugal fan inside the back of the alt had splintered into a bunch of little pieces and they were being flung all over the engine bay. I'm getting a warranty replacement which I'll be inspecting the hell out of. But next time I need an alternator Ill be forking over the extra $$ for a better brand.
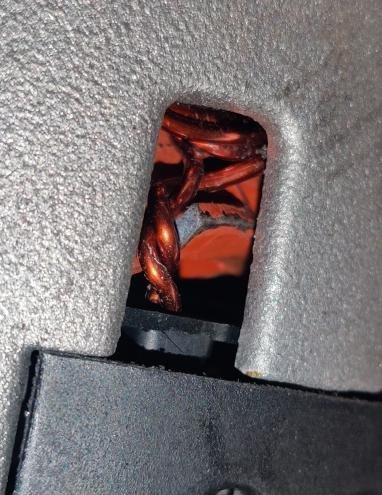
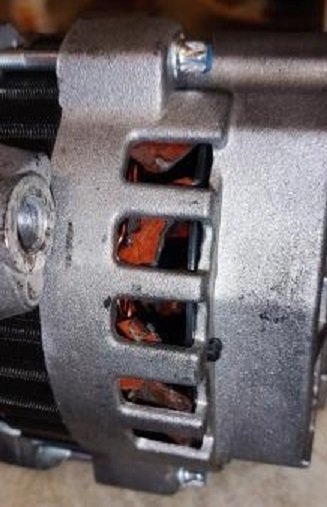
-
Knocking On Valve Cover 2.5L
jamcomanche replied to jamcomanche's topic in MJ Tech: Modification and Repairs
Thanks. I've been searching around on here about the metal covers. I've been able to find a couple beat YJ covers on ebay but they are wanting $120. I may need to dig around some salvage yards in the area. Unless you guys know a place I could find one. -
Have you tried bleeding the line? BTW, If you have any fluid leaking inside the firewall at all, my advice is to go ahead and replace the master cylinder. I had a problem with a slow leak in mine, slow enough that it took a while for the reservoir to go low. After some time though I eventually started seeing puddles on the floor mat. Not to mention it drips right onto the back of the fuse panel and creeps into every terminal. Replacing the master cylinder is really not bad, and you'll have a chance to bleed the lines which may end up being exactly what you need to do. You can do it fairly quickly if you have somebody to help you manage the pedal while you bleed the line underneath. Your bleeder is on the opposite side of the tranny from where the line from the master cylinder goes into it. If you don't have somebody to help with bleeding, you can do what I've done in the past with brakes and use a board just long enough to depress the pedal and wedge it in front of the seat xD. It makes the process take a lot longer though.
-
Aluminum 2.5 Valve Cover
jamcomanche replied to TheDirtyJeep401's topic in MJ Tech: Modification and Repairs
This is happening to me now after putting an OEM plastic on. What garbage. Guess I'll start looking for aluminum. -
87 2.5l Ive been struggling to get a replacement valve cover after mine started leaking pretty bad. I've ordered 3 plastic replacements so far. The fitment of the first was off and about 1/2" too long. The second was a Dorman that looked like it had been used with deformed bolt holes and crap all over it. I ordered one more Dorman and installed it today and it had to be pulled apart little bit to line up with the bolt holes, but it fit fine. However .. when the engine is running I can feel physical bumping on the cover with my hand. It makes a very very dull and subtle knock sound and I'm assuming the rockers are bumping the inside of the cover. When feel the head for any kind of vibrations i can't. but the cover gives off some pretty obvious bumps. As far as I know the top end is stock. Does anybody know if those vibrations are normal? Is there a taller cover I should get? This one was supposed to be direct replacement.
-
breaking into your vehicle (lost keys)
jamcomanche replied to JeepcoMJ's topic in MJ Tech: DIY Projects and Write-Ups
this is an old post, but i locked my keys out today and after trying various things, the method that worked for me was straightening out a coat hanger with a hook at the end, slipping it down between the window and the door and just grabbing whatever i could around the handle and lock cylinder area, pulling it away from the door handle toward the front of the truck. it only took me a few tries and it popped the lock pretty easily. -
There are 3 wires that come out of the socket. The 2 that come out of the end of the socket are your switch and signal wires, these are usually blue and gray, or blue and brown depending on the side of the truck. The 3rd wire goes to the outside of the socket in a separate outlet. I swapped the two wires that I had connected the blue and gray / blue and brown wires to. So for me, instead of blue connecting to blue on the harness, I had to connect blue to gray, and blue to brown on the other side. I tried uploading an image to help but it failed for some reason.
-
What do you mean by "complete?" Are you saying you need to buy other parts separately to support the lift? I've been looking to lift mine about 2-3" to get rid of some tire rub that's happening and I've come across these two places. Rusty's Offroad Jackit (Rough Country kits) Their kits look pretty complete, but I might not be considering everything.
-
I went out this morning and swapped connections on the non-ground wires (blue+brown/blue+gray) so that the blue was connected to the brown/gray on either side and that has fixed my problem. It's funny to me that both sockets had the same wire colors as the wiring harness, yet they were colored backwards. Definitely can't be the stock sockets. Signals are working perfectly now with lights on or off. Thanks for your help
-
How hard was it getting the RMS out? Did you do it without removing the crank and do the cut/feed/rtv trick?
-
Ok, fair enough. I also have no idea if the sockets that came with the truck even belong to it, so I'll try flipping them around and see what happens. I used WD-40 Electrical Contact Cleaner spray which does a good job at cleaning up corrosion with the help of a brush. The S-77 fits the housing perfectly. I was mainly curious about it because of the wire colors. Thanks to you all for the advice. I'm going to start with flipping the connections. If that doesnt work I'll probably tap a new ground near the lights. If neither of those work I'll buy new sockets.
-
Can anybody confirm the socket type that is supposed to go in the front signal lamps? The ones I have are S-77 three-wire sockets, which I don't show as being standard for AMC/Dodge/Jeep. I can only find the S502's as being standard for the rear lamps.
-
I was thinking that this could be a possible cause, but that makes me think that the wiring harness would have to have been altered further up the chain. This is the diagram I used to wire up the light sockets. I connected the wires for the park/turn lamps by color. Anyway, I'll have to do some more troubleshooting and check further up the harness I guess.
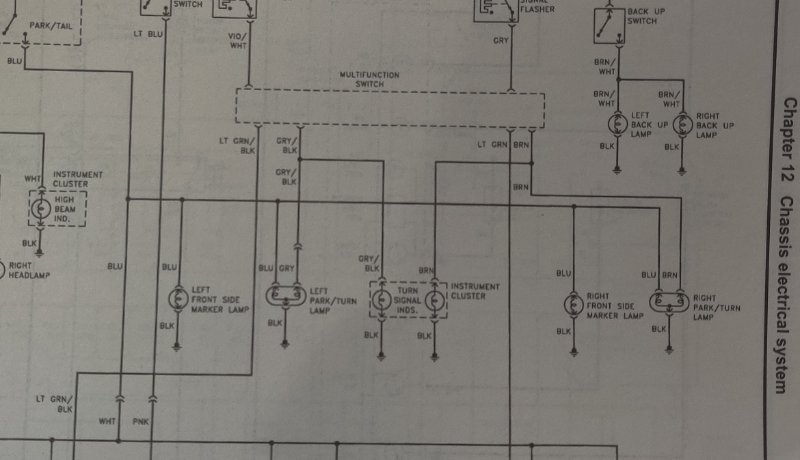
-
Yeah, the sockets are in good shape. I even cleaned them up a bit myself. If I can't find any other possible solution and tapping a new ground for them doesnt work, then ill probably order some new ones.
-
You have oil on your starter. Looks like I'm too late and It may not be the same issue obviously, but my 87 has a steady oil leak that is dripping in the same location as yours. I degreased everything and have been monitoring it for a few days. The first day I noticed that oil was dripping down the starter, just like yours. I was able to trace the leak up to the distributor. I'm ordering a distributor mount gasket today.
-
My 87 had an issue with the front parking lights and corner markers when i bought it. They didn't work at all. The dummy before me spliced in a third parking light on the driver's side trying to get them to work. I cut all the lights off and reconnected 2 properly using disconnects on all 3 wires for each light. I followed the Haynes schematic to connect them. The corner markers now work, and the turn signals work when the lights are in the off position. (though they are a little dim) When i turn on the parking or headlights, the signals don't blink at all. They just stay illuminated. Tail lights/ signals work fine Does anybody have any idea what the problem might be? I'm considering tapping a new ground for the lights to see if that might be the issue. Any help is appreciated.
-
87 2.5L AX-4 - My First Comanche
jamcomanche replied to jamcomanche's topic in Member Projects: Your Comanches
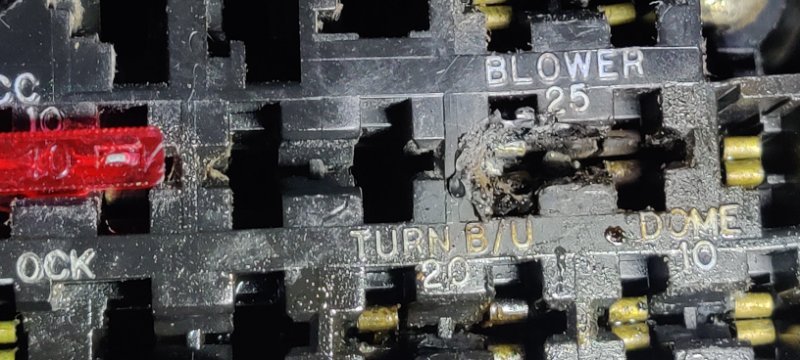
Sunday's Work Over the weekend I decided to do some minor reconditioning of the fuse box after seeing the clutch fluid drip. I'm glad I looked at this when I did, because the genius that owned it before me had stuck 25amp fuses in almost all of the fuse slots, and one of them had the terminals wrapped in threaded copper wire..... Never put copper wire on your fuses, people. This is what happens. I took all of the fuses out and it looks like they had somehow melted one of them into the blower slot. It looked pretty bad. At first I thought the fuse box itself was melted, but it was actually plastic from an old fuse that had melted and stuck to it. I was able to clean this out of the slot with a small flat-head screwdriver. I also went through each terminal with the screwdriver and pushed the contacts together where some of them had been separated (like shown in the TURN B/U slot) Using some WD40 Electrical Contact Cleaner, I sprayed the fuse panel down really good to remove all of the clutch fluid residue and debris. I used the low setting of a heat gun to dry up any contact cleaner that had not evaporated and try to liquify any grease/oil that may had been deeper inside. Then I wiped it down and installed new fuses. I also wrapped some plastic around the top of the fuse panel to stop any more fluid from leaking into it until I replace the master cylinder. I still don't have working interior lights, so I need to check the bulbs next. They are probably bad or they don't have any bulbs in them. During this process I also found out that the horn isnt working. I'll have to investigate that one day.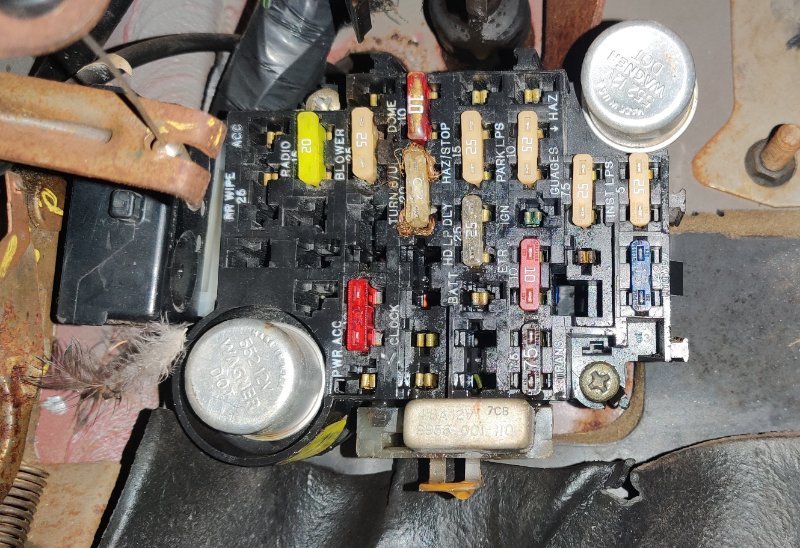
.jpg.bb15063355ddba8f622f2376811fa07d.jpg)
.jpg.d9691e8a0edef0ee1213816d4fbdae2f.jpg)
-
87 2.5L AX-4 - My First Comanche
jamcomanche replied to jamcomanche's topic in Member Projects: Your Comanches
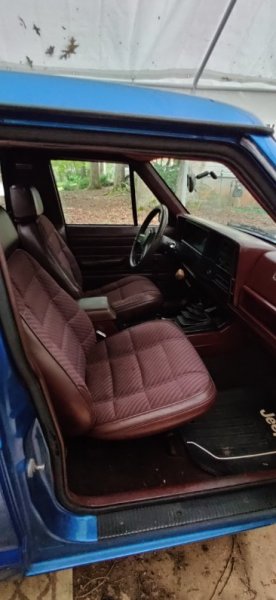
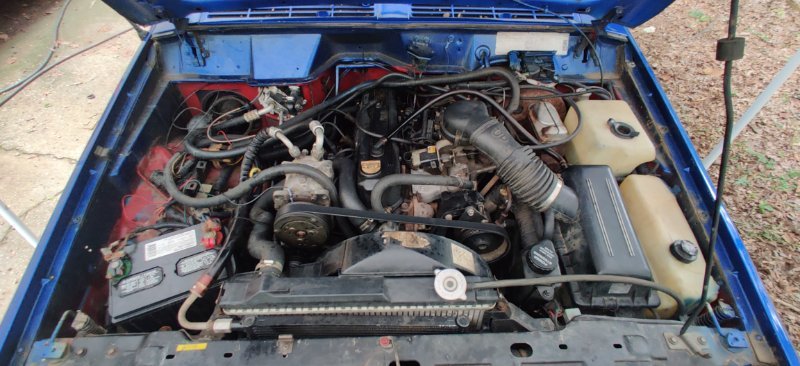
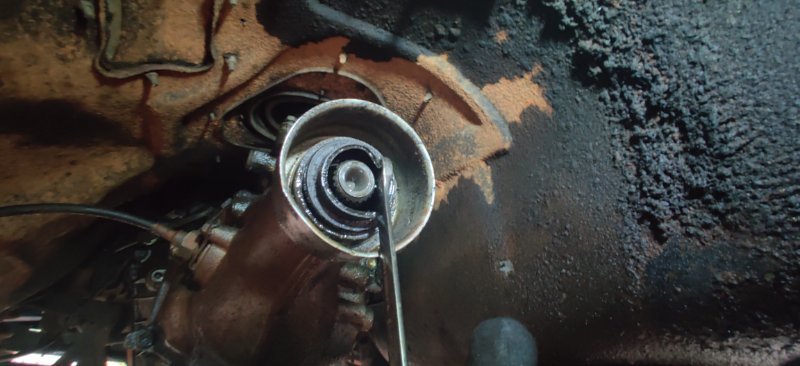
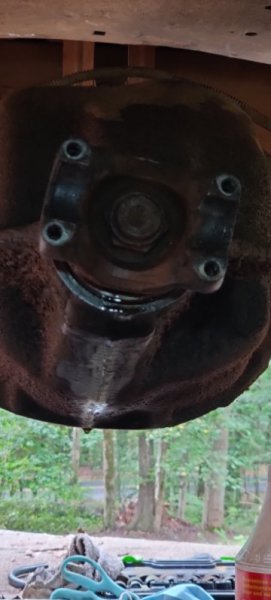
I kinda feel like I didnt give my jeep the best introduction, so here is a little more info on it before I talk about the work I did today. This truck is pretty much a junk-yard build. The previous owner had gutted it and installed parts from a mix of different Comanche and Cherokee models. The bed is not original, it was taken from another truck. The interior was taken from a Cherokee, so it's been converted to bucket seats which I actually like quite a bit. I really don't like the shift knob, but I can't seem to find a decent one with the 4-speed gear indicators. There are a lot out there with reverse plotted up and left, but the AX4 is down to the right. So I need to keep looking for a bit. Here's all the grease covered spaghetti under the hood. Previous owner added A/C and Power Steering. You can see that the original paint was red. One of these days I'm going to try to organize and clean it up a bit in there. Today's Work Last night I sealed the rear end case with RTV and this morning I torqued it down. After filling it up with Lucas gear oil, it has a drip from the pinion seal. I did not want to mess with that today. U-Joint After removing the driveshaft to get to the U-Joint, I noticed that the output shaft from the transmission had been leaking and slinging grease all under the truck. I picked up a new seal for that, which ill cover in a sec. After some research I checked around for U-Joints in stock nearby. Nobody seemed to have any Spicer joints. I managed to find a MasterPro at Oreilly's, so that's what I got. MasterPro #269 Non-Greasable When I tried to remove the original retainer clips, they snapped xD. It took a little banging around to get the old joint out, but I managed. Putting the U-Joint in was another story. For some reason, the yoke doesnt have room for retainer clips. Instead, it has a lip that prevents the joint from sliding out. Even with the new joint, there was still a tiny bit of play left so I had to shim the bearing caps with a thing piece of sheet metal around one half so the U-Bolts would hold it tight. After that, it was nice and snug. Output Shaft Seal This was the easiest thing I did all day. The seal that was leaking was a really cheap, rubber seal. It was stuck in there pretty good, and I wasnt sure how to get it off without damaging the output shaft. What I ended up doing was taking a skinny wrench and using leverage from the transmission to pull it out like this: The Replacement seal Oreilly's had in stock was the National Multi-Purpose Seal, Part # 710319. It was much nicer quality that what was in there, and tapped in pretty easily. Wrapping things up After all of this, I slid the driveshaft back in and connected it to the rear end. The rest of the work was putting the drums and wheels back on and cleaning up. I took her for a test drive and the U-Joint definitely did the trick. The clunking from the rear end and all of the vibrations are gone :) Feelsgoodman I'm happy to have these repairs behind me. It will be a couple weeks before I can tackle anything else that's significant.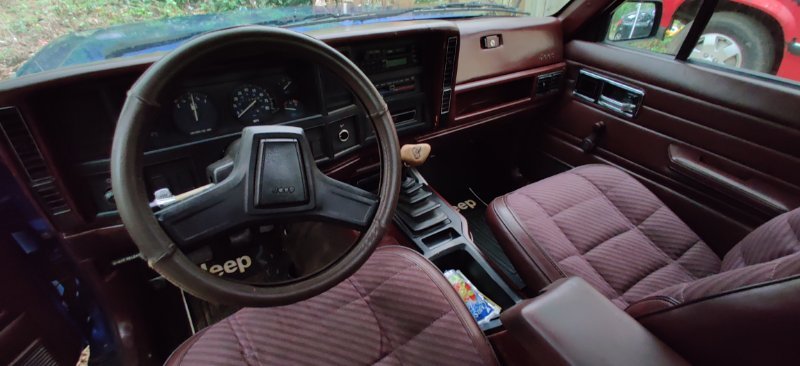
-
I was just referring to the pics in the OP. My engine bay looks like grease-covered spaghetti. It has WAY more cables, hoses and tubes visible that weave in and around all of the other components. The pics in the first post put me to shame. I also have power steering and AC though, which adds some clutter.
-
Thanks! ill look into these next. I figured out that Spicer 1310s are the all around stock fitment. I saw that the parts stores also carry MasterPro brand. It's a little cheaper than Spicer, but their measurements are different. Spicer Bearing Cap Diameter: 1.062" (26.9875mm) MasterPro Bearing Cap Diam: 1.063" (27.0002mm) The full measurement for spicer is 1.0625.. so I want so assume there is just some rounding going on and MasterPro is rounding that up in their specs. Either way, it doesnt seem like a difference that would cause a problem.
-
What are your plans for the interior?