

AZJeff
-
Posts
1295 -
Joined
-
Last visited
-
Days Won
1
Content Type
Profiles
Forums
Gallery
Everything posted by AZJeff
-
Heim joint steering components
AZJeff replied to rylee144's topic in MJ Tech: Modification and Repairs
Several thoughts: —A socket-head capscrew might give you a bit more clearance. —I would seriously consider shortening the misalignment spacers a bit. —Better than nylock nuts and lock washers would be the all-steel distorted thread locknuts -
Heim joint steering components
AZJeff replied to rylee144's topic in MJ Tech: Modification and Repairs
I am guessing that, when you drilled out the hole in the steering knuckle to remove the taper, the hole is at an angle now. That's my guess based on one photo. -
I disagree with the suggestion to use one from Autozone. I wound up replacing my remanufactured steering box in my F150 from Autozone THREE times. in the course of 20,000 miles. I suggest gettting one from someone like Rock Auto, rather than the stuff like "Duralast" brand featured at Autozone.
-
If the shell is even with the bore in the housing (and yours is), you are good to go!
-
which steering wheel puller do you own?
AZJeff replied to Pete M's topic in MJ Tech: Modification and Repairs
My first one was a K-D brand that I got at a NAPA. The second one that I got and hacked up to make a custom puller for a Ford 4.6L is some Chinese junk from O’reillys. -
I am not familiar with the older MJ/XJ window motors, but from the photo you provided, it looks like the motor assembly is constructed so that the end of the assembly where the wires enter the motor is crimped to the body of the motor with some bent tabs. I am guessing that the lugs that connect the wires into the motor proper are only accessible after the end plate for the motor is removed from the motor body. This would be accomplished by unbending the tabs holding the endplate to the body.
-
Valve cover / crank case breather
AZJeff replied to Dave Vig's topic in MJ Tech: Modification and Repairs
The 4.0 crankcase ventilation system is properly called a CCV (controlled crankcase ventilation) system. And as others pointed out, it uses a metered orifice in the REAR hose on the valve cover to control the amount of crankcase vapors that are sucked into the intake manifold when the engine is running. when the engine gets old, this metered orifice can become restricted, and thus the normal draw of vapors from the crankcase is defeated. Once that happens, crankcase vapors blow out through the intake hose on the FRONT of the valve cover, and the engine gets coated in oil residue. It may also contribute to oil loss by other than burning, and thus it is wise to address a plugged CCV system in the way others have explained above. -
Since we are on the topic of salt, and how it causes rust, here is a tidbit I remember from my youth: I grew up in N. Illinois, where salt is commonly used on the roads in winter, of course. To extend the life of his cars, my dad always got his vehicles rustproofed with "Zeibart" undercoating, which was quite popular at the time. I remember the Zeibart guy saying that how/where they applied the Zeibart undercoating/innercoating varied across the country. Areas along the coasts often had issues with the inside of the roof panels rusting where insulation used as a heat barrier would trap and hold salt vapors, causing rust. In those regions, Zeibart would take down the headliner and spray a protective coating on the inside of the roof panel, and reinstall the headliner. It was something they did only in the coastal regions.
-
When it comes to auxiliary lights, you will find different answers depending on the region of the country. Back east, you really don't need much (relative speaking) in the way of added lighting, and using it on real roads will get you attention from law enforcement. Out in the west (such as AZ, where I live), extra lighting outside of town is VERY appreciated, especially on secondary roads. It's damned near mandatory on Forest Service roads. And if you are using those added lights, just be courteous to other drivers and tone it down when there is oncoming traffic. If you do that, the cops probably won't even say anything about your lights.
-
Stripped oil pan bolt threads
AZJeff replied to Junder28's topic in MJ Tech: Modification and Repairs
SIde bar here: One of my caliper mounting bolts was "almost" stripped out, and I finished the job when I installed a new caliper. Of course, because the caliper bolts are special, I needed to keep the original size/pitch of the caliper mounting holes. Helicoil to the rescue!! -
Thread size/pitch on rear cab nuts.
AZJeff replied to knever3's topic in MJ Tech: Modification and Repairs
You would need to measure the diameter of the stud and get a clip whose hole is a slight interference fit onto the stud. My local hardware store actually stocks these kinds of clips, so maybe you can find one nearby that does the same. Otherwise....Amazon is your friend. -
Front Axle outer spline shaft help!!!
AZJeff replied to Rotten Ralphy's topic in MJ Tech: Modification and Repairs
You will need to create a small "lake" of PB Blaster or the like around where the nut would normally seat on the hub. This will allow gravity to help the PB Blaster to seep down into the splines. Heat will be tricky, because the only area you can really get the heat to transfer through is the part the splines of the hub. If you apply heat to the parts further down, it must travel through the bearings themselves, and that's a very small path, with lots of resistance to heat flow. What sort of heat are you using? On parts that big, you need to be using an oxy-acetylene torch. Anything less won't apply enough heat fast enough to get the hub splines to expand away from the axle shaft. -
Agreed. Getting the control arms lined up to slip in the bolts can be challenging. After I installed my Core 4x4 arms, I didn't like the pinion angle or the caster (too much), so I decided to adjust the arms a second time. What I figured would be a 30 minute job wound up taking about 3 hours, because I found I had to loosen ALL the mounting bolts on both the upper and lower arms, and then using ratcheting straps, a floor jack, and a bottle jack to get all bolts aligned. On the passenger's side, i found it easier to get the lower arm installed first, and then muscle the upper arm into position. On the driver's side, it was the opposite: upper arm first, lower after that. Having a helper makes this much easier, by the way. I did it once by myself, and the second time, my son was in town, and it went MUCH easier with his help.
-
Thread size/pitch on rear cab nuts.
AZJeff replied to knever3's topic in MJ Tech: Modification and Repairs
Those nuts cut their own threads as they are installed the first time onto the smooth stud that is welded to the cab. If you want to use conventional nuts, you will need to thread those studs with a corresponding die. That may prove difficult, since the lead-in on a die won't allow you to create full-depth threads for more than 1 or 2 turns. Unless your studs are really trashed, I would use the OEM type speed nut. Alternatively, you could use a push on clip like this: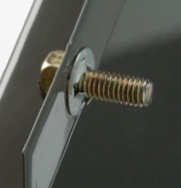
-
I have Core 4X4 arms on mine. I had JKS on my last XJ. They both seem similar in overall quality. Whatever you do, make sure the arms come with RUBBER, not urethane, bushings, unless you want your fillings rattled anytime you drive it.
-
Guys, I would think what hub size will work is really dependent on whether it will fit the PULLEY on an XJ/MJ with the 4.0 The pulley (and it's bolt pattern) is the determining factor, is it not?
-
Steering Linkage Pop....Somewhere...
AZJeff replied to SoCalManche's topic in MJ Tech: Modification and Repairs
Gee, Cruiser. That would imply you were torquing them to 185 ft-lbs or more. I guess the bolts are strong enough to handle it -
Steering Linkage Pop....Somewhere...
AZJeff replied to SoCalManche's topic in MJ Tech: Modification and Repairs
Good point. -
Steering Linkage Pop....Somewhere...
AZJeff replied to SoCalManche's topic in MJ Tech: Modification and Repairs
The spec. for track bar nuts (depending on which ones) is no more than about 90 ft-lbs. While that is high, I would torque them ALL to about 100 ft-lbs, and use self-locking nuts or Loctite on the nuts. They are either 7/16 or 1/2 inch diameter, and the limit for grade 8 with dry threads is supposed to be 110 ft.-lbs, so I don't think they are overtorqued at 100. It seems those nuts have a propensity to loosen up relatively easily, for whatever reason. -
Cork will work, but it’s not as compliant as the closed cell foam. The gasket is intended to basically be a water shield against any droplets that run down the engine side of the firewall.
-
Pretty much any kind of closed cell foam will work.
-
So I am collecting parts again.....
AZJeff replied to watchamakalit's topic in MJ Tech: Modification and Repairs
JEGS and some of the on-line speed shops will have those conical manifold washers. I would recommend using studs with nuts in place of the bolts in as many locations as possible. (Particularly on the bottom row of bolts.) -
By “headliner” I assume you mean the foam-backed fabric. That’s available from multiple vendors on eBay in a variety of colors, as is the spray adhesive used to attach it to the backer board. The backer board that supports the foam (and is made from some fiberglass like material) is unique to the MJ vehicle. You might be able to adapt one from an XJ (this is what I did). Others on this forum might have a line on an original MJ backer board.
-
Brake Lights Stopped Working
AZJeff replied to BP_MJ_978's topic in MJ Tech: Modification and Repairs
Cool!! Yeah, Eagle and I are both "seasoned veterans" when it comes to working on automotive stuff. Other persons might use terms like "fossil" or "old codger" In any case, I remember when (as a YOUNG teenager) there were brake light switches like that. I am glad you were able to fix it with one old codger's advice. -
I must be a hillbilly. I always use a pipe wrench. Yeah, it makes small marks on the rod from the teeth in the jaws, but it's really easy to use, since it's self releasing when you turn the wrench backwards.