


coolwind57
-
Posts
992 -
Joined
-
Last visited
-
Days Won
6
Content Type
Profiles
Forums
Gallery
Everything posted by coolwind57
-

Bench seat rebuild with 97+ XJ seat belts
coolwind57 replied to Airborne Janitor's topic in MJ Tech: Modification and Repairs
Good work, man. Yes the office mat worked well for me although what I used couldn't be cut with scissors. I had to use metal snips. Anyway, good job "takin' care of business." -
Yea, you're screwed. Just like the rest of us. MJ addiction is too overwhelming to overcome once it takes that first bite of you. Best to just accept it and enjoy the ride. I've spent WAY more money than I expected over the last 8-Months of ownership and I've cursed, busted knuckles and even pulled muscles and physically suffered, but man I have had SO MUCH FUN! Love my truck.
-
(Not so) Funny thing that happened to me: two weeks after I converted to an open system (and THOROUGHLY flushed my cooling system in the process) I found that I now had to do a freeze plug job. 30+ years of aging components, my friend. This is the life that we as MJ owners have chosen to live.
-
I'll tell you this from my experience, you probably have some junk in there for sure. I had to replace my freeze plugs a Month or two ago and was kinda shocked to see what all was inside the block. That rear freeze plug behind the bellhousing was particularly bad. I pulled half a coffee cup of gritty sludge from that hole--Nickintimefilms did too. He had a video on freeze plug replacement and he shows the junk he pulled from that area. After removing all my freeze plugs, I still had to flush with a garden hose for like 30-40 minutes to get as much out as I could. The block appears to be a big open chamber and you can see the 6 cylinder walls when peeking in through the side freeze plug openings. No tight, tubular passageways...just a big open chamber where water surrounds the cylinders. I wonder if your best bet is to hook up a garden hose somewhere and remove your water pump if you can't get that drain plug from the block. Maybe just keep flooding the block with your hose. That drain plug is a beast to remove, even when it is not damaged. Heat helps. As far as getting ALL of the water out: I'm not even sure I got all of mine out despite having all the freeze plugs removed. There's lower recesses in that rear-angled engine block. Once buttoned back up, I did add good coolant and distilled water but i didn't stress too much of residual hose water being in there. I was more concerned with getting the debis flushed out of there. We're all different, but if it were me, I'd heat and work on getting that block drain plug out. You can always extract and retap to clean threads if you had too. If that is deemed too much work, then I'd probably drop (and go ahead and replace) the water pump and flush the crap out of the block as best I could, refill and then call it done.
-
Can't get it to pass CA smog
coolwind57 replied to ratty's topic in MJ Tech: Modification and Repairs
Don't quote me, but seems like Indiana had this thing where if you couldn't get a vehicle to pass smog despite a list of applicable replaced parts and work-done that you could get an exemption. Seems you had to prove with receipts and/or confirmation from a automotive repair business. I might be completely wrong on this, but this seems to be bouncing around in my brain housing group. If you hadn't already, you might consider calling the BMV and asking what your options are. If you're California, then they may laugh at you. Worth a try, I'd say. -
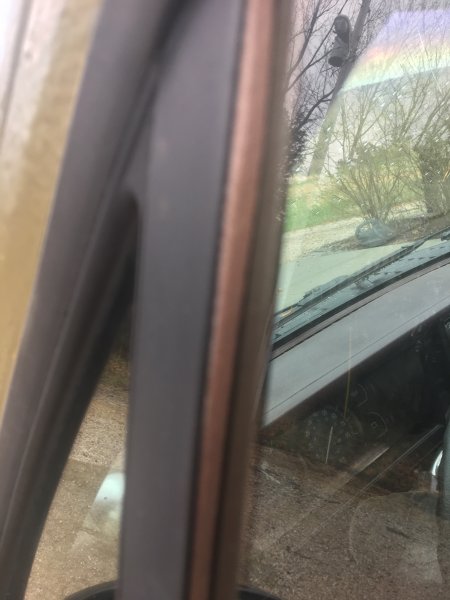
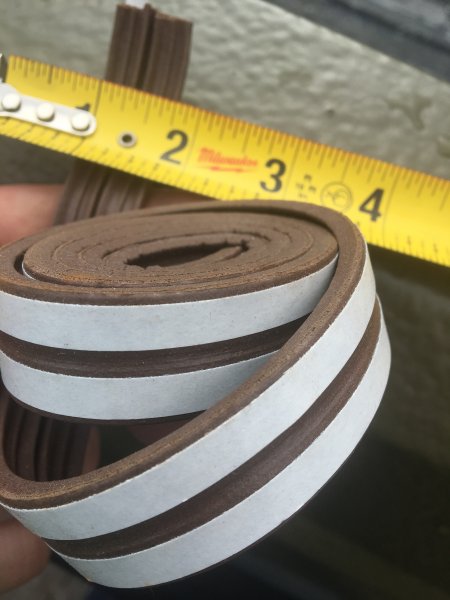
Here's a very successful "mod" or fix I did a Month or so after I bought ol' Warrior: Window/Smoker's window weatherstripping for the verticle U-channel. Check out the pics: Looks like it is 3/8", doubled. This is cheap, basic rubber weather strip that I purchased at Home Depot. I removed my crumbling old weather strip just past where the window goes inside the door cavity. I didn't remove the old weatherstrip from below the door sweep (inside the door cavity) because it wasn't brittle and desintegrating like above. I just tore/cut it just below where the horizontal sweep is. This size of Home Depot weatherstripping fit perfectly inside all three sides of the U-channel and the adhesive has stood up with no problems for 8-Months now. Just spit the double row into a single off of the roll. Although I picked up brown (My truck was camoflaged at the time, so it didn't matter to me), I'm sure they sell this in black too. In the last picture, you can see the exterior and interior piece. Obviously the third piece is covered by the edge of the glass. After firmly pressing all 3 pieces in place, just take it slow and easy when you row up your window the first couple of times. If it catches, it'll roll up on you and make you say bad words. You might press on some talc or dry film lube or something if it sticks to your glass too much and wants to delaminate, but I didn't have this problem at all. Really holds the window very well, with no more rattling or whistling wind noises. One of the best, easiest fixes I've ever done and I didn't go have to source rare and expensive aftermarket parts. Total cost was maybe $4 if I remember right.
-
I can take my fist, turn it sideways and get it between my big fat head and the headliner. I think there is slightly more head room than before. My legs seem more comfortable now too. Changes the angle my lower legs come down or something. Just seems like there's more leg room. One of the biggest things is that my upper body feels more securely in place. I'm 5' 11" and I weigh about 228lbs. I really can't believe how comfortable I am driving my truck now. My wife even likes sitting in the truck now and she HATES my truck. You can make adjustments as you go along so surely you can arrive at where you want to be. Let me know if I can assist you, pics, etc.
-
I've got a free rear bumper still. See classifieds. Not sure where you're at. But free is a pretty good deal if you can trek to S. Indiana.
-
Happy-happy resurrection day!
-
Well, that sucks -- Fuel Injector department
coolwind57 replied to Eagle's topic in MJ Tech: Modification and Repairs
Like he said, Eagle. Swap those injectors to 4-hole 746s. The best $52.99 I've ever spent on my MJ. https://www.amazon.com/gp/product/B01N302XMZ/ref=oh_aui_detailpage_o01_s00?ie=UTF8&psc=1 -
Try this: Mopar 83503643 I found it on E-bay that says that number fits Renix. https://www.ebay.com/itm/Mopar-83503643-Fuel-Injection-Idle-Air-Control-Valve/222681283166?epid=1833941630&hash=item33d8d6ba5e:g:QeAAAOSwK~RZ5c1t Crazy price differences in IACs. You can spend $8 or you can spend over a hundred dollars. I lucked out and found a Mopar NOS about 4-months ago for a great price so I quickly scooped it up. Good luck.
-
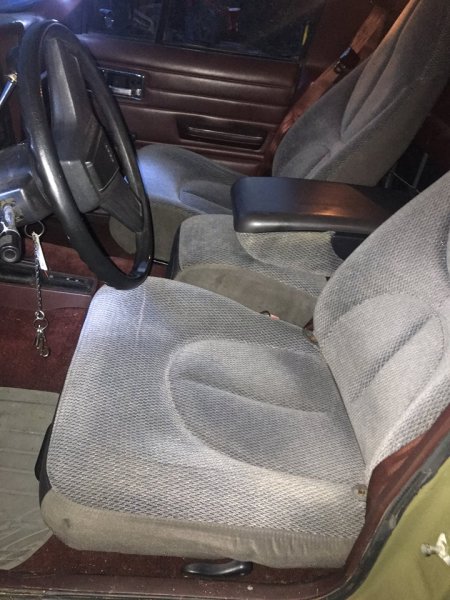
Got it all done today. It was quite the chore, but I'm SO glad I did for sure. These Dakota seats rock. So comfortable. Here's my AFTER pic: So, here's what I found out during this job: 1. I initially wanted a jump seat/console the same height as the seats. This would allow for kind of a bench seat if the console is swung up. Well, you're either going to have to lift the buckets way up (in my opinion, too much) or cut into the jump seat--big time. It's probably possible, but not worth my time. As I began thinking more about it, I'm going to use the console 99% of the time. Maybe put a baby carrier seat in if my wife gets pregnant. Or maybe haul a kid, but that jump seat is much too narrow for an adult butt anyow. The height of the jump seat as it is installed on the tunnel is too high for an adult over 5', 8", I'd say. 2. I wanted to install the console/jumpseat even with the front of the buckets "for looks". But if you do that, then you won't be able to use the super cool pull-out drink holder tray. I placed mine far enough back for cup holder access, and it works just fine for my resting elbow. Another thing about this being higher than the buckets that I worried about: Will your right elbow sit too high when rested on it since the buckets are lower. Answer is no. I am completely comfortable. In fact, I love it. Can't see how I did without an arm rest back when I had my bench. It's at a great height for me, awesome comfortable. 3. I bought some 2" flat metal and bolted lengths up under the jumper seat at the factory mounting holes where the buckets normally bolt onto. I placed the jumper, then bent the metal to form around the tunnel and then bolted through it using galvanized 3/8" bolts/washers/nuts. Plenty of room up under your tunnel if your bolts are 2" in length. 4. I could care less that my interior colors don't match. The gray seats actually have some blue and red specks in them, that don't show so much in the picture but the red pops out when you view in person. Again, not a big deal for me. Heck, my truck is OD green (Monstaliner bed coating) with a red interior. I'm more about practical. Looks fine by me. 5. Passenger seat was easier to fab a mount....but not by much. If you're going to do this upgrade in a similar manner as I then you're going to have cut, weld, check fitment. Cut, weld, check fitment. Takes a lot of time. 6. I did final fit and then decided to lift the entire bucket brackets off the floor by about 3/8" after I built up my seat brackets. This allowed closer fitment to the tunnel on both sides--there's a odd bulge on the driver's side of the tunnel due to the transfer case underneither. I did this because it seemed like I was too close to the door and not centered behind the steering wheel. I had some pieces of used metal left over that I placed under the seat brackets to accomplish this small lift. 7. I can still use my door-mounted arm rest, which indicates that my height is pretty close to what I had from the factory seat. Lifting the seats as much as GrayWolf did with his brackets looks like it would make this arm rest too low for use. Check out his thread for a different Dakota seat mount option if you hadn't already. His seats match the height of the jump seat, but I just didn't want to go this route as I started working this project. There's pros and cons to each method, I'm sure. 8. Ceiling height is great. I'm 5, 11" and I weigh 228lbs. I can place my fist above my head as I'm seated. This is good for hat-wearers like me. And I LOVE the adjustability that I now have over my MJ bench. And I also love that I can lean back and my whole head is cushioned behind me. These seats are nice and tall.
-
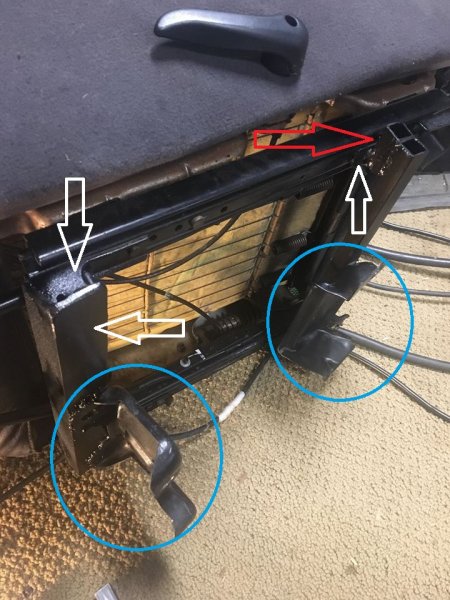
Oops, that bottom-most arrow shows the 3/16" thick angle iron used for the front of the seat.
-
Ok, so here's how my custom driver's side seat brackets came out: 1. White arrows: Show that I used the stock Dakota track/rail attachments. After modifying them slightly, I simply welded onto them insead of removing them and welding or bolting my metal directly onto the Dakota tracks. 2. Blue circles show my original MJ brackets. Welds look horrible, but hey it's a cheapo flux core welder I have to work with. I got good penetration and the welds are strong. Just looks like hell. 3. I chose to use 3/4 tubing to support the rear, as I felt 1" tubing might be too high. Red arrow shows that I had to stack another piece of 3/4 tubing on one end to get the height of the seat's outboard side correct. It's now bolted into my MJ and I LOVE it. Very comfortable. Dakota seats certainly fit tight in there. My door panel touches the seat fabric, but just barely. Going out this morning to work on the passenger side next.
-
-
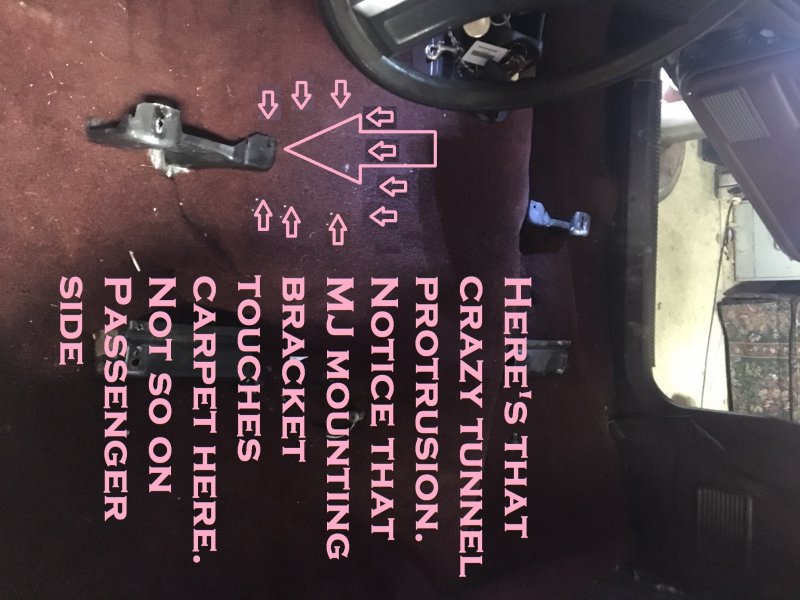
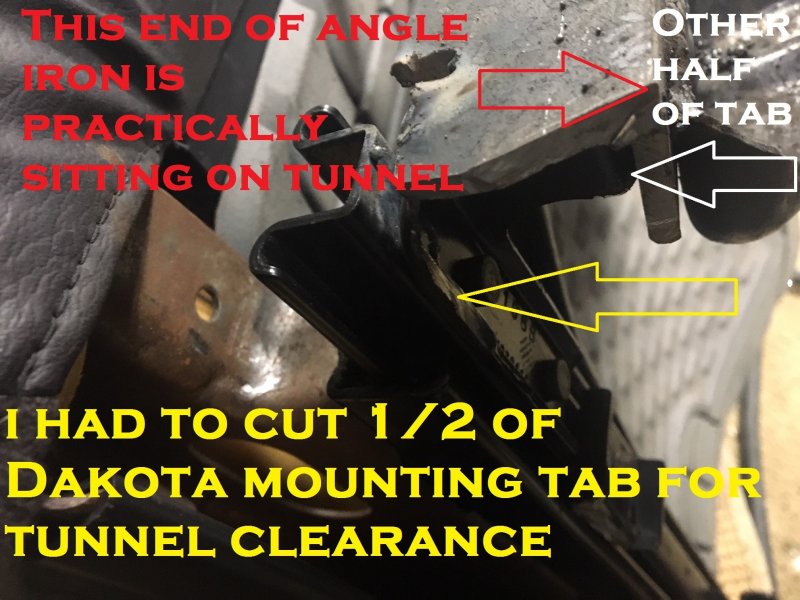
So before I did the weld above, I did "dry fit" my seat and found that I didn't like the height that it would create if I left the two buckets and jump seat bolted together. So scratch to plan to keep them bolted together. The thing is--Dakota seats like to be placed high. The higher you place this driver's seat, the more clearance you'll have from that goofy protrusion of the tunnel. I found the best combination of minimizing seat height and decent slider track placement was when I had my angle iron practically sitting on the tunnel protrusion. If you go back and look at my pic with just the bench seat mounts (minus the bench) secured to the floor, you'll see that that driver's side front bracket is practically sitting on the tunnel as well. I did have to give up one half of my front Dakota mounting tab, however. in this pic, you can see where I had to trim 1/2 of the tab (in YELLOW). You can kinda see the other half of the tab that I'm welding on to the angle iron (WHITE). I also had to cut my angle iron at an angle to better accommodate the protrusion of the tunnel (RED). So far, I've been able to weld on attachments to the lower glide rail, not the rail itself. that's my plan as I continue to mount these seats.
-
i bought a piece of 3/16" (I think) angle iron on the way home from work last night. I then placed my seats inside the cab and cut a piece of angle iron to see how I could get the front mount positioned. I chose the hardest to work with first: The driver's front bracket. That tunnel sticks out on the driver's side and it really pushes the limits on placement of the Dakota inner rail. Man, what a pain. I was able to tack weld once I found the sweet spot. I then removed and began to weld in earnest until I suddenly ran out of wire for my flux welder. Dang. End of evening until I can hit it again tonight.

-
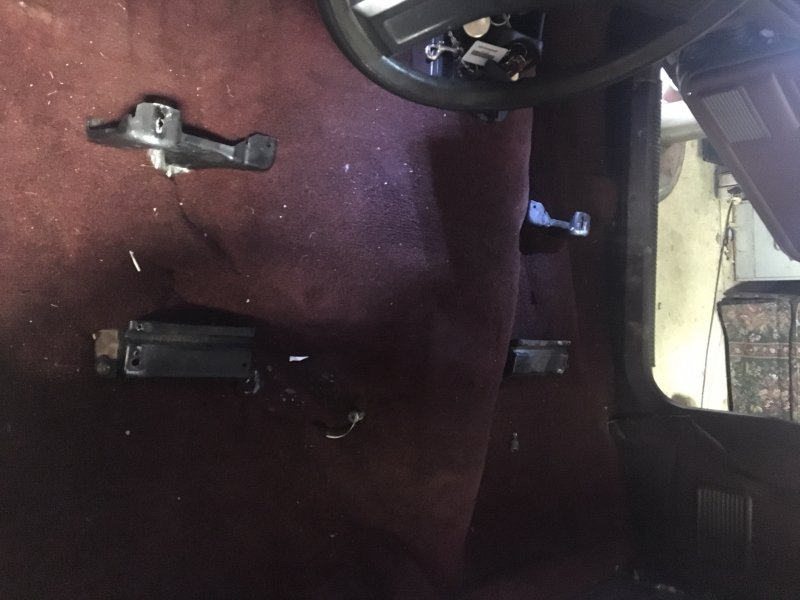
Ok, well I've decided to mount these seats myself. I've got a flux core welder, so I just couldn't stand having these awesome seats sitting around NOT in my truck so I bit the bullet. The goal is to mount them using factory mounting studs. I think i can use my original bench seat brackets so the first thing was to cut them from my bench seat and mount them on the floor just to see how i can match them up with the Dakota seats. So here's what they look like re-installed:
-
Junkyarding today. Needs/ideas?
coolwind57 replied to coolwind57's topic in MJ Tech: Modification and Repairs
I've decided to take this on myself and document as I go. Last night I began by pulling my bench and buying a piece of angle iron. I'll document on my build thread, "Coolwind57's". Should have it all done by Saturday, God willing. -
2018 manufactured cj7 with 2.5 TBD, 5speed, dana44s front/rear?
coolwind57 replied to Kickin’Chicken's topic in The Pub
$15,000+ and not street legal!?! Well hell... -
Most automobiles non electric or diesel manufactured after 1976 in those two Indiana counties has to be tested. Except if you have a car that is 4-years old or newer. Kit cars, motorcycles, recreational vehicles, "Farm-Only" registered vehicles, anything weighing over 9000lbs, ceremonial vehicles and show cars are exempt too. Perhaps titling and registering is different than plating. i looked all this stuff up just now just for S & Giggles. You can register vehicles in any county and even on-line if you have an valid Indiana title. According to BMV, the emissions inspection isn't required to have before you register a vehicle: Emissions Inspections While you do not need to get an inspection before you register your vehicle, you will be required to get an emissions inspection every 2 years to keep your vehicle legal in Indiana." Yet a few pages later BMV states: "Once your vehicle passes, you'll receive a Vehicle Inspection Report (VIR) to use when you register your vehicle or renew your registration." A bit confusing for sure. I can only guess that after registering and title work, they won't mail those Lake and Porter folks a plate (or annual sticker) until they process a successful VIR. Again, just a guess. i know my wife just had her driver's road test performed two weeks ago at a BMV in Clark and we live in Floyd. I remember that several years ago, i registered a vehicle in Washington County and i actually lived in Clark. Hey, I had some time to blow and I learned a little just now.
-
I believe these years are probably accurate. Just look for later XJs that have the larger mirrors attaching to the front corner of the glass, just as in Shardien's picture above. You'll pop an interior triangular cover just inside the door of your MJ and you'll see 3 holes that the factory put in there. Exact same set up on the XJs, as that's where they bolt their mirrors on. Pretty-much plug and play with the exception of some very minor trimming of your aluminum trim in that corner. Let us know how it goes.
-
There was a year in which Jeep changed this piece to a much more durable one and I think you're correct, 95+. You'll see the difference in design. The weather strip we're talking about installs on the door metal itself, where the lowest part of glass meets the door. It's installed on the door metal, with a rubber sweep that touches your glass. You can usually pull them off by hand or by carefully using a pair or small piers. Just yank straight up. It installs using clips I think attached to the door. Check out http://bleepinjeep.com/ and do a search. He's got a nice video of how to pull and prep them for your use.
-
Vakarian's Comanche 'Trailbreaker'
coolwind57 replied to Vakarian's topic in Member Projects: Your Comanches
Good Lord, man! Sounds like the 15-mile stretch my brother travels every morning. There's been people killed by hitting deer on his road. Sounds like you need to mount on of these, haha: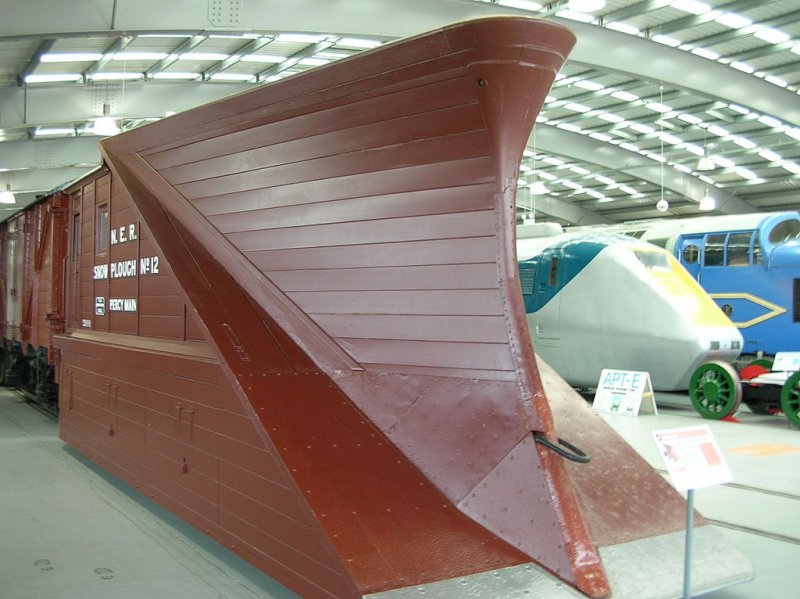
-
Wow, looks like you're in Lake or Porter county--the only two counties in Indiana (I believe) that emissions test. I remember a decade ago we tested in Southern Indiana. If I remember correctly, they got rid of it because it seemed kinda dumb that the three smaller Indiana Counties surrounding metro Louisville, Ky were testing and much-larger Jefferson County/Louisville, KY wasn't. I certainly do not recall them testing brakes specifically, but perhaps they did as part of the tire/machine roller process. Also, It is my understanding that I can go to any county to register my vehicle. Good thing we don't test down here in the South now. The PO of my vehicle removed the CAT and I just recently deleted the EGR.