


coolwind57
-
Posts
992 -
Joined
-
Last visited
-
Days Won
6
Content Type
Profiles
Forums
Gallery
Everything posted by coolwind57
-

Question: Transmission disconnect lines
coolwind57 replied to coolwind57's topic in MJ Tech: Modification and Repairs
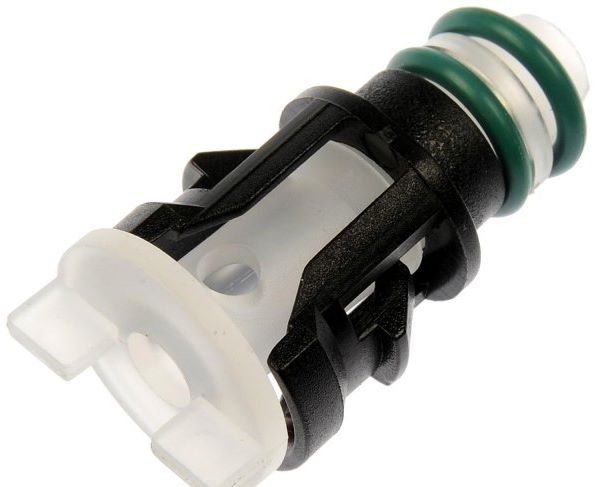
I'm still a bit confused as to why they make two options: Option 1 is this (what I had bought) and it costs $6.35 at Rock Auto: Option 2 is this and it runs $13.21 each: I am assuming that Option 1 has everything Option 2 has, only more -- with the big block housing included and preloaded with o-rings/space, etc. Option 2 appears to be just the guts--orings, clip, spacer. One would have to gut the insides of the old block housing, and insert this right? Why would anyone pay more for just the guts when they can have the entire assembly for half the cost?? What am I missing here?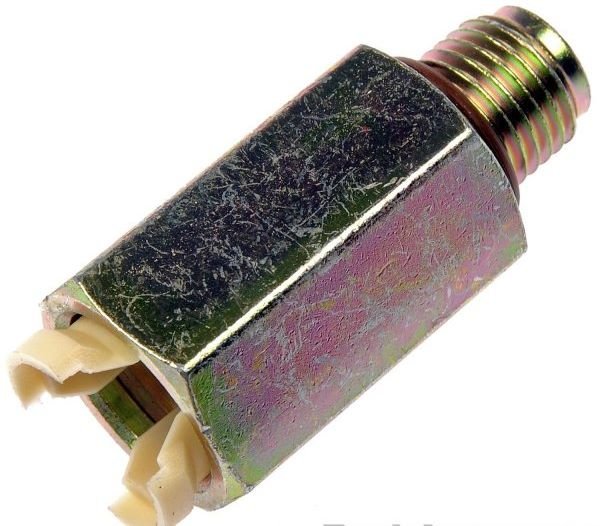
-
Wow! Really appreciate the help, fellas. I wish I would had looked more into this before I installed. I have certainly learned the hard way. Just hoping i didn't mess anything up. I'll update when i find the time to pull again.
-
Yes, maybe a bit as I recall. ...This sounds like bad news. I certainly didn't feel as if I was forcing anything. That never entered my mind during the reinstalled. It certainly didn't slap together like a magnet, but I recall bringing it together with the first bolt. Again, didn't seem excessive at the time. So when you did your screw-up, did anything inside there get mangled? How bad was your result?
-
I'm tempted to try this first....just to see if it feels like it's going to rotate. I'd hate to unnecessarily pull the transmission, as this will consume nearly a full day as I am by myself...but then again, I'd also hate to booger up Torque converter/pump engagement by attempting it.... I remember pushing the torque converted onto the transmission. Was I suppose to rotate a bit (or wiggle) to hear the clicks, or simply push straight forward?
-
This makes sense to me, as I wondered if my exhaust needed more support that it has. I'm heading to an exhaust shop soon to have them install a flex pipe near the downpipe. I was going to ask them to add an additional hanger somewhere if they thought it needed one too.
-
I did. Still didn't budge. This might be the issue, then. I pushed the torque converter onto the transmission--didn't know to listen for 3-clicks.. Amateur mistake, fellas. I just didn't know. Yes, I'm scared now. Anxious to pull and see what's going on in there. Thank you so much for your input. I'll update.
-
What's this thing? It is installed on the driver's side lower bellhousing bolt (AW-4). Doesn't seem to do anything. Left over from something deleted, perhaps?
.jpg.c815a21929ec1de9a3c66f18491b5faf.jpg)
-
Got my tranny bolted back up my MJ on Sunday. Got bellhousing bolts on, got both driveshafts hooked up and vac/wiring hooked up. Tonight, I thought I'd get my four flex bolts installed. I went to rotate my crankshaft to align the holes and found that I cannot budge it. Notice in my pic, that the flex plate is very close to the bellhousing edge and the inspection cover. I'm talking like 1/16" from touching. I think this means that I probably put the #@!n flex plate in backwards. At least I'm guessing that's the issue. I can't seem to mentally picture at the moment how I had oriented these plates. I had no concerns where I was reassembling. Now it looks that I have to drop my transmission again. By the pic, does this seem to be the case to you guys too? Yea, go ahead and make fun. I assure you that you cannot possibly make me feel more like a turd that I already feel!
.jpg.2103b2cf8bdc1c41c220cd4b7c390cb8.jpg)
-
Rear window replacement
coolwind57 replied to Smokeyyank's topic in MJ Tech: Modification and Repairs
I put in a junkyard 3-pane easily myself. It wasn't bad. Remove your rubber trim molding, clean and sit it aside. Clean the heck out of that metal window channel. Both mating surfaces need to be quite clean -- I used lacquer thinner. I'd go for any heavy non-film-leaving solvent if possible. You may need a heat gun to help you along. It was a God-send for me, as my job would had taken a lot longer without one. Do any rust repairs. I had quite a clean truck, but still found a couple of rust spots in that channel area. I psanded them down and shot some primer/paint over them. Go to Advance Auto and pay $25.99 for this: Have yourself a warm garage. Dry fit to ensure you're not getting ready to do something dumb. I then placed the ribbon sealer in the window channel surface, then brought my glass to it. Mate the two surfaces. All at the same time, use good duct tape (Monster tape is awesome for this) to attach to glass and wrap along the roof of your truck. I used three equally spaced pieces of tape. That'll help you keep it good as you install glass and as you apply pressure to sealer areas. You'll be leaving an open channel around the perimeter so that you rubber trim goes back in. That trim is essentially cosmetic, you know...doesn't really do anything as far as mechanically holding the glass in. Shove it into place. I shot a little black silicone in the upper corners and secured with tape till dry just to kind of seal it down a bit. My had very minor curling with age. I've got several Months on my truck using this product/method and I'm good. No leaks. Looks good. Quite inexpensive.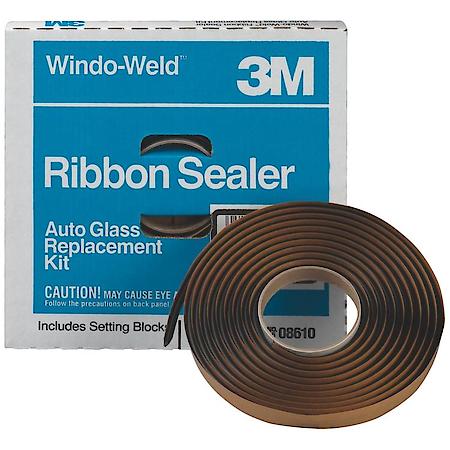
-
Comanche Stetson Cowboy hat on ebay (sold!)
coolwind57 replied to Pete M's topic in Craigslist/eBay... i.e. Not Your Stuff
Aw dang. Wrong size for me. -
Comanche Stetson Cowboy hat on ebay (sold!)
coolwind57 replied to Pete M's topic in Craigslist/eBay... i.e. Not Your Stuff
Wow, Pete. Thanks for posting this. I'll probably bid. -
Great story. Reminded me of an experience I had. A buddy and I were in Equador driving a HMMWV (Humvee) from the big city of Quito back to our base camp deep in the jungle. We had strict orders not be alone out on roads after dusk due to the dangers of the FARC (a Narco terrorist unit) or other bad guys looking for trouble. We had forded a large stream a half hour earlier in our journey. We got to this huge hill that lasted like a half mile and began our incline. Within less than a minute, we started overheating. We pulled over to cool down and began stressing out that it was beginning to get dark. We added some non-potable water we happen to have had and fired her back up only to have to pull over again near the top up of the hill. We couldn't figure out why we were overheating. Finally as I was standing over the engine urinating in the radiator, I began to see little tiny bits of plastic laying all over the engine. It dawned on me that our plastic cooling fan had disinegrated when we hit the water too fast during our previous fording adventure. No fan blades = no cooling when you're moving slow, huffing up a big hill. We apparently had enough urine and canteen water to get us up the hill and back to base camp without getting captured or killed just in time for our a$$ chewing for being out after dark. Good times, man.

-
Aw4 shift solenoids
coolwind57 replied to Strokermjcomanche's topic in MJ Tech: Modification and Repairs
Just means they're including the three solenoids. -
Aw4 shift solenoids
coolwind57 replied to Strokermjcomanche's topic in MJ Tech: Modification and Repairs
Hope you don't mind if I jump in on this topic, Strokermjcomanche.... I'm planning on doing a tranny screen/gasket swap. Amazon sells an upgraded kit. For 50-bucks more, Autex tosses in two shift solenoids with a lock up solenoid. Not knowing much about our AW4s, their solenoids and not having any shift issues, should I consider upgrading and replacing them while I'm in there? -
Question: Transmission disconnect lines
coolwind57 replied to coolwind57's topic in MJ Tech: Modification and Repairs
i went ahead and bought new transmission line connectors, that whole block thing I described above. Amazon had them for $9.34 each. Figured I'd replace them both, even though one seemed fine. 28-year old plastic and O-rings....my luck is bad. I'd probably be at least $18 into doing it a different way, say hose barbed fittings and associated adapters, rubber line, etc. Application chart on the back says it'll fit 87-2001 Cherokees, Comanches and Wagoneers.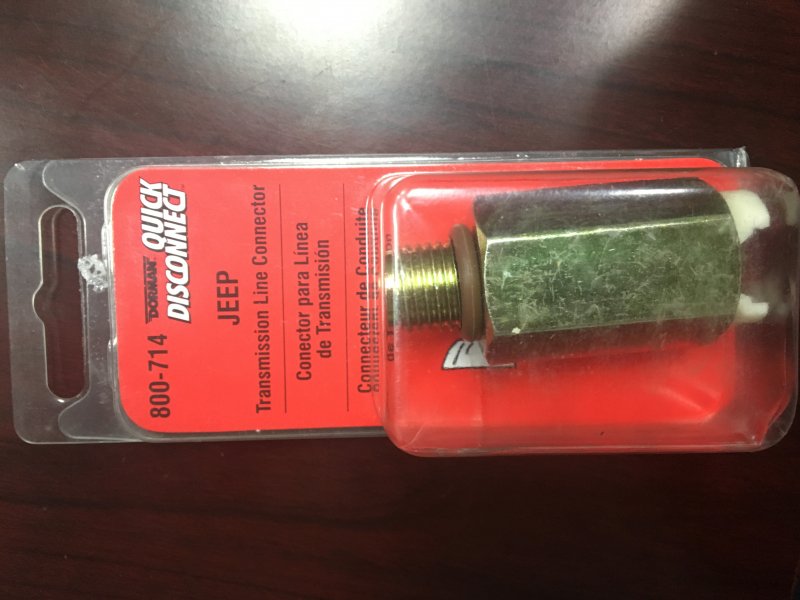
-
Freeze Plug Frustrations
coolwind57 replied to coolwind57's topic in MJ Tech: Modification and Repairs
I agree with your use of this word. I certainly don't think putting brass in as being silly. I also am not afraid of steel plugs. At this point in my MJ's 29 years of life, I would agree that it probably doesn't really matter which you use. I can't however, can't help but have those that nagging thought that had the factory used brass to begin with, I'd be driving my MJ right now. I also wouldn't have pulled a back muscle last week working on it. Taken in variables: conditions, aging, cooling system maintenance, chemistry, etc., my opinion is this: brass is just better for this application. Factory probably saved a few bucks for each vehicle by buying the cheaper steel plugs over brass. If I were tasked to build a most reliable vehicle from scratch to sell and goals were zero call-backs, then I'd choose brass for this particular application. This is one of those areas in which opinions differ, but an owner can go either way and still sleep well at night after the repair....providing they don't pull a muscle like I did, then they probably won't sleep so good for a few weeks. -
Freeze Plug Frustrations
coolwind57 replied to coolwind57's topic in MJ Tech: Modification and Repairs
Nickintimefilms replaced his with steel. Mentioned some concern with different expansion rates of the metals, so I think he feels like he played it safe. Poor guy installed the five on the block, re-installed his two manifolds, fired her up only to find that the ones behind the engine leaked too. I learned from him. My luck is bad, so I didn't gamble. I pulled my trans at same time and did em all. As for me, brass was a personal thing. If I can make an improvement on something, then I usually will Rare is the dude that chooses zero aftermarket parts on his ride. Steel is stock. More corrosion-resistant brass is aftermarket. So personally, I got my warm fuzzy from the brass ones. Plus they look really cool too. -
Freeze Plug Frustrations
coolwind57 replied to coolwind57's topic in MJ Tech: Modification and Repairs
No. Those brass or steel discs are called "Welch Plugs", "Core Plugs", "Freeze Plugs", "Frost Plugs", "Expansion plugs", Engine Block Expansion Plugs", etc. I called that one in the back of the head a different name as I bashed that sucker in place, but I won't repeat it here. Lots of names depending on the person messing with them, it seems. The real purpose of the plugs are to fill in the holes made during the sand casting process. I have a buddy in my band who's an geek engineer. He corrected me when i called them "Freeze plugs." Said they are actually "Welch plugs". He said they're not really for saving the block in times of coolant freeze and expansion like everyone thinks. By the way, the rubber thing in the pic: I had one of those in my #5 cavity on my block. That's what was leaking. Obviously installed by a PO, but I'd never do this. Just a matter of time before they go. Just bite the bullet and pull your manifolds and trans and do it right. Weird--mine was stamped "Made in Italy." -
Freeze Plug Frustrations
coolwind57 replied to coolwind57's topic in MJ Tech: Modification and Repairs
Man it was a booger to get to with the engine still in the truck. Glad I bought new motor mounts because I stretched my originals out to the max. You have to get creative in seating the new expansion freeze plug in there under these conditions. -
In the short 7-months I've had mine, I've had two issues with turn signals. Similar symptoms. Both were remedied by inspecting for bad contacts, cleaning the heck out of the bulb sockets, both front and back (and replacing the ones that were beyond bad). Try that if you already hadn't. Same wife issues, by the way.
-
Down the road from me. Military style. May fit MJs: https://cincinnati.craigslist.org/pts/d/jeep-cherokee-xj-leaf-springs/6505496064.html
-
Freeze Plug Frustrations
coolwind57 replied to coolwind57's topic in MJ Tech: Modification and Repairs
Yes, this was an option for me. But more wait time for shipping. I was hoping to knock it out quickly by finding a local source. I screwed up initially when I didn't realize that I needed an additional one. I would had thought that nearly any parts store or machine shop would have them sitting around. Yea, everyone in this world is an idiot except you. Wrong. New Albany Auto Parts and Machine Shop, whom I had called had only steel ones in stock. Wrong. $12.99 for the Melling brass kit, plus $2.16 for the additional plug. $7.99 for ground shipping (You have to spend $99 for free shipping). Total $22.71. 1-2 day from Tallmadge, OH to me. yes Sir, you nailed it. It was indeed BS, but not a direct mail to me, store pickup. After calling about 8 places, I finally found a local source across the river in Louisville Kentucky. They are a wholesale supplier and could not sell directly to me. The dude there advised me to call Napa and have them call him. So, I called a different Napa store and they sent a driver over to pick it up, all for a total $3.99 purchase. I'm happy now. I think the other Napa store just had momentary H.U.A. syndrome or something. Both Napa stores in my area didn't have them on the shelf. They didn't have steel either. I suppose one just has to call around and hope to get lucky. I had really two reasons for posting my frustration here on the forum: One was just to vent a bit over my surprise that there seems to be no dang single brass 2" expansion plugs in my local parts stores (and a local machine shop). I was especially irritated that I didn't discover my mistake until my Mellings kit arrived. I assumed that Melling's description of the kit was accurate and I didn't verify. I also had already pulled the trans out and had removed the old plugs. I planned on knocking it all out and buttoning it up in one day. Plan diverted. The other reason I posted is to add to additional experiences on the freeze plug topic here on this forum. I might one day help others know that these kits may not include enough plugs to include the one in the head. Some of us here enjoy gaining more knowledge about our trucks and are happy to "pass it on" and help others doing this repair. Newbys must focus on the knowledge and helpfulness of the good guys here and learn to ignore some minor arrogance here and there. -
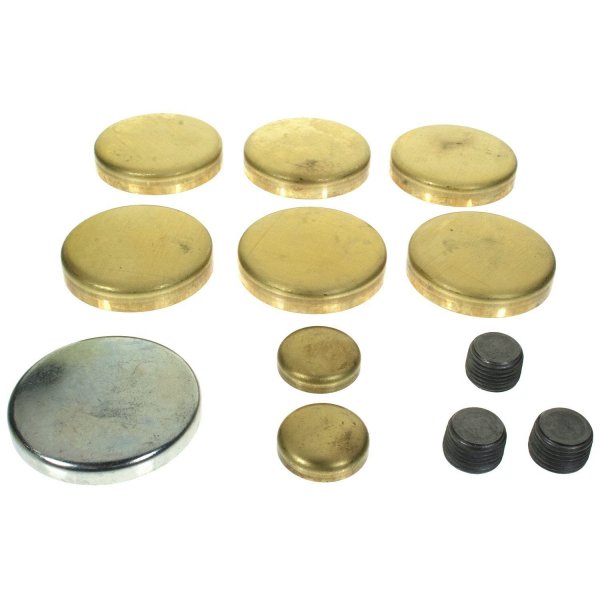
Insane. Bought the Melling brass freeze plug kit (MPE-256BR) from Amazon a few weeks ago for $18.17. When it arrived, I promptly sent it back because they sent steel plugs instead of brass. That cost me another week of having my truck down. Finally got the brass ones and then I realized that this kit will not do the whole engine. Our 4.0s take 5-each of the 2" plugs along the side of the block. Two more go on the back side of the engine, one at the cylinder head and one under the bell housing. That's seven total. Kit only has 6. That larger steel one in the picture also goes under the bell housing but it is for an oil port. There's extra drain plugs and a couple of small plugs that make this kit fit multiple applications, I suppose. I reckon that the kit was designed to cover your block, but not your cylinder head. So now, I've called all over town looking for someone with a SINGLE deep dish, 2" brass expansion plug and I'm coming up with nothing. Autozone sells a single brass plug....for $24! https://www.autozone.com/gaskets-and-miscellaneous-fasteners/expansion-plug/dorman-autograde-brass-cup-type-expansion-plug/696380_0_0 I even called them to see if it were a mistake and the parts dude confirmed the price. I told him that it is obviously priced wrong and i gave my best wishes for Autozone to sell a bunch of them and make millions off of dumb people. Finally, I called Napa and they can special order one for me. Will take 3-4 days and I have to pay all shipping charges. $3.99 plus $5 in shipping. Good grief.
-
Question: Transmission disconnect lines
coolwind57 replied to coolwind57's topic in MJ Tech: Modification and Repairs
I found them today at the parts store. Not Dorman, but they were in the HELP isle. They had one package that came with two different sizes. It sure is sounding like an option I may explore, the whole barbed fitting option. I dread getting the fuel rail back together too. I hear they give people fits. Probably can't really do barbed fitting there, I assume. I'd think there's probably too much pressure involved. I disconnected my forward fuel line at the disconnect location down the side of the block instead of at the fuel rail. Probably a mistake. I guess I was thinking that a leak there would be better than on top of the two manifolds. Ha! Yea I was a bit confused, Don. -
Question: Transmission disconnect lines
coolwind57 replied to coolwind57's topic in MJ Tech: Modification and Repairs
heck no. I went off of what everyone else shows in video or stated on here. Pinch with fingers, pull. I was able to dig the plastic connector out after 15 minutes with a precision screwdriver. A brisk yank and it freed. One of the two had an o-ring that fell out. I'll go O-ring shopping now I suppose.