cruiser54
-
Posts
9413 -
Joined
-
Last visited
-
Days Won
14
Content Type
Profiles
Forums
Gallery
Everything posted by cruiser54
-
Grinding the booster rod for the old style switch was hit and miss.
-
LOL!! Who did that? Even after that, I'll still gladly share the switch that does it all. Cadillac part I think.
-
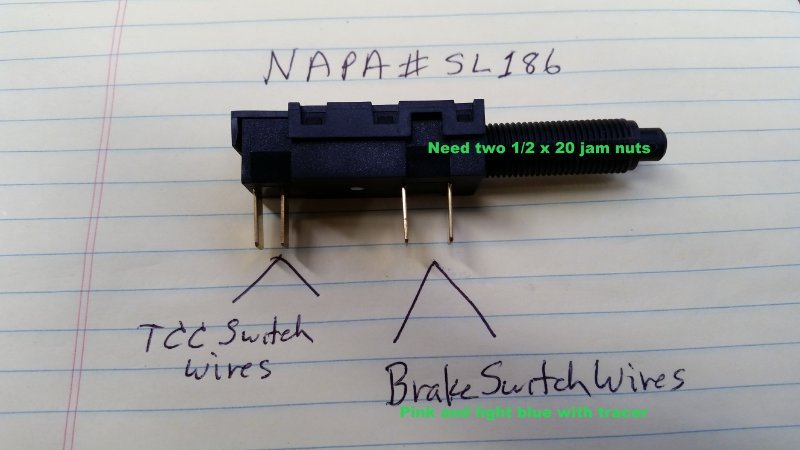
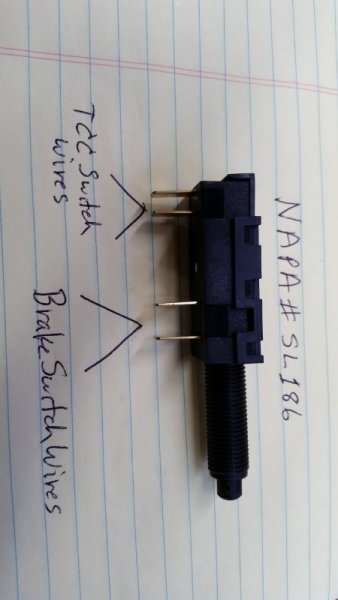
And, there's an easy antidisestablishmentarianism to convert the brake light switch to a later style. No fabricating required.
-
Double check the TPS adjustment.
-
The IAC could be bad... When you replaced the TPS, did you adjust it according to my instructions?
-
It starts rignt up and drives great going down the road. When you stop it dies and i smell gas. I have to crank and crank and give it gas to start it back up. It will drive down the road fine. Except now ive noticed its starting to hesitate and buck when your going around 40mph sometimes. These problems are sperratic. I drove it sunday and it died 4 times. Yesterday i let it idle for 20 min and it never died. I drove it about 10miles and it only died once I wonder if your EGR valve isn't hung open..... You have cleaned the throttle body and IAC?
-
 Have you adjusted up the rear shoes?
 -
Why not?
-
Source for injectors -746
cruiser54 replied to pizzatree's topic in MJ Tech: Modification and Repairs
Closest fit? -
Here's a good fix. http://cruiser54.com/?p=280
-
Most common is this:

-
CRUISER'S MOSTLY RENIX TIPS IMPROVING BLOWER MOTOR PERFORMANCE NOVEMBER 28, 2015 CRUISER54 28 COMMENTS EDIT On 1984 to 1990 MJs and XJs, the blower motor’s factory grounding point is on the driver side inner fender under the sheet metal screw. This ground is shared with windshield wipers, front windshield washers, rear windshield washers, AC clutch relay, fan control relay, fog lamps, fan motor, headlamps, front turn signals, front side markers, and park lamps. So your blower motor has its ground point 10 feet away from where it is located!! What we’re going to do is leave that ground intact and also ground the blower motor on the passenger side inner fender much closer to the blower motor itself. This will also benefit the other components on the factory ground circuit. Take this opportunity to refresh the factory ground as a matter of course. Remove the screw, scrape the surface to bare metal and reinstall the screw securely. Here’s what I do to get the ground much closer to the blower motor and add another ground point to this overloaded ground circuit. Find the blower motor connector on the passenger side. Red and Black two wire connector. Find a location where the black wire can be made to reach the passenger side inner fender, and cut the wire. You may have to do some rerouting of the harness to achieve this. Take both cut pieces of wire and put them together into a yellow eyelet and crimp. Fasten the eyelet to a place on the passenger side inner fender with a sheet metal screw after applying OxGard to the contact surfaces. Be sure to scrape the attaching point on the fender to bare metal first. Your blower motor will now turn faster and last longer, and the other electrical components on the circuit will benefit from a better ground path.


-
A couple things I'll throw out here. Blower/TS gets power from big brown wire at ignition switch. It's too big a load for the switch and the blower has a crappy ground circuit. As mentioned, the connector behind the driver side headlight is generally all corroded. CRUISER'S MOSTLY RENIX TIPS CONNECTOR AND RELAY/RECEPTACLE REFRESHING OCTOBER 30, 2015 SALAD 35 COMMENTS EDIT I suggest unplugging EVERY electrical connection in the engine bay you can find, whether engine related or not, and spraying it out with a good electronics cleaner, visually inspecting the terminals making sure they haven’t retracted into the plastic holder, and then plugging it back together. There’s a critical 10-pin connector for the front lighting system located in front of the air cleaner and behind the left headlight assembly. Don’t miss that one. Also be sure that the connectors to the ballast resistor mounted near the air cleaner housing are clean and tight. ALL of the relays should be removed, the terminals wire-brushed until shiny, and the receptacles sprayed out with contact cleaner. Then plug them back in. I do this on every Renix Jeep I purchase or work on for someone else.
-
Source for injectors -746
cruiser54 replied to pizzatree's topic in MJ Tech: Modification and Repairs
trevor.skankfootracing@gmail.com -
1171342526_MountainLion(2).MOV
-
88 MJ runs great "BUT" it won';t restart why?
cruiser54 replied to Submariner's topic in MJ Tech: Modification and Repairs
I suggest completing those Tips now. super easy. -
Check and make sure intake manifold bolts are snug. Ever been to www.cruiser54.com and COMPLETED Tips 1,3,4, and 5?

-
If the problem was in the distro valve. wouldn't both front brakes have a problem?
-
The best I've experienced is eliminating the distro valve completely and installing an adjustable one in the rear line. Better braking performance overall as the distro valve has passages that are smaller than the ZJ and the brake lines.


-
88 MJ runs great "BUT" it won';t restart why?
cruiser54 replied to Submariner's topic in MJ Tech: Modification and Repairs
Have you completed Tips 1 through 5 yet? -
This^^
-
Only use Bosch.
-
Starts sluggish and slowly gets up to idle
cruiser54 replied to yahma's topic in MJ Tech: Modification and Repairs
Is your starter soaked in oil by chance? -
‘88 pioneer fuel problems?? SOS.
cruiser54 replied to MulletDaddy25's topic in MJ Tech: Modification and Repairs
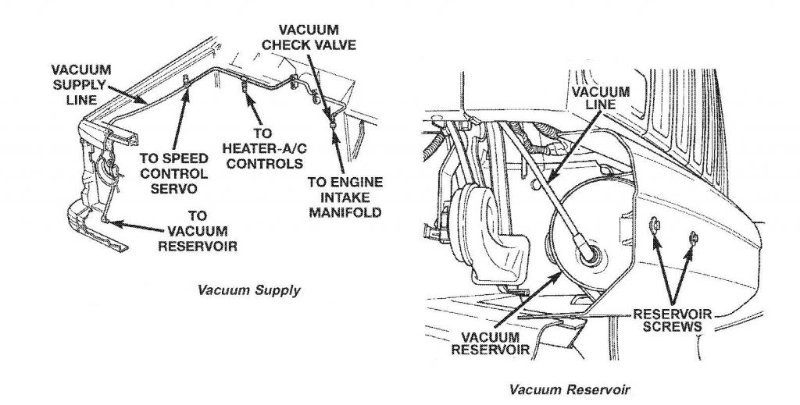
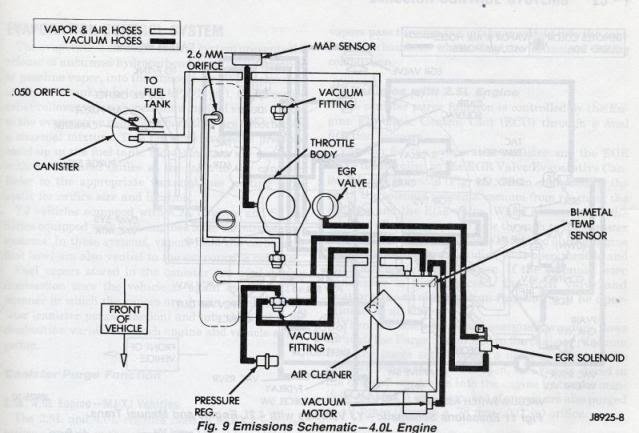
CRUISER'S MOSTLY RENIX TIPS RENIX VACUUM HARNESSES NOVEMBER 17, 2015 SALAD 25 COMMENTS EDIT The vacuum harness that attaches to the front of the valve cover and includes the grommet/fitting, and is called the front harness, is Napa part number BK 715-1367 or is a Dorman 46003. The vacuum harness that is closest to the air cleaner, EGR etc, and is called the rear harness, is Napa part number BK 715-1366 or is a Dorman 46004. The tube from the rear of the valve cover to the intake manifold is part number BK 715-1365 or Dorman 46005 and comes with the valve cover grommet. The Throttle Body to MAP hose is no longer available. Click HERE to access a fix for that. Revised 2-6-2016 -
‘88 pioneer fuel problems?? SOS.
cruiser54 replied to MulletDaddy25's topic in MJ Tech: Modification and Repairs
And here's some stuff to look at.