

DigitalBman
-
Posts
174 -
Joined
-
Last visited
-
Days Won
4
Content Type
Profiles
Forums
Gallery
Everything posted by DigitalBman
-
Before and after
DigitalBman replied to kansashogan's topic in MJ Hardcore Tech: Epic Journeys to Greatness
That's a shame... I am getting ready to do a radiator upgrade on mine. I was looking at the flex a lite radiator with the 3 fans. What is your opinion on that one versus your Novak? Both seem to he quality radiators -
So I picked these up today! Dave Cepek FC-II Radials. 37x13.5x17. Should due just fine for a while. They all still have the little nipples on them from being new. 4 of them for 650. don't have the cash to plop down on the Mickey Thompson Baja Claw TTC Radials I really want. Figure these will due for a few years at least. I litterally picked these up about 30 minutes before I had to be at the airport. Going TDY for a while.. So it will be a good while before I get these on the jeep.
-
Per side or per set?
-
-
So.... I like the look of these wheels. But they are spaced to far in. They look totally funky being an inch or so inward of my flares... Gonna make the wheels and tires a priority I think.
-
Don't have permission to view
-
Got these installed today! Some Blue Kevlar coated stainless steel brake lines since I ripped off the one at MOAB. These are about 1.5 inches longer than the old ones. Which were long enough for the 6 inches of lift! These are are actually YJ lines meant for a 6 inch lift. Felt good to get her back on the road again!
-
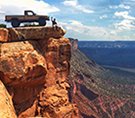
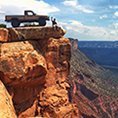
The cliff picture was taken at the Top of the World trail! its a slow... extremely bumpy rough drive with not a lot of challenging obstacles. Took about 1.5 to 2 hours just to get to the top after the 30 minute drive to the trail head. I just didnt wanna shake my jeep apart.
-
Do you plan on doing the rear as well?
-
Why are you trying to accomplish that? I to am wanting to do something similar. I want a hydraulic E- Brake that locks the wheels.
-
Here is the link to a big album full of MJ MOAB Pictures! https://www.facebook.com/brianpatti.busby.1/media_set?set=a.169606366930589.1073741831.100016436808111&type=1&l=ae771db996
-
Lol that link still works for me! But see for yourself!:]
-
Lol yeah It kinda looks like that for sure! But nope... Just a broken valve stem that hot ripped off by a rock and of course I didn't have a spare with me... I drove my jeep and my dad drove my tow rig to the trail head on our way back to the interstate. This was our last trail on the last day. But to get back down the mountain I had to drive on that tire all the way till it fell off totally. Destroyed the wheel. It also ripped off a brake line. Got within 4.5 miles of the tow rig, we were making such little progress my dad took off jogging. And I made it about another mile before I couldn't drive it any more due to the wires that make the bead in the wheel coming lose and wrapping around the knuckle, it also took out that brake line. I was working on cutting them off for about 30 minute and my dad rolled up in the tow rig. So we loaded it up and towed it the rest of the way down the trail / gravel road at this point. I picked these up really cheap and I had adapters laying around. So these will get me buy until I get my method race wheel beadlocks and I'm prolly gonna go with the 35 x 12.5 x R17 Baja Claws.
-
Dual Batteries Under the Hood
DigitalBman replied to Dzimm's topic in MJ Tech: DIY Projects and Write-Ups
Wow! That's really odd that it sits up so high... I wonder what's different... -
Dual Batteries Under the Hood
DigitalBman replied to Dzimm's topic in MJ Tech: DIY Projects and Write-Ups
Nice!!! Got some pictures man?? -
So this past weekend I attended MJ MOAB Takeover! Tackled all of Hells Revenge, including Hells Gate and The Escalator! Also went up to MOAB Rim and to Top of the World!
-
I'll start! Name the Krustyballer product(S)!! Lol
-
Dual Batteries Under the Hood
DigitalBman replied to Dzimm's topic in MJ Tech: DIY Projects and Write-Ups
So basically, in order for the battery to automatically charge it needs to be wired into an accessory 12v ignition source. That way when the truck is being driven both batteries stay charged. The switch gives you the option to control the isolator I'd the start battery is dead. There are other options other than what I have layed out for you. There are also automatic duel volt sensing isolator that does everything automatically. I just wanted the option to control it when I wanted. Feel free to ask any questions and I'll do my best to answer!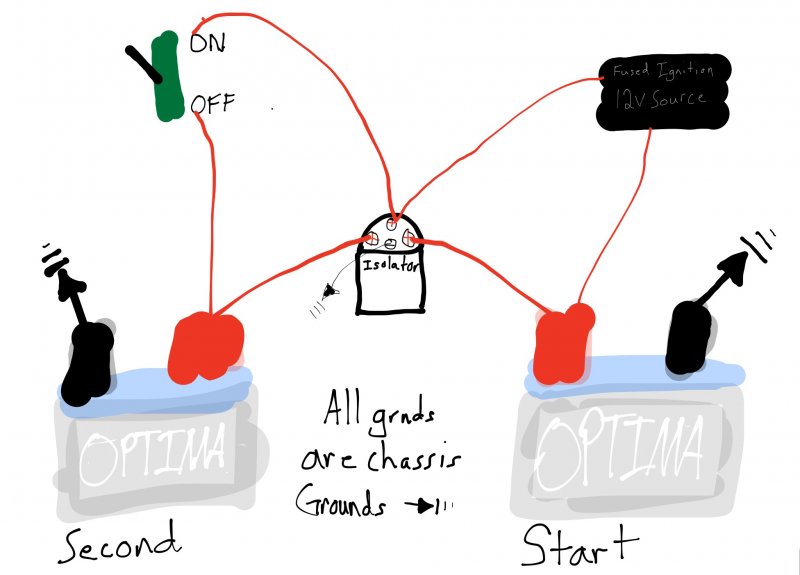
-
Dual Batteries Under the Hood
DigitalBman replied to Dzimm's topic in MJ Tech: DIY Projects and Write-Ups
Hey Dzimm, I don't know if you ever figured this out or not, just thought id chime in with what i did. On my dual battery setup I routed a cowl are intake with inline filter. This opened the space up very similar to what you have. Then i went to the JY and got another battery tray, I had no idea about BleepinJeeps video at the time, but after throwing it in there i ground off the one spot on the bottom of the tray, the little round protrusion sticking out the bottom. This allowed me to fit an auxillary fuse box, actuator for my fron tlocker, battery isolator, and second battery. As you can see, the batteries are pretty dang symmetrical. Every time I pop my hood now I get compliments. My start battery runs my front winch and putco headlight harness (for now). My second battery powers: the auxiliary fuse box with my front / rear lockers and my front LED lights. It will power my rear winch and rear LED lights as well as on board air, plus who knows what else. The Battery isolator is powered off of my second battery, that way if my start battery dies, I can still have switched power to the battery isolator, this allows me to literally jump start myself with the push of a button if my start battery is dead. If you have found a solution already, great! If not i hope this helps or helps anyone else that finds this thread. Some more details can be found in my build thread or I can answer any questions. -
I read somewhere else that the plugin for the new site is not installed yet.
-
Just another small update today and no pictures. But I got the bumper mounted the rest of the way. 5 bolts on each side. Also got the winch wired up. Fixed a nick in my battery isolator power wire. Also ran the 5 switched wires from the auxiliary fuse box to the interior. I have found that running wires to cab can be done pretty cleanly by drilling a hole in the firewall to the cowl area. Then another hole through the cowl area and drop the wires right in behind the dash. Using grommets in the holes around the wires creates a pretty factory look and it just works well. Tomorrow I'll try to get the headliner in, the console wired and installed, and the front LED lights wired up.
-
Lol Bring it on by!! We I'll give ya a hand with what I can! Just few more teaser pictures! Got the final assembly of the Overhead console done. Also got the RKE board mounted I'm there for the key Fobs.
-
The lip on the rear of the console goes through the fiberglass lip of the headboard and then is scooted back against the fiberglass bondo Hair which makes it snug against the headliner. The front holes are screwed into where the visor holes are. This was an early test fit.
-
Was this built by KCsurfer20?
-
A little taste of what the Shortened overhead console looks like with most of the electronics in it
