


gogmorgo
-
Posts
5984 -
Joined
-
Last visited
-
Days Won
4
Content Type
Profiles
Forums
Gallery
Everything posted by gogmorgo
-


-
Not sure which seats you have, bench or buckets, cause the thread title says one and the post says the other. You can use the bucket belts with the bench as long as you don’t mind not having a lap belt for the middle seat. The bucket belts are the same as the 4-door XJ belts. The bench seat belts are also the same just with different plastic sleeves to hold them up above the bench, and the added lap belt. The lap belt bolts down with the same bolts as the female ends for driver and passenger belts. I don’t know if you’d be able to use the rear centre lap belt out of the xj or not, never looked too close.
-
I wouldn’t suggest new cars are any more reliable than something old and looked after. There’s thousands of components that go into a car, and the risk of one having a manufacturing defect goes up the more components you’re looking at. There’s a term for it in engineering, something related to infant mortality, where the chance of things going wrong right away is high but the risk of issues decreases over time. On an older machine you’re mostly dealing with wear and tear, and while the chance of wear related issues goes up when the chance of manufacturing defects goes down, wear and tear is predictable and easily managed through proper service. We’ve got a ton of older vehicles in our fleet. We don’t experience too many failures because when we bring them in for scheduled maintenance we give them a thorough look over, and deal with any issues that are starting to be a problem. The vehicles that are being headaches are the newer ones with teething issues. We’ve got a ‘24 F150 our safety/rescue team uses that bricked itself in one of the most remote locations we’d send vehicles to and took a 50-mile tow to the dealer yesterday, and the first 20 miles of that weren’t paved. No blown fuses, batteries are good, but only half the truck works and it’s not the driving parts. We’ve also got a ‘23 F550 that keeps throwing misfire codes and has been back to the dealer twice already with no actual repairs done because there’s nothing obviously wrong with it. Considering out of our fleet of ~100 vehicles, some of which date to early ‘90’s and mid-‘80’s, we only picked up a half dozen new vehicles in the last couple years, that’s not great numbers on the new vehicles. While newer vehicles definitely have better occupant protections in the event of a collision, which is a legitimate concern about loved ones, the only other advantages are modern creature comforts, status, and there’s usually a warranty often with roadside so you don’t get the bills for repairs. Wear and tear doesn’t go away, they still need all the same maintenance. You just pay more for them.
-

Replacing the heater core without yanking the dash
gogmorgo replied to Pete M's topic in MJ Tech: DIY Projects and Write-Ups
Any chance this video still exists somewhere? I spent a ton of time trying to research this and failed, other than one forum post that was never backed up suggesting there's a panel you can drop out without pulling anything else... I don't think that's true, half the fasteners for the heater section of the box are accessed from the top and I don't think you'd get at them with the dash in. Mostly I was trying to find a way to pull the heater core without opening up the a/c system. Eventually I realized I'd spent way more time digging through the internet than it would take to pull the dash completely, and my a/c system was discharged already for unrelated reasons so I just went for it. I followed a different forum post with broken pictures that missed a couple steps (notably in regards to the A/C evaporator), that loosely followed the service manual as well. In regards to pulling the dash they both suggest just removing the lower dash panel and right side kick panel to pull the main (lower) dash support bolt on the right side. But like most people I didn't find this to give enough clearance to get the HVAC box off the firewall. What I did instead of pulling the entire dash was to remove the top panel/vent cover so I could get at the upper dash bolts. Whether it's necessary to pull the two centre upper dash bolts I'm not sure but I did anyway, as well as the right side bolt. This allowed me to pull the whole right side of the dash back far enough that I had tons of clearance to get the evaporator side of the HVAC box off the firewall without pulling any more of the dash apart or dropping the steering column. Other than discharging and recharging the a/c system I think the whole job of changing the heater core could easily be done in an evening by most of us. I had everything apart in under an hour, although I haven't put it back together yet. My evaporator has clearly taken some foreign object damage by things that have made their way into the blower fan and it's got an oily smudge on it that suggests minor refrigerant seepage, so I figure I'll change it while it's out and now I'm waiting for that to get here. There's a lot of guides to changing the heater core out there and almost all of them recommend disassembling and removing the dash completely which adds many hours of labour to the job for no reason. Some of the guides even start the dash removal process by removing the seats, which is completely unnecessary and especially if you live in the salt belt and you've never had them out adds the risk of snapping the mounting studs which will significantly complicate changing a heater core for absolutely no reason. -
Acceleration Thud Problem
gogmorgo replied to Salvagedcircuit's topic in MJ Tech: Modification and Repairs
Exhaust hitting the crossmember is a common enough occurrence. Motor mounts in good shape? Are you accelerating hard enough it could be related to suspension drooping in the front or squatting in the rear? Double check your lug nuts. Even if you don’t think that’s what it is. -

-
Bench Bleeding and Brake Bleeding Procedure.
gogmorgo replied to CheepComanche's topic in MJ Tech: Modification and Repairs
I’ve always done it by bleeding the bypass first. It’s how the procedure is always quoted from the manual. But maybe the order doesn’t matter. Like with starting with the furthest away, the only reason is because that will push the most air out of the first bleeder and you’ll have clean bubble-free fluid to the other bleeders more quickly. But you can bleed in any order, you just might spend more time on average at each bleeder that way. -
Bench Bleeding and Brake Bleeding Procedure.
gogmorgo replied to CheepComanche's topic in MJ Tech: Modification and Repairs
Bench bleeding is done to prime the system. Both to make sure the seals get lubed and to make sure it actually pushes fluid when you push the pedal, to speed up bleeding the system when it’s installed. If you just assemble and tighten all the lines you’ll compress air in them and risk just pushing that air back and forth in the master until you wreck the dry seals. Even with bleed screws open, you might not get enough pressure out the bottom to make up for the amount of air you’re squeezing up top. “Bench” bleeding can also be done with everything installed in the vehicle, just by leaving the brake lines on the master cylinder loose and slowly pumping the pedal until they leak. Then you can tighten up the lines and move on to bleeding the full system. Just make sure to flush away the brake fluid dribbles with copious amounts of water or it will eat paint and the metal underneath will rust away. -
Excessively high idle is usually due to air getting into the engine some other way than through the throttle. Vacuum leak, bad intake gaskets, etc. There’s also other factors that could cause it. A stuck open Idle Air Control (IAC) valve could cause a mild high idle. A throttle stuck open, either of it’s own accord or due to a sticky cable or a floor mat jamming the gas pedal can also cause a high idle.
-
Poor response to throttle input is often a throttle position sensor issue. Its also a symptom of a weak fuel pump or other fuel delivery issues although usually closing the throttle will improve things in that case. I also did once get a distributor put in one tooth out, which was close enough the engine would idle but wouldn’t always stay running and didn’t want to change rpm. But that’s an HO, not a Renix I wouldn’t expect year-old gas to be bad enough to stall the engine but it is a lot hotter down your way and fresh gas can’t hurt anything.
-
AC condensation in passenger floor
gogmorgo replied to BentGear's topic in MJ Tech: Modification and Repairs
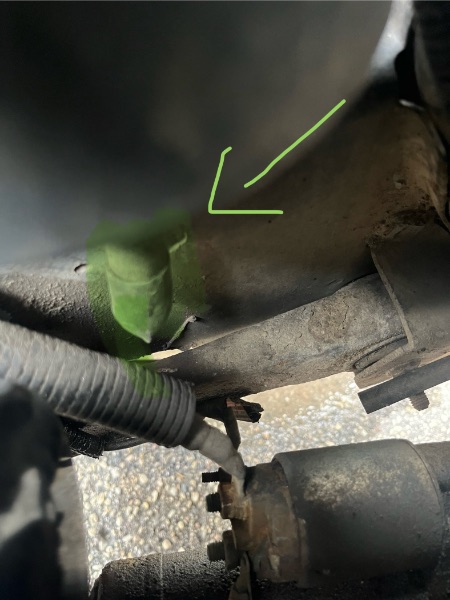
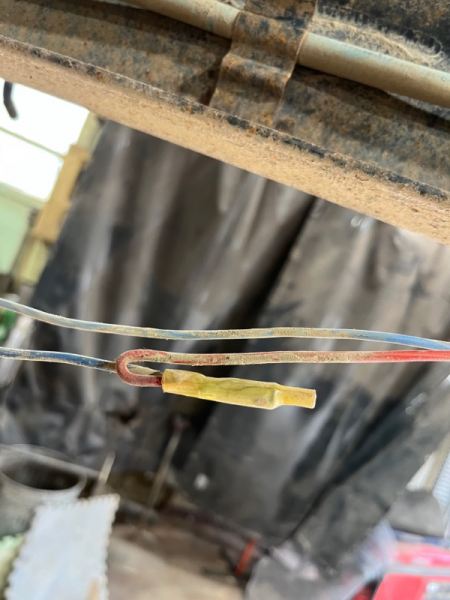
The tip of the train hose is supposed to be pinched closed, in an effort to stop road grime, dust, etc., from getting up in there and plugging it up, while still allowing for condensation to get pushed out by the gentle pressure from the fan. A bit like the outlet on a whoopee cushion but without the extra flap length for sound production. Problem is the hvac on an old vehicle doesn’t have any sort of filtration so it will eventually plug with dust from inside. For the benefit of future readers, the a/c drain tube is on the passenger side firewall in the engine bay right above the frame rail, if you forgive my terrible phone art: Directly below the charcoal canister on my ‘91, I don’t know that the canister is in the same location on a Renix but the location relative to the blower motor that you can see on the left is the same. It comes straight out and does a 90° bend downwards. And this is the pointy pinched shut tip, next to starter on a 4.0: Generally speaking giving the tip a squeeze should be enough to pop the tip open and let the accumulated water blow out the plug, but it might be necessary to push something into the end to bust it up. The hose also pops off the firewall easily enough for a very thorough cleaning. Also worth warning, if you’ve got enough condensation in there it’s coming out the floor vents you’ll get a couple gallons of water out of it when you blow it free. On the off chance you’re somewhere you wouldn’t want to dump that much water on the ground.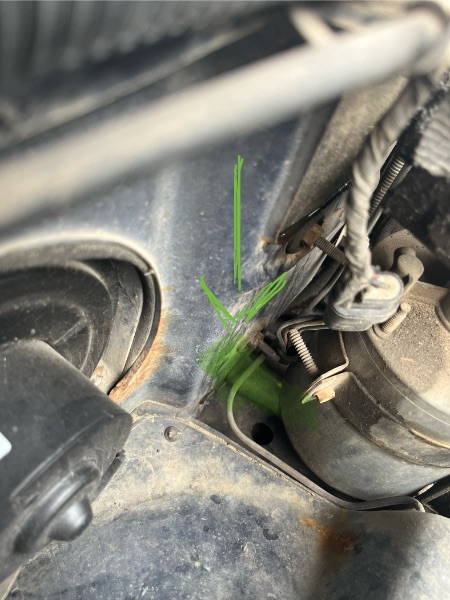
-
I’ve had to replace them up here just from gravel road dust on vehicles that don’t see any use in the winter. We’ve still got a couple medium and heavy duty trucks from the ‘80’s and ‘90’s at work that have them. Most are screwed to an 1/8” steel plate patching a hole. Although thinking about it now it wouldn’t surprise me if the old truck drivers are stepping on them with the same force they’d step on the clutch and just kicking them through the floorboards instead of it being totally down to the grit and rust.
-
The only one of the switches you want to remove from the column that’s actually in the column is the wiper switch, and you need it in there if you want turn signals because it holds the turn signal stalk. Ignition and high/low beam switches are under the dash at the base of the column and actuated by rods. Look up a write-up for teardown on a GM Saginaw column. You’ll want a cheap lock plate tool for making the process much easier. You shouldn’t need other special tools to get any deeper into the column unless you need to tighten up a floppy tilt mechanism. The steering lock plate needs to be in the column because it retains everything, I don’t know if it would be easier to pull the lock pin or trim the locking portion off the lock plate, it’ll make sense when you get it apart. If you’ve got an automatic you’ll want to do something with the shift interlock as well. Don’t remember off the top of my head how that fits into the picture. IMO floor mounted high beam switches are more problematic than they’re worth. They fill full of crap off your boots and get sticky, and where they screw to the floor pan usually rusts out in short order. But they are definitely cheaper than other high beam switch options.
-
Trailer wiring 🙄 Although I suppose this is still better than the typical scotch locks and marrettes ¯\_(ツ)_/¯
-
From the factory, manifold(s), downpipe, cat, and muffler are the same as a same-year XJ Cherokee with the same drivetrain. The tail pipe is not. There’s tons of options for the front part as a result, and a couple cheap parts store MJ-specific tailpipes (Walker, etc) out there but I don’t think you’ll find a full kit anywhere. Your best bet is going to be going to a local exhaust shop and getting something custom built if you want something fancy. Or build your own system out of a universal diy kit. Factory system is 2-1/4”. If you post up your drivetrain people here may suggest what they ran on their truck.
-
Pull a line off the outlet of the filter, see if you’ve got fuel flowing there. If you don’t, pull the inlet line off to see if you’ve got flow there, indicating the filter is blocked. But I bet the issue is in the tank. If you didn’t change the rubber line from the sending unit to the pump, or if you did but didn’t use submersible fuel hose, I’d be willing to bet that failed. I also had a not-great-fitting aftermarket pump come out of the sending unit in a way that it wasn’t pulling fuel from the bottom of the tank, so I’d essentially run out of gas with roughly 1/3 tank remaining.
-
Shiny Leaf Spring Bushings
gogmorgo replied to krustyballer16's topic in MJ Tech: Modification and Repairs
Are those aluminum? -
Not 100% on what you’re referring to with the vacuum line. The one going to the fuel rail is for the fuel pressure regulator, the other end goes to the intake manifold. There are also evap lines going from the rollover valves on top of the fuel tank that should then go to the charcoal canister under the hood.
-
Sorry, only just saw this. My homemade crank didn’t last very long. I managed to track down an original and that didn’t last too long either. Kinda like the spare tire jack, seems like it’s not intended for regular use. I’m at work right now but can dig up the blueprints for the handle when I get home. As for oil filters, the ‘91+ Jeep 4.0 filter has the same mounting just a little taller with a little more volume. Hasn’t been an issue using it. I was working at a parts store shortly after buying my Niva, and spent a while with the catalogue matching up the specs for the original Lada oil filter, then I chose the one we had the most inventory, on the grounds that would be the most available. I was a little surprised when I got home and discovered it was the same one I used on my MJ. As for other parts, I’ve mostly been ordering online. Ladapower.com was my go-to but he was located in Ukraine so things have been interesting. He’s since moved the operation to Estonia, but it’s taken a while to rebuild his supply chain from what he once had. But they have excellent parts catalogs (in English!) and even if they haven’t had the parts I needed I’ve had good success just googling the part numbers and finding them on eBay or some other dedicated parts store. There are some pretty hefty duties now on parts originating in Russia though. I also had a DHL shipment get routed through the States and somehow they decided it was appropriate to charge me duty in the US as well, so I’ve been sticking to regular mail service for orders since then instead of courriers. I’ve also bought parts from Ital Motors in Edmonton. They’re a former dealer that has done their best to keep in the game. Bit of a cool shop if you ever get the opportunity to go in person, they’ve got some race cars hanging out in the front room.
-
Basically you’re just wanting to use a vacuum switch to manually actuate the CAD? Can’t see any reason it wouldn’t work. It wouldn’t be any different than the “posi-lok” cable CAD shifter thing. As long as you shift out of 4x4 it shouldn’t cause problems if you leave the CAD engaged by mistake, no different than any of us with the thing locked in permanently. It’ll just use a modicum more fuel. Running around in 4x4 with a failed CAD that’s not engaged doesn’t blow things up, either, you just don’t actually have 4x4 when you want it. I’m not sure how the early manually vacuum switched systems work, but no reason you shouldn’t be able to just run new vacuum lines to the switch. I don’t know if the factory vacuum switches are readily available in working condition either, or if you might be better off with an aftermarket switch. I wouldn’t really call it a selec-trac system though. The defining feature of Selec-trac is a centre differential that allows you to run 4x4 on high-traction surfaces, not the vacuum shifting. I’m also not completely sure what the advantage of 2wd low range is. But maybe this is a conversation for a different time. I think the only situation I’ve been in where I might have wanted it was for parking a heavy trailer with a stick shift.
-
Starting to get smoke blowing in from fires up north.

-

-
Easy test for bad ballast resistor, just bypass it, connect the wires on either end together. If that fixes it you’re laughing. Finding a new one or leaving it permanently bypassed is up to you. NSS going out prevents cranking, shouldn’t kill the engine or make it run rough. I might add the TPS to the sensor testing list. Cruiser had a tip for adjusting it too. Also some tips for the trans shifting issue. If it’s not fuel related I’d be looking at ignition components. If you don’t know how old the distributor cap and rotor are it might be wise to change them.
-
I still think it defeats the purpose of a sealed container when you deliberately slather the side of the thing in oil. Drain pans for draining, bottles for bottling. I actually have this container. Bought it last fall because my garage was in storage while I was between places, it was the only one at the local hardware store. Forgot about it after disposing of the oil and left it sitting in the back of a truck I parked for the winter. Found it full of water after the snow melted out of the truck bed. If water got into it…
-
Unknown Ground Wire Location
gogmorgo replied to Torq_Shep's topic in MJ Tech: Modification and Repairs
Might be one going to the alternator? Otherwise not a lot in that spot to connect to. My ‘91 4.0 has the oil pressure sending unit wire in loom with the starter trigger wire and it’s not a ring terminal. I don’t see anything that looks exactly like that on mine. I do have a ring terminal on what looks to be an alternator ground bolted down to a coil mount stud but it’s thicker than that one looks, 6awg maybe, roughly the same diameter as a spark plug wire. The field wires off the alt are roughly that size, although normally they’re encapsulated in that plastic block that holds all the alt wires, unless that’s gone missing. For me that bundle has the ignition coil wires, a/c clutch, alt, and starter trigger and oil pressure that run way further back past the oil filter. Only ones with ring terminals are the two alternator field wires, black and green, and then the big alternator ground, all of which have the black plastic block holding them together, and I think you’d have charging problems or a Code 41 if any of them were disconnected.