boxyjeep Posted March 31, 2023 Author Share Posted March 31, 2023 14 minutes ago, Salvagedcircuit said: That's one excellent method to paint bolts! The United States Postal Service, If it fits it ships a proud sponsor American vehicle restoration. The seller on that amazon link is: There is a good chance that kit is import rubbish that might not meet your expectations. I've used these cables below on my longbed and they fit and work well. Granted, I don't know if raybestos quality is any better than the link you posted, but just thought i'd let you know. One of these cables is for longbed only. There is a shorter shortbed version of one of the cables. I forgot which one. Parking brake cable cabin: RAYBESTOS BC93589 Parking brake cable rear: RAYBESTOS BC93591 The kit is high quality and appears to be the same as the Lokar kit that’s 2-3x the price. Probably made in the same factory. Link to comment Share on other sites More sharing options...
Salvagedcircuit Posted March 31, 2023 Share Posted March 31, 2023 6 minutes ago, SoCalJeepComanche said: The kit is high quality and appears to be the same as the Lokar kit that’s 2-3x the price. Probably made in the same factory. Ok cool. Sometimes I forgot to check the supplier on amazon, it's so easy to overlook. The parts are coming out looking great otherwise . Keep it up! Link to comment Share on other sites More sharing options...
boxyjeep Posted March 31, 2023 Author Share Posted March 31, 2023 5 minutes ago, Salvagedcircuit said: Ok cool. Sometimes I forgot to check the supplier on amazon, it's so easy to overlook. The parts are coming out looking great otherwise . Keep it up! Thanks! It’s getting there for sure Link to comment Share on other sites More sharing options...
Drahcir495 Posted April 1, 2023 Share Posted April 1, 2023 What a great build up thread . I am amazed at how you were able to go through the engine bay wiring . Very nice MJ by the way! Link to comment Share on other sites More sharing options...
boxyjeep Posted April 2, 2023 Author Share Posted April 2, 2023 2 hours ago, Drahcir495 said: What a great build up thread . I am amazed at how you were able to go through the engine bay wiring . Very nice MJ by the way! Thanks! Certainly a labor of love. Took way too much time to redo the harnesses. Link to comment Share on other sites More sharing options...
boxyjeep Posted April 9, 2023 Author Share Posted April 9, 2023 Been making some good progress and finally have most of the truck back together. I installed 4.5" RE springs with an extra isolator on top, which seems a bit better than the RE 5.5" springs (which netted about 6.5" of lift--too much for me). I painted my 1.5" aluminum steering gloss black, as well as the sway bar (with new bushings). I also installed Clayton's high-steer swaybar brackets, which weld onto the inner C's on the axle: And I also got the rear shocks installed and custom length emergency brake cables installed: There's just a few more odds and ends to wrap up before I can get it aligned and back on the road... Link to comment Share on other sites More sharing options...
Pete M Posted April 10, 2023 Share Posted April 10, 2023 sooooo clean! where's your overload leaf? Link to comment Share on other sites More sharing options...
boxyjeep Posted April 10, 2023 Author Share Posted April 10, 2023 34 minutes ago, Pete M said: sooooo clean! where's your overload leaf? I took it out. I know there is a risk for axle wrap, but I’m targeting the lowest and softest SOA possible for the rear. May swap it back in after some driving. Link to comment Share on other sites More sharing options...
Pete M Posted April 10, 2023 Share Posted April 10, 2023 I can assure you that the overload doesn't restrict things. but neither are they the perfect fix for axle wrap (my tired soft leafs were just not up to the task so I eventually replaced the whole packs) Link to comment Share on other sites More sharing options...
boxyjeep Posted April 10, 2023 Author Share Posted April 10, 2023 32 minutes ago, Pete M said: I can assure you that the overload doesn't restrict things. but neither are they the perfect fix for axle wrap (my tired soft leafs were just not up to the task so I eventually replaced the whole packs) Sorry, I guess I should say I wanted the lowest SOA possible—I know the overload leaf doesn’t impact flex much. To achieve this I ended up making my own low profile spring perches and running XJ shackles. The overload leaf would have added about 1/2” of height that I wanted to avoid. I cleaned up the leaf springs, painted them individually, installed new rubber bushings and new spring pads (greased). The Fox shocks are really stiff and look like they have raised the rear a bit themselves. I’ll be doing some driving to see how things settle out. Link to comment Share on other sites More sharing options...
boxyjeep Posted September 28, 2023 Author Share Posted September 28, 2023 I started a new job a few months back and have been super busy with that and ramping up BoxyJeep.com. That being said, I've been accumulating parts for the next phase of the build and just got this in the mail. Next phase of the build: Swap the old AW4 for a new Novak AX15 with external slave Rebuild the NP231 and install 23-spline input shaft and SYE Swap out automatic pedals and shifter for manual parts Measure for rear CV driveshaft and get it ordered De-pin and minimize wiring harness to eliminate automatic TCU bits Install NOS Pacesetter CARB-legal header and verify manifold seal New power steering pump and Mushimoto cooling fans Get tires re-balanced and aligned (had minor death wobble when I last took it out) Link to comment Share on other sites More sharing options...
89 MJ Posted September 28, 2023 Share Posted September 28, 2023 Yes! Love to see its getting three pedals! Link to comment Share on other sites More sharing options...
boxyjeep Posted September 28, 2023 Author Share Posted September 28, 2023 1 hour ago, 89 MJ said: Yes! Love to see its getting three pedals! Thanks! My first few XJ's were 5-speed back when I was in my late teens/early 20's and I really liked that, but it got tiring as a daily driver. That being said, I don't drive my MJ too much so it'll be a nice change of pace to have something fun to drive when I take it out. I'm still debating on whether or not I can get by with the 3.55 gears and 33's. It's bearable currently with the stroker engine and automatic transmission. If I did re-gear, I think I would only want to step up to 4.10's if it wasn't good with the standard transmission... Link to comment Share on other sites More sharing options...
Bomberjeep Posted September 29, 2023 Share Posted September 29, 2023 Man. I just read your whole build. She's awesome. Keep up the great work!! Link to comment Share on other sites More sharing options...
boxyjeep Posted September 29, 2023 Author Share Posted September 29, 2023 13 hours ago, Bomberjeep said: Man. I just read your whole build. She's awesome. Keep up the great work!! Thanks! It's been a long road (over 5 years), but it's finally getting close to final form :-) Link to comment Share on other sites More sharing options...
Bomberjeep Posted October 4, 2023 Share Posted October 4, 2023 On 9/29/2023 at 11:41 AM, boxyjeep said: Thanks! It's been a long road (over 5 years), but it's finally getting close to final form :-) I know the feeling. Ive had both of mine for a year and they both seem to just want repairs more than anything else. All we can do is plug away Link to comment Share on other sites More sharing options...
Pete M Posted October 7, 2023 Share Posted October 7, 2023 35 year old trucks are like that. always wanting all the attention. Link to comment Share on other sites More sharing options...
Bomberjeep Posted October 9, 2023 Share Posted October 9, 2023 On 10/7/2023 at 1:16 PM, Pete M said: 35 year old trucks are like that. always wanting all the attention. Shoot. Just like the kiddos, wife, dog, Wrangler, Sierra..... At least its not meth. Link to comment Share on other sites More sharing options...
boxyjeep Posted March 31, 2025 Author Share Posted March 31, 2025 Thought you guys deserved an update--finally done with my AX15 swap after almost a year. I installed new F&R Adam's CV driveshafts, rebuilt the transfer case with 23-spline input shaft and SYE, SFR transmission mount, and a bunch of rewiring with new heatshink/loom. I'll probably be doing a walkaround video on YouTube soon, but just passed smog today (which is a big deal in California when running a 4.6L Renix stroker...). Still a lot to do before it's ready for some off-road adventures (and even longer on-road adventures). Swap in CavFab Track Bar mount and brace with +2" forward movement (currently hitting the track bar is hitting the diff cover over bumps). Install front steering stabilizer and tighten up front end--it's still "loose" and on the edge of DW over some bumps. Something is wrong there and I need to figure it out. Re-seal tail cone of SYE housing. Slightly leaking after rebuild. Luckily it's just the tailhousing and not the case half. Some minor wiring fixes. I also have a set of Core4x4 long arms that I may install at some point (although I'm not looking forward to chopping up the pristine frame) and some CARB-legal Pacesetter Renix headers (that I may or may not install with a full 2.5" exhaust system). Link to comment Share on other sites More sharing options...
89 MJ Posted March 31, 2025 Share Posted March 31, 2025 I’m looking forward to that walkaround video. Link to comment Share on other sites More sharing options...
Gjeep Posted March 31, 2025 Share Posted March 31, 2025 Nice job and congrats -- CA smog is no fun with modified trucks. Link to comment Share on other sites More sharing options...
boxyjeep Posted March 31, 2025 Author Share Posted March 31, 2025 29 minutes ago, 89 MJ said: I’m looking forward to that walkaround video. Thanks--coming soon! 3 minutes ago, Gjeep said: Nice job and congrats -- CA smog is no fun with modified trucks. Appreciate that. It took a long time to get it to pass after the 4.6L stroker install. New cat, injectors, plugs, adjustable map sensor, etc... Link to comment Share on other sites More sharing options...
89 MJ Posted March 31, 2025 Share Posted March 31, 2025 On 8/1/2021 at 8:55 AM, boxyjeep said: I wanted a short bed, 4.0L, auto, 4WD. I started ready through this thread and thought this was funny. Funny how our minds change while working on these projects. Link to comment Share on other sites More sharing options...
neohic Posted April 1, 2025 Share Posted April 1, 2025 5 hours ago, 89 MJ said: I started ready through this thread and thought this was funny. Funny how our minds change while working on these projects. Truth. Truck looks great! Very well done build. Link to comment Share on other sites More sharing options...
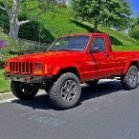
boxyjeep Posted July 20, 2025 Author Share Posted July 20, 2025 Been awhile since an update. Got 4.56 gears installed with Yukon LSD in the rear and Eaton e-locker up front. Really perfect ratio for 33's, AX15 and the 4.6L stroker. I've also finally got the steering "functional" but not super happy with it. The front end isn't as stable as I'd like--most likely due to the length of the OTA track bar vs. the WJ drag link. This causes some bump steer and less stability than I would expect (even with 8* of caster). Currently working on getting a few new parts installed to open up the air flow on the Renix engine: Dynomax header with 2.5" downpipe and exhaust all the way back, new intake tapped for GM IAT sensor, AC bypass pulley, and a Hesco AFPR. Overall, super happy with how the truck runs and drives. Finally feel like it's in a 99% done position and usable. I was able to take a picture in the same parking lot from when I bought the truck 7 years ago to now. Crazy transformation that I never expected to take this long... Link to comment Share on other sites More sharing options...

Recommended Posts
Create an account or sign in to comment
You need to be a member in order to leave a comment
Create an account
Sign up for a new account in our community. It's easy!
Register a new accountSign in
Already have an account? Sign in here.
Sign In Now