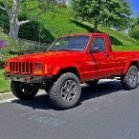
boxyjeep Posted August 1, 2021 Posted August 1, 2021 How it started in Aug 2018: How it currently sites April 2025: Backstory: It's been 3 years since I bought the truck so I figured it was time to start a build thread. These pics start from middle 2018 to now. Some background--I'd grown up with Cherokee's as a kid, but hadn't owned a Jeep since ~2005. In 2016 I was living in SoCal and got the urge to buy a truck--I kept my eye on Tacoma's but couldn't believe how much used ones were going for. I think I saw a Comanche build online and decided that I could get the best of both worlds: have the bed of a truck to haul stuff and the reminiscence of my first car (a 1990 Jeep Cherokee). I kept my eye on Craigslist and followed-up on a few listings, but nothing great fit my criteria. I wanted a short bed, 4.0L, auto, 4WD. Preferably 91+ for the HO engine and non-Renix systems. I was willing to consider a manual transmission or 2WD if the opportunity came up, but needed to stick with the 4.0L since engine swaps in CA are hell. After almost two years, a posting came up for a 1988 Pioneer with everything I wanted, plus D44 rear axle. The only negative was the engine not being HO and the paint being totally baked. But it was a desert truck, absolutely zero rust, and the guy who was selling it had bought it from a neighbor he knew that had it since new. He'd done some maintenance like a new fuel pump and radiator and promised it was in good condition other than an exhaust leak and some electrical issues. I specifically recall it "not leaking a drop of oil" when I spoke to him. His asking price was high ($4000) and he was about 2 hours away, but this was the best rust-free, straight body MJ that I had seen since I started looking out for one. My goal of this project is to build a streetable, but also capable offroad Comanche pickup with original straight body in "almost show" condition. I wanted to keep it under 6" lift and 33" tires. Ideally with HP D30 and D44 stock axles (re-geared) and 4.0L engine. I'll be driving it around town, on some trails/rides, and using it for any light hauling purposes around the house. This is not an offroad-only truck and will be babied for all intents and purposes. Listing photos:
boxyjeep Posted August 1, 2021 Author Posted August 1, 2021 So one Sunday, I got an Uber and met him about halfway. I took the truck for a quick test drive and realized that it was in a lot worse shape than he mentioned. It could barely idle, the engine ran like $#!&, the exhaust leak was really bad, and the rear main seal leaked excessively. When I pointed all these things out, he was quick to show me that the AC still worked. I was already $170 into this with the Uber ride and would need to figure out a return trip if I backed out, so I went over it a bit more and made an offer that he accepted. I drove it home the 2 hours and was very surprised that it kept up with highway traffic, didn't overheat, and didn't have death wobble, so that helped any sense of buyers remorse I may have had :-) I got it home and quickly started digging in. I found that the exhaust header was bad and had a few bolts missing or broken off in the head and that there were a ton of wiring gremlins. Most of the sensors on the drivers side of the engine had their wiring simply cut off (including knock sensor, O2 sensor, water temp), which I thought was contributing to the rough idle. Additionally, most of the terminals in the fuse block were corroded and none of the blinkers worked. I got the fuse block pulled out and re-did a bunch of the terminals. I also found a few bad bulb sockets that needed to be replaced (I didn't even know these could go bad).
boxyjeep Posted August 1, 2021 Author Posted August 1, 2021 I got some of the wiring stuff fixed and continued on towards fixing the leaks. The rear main seal would only leak after driving for a long period of time. However, for some reason it always smelled of burning oil. I found a leak from the PS pump (or so I thought) and ended up replacing that and then eventually the steering box and lines. While I was in there, I also replaced the terrible engine mounts with Brown Dog. Somehow the new engine mounts introduced a level of rigidity that ended up causing death wobble. So I decided to replace all the steering components and throw in 2" spacers and new shocks to level the truck out. I ended up buying the Rusty's heavy-duty steering kit, Rough Country track bar & bracket, and JKS disconnects. Despite spending a lot of money on this setup, and getting it properly aligned, I found that the Rusty's kit drove terribly. There was always a dead spot, it still had death wobble, and the tie rod would contact the track bar bolt on full turn. Unfortunately, eventually I swapped this back to an OEM system.
boxyjeep Posted August 1, 2021 Author Posted August 1, 2021 The truck came with a really rough set of Turbines and shot 225 tires, which I wasn't a huge fan of. I got some inspiration from one of the build threads here (Ryanmrph IIRC) and decided to get a set of TJ Ravine wheels. I liked how these looked and the fit was pretty good with the 30" BFG A/T's. I started working on other small issues in the interior (like seat belts that didn't work) and issues with the manual windows. I also wanted to level off the rear after adding the 2" front spacers. I achieved this with some longer rear shackles and new poly bushings. This was inside a bad seat belt retainer: Removing the OEM rubber bushings and sleeves was not fun. After installing these, I quickly found out that they were very rough. I may switch back to rubber in the future.
boxyjeep Posted August 1, 2021 Author Posted August 1, 2021 I finally had a chance to replace the exhaust header and extract a broken manifold bolt from the head. Somehow it went well with an extractor kit and I was able to get the new header installed. I also replaced a bunch of the vacuum lines and took Cruiser54's advice to tap my throttle body and replace the MAP sensor line. At this point, the truck is starting to look good, run slightly better, but still periodically have a rough idle and stumbling condition. I had done a bunch of other validation of plugs, wires, etc., but still didn't have a great idea of what to do.
boxyjeep Posted August 1, 2021 Author Posted August 1, 2021 20 hours ago, marcial88 said: How did you fix the fuse block terminals?, I bought new terminals online at Del City, used a pick to pull out the old ones, then soldered and heat-wrapped the new ones in place. I used these parts from Del City: 7388520 Single Terminal for 1 Way ATC/ATO Fuse Block 7389520 4-Way Terminal Strip for 4-Way ATC/ATO Fuse Block
boxyjeep Posted August 1, 2021 Author Posted August 1, 2021 Next leak to fix was the rear pinion seal. It was destroyed, so I took the opportunity to inspect the Dana 44 rear, install a Lubelocker gasket, and also replace the u-joint straps with yoke-style retainers. I ended up not being able to use the yoke straps, since the pinion yoke would need to be drilled and didn't have an opposing flat surface. I ended up changing this a few years later to the yoke style. The strap-style with 8mm bolts has always been a weak point that I'd like to avoid. Next up was getting the interior cleaned up. I had bought a new carpet and was planning to change the interior from blue to grey (to coordinate with the future exterior paint being either silver or red). Blue interior pretty much only goes well with blue exterior... Nasty old carpet: SoCal truck it's whole life. No rust :-) Insulation installed throughout: Carpet installed: I went with a 97+ center console. My end goal would be to refresh the front clip, dash, and doors. For now though, the console would have to do it.
boxyjeep Posted August 1, 2021 Author Posted August 1, 2021 At this point, the interior was getting pretty cleaned up, but the truck still ran like crap. I had replaced the exhaust manifold and gasket, made sure the O2 sensor was good, and started looking for other potential causes. Fuel pressure was good. Distributor was clocked correctly. I verified the grounds and followed the tips to replace the C101 connector. Unfortunately, still a very rough idle and close to dying at stop signs. I also verified the TPS and other suggestions from Cruiser54 and others on this forum. I was able to take it out for some drives into the hills, but still wasn't comfortable enough to go anywhere far. I also ended up replacing the Rusty's Heavy-Duty steering with OEM replacement. I could finally drive on the highway with zero death wobble. However, at this point, it was around the middle of 2019, I had the truck for a year, and I took a new job in northern California and had to move. I loaded the truck up and got it shipped up there.
boxyjeep Posted August 1, 2021 Author Posted August 1, 2021 The truck finally arrived in NorCal (Fremont) and had a very bad misfire. I could barely drive it off the shipping truck. I had just started a new job, so it sat for a few months before I could work on it. Turns out the distributor rotor had broken apart. I replaced that and I started right up (but still had a rough idle). It was now time to tackle the next big leak--the RMS. It must have been the original oil pan and gasket, as they were fused together. I couldn't get the pan off without destroying it, so... time for a new pan. I also spent almost two days scraping and cleaning off the old gasket material from the block. I also took the opportunity to replace the oil pump with a new standard-volume Melling pump. Started right up with great oil pressure. At this point I also realized that the muffler I put on back in 2018 was garbage and starting to make weird noises. I decided to replace everything from header back with a new CA-legal cat, Flowmaster muffler, and piping. At this point it was driving okay (still stumbling a bit) and not leaking oil. I used it to commute from Fremont to Menlo Park for the rest of the year without issue, as I started to accumulate parts and plan the next stage of the build. I bought JCR bumpers and sliders during their Thanksgiving sale. Unfortunately, wasn't very happy with them--they took a very long time to be shipped and when I got them there were a ton of missed welds on the front bumper and sliders. JCR gave me a discount and sent out a replacement set. I still wasn't super happy with how the sliders would mount, so I ended up selling those and just hanging onto the bumpers. Primed and ready for paint.
Comanche SS Posted August 1, 2021 Posted August 1, 2021 Nice build so far, I'm in socal too if you ever need a hand or advice Sent from my Pixel 5 using Tapatalk
howeitsdone Posted August 3, 2021 Posted August 3, 2021 That Uber was a risky choice for sure. Glad it worked out. The turbines are the best!
WahooSteeler Posted August 3, 2021 Posted August 3, 2021 On 8/1/2021 at 12:21 PM, Chargum85 said: I finally had a chance to replace the exhaust header and extract a broken manifold bolt from the head. Somehow it went well with an extractor kit and I was able to get the new header installed. I will be doing the same very soon, what extractor kit did you use and more importantly, what size is the manifold bolt? Thanks!
boxyjeep Posted August 7, 2021 Author Posted August 7, 2021 On 8/2/2021 at 9:54 PM, WahooSteeler said: I will be doing the same very soon, what extractor kit did you use and more importantly, what size is the manifold bolt? Thanks! This is the set I used -- https://www.amazon.com/gp/product/B0002NYBH8/. I would suggest buying a replacement set of bolts too. Also, take a good long look at your cylinder head. I ended up pulling everything out a few years later and replacing the head.
boxyjeep Posted August 7, 2021 Author Posted August 7, 2021 In March 2020, due to Covid my job turned into 100% WFH overnight. I took this opportunity to get the next big phases of the truck done. Primarily replacing the cylinder head, painting the engine bay, cleaning up the wiring, and installing 97+ front clip/doors. This is where things crossed from simple upgrades/fixes to making big changes to the truck. I had gone back and forth for awhile on whether or not I wanted to make the decision to alter the body (as I did get a lot of compliments on the patina), but I originally bought this truck with the though of an eventual 97+ XJ header/clip/dash/door swap. I also converted from column shift to console shift, as well as upgrading to Azzy's NP231 shifter linkage. First thing was pulling out the dash. I was planning on replacing it, since it was super dry and cracked, and also had a ton of ultra-fine dust/dirt particles embedded in the HVAC system. I started cleaning up the wiring and creating a harness for the 97+ doors I had pulled from a local pick-n-pull. This was not fun. My goal was to have full power features (Windows, Locks, Mirrors) using an aftermarket keyless entry/remote start system. I also didn't want to modify the wiring too much, since I planned to eventually upgrade to a 97+ dash and electrical system and wanted it to be plug-and-play. It look awhile and a lot of learning about electrical diagrams, but eventually got there.
boxyjeep Posted August 7, 2021 Author Posted August 7, 2021 The next to-do was getting all of the interior trim painted to match. I had a hodgepodge of blue, grey, and other colors since I had to source some of the panels from different vehicles. I got everything pulled and sprayed with vinyl dye paint. Overall it came out pretty good. Mixed colors before: After painting: Also took the opportunity to paint a spare valve cover, intake manifold, and some other engine parts with silver high-temp paint: As you can imagine, I was now at the point where I could take some time to focus on the small details.
boxyjeep Posted August 7, 2021 Author Posted August 7, 2021 Up next was the engine bay. I wanted to paint it black while I had the head off to be replaced and also clean up the insane amount of wiring that comes with the Renix electrical system. I hated the relay center, fusible links, and how there was wiring routed out and around the radiator instead of along the firewall. There was also a leak coming from somewhere in the cowl/engine bay that was leaking into the passenger floor. Used a bunch of black silicon to seal up where the blower motor mounts. After that, things were off to a good start, but got a little out of control. I ended up installing a relay/fuse box on the driver's side to power the headlights (high & low), fogs, and horn. This allowed me to simplify a lot of the wiring inside the cab as well (and ditch the horn relay). I also made the decision to replace the fusible links with a 97+ PDC. It came out looking pretty clean.
boxyjeep Posted August 7, 2021 Author Posted August 7, 2021 I don't remember how or why, but I also pulled the interior harness out again to simplify it. I shortened or removed any unnecessary wiring and cleaned it up as best possible. On the bench: Wrapped:
boxyjeep Posted August 7, 2021 Author Posted August 7, 2021 At this point, the engine wiring was simplified and it was time to pull the cylinder head. This was somewhat of an exploratory process. I had spent so much time checking sensors, replacing components, and basically doing everything possible based on best-practices and advice from these forums and elsewhere to get the truck running well. However, nothing worked. I figured that it was likely a warped/cracked cylinder head or some other type of internal engine damage. Time to pull it all out: Wiring rolled up and out of the way: Taped and painted: Done:
boxyjeep Posted August 8, 2021 Author Posted August 8, 2021 While that was drying, I got a good look at the cylinder head. Nothing too noticeable, but it definitely had a very slight warp to it. I replaced with a new Clearwater HO head. Block and pistons looking okay: Disgusting old cylinder head. It's definitely seen it's fair share of use and abuse in 210K+ miles. New cylinder head installed: Decided to install my temp sensor in the thermostat housing. I cleaned it up, painted, and then tapped the hole: New head with freshly painted valve cover and intake manifold: I ran into some issues with trying to figure out the correct exhaust gasket to use. Since it was a HO head with Renix header and intake, the Renix gasket is the correct one to use. You can see the gaps below if you try to use the HO gasket.
boxyjeep Posted August 8, 2021 Author Posted August 8, 2021 At this point, things were coming along pretty well. I installed a Mishimoto aluminum radiator, 97+ washer fluid reservoir, and aux power steering cooler. You may be asking why I kept the Renix manifolds, EGR, and other parts. Since this truck was in CA, I wanted to pass smog without issue. Washer fluid reservoir installed. Radiator and wiring coming along nicely: Fenders and front clip installed. Starting to look pretty clean. Still need to loom the wiring. You can see the 97+ PDC, overflow bottle/bracket, small vacuum canister, and Renix intake. LED lights installed:
boxyjeep Posted August 8, 2021 Author Posted August 8, 2021 Now it was time to start getting the interior buttoned back up. I had replaced the carpet, headliner, and painted all the interior panels, but still had the old blue rear panel. I decided to make my own panel with some extra matching carpet I ordered and 1/8" luan plywood. Cut to shape: Rear brackets installed: Carpeting glued and clamped: Front side after drying: Before installation. While I had the B-pillar trim out of the truck, I installed some 6.5" JBL speakers. I had installed a cheap set of 4x6 when I first got the truck. Those were garbage and had to go. Installation complete:
boxyjeep Posted August 8, 2021 Author Posted August 8, 2021 At this point, the truck was running, but the dash was still out and the body was a mix of colors. I replaced the hood with a straight one I got from a junkyard and also got the JCR bumpers installed. Unfortunately, it had been a year since moving up to northern CA and it was time to move again. I loaded the truck up on the back of a U-Haul and we made our way up to the Pacific Northwest (southern WA state): Arrived at our new (rainy) home. I had sold the original bumpers and TJ Ravine wheels and installed a set of JK Rubicon take-off's with adapters. Everything on the exterior was mostly "complete" at this point, but there were a lot of interior items to button up.
boxyjeep Posted August 8, 2021 Author Posted August 8, 2021 I found a nice dashboard out of a 96 Cherokee at a junkyard. I will say that the best pick-n-pulls along the west coast were definitely in the San Jose area. SoCal and WA state would rarely get XJ's in stock, so I was super lucky to find such a nice dashboard in good condition. Unfortunately, the bad thing was the color. I disassembled the dashboard and got everything painted to match the other panels with the vinyl dye that I've come to love. Overall it came out pretty good. I had to swap over the VIN plate and scratched a few areas of the dash during re-install in the truck, but the interior now looked almost fully complete (minus some wiring and other small bits (like the horn button). I also took the opportunity to install a 97+ e-brake. I also got the wiring loom for the engine cleaned up and looking really clean, with a 97+ injector loom cover and black bolts on the valve cover. At this point, the truck was in decent shape. I had diagnosed an electrical gremlin causing it to periodically stall (the knock sensor wiring had come in contact with the exhaust manifold, causing it to melt and stall intermittently while driving).

Recommended Posts
Create an account or sign in to comment
You need to be a member in order to leave a comment
Create an account
Sign up for a new account in our community. It's easy!
Register a new accountSign in
Already have an account? Sign in here.
Sign In Now