mikekaz1 Posted September 3, 2016 Author Posted September 3, 2016 picked up some custom stickers from Spencer over at jeepsticker.com
mikekaz1 Posted October 1, 2016 Author Posted October 1, 2016 Finally have some cup holders in the old girl. Called "The Mugger" made in USA and $8.50 on amazon and comes in 5 colors!
strictlyxjs Posted October 7, 2016 Posted October 7, 2016 That mj is sweeeeet I'm in massachusettes too!
mikekaz1 Posted October 7, 2016 Author Posted October 7, 2016 That mj is sweeeeet I'm in massachusettes too! thanks! What part?
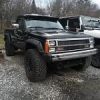
Newton Posted October 8, 2016 Posted October 8, 2016 older picture, but still lookin good. Nice!...what wheels and tires are u running if u don't mind me asking?
mikekaz1 Posted October 9, 2016 Author Posted October 9, 2016 older picture, but still lookin good. Nice!...what wheels and tires are u running if u don't mind me asking? BFG KO2 33×10.5r15 tires on TUFF A/T wheels. Model T01 I believe.
mikekaz1 Posted November 26, 2016 Author Posted November 26, 2016 went over and saw Joe at http://spadanoenterprises.com/index.html and checked out some of his awesome military trucks and projects. While there I picked up a set of his bare ROCKersliders as my factory rockers were toast. Nothing but quality. Cuts and bends were perfect and I was able to adapt them with little issue. Got them welded up and painted and I think the final product turned out great!
A-man930 Posted November 26, 2016 Posted November 26, 2016 went over and saw Joe at http://spadanoenterprises.com/index.html and checked out some of his awesome military trucks and projects. While there I picked up a set of his bare ROCKersliders as my factory rockers were toast. Nothing but quality. Cuts and bends were perfect and I was able to adapt them with little issue. Got them welded up and painted and I think the final product turned out great! I've been eyeballing these since he introduced them. Any pictures during the install? My rockers are finally, um, air-permeable :ack:
mikekaz1 Posted November 26, 2016 Author Posted November 26, 2016 I've been eyeballing these since he introduced them. Any pictures during the install? My rockers are finally, um, air-permeable :ack: no hands were too dirty. but instal was very straight forward. Flat stock welded directly to the inner floor/ flat part of the inner rocker I left it about 1/4" above the factory rocker pinch weld, pretty much pressed right against the lower seat belt bolts and then leveled across.. Then the rear frame cap. Then wleded the front frame cap onto the outter rocker. And tacked it in. Made sure everything looked good and burnt it in. I cut about flush with the lower door edge and straight acrossthe cab corner. Seam sealed everything, a little skim coat of bondo, and then some bedliner and all done.
mikekaz1 Posted December 30, 2016 Author Posted December 30, 2016 Original clutch fan was going out. And I broke my fan shroud. So I wasn't cooling too well anymore. Swapped it out of an electric fan. And it worked alright but still wasn't very happy with it. So I'm trying out a ZJ- "severe duty" clutch fan. Got it at carquest for about $40. And is said to be 90% efficient, Versus the XJ/Mj 60%. It is noticeably more stout. And has the same bolt pattern. Just waiting on my new shroud to come in the mail and I'll be doing the swap over.
mikekaz1 Posted January 1, 2017 Author Posted January 1, 2017 So got my shroud in today. And mounted everything up. Install is straight forward, albeit a little tight but all went well and clearances showed no issue. Fan works great, my Temps have never been so steady even with my plow fully raised and climbing hills and mountains. Couple minor downfalls is it now sounds like a freight train, you can really hear this fan when you lay into it and maybe it's just in my head but the throttle response does seem a little slower with the clutch fan vs all electric. All in all I'm glad I did the swap over.
mikekaz1 Posted May 15, 2017 Author Posted May 15, 2017 old exhaust rotted off... didn't feel like trying to source a full cat back system. so I made a side exhaust... kinda weird, but its dfferent. I like it.
DirtyComanche Posted May 15, 2017 Posted May 15, 2017 Very different... I'd have down turned it and dumped it into wheel well or just straight down rather than cutting the bed, but that's just me.
A-man930 Posted May 15, 2017 Posted May 15, 2017 I would have slash cut it, but I've actually thought of doing the same thing. Pics of it from underneath?
mikekaz1 Posted May 16, 2017 Author Posted May 16, 2017 I would have slash cut it, but I've actually thought of doing the same thing. Pics of it from underneath? slash cut? like a miter tip? I thought about it. this is just one of the screw clamp chrome tips, so I can swap out whenever. I don't have a pic of under right now, but its just the muffler to a 90* elbow to a 45* and straight out between the frame and bed.
mikekaz1 Posted May 16, 2017 Author Posted May 16, 2017 Very different... I'd have down turned it and dumped it into wheel well or just straight down rather than cutting the bed, but that's just me. beds kinda trash, didn't bother me to drill through bondo.
DirtyComanche Posted May 16, 2017 Posted May 16, 2017 Very different... I'd have down turned it and dumped it into wheel well or just straight down rather than cutting the bed, but that's just me. beds kinda trash, didn't bother me to drill through bondo. No loss then.
mattbuch96 Posted August 28, 2017 Posted August 28, 2017 On 8/18/2015 at 7:11 AM, mikekaz1 said: Typical floor rot. And some frame rot in front of the drivers rear spring perch Did you have any problems welding new metal on the driver side floor pan along the frame, I am in the similar situation and I realized the fuel lines run directly below the unibody. Any suggestions? thanks.
PCO6 Posted August 29, 2017 Posted August 29, 2017 Great job overall but I really like the way you fabricated your frame hitch and married it to your bumper. Also appreciate the link to http://jeepsticker.com/ . I'll be calling them.
mikekaz1 Posted October 1, 2017 Author Posted October 1, 2017 On 8/28/2017 at 1:05 PM, mattbuch96 said: Did you have any problems welding new metal on the driver side floor pan along the frame, I am in the similar situation and I realized the fuel lines run directly below the unibody. Any suggestions? thanks. No issues. I just unclipped them so they hung down slightly. And then also wrapped them in wet towels just for reassurance.
mikekaz1 Posted October 1, 2017 Author Posted October 1, 2017 On 8/29/2017 at 12:25 PM, PCO6 said: Great job overall but I really like the way you fabricated your frame hitch and married it to your bumper. Also appreciate the link to http://jeepsticker.com/ . I'll be calling them. That's how the factory made the hitch👍 I just copied it. But thank you!
mikekaz1 Posted October 1, 2017 Author Posted October 1, 2017 Old master/booster finally died. Installed a 1998 ZJ dual diaphragm unit. Install was straight forward. Reused the ZJ booster, master and distribution block. Everyone always talks about the 95/96xjs.... But NEVER have I found anything about a ZJ, which i find are far more plentiful. Unit was a direct bolt in, even came with the aluminum spacer like the 95/96. And was able to keep washer fluid in factory location. Unit has Two lines coming off of it. With built in flexhose. So bending/making new lines is easier. Cut off original oddball ends and flared two standard 3/16 flares into existing line. Installed one T block for the front lines and connected rear line direct. Shaft fit perfectly onto my factory 91 pedal. Only real modification necessary was making a 1/4" or so standoff on the pedal arm to reach the factory brake switch. In which I just tightened a hose clamp around the pedal arm that then presses the switch when it's at rest.
billyjp2 Posted May 6, 2018 Posted May 6, 2018 I drive by your house all the time, I live in Indian orchard and drive a blue sportruck.

Recommended Posts
Create an account or sign in to comment
You need to be a member in order to leave a comment
Create an account
Sign up for a new account in our community. It's easy!
Register a new accountSign in
Already have an account? Sign in here.
Sign In Now