HOrnbrod Posted January 20, 2014 Posted January 20, 2014 Which header did you have to rework? It might help the next guy contemplating mounting a 99+ intake. :thumbsup:
Korsch_RS Posted January 21, 2014 Author Posted January 21, 2014 Which header did you have to rework? It might help the next guy contemplating mounting a 99+ intake. :thumbsup: I bought the cheap-o ATP 101212 header from Amazon. It'll probably flow better than my stock one (which was also cracked), but it's nothing special. You get what you pay for. There are lots of reviews of other people that had to modify to fit, mostly just grinding the intake and squishing the header a little. I decided that because I had the tube and the welder, I would build a little extra clearance in to try and stave off heat soak. I test fit it with my stock HO intake manifold as well and that didn't fit either. Cliff notes: only get the ATP header if you have the means to modify to fit.
Korsch_RS Posted May 28, 2014 Author Posted May 28, 2014 Well I'm not dead, and progress has not halted. Just got really close for a couple months. Basically I've been traveling a crap ton for work and pleasure the last couple months. But, I have about a month in the office, and then we're taking our prototype vehicle out for some more testing, probably up to the UP, so I want to get the Comanche driveable and wheelable before then so I can bring it up and play on the weekends :) Anyway, here's some pics: Got some fancy pants new ford injectors on a cleaned and painted rail Working on the weekend and did some sliding in the snow :) Found myself a 242! Pulled out the leaking RENIX 4L and silly front axle cursed electrons and wires and leaking master cylinders and cursed rust Took all my overtime pay and bought some goodies :)
Korsch_RS Posted June 25, 2014 Author Posted June 25, 2014 finished up the floor. forgot to take pictures of a lot of the in-progress parts. i Por-15'ed it all, then seam sealer, then rubberized undercoating. Hopefully it will keep away the rust. Built a winch plate. It'a all 1/4" steel. It's pretty simple, just a 28"x7" plate with 4 holes in it and a cutout for the steering gear, with 1" tall vertical strips on the two ends. I had to move the winch 2" to the right to get it to fit properly. The mounting plate will also be bolted to the bumper to make the whole thing one big structure. I cut and folded down part of the uniframe in the front, and welded the two little strips to that, then gussetted it. I also bought the JKS HD bumper tie in brackets. I'll be using the main brackets of these to weld my custom front bumper on to. I trimmed the frame capping plates to also help reinforce the winch plate a little, and welded them on.
Korsch_RS Posted June 26, 2014 Author Posted June 26, 2014 Mocked up the front suspension so I could roll it out of the garage to wash the underside before undercoating the truck. Installed the daystar KJ09114BK extended front bumpstops (4" long, in case anyone is curious). Moved the axle through full compression and some articulation to check angles and clearances. With the axle at full compression, I have about 2" compression left on the bilstein shocks. I will be adding Bar-pin eliminators later, and maybe trimming the bumpstops depending on how much they end up compressing during normal driving. The JKS Over Axle Bracket gets pretty close, just 1.5", away from the frame. I may in the future trim this down as I only need the bottom hole. I'm using the Iron Rock Offroad double shear bracket for the chassis side of my custom track bar. I was worried about it hitting the flipped tie rod, but with the arc of the control arms it ends up in the hole between the tie rod and coil bucket. It does hit at full left turn with the front suspension at full compression both sides, but clears (barely) while flexed, so as long as I don't land any big jumps with the wheel cranked to the left I should be fine. Fingers crossed. I mocked up the drag link and track bar (haven't built those yet) with rope, and at full compression the angles look pretty good. Checked at ride height too, but forgot the pic :( Based on my calculations (damn engineers and their spreadsheets lol) I should only have only about +/- 1/8" of bumpsteer with this combo from ride height to full compression/rebound, and so far the angles look good enough to get that. As the suspension compresses in the front, all the links get really close together. It was kind of a long shot if the flipped steering and relocated higher suspension components would clear each other with just a 3" lift, but it looks like they should all play nice. Also, I finished by front bumper design, and sent all the DXF files out to the laser cutter yesterday. Hopefully they'll be cut out and ready for me to pick up on July 3rd, but if not they said they should be done the Monday or Tuesday after. I integrated fog light locations for Hella 90mm units, and also a nice recessed/protected spot for the LED light bar. The fairlead is offset to the right 2" to match the winch. I was also really worried about side pulls with tow points like the ones on the JCR, so I reinforced these ones with the top plate. It's pretty much all 3/16" plate, except the tow points/bumper brackets which are 1/4" (tripled for the tow point).
88whitemanche Posted June 26, 2014 Posted June 26, 2014 I'm liking the bumper design...integrated light bar?
Korsch_RS Posted June 26, 2014 Author Posted June 26, 2014 Thanks! Yup it's a zeus 20" Pro single row in the 10 degree spot beam. My hope is having it slightly recessed will help protect it
Korsch_RS Posted July 2, 2014 Author Posted July 2, 2014 Bumper plates came in! already found a couple little issues with my design. I didn't leave enough room for the big Warn fairlead, so now I'm looking for a low profile one. Mounted my Ruffstuff battery box. I put it in the stock location for now, eventually I'd like to relocate it under the bed somewhere, but for now this will work. And my driveshafts came in! From Tom Woods Opposite the battery will be the contactor box for the winch. Fabbed up a little bracket to space it up a bit and give enough room to run the cables easily.
Korsch_RS Posted July 15, 2014 Author Posted July 15, 2014 Working lots, not posting much. For the most part it's all reassembly, so not really interesting pictures, but I will keep posting pictures of fab stuff or things that I did a little differently than other people. Ran my winch cables along the radiator support Normally when doing the HO intake swap, I hear of people replacing the whole fuel lines, but I just used some 5/16" brake compression fittings, and spliced the lines from my 2dr XJ into the hard lines of the MJ. Made a Renix TPS adapter. I slotted a 1/2" bolt I had laying around and added a set screw, then just welded the lever arm directly onto that. And fabbed up my new track bar and shortened the WJ draglink. The draglink center threaded tube section was 20" long, and the track bar was 29.125" long center to center
Korsch_RS Posted August 1, 2014 Author Posted August 1, 2014 A lot's changed since I last posted! First a bit of catch up: Got the suspension finished up, and rest of the engine bay assembled. Not too many pictures, as a lot of it was in the "get it in and driving, clean it up later" phase. It's unfortunate, but I had a work opportunity that will make it well worth the added work down the road. On first drive it had a nasty misfire a some bad death wobble. Checked and the alignment and i had almost an inch of toe-in, oops! corrected that out to between 0-1/8" and the death wobble has been cured. Also realized that in one of my late night assembly thrashes I hooked up the spark plug wires incorrectly, 3 and 4 were swapped. Fixed that and it's running smooth, mostly... I still have a misfire with partial throttle when cold, but once it warms up it's fine, so I haven't worried too much about it yet. Now that it's driving and i've flexed the suspension a few times to check fender clearances, it was time for some new tires! I ended up selling the Duratracs I originally bought as I was getting nervous about sidewall strength. The final straw was actually concerning snow performance. Originally the mountain snowflake winter rating on the goodyears was a huge reason I had settled on those tires, but a friend of mine with duratracs still had to add additional sipes to his tires to get acceptable snow performance. We both also drive turbo subarus with true winter tires (blizzaks for him, wintersports for me), so we have high standards for snow performance. Because it was clear I was going to have to add sipes even with the duratracs, I decided to get a more off-road oriented tire, and the sipe the crap out of the center lugs for the winter. So I bought some KM2's :)
Korsch_RS Posted August 1, 2014 Author Posted August 1, 2014 After that I wanted to get my bumper done for the front tow points before leaving town. I had already gotten all my laser cut bits for the bumper, I just had to do some fitting and welding. Added a shelf for the led bar And then tacked all the pieces together right on the truck. I originally designed the sides to stick out a fair ways to provide some fender protection and to hopefully line up with the flares when I reinstall them. Right now they look like they stick out way too much, but hopefully it looks better once everything's finished Once the whole thing was tacked together and fitting the way I wanted, I fully welded it. Backstepped the whole thing, working from one side to the other trying to keep warping to a minimum. I was going to remove it and weld all the backsides, but I realized I made a boo-boo on my design and it's unremovable! Looking at it, I just need to trim about half an inch off the top plate underneath the headlights, but I didn't have time to do that at this point, so i just did the best I could with it on the truck, and threw some paint on it. No pics of that in my garage, but you'll see plenty of it in action :) The rush on this project was because I had a work trip coming up. We built a prototype vehicle, and are taking it to the Upper Peninsula of Michigan for some testing for four weeks. This is actually my old stomping ground, as I went to school at Michigan Tech, and I desperately wanted to do some serious exploring of the Keweenaw peninsula after work hours. So i packed all my crap, including motorcycle, and got ready to drive 600 miles North. I ended up finished the truck about midnight, and packed until 4am, before leaving the next morning at 7:30am!
dscowell Posted August 1, 2014 Posted August 1, 2014 Still loving your build. You are the first person to say that the duratracs don't preform as well as you would like in the snow. Everyone else I talk to says that they are almost a must have during the winter.
Korsch_RS Posted August 2, 2014 Author Posted August 2, 2014 Thanks! Yeah I've heard nothing but good things about them in the snow, and I'm sure they are the best off-road tire in snow out there in stock form. But for my application, if I'm going to have to sipe anyway to meet my high standard for winter traction, I decided to get a more off-road oriented tire. I'm loving the KM2's so far, we'll see if I still think I made the right decision come winter time (after I've siped them). It's not the end of the world if I'm not super happy with them in the snow, I'll still have my beater subaru with real snow tires for fun in the white stuff >:) They've been great in the summer. A couple times I've been on a snowmobile trail or something in 2wd, and start driving through what looks like a normal puddle, only to feel the truck suddenly sink. But it's just kept paddling in the 2wd everytime so far!
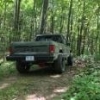
Korsch_RS Posted August 4, 2014 Author Posted August 4, 2014 Finally some wheeling pics. Took the truck up Cliff Drive trail. Has a really great view from the top
Korsch_RS Posted November 16, 2016 Author Posted November 16, 2016 Well it’s been a long time since I updated this build thread. Since my last post, I did a lot more wheeling up in the Keweenaw in Michigan’s upper peninsula. One of my coworkers brought his Discovery up as well. This thing is really nicely built as more of an expedition style rig. He’s driven it along the continental divide a few times, in and around Canada, and tons of other places. We did a night run out to High Rock Bay at the tip of the Keweenaw Took the truck up Brockway Mountain And a quick stop at Lake Medora Drove around on the Stamp Sands in ghey, MI Took it up a different trail off Cliff Drive that was a little too narrow. Put some dents in my bed and a bend in my back bumper :(
Korsch_RS Posted November 16, 2016 Author Posted November 16, 2016 I was in the Keweenaw for 5 weeks for work, and spent a lot of time exploring around on snowmobile trails. On the last weekend I was the only one left and was doing some last little bit of exploring before heading south. I dropped the front into a hole, when smoke started coming out from under my hood. Temperatures looked fine, oil pressure was good, it wasn’t just steam from splashing through a puddle. I looked around the Engine Bay but couldn’t see anything. I was by myself and it was getting later in the day anyway, so I decided to play it safe and get the truck back to civilization in case it was something serious. I turned around and headed back to the last dirt road I had crossed. I made it a mile or so down the road when the truck turned itself off. The gauges went out first, then shortly after the engine shut off. The tow truck couldn’t find me at first, but luckily some nice ATV riders passing by knew the guy driving the truck, and went out to the highway to lead him along the dirt roads to where I was sitting. I ended up having to rent a U-haul to get it back home to Detroit. The truck sat for a few months before I dug back into it to figure out what went wrong. Turns out the wiring harness that crosses the front of the truck had gotten jammed against the radiator, and the end tank seam cut through it. I spliced it back together and it ran fine for awhile. Looking at the charred ends of the wires, it looks like I was actually pretty lucky that it didn’t cause a fire. I fixed the wiring harness, added some lock cylinders so I could actually lock the doors, and mounted a small underseat subwoofer from my old Subaru and a auto charging flashlight onto the back wall. I took it on some camping trips and had some more fun with. The 4.0L had some other electrical gremlins, I don’t know if they were caused the harness getting cut earlier, or it was just symptoms of an old Renix truck, but I decided that rather than go through the entire harness, it was time to pull the 4.0L out and put in something more fun. So I bought an LS2 and 4L70e.
wheelsaz08 Posted November 16, 2016 Posted November 16, 2016 man this thing as friggin awesome! love all the fab work and attention to detail! can't wait to see more :thumbsup:
Korsch_RS Posted November 16, 2016 Author Posted November 16, 2016 man this thing as friggin awesome! love all the fab work and attention to detail! can't wait to see more :thumbsup: Thanks! There's plenty more to come! I got an LS2 pullout with 4L70E transmission from a Trailblazer SS that I found on eBay. This is a 6.0L aluminum block engine rated at 400hp and 400lb-ft. Unfortunately when I went to pick it up, it was being stored outside under a tarp with no intake manifold on it, so when I got it back to my garage I pulled the heads to inspect everything. One cylinder had some very light surface rust on the wall, so I honed and re-ringed just that cylinder. Here's that cylinder after I wiped the rust off with some acetone, before honing. The surface roughness was just enough to feel with my fingernail, not enough to actually catch my nail, but enough to feel Putting it back together Ripping the 4.0L out, It’s amazing how narrow the block is Look ma no engine! First test fit Since I’ve already completed this swap and had the truck up and running, I’m going to split the next few posts up to discuss different aspects of the swap process with links to useful sites and other technical resources. I think this will help make this act a bit more of a guide to how I did my swap for anyone looking for info for their own
4.0forlife Posted November 16, 2016 Posted November 16, 2016 i love this truck! keep up the good work!
neohic Posted November 17, 2016 Posted November 17, 2016 Since I’ve already completed this swap and had the truck up and running, I’m going to split the next few posts up to discuss different aspects of the swap process with links to useful sites and other technical resources. I think this will help make this act a bit more of a guide to how I did my swap for anyone looking for info for their own Very interested in this! Been planning an LS swap lately and this would be awesome from someone in the know. :thumbsup:
reson46 Posted November 17, 2016 Posted November 17, 2016 Looking forward to this. Interested in what parts you used. I am guessing those are the Novak swap headers? Willy
Korsch_RS Posted November 18, 2016 Author Posted November 18, 2016 Yup, Novak Swap headers. I got the ceramic coated ones to try and reduce underhood temperatures a bit to aid cooling.
Korsch_RS Posted November 18, 2016 Author Posted November 18, 2016 (edited) Engine: I’m using Novak Engine mounts and transmission parts to adapt the 4L70 to my NP242 T-case. All in all, bolting the engine in was the easiest part of this whole swap. I ended up having to mount the engine in the furthest forward setting on the engine mounts to clear the firewall, and it’s still quite close, about 1/2 - 3/4" on the passenger side, and 3/4 - 1" on the drivers side. I put the engine in and out probably about 10 times checking different things before finally bolting it all in. I swapped all the front end accessories over to corvette parts, but I whipped up a little adapter to fit the truck alternator in the corvette brackets. To do this, you need the alternator bracket, the water pump, the power steering pump and pulley, PS reservoir, the harmonic balancer, the idler pulley, and belt tensioner from the corvette. There is a fair bit of extra space in front of the engine with the shorter corvette accessories, but I ended up needing all this space for coolant lines to fit my stock style radiator. I measured about 4” from the harmonic balancer to the front crossmember with the 4.0L, and about 6.5” with the LS2 and corvette accessories. I haven’t tried to get A/C running yet but I want to in the near future. Truck accessories are ~2” longer, so you should be able to use a complete truck engine as is with the stock accessories, it will sit about as far forward as the stock 4.0L. If you’re doing this, you will need a radiator with both inlet and outlet on the passenger side, instead of the stock style with them on opposite sides. Novak sells an aluminum unit. I decided to stick with the stock Trailblazer SS intake manifold, as it’s been dyno tested as the best overall stock GM instake manifold for the cathedral port LS heads (http://www.hotrod.com/articles/20-ls1-intake-manifolds-tested/). I did have to cut a hole in the hood to fit it, but the stock LS1 and LS6 manifolds should fit under the stock hood. Similarly, you can cut a hole in the hood for the stock truck intake manifold, and expand it a bit for the truck alternator to stick through if you want to keep the swap as budget as possible. I used a modified truck oil pan that I shortened 40mm and had welded back together by a coworker of mine. If I did it again I would just use the H3 alpha oil pan though. You can use a truck oil pan unmodified, the sump just sits quite low, lower than the transmission oil pan. The 40mm I took off mine made the sump about 1” (25mm) above the bottom of my axle tube at full suspension compression, and about even with the transmission oil pan. Here’s a useful LS oil pan comparison: http://ls1tech.com/forums/conversions-hybrids/817787-lsx-oil-pans.html I ended up with a slight track bar contact at full bump, but I’m running an OTA track bar in the top hole of the JKS bracket with my WJ brakes, so I’ve since had to put a few small bends in my Track Bar to dodge around the oil pan and differential cover. IMPORTANT: If you take the oil pan/oil pickup off, REPLACE THE O-RING! It’s a $7 part, and I was chasing a nasty ticking noise around my engine for a few days. I thought it was a dead lifter (pulled the valve cover and I could push one pushrod by hand) so I spent almost $200 to replace the lifter, with no change in the ticking noise. Turns out the oil pickup O-ring (which I inspected and it looked totally fine) had just enough of a leak to let air bubbles build up in the first lifter on the oil passage, and start ticking when the engine got warm. I dropped the oil pan and replaced the $7 o-ring and it was fixed. Don’t make the same mistake. There are two different o-rings for different oil pickups, here’s a link explaining the difference: http://www.lsxmag.com/news/identifying-the-correct-oil-pick-up-tube-o-ring-for-your-ls-swap/ Edited December 14, 2016 by Korsch_RS

Recommended Posts
Create an account or sign in to comment
You need to be a member in order to leave a comment
Create an account
Sign up for a new account in our community. It's easy!
Register a new accountSign in
Already have an account? Sign in here.
Sign In Now