Korsch_RS Posted July 22, 2013 Author Posted July 22, 2013 Got the 8.8 all finished up and bolted in! The shock placement isn't ideal. It's the same travel as stock, but adjusted for the height change. I basically just let the axle hang all the way down and tacked the mounts on there with the shocks at full extension. The result is only about 2" compression travel when it's sitting at ride height. I've started planning out how I'll convert to the / \ shock arrangement over the axle, but in the mean time this will get me rolling until the front end and 4wd swap is complete. Bigger fish to fry... Unfortunately, come back from my short test drive and find this: Drivers side axle seal is leaking. My fault, should've replaced it and the bearings when I had everything apart. That's what I get for cutting a corner. Anyway, that side is up a ramp at the moment to keep any more oil from leaking out while I wait for new seals and bearings, gonna do all of them and the pinion seal for good measure. The other issue I noticed is that the pass side caliper was sliding back and forth on the pins as everything was rotating (idled it on the jackstands), so I'll be measureing the rotor and also axle face to see if it's the rotor if my axle shaft is slightly tweaked. The vibrations were minimal (I've felt worse with snow or mud packed in the wheels and tires), so worst case scenario I'll replace the shaft and keep the bent one as a get-me-by replacement if I ever manage to snap one, which I highly doubt on 33's. Fingers crossed it's the rotor... More soon!
Korsch_RS Posted July 23, 2013 Author Posted July 23, 2013 Well, the axle shaft is bent. 0.046" axial runout on the rotor mounting flange, and 0.031" radial runout on the spacer. Anybody in SE MI have a spare set of 31-spline F8.8 shafts they're interested in selling?
Korsch_RS Posted August 4, 2013 Author Posted August 4, 2013 Got a lot done. Found a new axle shaft from ebay, and while I was replacing that I also did both wheel bearings and axle seals, and also the pinion seal. No mo leaks! Also the wheel doesn't wobble anymore :) And while I was bored in the garage and waiting for my axle shaft to arrive I started taking the fender flares off, and I found rust under the rear fender flares :( and that apparently it was never painted under the drivers side front flare?? Also while I was under there I decided to address my rear shock mounts. I'm currently using 8" travel Bilstein 5125's with 255/70 damping. When I was assembling everything I just let the axle droop as far as it wanted to and tacked in the lower mounts with the shocks at full extension. This netted only about 2.5" of compression travel. Not enough. Confirmed by the ziptie method, I was bottoming out the shocks with normal driving, I cut off the tabs and rewelded then as low as I could, which wasn't very far. One starts hitting the u-bolt plate if you go any farther. This got me about another inch of compression travel, which is enough for the time being, but I'd like to get about another 1.5 - 2". Once the 4wd swap is completed I'm going to go back and convert to the / \ shock setup with hopefully some 10" travel Bilsteins. The 255/70 damping also feels a little too strong, so the / \ conversion will have the bonus effect of reducing the shock motion ratio and decreasing the over all vehicle damping strength.
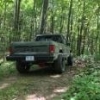
Korsch_RS Posted August 4, 2013 Author Posted August 4, 2013 After getting the rear axle buttoned up again, I decided to put the ditch in my front yard to good use: This is with the front sway bar still connected. Also when I bolted the rear end back together I filled it with 85W-140 Dino oil with no friction modifier for more lockage. With the 33's, revised clutch stacking, CF clutch plates, and standard s-spring it now was still pulling up the ditch a little, even though that rear tire was in the air, so it's definitely working. It will chirp and spin the inside tire going around tight corners if I'm on a gas about 50% or more, but otherwise it's quiet and behaved. The Trac-Lok will stay for awhile, but eventually I'd like to get something better back there. And it's a good thing I'm planning on doing the old cut-and-fold on the rear fenders! The tires are just grazing the lip now, with about 1/2" left before the shock bottoms out Front is looking good clearance wise, although I still get a bit of rubbing near the rocker panel when turning and stuffed And took it out exploring this morning! Didn't hit any trails as I was by myself and 2WD for the suck. Need to satisfy wheeling bug soooooon! More progress soon!
dscowell Posted August 5, 2013 Posted August 5, 2013 Coming along good I really like the look with the 33s
Korsch_RS Posted August 5, 2013 Author Posted August 5, 2013 Coming along good I really like the look with the 33s Thanks! I'm really liking it too. Just enough clearance with the 3" lift with fender trimming, although I might need to massage the front inner fender pinch seam for full flex with the swaybar disconnected
dscowell Posted August 5, 2013 Posted August 5, 2013 Yeah that's good one of my friends was running a 2" on his XJ with 33s and trimmed fenders didn't look like he would get any flex at all but it flexed a lot better then it looked like it would.
Korsch_RS Posted August 18, 2013 Author Posted August 18, 2013 Well it's time to get cracking on my D30 build. It's getting this big ol pile of parts Factory big-joint axles, new Spicer 760X u-joints, Alloy USA tube seals, new internal oil seals, G2 R&P install kit with Timken bearings, Alloy USA 4.10 R&P, Detroit TrueTrac LSD, WJ Akebono brake and steering conversion, 1.5" x0.25" DOM for track bar, Timken hubs, WJ front UCA's, and all new Moog ball joints and TRE's. It's also getting a lower half sleeve and a small truss on the top. I don't plan on jumping this truck regularly, but I'm sure it will happen, so while the axle's getting built I'll strengthen it so all my work doesn't go down the drain upon landing. I'm sticking with the D30 instead of upgrading. I considered a D44, but with 33's now, and a very slim chance of 35's in the future, I don't think a D44 is necessary. If i do go 35's iit'll get chromo's, possibly in the 30 spline variety I started getting the axle ready for the JKS OAB, then moved on to prepping the WJ knuckles and calipers More soon!
Korsch_RS Posted August 20, 2013 Author Posted August 20, 2013 WJ knuckle conversion and tie rod flip progress! I was really nervous about drilling the steering arms out to 0.75" without a drill press, but it ended up being quite easy, even with the cheap home depot drill bit that I bought. So, for anyone else thinking about this conversion and nervous about this part, a drill press is not required. Just take your time and use something to keep the bit cool and lubricated. I also used a step drill to create a V on the back side for a good penetrating weld. Anyway, on to the pics: More soon after the paint dries!
Korsch_RS Posted August 23, 2013 Author Posted August 23, 2013 Knuckles got a fresh coat of paint I picked up some steel and got started on the lower half sleeve and low profile truss and the truck looked good so I had to take a picture More soon!
dscowell Posted August 23, 2013 Posted August 23, 2013 I'm loving the look and stance keep up the good work!
Guanaco.13 Posted August 23, 2013 Posted August 23, 2013 SICK build it has some nice paint i like that color too :thumbsup:
Korsch_RS Posted August 24, 2013 Author Posted August 24, 2013 Thanks guys! I got some color matched paint to touch up under the fender flares and to cover some rust I have to fix, and the can said Hyundai steel gray. I really like it too :) More D30 progress! marked up UCA mount where I need to cut it making some truss progress. I set it up to have 5.5" of clearance to the oil pan with the 3" lift to allow for 5" of compression travel. Right now my shocks only allow for 4, so I shouldn't have any worries about contact More soon!
HOrnbrod Posted August 24, 2013 Posted August 24, 2013 According to the Bilstein tech rep I talked to, your rear shocks are mounted upside-down. The correct mounting position for the Bilstein 5100 series shocks are for the writing and part number stamping on the shock body be right-side-up, like this, rod down:
Korsch_RS Posted August 24, 2013 Author Posted August 24, 2013 ccording to the Bilstein tech rep I talked to, your rear shocks are mounted upside-down. The correct mounting position for the Bilstein 5100 series shocks are for the writing and part number stamping on the shock body be right-side-up, like this, rod down: Woops! Thanks for the heads up. I'll switch them around and see if that changes the feel at all. I hope I didn't cause any damage by running them like that!
Korsch_RS Posted September 1, 2013 Author Posted September 1, 2013 Made a lot more progress! I'll just shut up now and post some pics :) More soon!
Korsch_RS Posted December 29, 2013 Author Posted December 29, 2013 Well I've been traveling basically every week for work since october, but I've managed to get a few things finished in my short breaks back home. Hopefulyl I'll get more time to work on the MJ in 2014. My door latch started seperating a while back. it finally got so bad I couldn't latch the door at all anymore: So I fixed it:
Korsch_RS Posted December 29, 2013 Author Posted December 29, 2013 Started working on the front end gears and truetrac install. This axle is getting all new parts. Every wear item (seal, bearing, ball joint, etc...) is new measuring side play and pinion play for starting shim stacks Final Gear pattern And I got a new shift knob :) my favorite beer!
Korsch_RS Posted December 29, 2013 Author Posted December 29, 2013 New outer axle seals, and some paint :) When I was installing my new u-joints, I discoverd one of my junkyard 760X axles had a cracked stub axle So rockauto provided a 4340 replacement. With the axles finished, I moved on to the knuckles and brakes. This is why you measure twice before you buy bolts. Even with a big stack of washer they are still way too long Fixed: And mocked up the brakes just to see how massive they were And finally, I managed to squeeze in a little exploring in some of the small little state parks around Detroit
88whitemanche Posted December 30, 2013 Posted December 30, 2013 Your truck has come a long way!!!! Looks awesome keep it up!!!
Korsch_RS Posted January 5, 2014 Author Posted January 5, 2014 Your truck has come a long way!!!! Looks awesome keep it up!!! Thanks I will! Still a long ways to go too That is 1 beefy Dana 30! :thumbsup: Yeah I guess it is :) I'd like to do some towing with the truck, but don't see going past 33's (well.... not right now anyway), so I decided to stick with the D30 for ease of isntallation, and use the WJ brakes to handle the towing. I hope it works out! Did some more work. I had to trim the JKS LCA skids a bit to fit over my outer sleeve, but it was pretty easy. Got them mocked up with welders magnets and then burned them in! After that I split the HO engine and AX-15 from my old 94 cherokee, sprayed them up with Gunk degreaser, and took them to the local self-serve car wash for a bath! Much better! the MJ got a bath too :)
Korsch_RS Posted January 13, 2014 Author Posted January 13, 2014 Got a little bit done over the past week/weekend. I've got a lot of stuff on order, so I'm kinda jumping around as parts come in. Got the steering tie rod trimmed to the correct length. One of the old TRE's was so rusted in place that I couldn't get it to turn with my vice grips, so I ended up having to weld a steel bar to it to get enough leverage and remove it. I tacked the Tie rod back together (waiting for my sleeving tube to arrive so I can shorten it properly), and mocked it up on the axle. It's close but it does clear the diff cover and spring pads lock to lock. While I had it on there I was looking at stabilizer mounting locations. Ideally I wanted it above the tie rod for protection, but because I'm doing the Over the Knuckle steering with only 3" of lift, there is very little real estate on the top side of the axle, so I ended up mounting behind the tie rod. It's still decently protected so hopefully won't have any problems.
Korsch_RS Posted January 14, 2014 Author Posted January 14, 2014 Got the Tie rod sleeved and shortened. I used 1.125" OD 0.25" wall tube. I used my die grinder to try and get the rust out of the inside of the old tie rod, and then heated it up before putting the sleeve in. This worked great on the short side, but I couldn't quite get the other side all the way in. Then the tie rod cooled ans shrunk down and locked it in place. So i had to cut a slit in it to relieve the tension a bit. And all welded up and painted!
Korsch_RS Posted January 20, 2014 Author Posted January 20, 2014 Finished up the stabilizer tie rod mount. It's just two steel clamps from McMaster-Carr with some tabs welded to it. Test fit my 99 intake and header and ran into a clash with my cheap header. I had some 1.5" tube lying around from my motorcycle exhaust build so I just rerouted the #6 primary for more clearance rather than waiting around for a new header. Also I already painted it before checking fitment. oops.

Recommended Posts
Create an account or sign in to comment
You need to be a member in order to leave a comment
Create an account
Sign up for a new account in our community. It's easy!
Register a new accountSign in
Already have an account? Sign in here.
Sign In Now