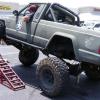
88pioneer Posted September 23, 2010 Posted September 23, 2010 Every time I look at this thing i get more an more jealous. How much lift would you say your running, 7"?. Pretty much the exact stance i want mine to be when its done. Keep up the good work :thumbsup:
Comanche County Posted September 24, 2010 Author Posted September 24, 2010 Thanks for the compliment bro. I'd have to measure to be sure, but I've got 3" or 3.5" tubes on the front axle so it would be off. Those are 6.5" coils and I've got about 2.25" of ACOS space set. But with the weight of the front bumper, I think its settled at about 8". The rear is at least 8" maybe 9"...who knows. To be honest, I would like to lower it some day and cut the fenders all the way around, then go up in tire size. Maybe 37s. I still haven't hooked up the ARB airpump and lines to both lockers yet. I was hoping to build a Kilby style OBA set up, or buy from Kilby, then run the ARBs off a MCMaster Carr air manifold....but money is tight right now. Also,,,one of the pulleys is screaming like a banshee and it driving me nuts. Could be the belt, I just popped for a new 40 dollar serp belt, I'll try to tighten it and see what it does. ...and...the brakes still grab like a wet mop. I need to do that WJ booster and master cylinder swap asap.
Comanche County Posted October 8, 2010 Author Posted October 8, 2010 Alright it's time to do the brakes! I bought a 99' WJ Booster and Master Cylinder, plus the MJ also received new pads and rotors. I'll turn this into a DIY post too. There are several good write ups on this mod around the net. But I thought I'd do it and post a few pics and lessons learned that may augment the great info that's already out there. Here's a couple of links: http://www.4x4wire.com/jeep/tech/brakes ... 3/booster/ http://www.jpmagazine.com/techarticles/ ... index.html Those articles are what I basically followed to get it done. James750 has also done this mod and lent his expert advice via pm. If you're thinking of doing this one. Do it, its not hard to complete and can be done in 2-3 hours and... yes, it greatly improves your stopping power. First get ALL items and tools needed. Get a WJ booster, Master Cylinder (MC), the two WJ lines with the flexible sections, all the hardware....and you're set... Tools I used: Metric and SAE sockets & wrenches. Cheap flaring tool from Harbor Freight 4.5" grinder with a cut off disc Drill 5/8" drill bit Vice Grips Duct tape and paper towels!! (more on that later) The articles above mention a custom spacer between the MC and firewall,,,,I did not use a spacer in this install. The first JY I visited asked $150 for the MC and Booster, so I skipped them and found another (Hi-Way Auto Parts in Brownwood, TX) that pulled it for me for $80. Only problem was they did not include the hardware and the guy that pulled them also cut the WJ lines that run from the MC to the proportioning valve. You will need those lines! All I got was the MC disconnected from the booster. I was so excited to get started that I didn't even think about the hardware and lines. You will need the four nuts that hold the booster to the firewall. The MJ and WJ have different nuts - don't forget them. They're Metric 8mm 1.25 pitch lock nuts. The two that hold the MC on the booster are the same. That's 6 metric nuts I didn't have in my extra bolt box. The part numbers: I thought I'd just use my MJ hard lines (from the MC to the proportioning valve) but the MJ MC lines exit on opposite sides from the WJ - no joy. I went back to the JY the next day and found the donor WJ. A 99' 2WD with 150K. I got the four booster nuts that were still laying in the floorboard as well as the cut lines and a couple of extras. I got the two more metric lock nuts I needed from Ace Hardware. While at the yard I pulled an extra set of lines off a burned out 07-08ish Grand Caravan based on their extra length of flexible hose in the line. Turns out I did not need them....also they have different threads than either the MJ or WJ booster. However, if you have a Bubble flare tool you could attach the proper connectors and benefit from the extra flexibility. I also pulled the cut lines from the donor WJ and another set of cut lines from another WJ in the yard. I wasn't sure how the line issue was going to work out, so I grabbed whatever I thought I may use. The Grand Caravan lines are on the left, the two cut WJ lines have the shorter flexible sections. One of the MJ lines is next to the two cut WJ lines for comparison. First remove the washer bottle. The motor is attached to the bottom of the bottle. There is a two wire connector, the fluid hose and two 8mm screws that hold it on. Be prepared for washer fluid to leak out once you pull the hose. Next pull the MC and booster as one unit. Disconnect the two hard brake lines at the MC and the four booster nuts on the inside of the firewall. A flexible ratchet extension would come in handy but I managed to get them out with a straight 3" and 6" extension. Use a deep socket. Also disconnect the booster rod from the brake pedal. Here's the bolt that comes out. IIRC its 15mm. I used a ratchet wrench and a small crescent. Here they are side by side: The MJ and early XJs have the same brake light switch that mounts on the end of the booster rod. When I pulled it I noticed something odd. My first car obsession was the early Mustang...first car was a rusted out springtime yellow 67' coupe, then I had a 65' fastback. Anyway I used to practically memorize the part numbers for everything on those cars. While digging through one of my old part boxes I found a 65' Mustang brake light switch I had leftover. The only real difference between the MJ switch and the old Mustang switch is the location of the connector prongs. OK enough trivia,,,back to the build. These are the sleeve and grommets that hold the switch on the booster rod. You'll need to drill out the WJ booster rod to 5/8" and use these items to mount the switch onto the WJ booster. Comparison of the two rods. Notice that the MJ booster rod has a flat spot. That flat spot engages the brake light switch and has to be right distance relative to the hole in the rod. Here's where the duct tape and paper towels come in. I used a brand new sharp 5/8" drill bit to enlarge the WJ booster rod. This was actually the only aggravating part of this mod. My drill is a dewalt 1/2 drive that turns out to have more than enough torque. The metal of the rod is fairly soft, the drill bit would dig too deep and catch solid in the rod. Then "super drill" decided to sling the WJ booster round and round and somehow take a nasty scrape out of my hand. The better way would be to use something with less torque or a duller drill bit....or remove the rod from the booster and use a drill press or put it in a vice. I didn't have either so I held the booster as best I could, slung it around a few times and finally got the hole threw. Then I sopped up the blood with the paper towels and used the duct tape to tape my hand back together. :fs1: The hole isn't clean, but the sleeve and grommets fit snug anyway. In the JP article they removed the both rods from the boosters and aligned them with the 5/8's drill bit then ground the flat spot on the WJ rod to match the MJ rod. That would be a good way to do it. Since I didn't take the boosters apart, I measured the distance with a micrometer then ground the WJ rod until it was a match. OK, once you've got the WJ rod set up with the brake light switch then mount it up in the vehicle. Next is connecting the lines. This one shows where the stock MJ lines orient to the WJ MC. I wasn't exactly sure how it would work and I thought I'd use the connectors here but it wasn't necessary. I used the longest set of WJ lines and slid on the old MJ connectors then flared the ends using my handy dandy HF flare tool that I believe only cost me about 8 bucks. I only had to cut one of the MJ lines because it had both sizes needed to connect to the valve. Here's the lines. After some creative manipulation bending the lines my MJ now has brakes. Also, note that the WJ lines are reversed, that is --- the end that was connected to the WJ MC is now turned around and connected to the MJ proportioning valve. In the WJ, the flexible hose is closest to the MC now the flexible portion is nearest the valve. Clear as mud? A couple more pics to show the difference in the flares. The WJ uses bubble flared ends and the MJ uses a double flare. The top line is the WJ style. You'll need to make a little room for the top of the booster. I couldn't find my wide sheet metal pliers so I butchered the bend with a pair of vice grips. The EGR tube must be moved above the booster but the clutch hard line can stay where it is,,,,there's room for it between the booster and the firewall. Pads and Rotors... I've got five huge tool and parts boxes, and I do not have a dang C clamp. Can't tell you how many I've had lost or broken in the past. I opened the bleeders and tried to push the caliper back in by hand to make room for the new pads but it wouldn't budge. So I got inventive and used a coil spring compressor to compress the caliper. Installed... After bleeding all the air out of the system I can vouch that this mod makes the brakes a lot better. They're actually not what I hoped, I still can't lock up the 35s on pavement (maybe if I slammed on the brake pedal but I don't want to put that stress on it if I don't have to) but I think the system works as well as possible given the higher rotating mass of my wheels and tires. Overall, I spent about 100 bucks. That includes the parts, brake cleaner, and brake fluid. Money well spent. The truck stops a lot easier and is much safer to drive. :thumbsup:
Dechion Posted October 8, 2010 Posted October 8, 2010 Nice write up, and nice truck. :thumbsup: The brake mod is on my list of things to do as well, and the way you laid it out I actually understand what I am looking at now.
Red 1989 MJ Posted October 8, 2010 Posted October 8, 2010 Clean job & a very nice truck ;) Keep going
Comanche County Posted October 11, 2010 Author Posted October 11, 2010 Good news! My clock started working. Not sure what happened but I'll take it when I get it. I also picked up some street meats for the MJ off of CL just now. 35/12.5/15" Dick Cepek Fun Country IIs. The ride is so much better on the highway than the bias ply Creepy Crawlers. They're lighter and my mpg improved on the way back to the house. They're still louder on the highway than I'd like, but much quiter than the Creep Crawlers and they'll do just fine. The PO only put 2.5K on the tires and they're practically brand new. I got 5 of them on new D windows and the spare has never touched the ground. The Maxxis tires will now be trail only, which is what they're for anyway... It was dark and my truck looks like the backside of a well ridden donkey but here's the pics:
btm24 Posted October 11, 2010 Posted October 11, 2010 man your truck looks great! you and your truck is just amazing :bowdown: great job Brandon
Comanche County Posted October 11, 2010 Author Posted October 11, 2010 Thanks Brandon. I especially like the color and striping on yours. :D
mj Mike Posted November 28, 2010 Posted November 28, 2010 check out these Ballistic joints i got to replace my lower control arm joints on my Rock Krawler 3 link their BEEFY! got them form Ballistic fabrication
Comanche County Posted November 28, 2010 Author Posted November 28, 2010 Thanks, I'll keep that it mind. But at my current rate of wheeling I'll probably never break \them. I think Rock Krawler's stuff has a lifetime warranty too.
mj Mike Posted November 28, 2010 Posted November 28, 2010 just a idea. thanks for the write up on the brakes. it on my list of things to do. :thumbsup:
Comanche County Posted May 28, 2011 Author Posted May 28, 2011 After a long and patient search I finally found a worthy winch. Picked up this Warn HS9500i from a Jeeper up in Dallas. He said it only had about 10 pulls on it. We tested it and it works perfect, its a few years old. After a new coat of Tractor Supply Company implement paint, the bumper is fresh and ready.
Comanche County Posted May 30, 2011 Author Posted May 30, 2011 and the pics of it actually on the MJ....sorry about the glare, its always sunny in Texas.
philbert001 Posted May 31, 2011 Posted May 31, 2011 Sweet build man! Your leg may be slowing you down, but it's great to see nothing seems to stop you! Happy Memorial day!
Comanche County Posted June 14, 2011 Author Posted June 14, 2011 Time for an update. This past week was a Jeep building/modding marathon at my brother's house (he has a garage). First we finished his CJ7, got the head back for his 4.2 and got it running again....then I commandeered his garage for the MJ. I got the ARB compressor, air lines and switches in. Cut the front fenders to clear the 35s at full flex, and also tackled a perplexing steering issue that turned out to be a weak steering gear box. I'll let the pictures do most of the talking. Now, the MJ's turn! I started on the wiring for the ARB compressor while I let my brother tackle the metal molestation on the fenders. I gave him complete artistic freedom since he trusted me enough to: recommend rebuilding his 4.2 head, let me rebuild his D300, and rebuild the shifter on his T176 which I did a fantastic job of rednecking it up with a 125 welder,,,,it shifts perfect now though. I followed the supplied ARB diagram which wires the switches in a way where the front locker can only be engaged if the rear locker is engaged first. I picked up a very clean XJ Country woodgrain bezel and used the old "VIC" plates for my ARB switches. These are the original blockoff plates that came in the MJ's regular black bezel. They snap right into the XJ's woodgrain bezel and I added epoxy to hold them in. If you trim just the inside rectangle the ARB switches pop in perfectly! Plenty of unused connectors in the wiring harness to get all the power I needed. I did end up running a couple of wires directly to the battery though. I mounted the compressor in my truck box and ran the air lines through the drain plug in the bed and followed the hard brake lines to the diffs. Oh, BTW, my truck still has the original owner's manual and warranty card still in the dealership bag. Here's my bro cutting on the fenders.... I also finally found a Goodyear Gatorback belt. I've been having belt squealing problems for some time now. Everything I read online seemed to agree that these belts are the best. Here's the part numbers for a Renix 4.0 w/ no A/C (or w/ the A/C delete pulley like mine). Got it at a Goodyear Service center. Advance, Auto Zone (AZ), and O'Reilly's do not carry it. The Dayco belts, which Advance and AZ carry are ok, but not as good IMO. The gatorbacks are also over twice as expensive. This one set me back $83 with tax but it comes with a lifetime warranty! :thumbsup: Here's how the switches look: We got the fenders cut and decided to do a little flex testing but ran into the steering box issue.... Went to the JY the next day and pulled a PS pump, that didn't work, went out again the following day and pulled a gearbox from a 95' XJ. That did the trick. I can steer fairly easily even while locked. More flex testing. We were going to cut the rear fenders also but after seeing how the 35s tuck into the rear fenders I decided not to cut them for now. I still need about 3-4" of more bumpstops up front and about 3" out back. Also, not having a freaking ankle makes feathering the skinny pedal difficult. It actually took me about 5 tries to get the MJ up like this. It'll go over almost anything if I can get a tire on it, but I'm not smooth anymore with the peg leg. Next mods are more bump stops and a hand throttle. Yes, that's a $10K running leg just sitting in the back of the truck! :cheers: Also picked up an XJ skid plate from the yard.
mj Mike Posted June 16, 2011 Posted June 16, 2011 Nice wiring! on the Carling Tech switches looks like my setup. Me likee! I also run 4 of them in my red Cherokee with the red face covers :chillin: Carling Tech make Quality switches! that is why ARB uses them.
Comanche County Posted June 16, 2011 Author Posted June 16, 2011 Thanks man, I made my own harness thinking I lost the supplied ARB harness, then I found it. I'll probably rewire it with their harness in a day or two.
comanche12 Posted June 17, 2011 Posted June 17, 2011 awesome! i like the look of wiring set on dash :thumbsup: also sweet shot of flexin. hope you will like arb alot because I'm think about get one or just get detriot for my 9" rear axle. :dunno:
Comanche County Posted June 17, 2011 Author Posted June 17, 2011 hope you will like arb alot because I'm think about get one or just get detriot for my 9" rear axle. :dunno: I went with selectable lockers because I'd like to use the MJ as a DD if I had to, drive across the country, or drive on snow and ice. Reasons not to go with an automatic locker. I know a lot guys use auto lockers up north and adjust their driving style accordingly but I wouldn't chance it, just me. Since I'm down South (for the moment) it wouldn't matter too much but who knows where I'll end up in the future. I'd say if you won't ever have to drive it in winter conditions and intend your MJ as trail only vehicle then I'd go with the Detroit - I think ARB is the way to go for selectables -- IMHO.
ncm1 Posted June 19, 2011 Posted June 19, 2011 Awesome build!! :bowdown: I gotta grab me one of those woodgrain bezels.
Comanche County Posted June 20, 2011 Author Posted June 20, 2011 Here's a couple of pics from wheeling at the Bridgeport OHV park in Bridgeport, TX. http://www.cityofbridgeport.net/index.aspx?nid=322 I didn't want to wheel alone so I linked in with a group I ran into being led by Mike Leary from Central Overland Travels, he had a really capable Land Cruiser. He was hosting a intermediate 4x4 class and was gracious enough to let me tag along free, really cool guy. The group had a couple of nicely built Wranglers and well as a foreign contingent of rides. Also there was King Mcneill of Texas Overland Travels, another really cool guy with a nicely built overland JK. Here's their websites: http://www.texasoverlandoutfitters.com. Didn't get as many pics as I wanted especially some of a real nasty hill climb at the end which broke my track bar bracket. But it was a lot of fun and I was able to limp to a local welding shop to get back on the road. Needless to say, an onboard welder is going on the Jeep soon. I was running 8 psi in all the tires. With the bias 4ply Maxxis I still didn't get a good bulge. I was afraid of popping a bead because the truck is well over 4,500 lbs. I'll try 5 psi next time. The truck flexes so well the 35s tuck nicely under the front fenders but I need more bump stops. When the driver's side compresses fully the upper control arm was getting banged by the rotating front pinion yoke. Still need another 3-4" of bump stops. It was 103 degrees and the MJ did well except when down in a creek bed with no wind blowing, the temp started hovering about 230 degrees. I was popping the hood to get some air circulating. It was a good time, however on the way home I noticed a significant power loss and only got 12.2 mpgs to the house. I won't have another chance to investigate it till next week but I'm hoping its either a simple spark or fuel issue or a clogged cat....and not a head gasket. It just lost the great throttle response it had....could be the 215K on the engine, maybe its just getting tired but I doubt it.
comanche12 Posted June 21, 2011 Posted June 21, 2011 looks fun to trip through there. how many lift do u got on this mj. i got 35" too but 6" lift. are you thinking about hood vents to reduce engine heatwave?
Comanche County Posted June 25, 2011 Author Posted June 25, 2011 looks fun to trip through there. how many lift do u got on this mj. i got 35" too but 6" lift. I think is about 8" or a little more? You're guess is as good as mine. I did measure from the axles to the frame rails and got 8.5" but parked next to my new stock MJ, it looks about 12" higher. Probably due to the 35s. are you thinking about hood vents to reduce engine heatwave? Yep, I think I'm going with these... I also picked up a few things at the JY. Finally found a headliner board. I'll have to fiberglass this thing because its practically falling apart. Also picked up a renix sanden compressor for future OBA. The little ARB electric compressor isn't fast enough. Got some badges, side vents, and some extra marker lights. I left the tail lights on that MJ because they were toast. Ooh, also picked up a fan. One of these days I'll follow Hornbrod's lead and get a SPAL controller for the fan. Till then, I'll use a manual switch and relay.

Recommended Posts
Create an account or sign in to comment
You need to be a member in order to leave a comment
Create an account
Sign up for a new account in our community. It's easy!
Register a new accountSign in
Already have an account? Sign in here.
Sign In Now