Comanche County Posted June 26, 2011 Author Posted June 26, 2011 Installed some Nissan 280ZX hood vents. Yes, they're from a Nissan :( but as long as they work I'll be happy....I put this in the DIY section in case anyone else wants to take part in this tomfoolery. I used some poster board to make a template of what I wanted to cut. These vents have three bolt in them but to use the bolts would have meant leaving about a 1/4" gap between the vents and the hood. They are recessed in a 280ZX. So I made an outline of just the outer lip and everything that hangs below would tuck below hood level. I traced the outer edge of the vent then sorta eyeballed how much of the lip I wanted to be on top of the hood. About 3/4" from the outer edge. This was enough to slightly rotate the vent in the hole to get the angle right before screwing them to the hood. You could cut similar holes and fasten a bracket, just a straight piece of metal, and use the existing bolts to "sandwich" the vent onto the hood but I just used screws, still looks fairly clean if ya ask me. Best to do this during the heat of the day also. Your jeep will respect you more and break down less if it knows you are willing sacrifice your well being for its well being. :smart: I used an angle grinder which doesn't make curved cuts all that well. I only made one template and just flipped it for the other side since the vents are mirrors of each other. Also don't pay attention to my measurements. They are approximately one Iphone length from the rear of the hood and one Iphone length from the center dent/stripe on the hood. I was trying to get them on each side of the valve cover as far as I could without having to cut the hood supports. Done, the hardest part was getting the hood off and back on by myself.
Comanche County Posted July 3, 2011 Author Posted July 3, 2011 Mark your calendars gentlemen, I've done something purely cosmetic....I painted my grille parts. I finally got tired of looking at a chrome headlight bezel on one side and a grey one on the other.
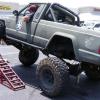
Incommando Posted July 3, 2011 Posted July 3, 2011 Have you thought about rigging up a hand throttle for delicate work? Love the truck!
Comanche County Posted July 3, 2011 Author Posted July 3, 2011 Yep, gonna order one soon. I've researched it and one can easily be cheaply made with parts from a bicycle shop. But I'd have to drive 100 miles to the closest good shop which would cost more in gas than just ordering one. I was thinking about the Teraflex kit.
Comanche County Posted July 20, 2011 Author Posted July 20, 2011 OK, got a reprieve from the heat today and got a little work done....it was only 101 today with a good breeze. :wrench: I've hated the sway set up I've had and ordered Teraflex high steer sway bar mounts. Took a long time to burn them onto the inner Cs with my 125 welder and I'll bet myself a 6 pack that they'll break off. I'll have to swing into a welding shop and have them add another good bead on them. Also under full compression the driver's side upper control arm was hitting the front D44 yoke and broke off the tab that centers the u-joint. I need to order another yoke but for now I just welded a big glob on it....maybe that will work. I also added another 3" of bumpstops to each side now there's 6" total, and also some 24" limiting straps. It took some fanangling with two jacks but I think I've finally got the suspension set up right with the bumpstops and limit straps. I should put some longer travel shocks on....anyway, here's a few more pics.... I've got one end of the limit strap bolted to the LCA, the other end I bolted to the inner frame with some 3/8" self tapping bolts. When I get longer shocks, I'll be able to move the straps around for more travel. You can see the old sway brackets on the bottom, they are now cut off and in the scrap pile. All done and sitting pretty. I also got my Teraflex hand throttle in, I'll get it on maybe tomorrow.
cody4359 Posted July 25, 2011 Posted July 25, 2011 looking good, how do you like thoes tires? and how are they for road noise/handling?
Comanche County Posted July 25, 2011 Author Posted July 25, 2011 They're loud but the noise isn't too bad. They're bias ply so if they're not fully aired up hard they'll wander a bit on the highway. I can still cruise at 70 and it's ok.
Comanche County Posted July 25, 2011 Author Posted July 25, 2011 Added a few things, the Teraflex hand throttle. Which btw was a very complete kit and at 35 bucks was a complete steal considering where I live and gas prices. I should have routed the cable through the shifter boot and under the console, but I didn't even think about it until I had it done. I may change it later if it starts to get on my nerves. Also added the some ARB diff covers from Motion. I guess half the reason is cosmetic, they match the red truck but I do like the added protection considering what I've spent on gears and lockers. I view it as insurance protecting an investment. Got my skid back on too. I am starting to think about bypassing the rear proportioning valve....???? :dunno: Also picked up some Kicker dual voice coil CVR 10"s and put some coaxial 5 1/4" Kickers in the doors. I need to build a box for the two 10s in back, the boxes they're in are way too small. New radio will come one day.
Motion Offroad Posted July 25, 2011 Posted July 25, 2011 Looks good Jay! Hope we got ya those parts in time for your trip! :cheers:
MancheKid86 Posted July 26, 2011 Posted July 26, 2011 you will be very impressed with your kickers once you get em tuned in properly :thumbsup: I'm running 2 of them on 630 Watts and the ladies love it :yes:
Druville Posted July 26, 2011 Posted July 26, 2011 wow awesome build thus far, i just read through it start to finish i love seeing that I'm not the only one that works out in a grass field rain or shine. keep up the good work brother. your jeep looks awesome.
btm24 Posted July 27, 2011 Posted July 27, 2011 95% of every thing you do is amazing! The rest is just a difference in options. I love it though just amazing please keep it up! :bowdown: Brandon
Comanche County Posted July 27, 2011 Author Posted July 27, 2011 Looks good Jay! Hope we got ya those parts in time for your trip! :cheers: Yup, got em in time but couldn't go for other reasons, darn it. 95% of every thing you do is amazing! The rest is just a difference in options. I love it though just amazing please keep it up! :bowdown: Brandon wow awesome build thus far, i just read through it start to finish i love seeing that I'm not the only one that works out in a grass field rain or shine. keep up the good work brother. your jeep looks awesome. you will be very impressed with your kickers once you get em tuned in properly :thumbsup: I'm running 2 of them on 630 Watts and the ladies love it :yes: What's the dimensions on your box? I've got 1000w on two 6" component sets and 2x 12" Kickers in my ZJ, its so freakin loud I literally go deaf if I turn it up too long. I had MTX 10s in the MJ and they had the same effect given the small cab of the MJ but they sorta died on me. I think you're right, with the right box and a 600w amp, these things should rock the MJ....I need it loud anyway since I'm half deaf and I can't hear the radio anyway going down the highway....you know, 2/55 AC, loud tires and no headliner makes for a loud MJ, so I need a louder radio. Thanks for all the compliments guys! Its not too technical and almost all bolt on, I do what I can do. :cheers:
Comanche County Posted August 21, 2011 Author Posted August 21, 2011 Got my JCR sliders on finally. Its taken about a year for me to finally install them, I guess I was having second thoughts because they were so freakin heavy, also I was trying to figure out how to adjust them for my long arms. Anyway, it was very simple, I just stopped making excuses and got it done. The fitment wasn't the best but they're a quality product and I'd recommend them. In fact both bumpers from JCR didn't fit that well either, the front was a little lopsided and the rear bumper bracket holes didn't come close to lining up, I only have three bolts on each side on my rear bumper. Also the center pin hole in the receiver hitch was drilled too high making it impossible to mount a hitch. All in all, it doesn't bother me that much, I'll just weld, cut, and re-drill as necessary. Its still tough stuff. Because of my long arm brackets I had to cut the front mounting plate down. More paint... and installed... :banana:
Comanche County Posted August 23, 2011 Author Posted August 23, 2011 Took my cousin on a little drive around the lake. It has rained once in 90 days here and we're working on near 50 straight days of over 100 degree heat. Anyway the lake is half the size it was which opened up some terrain for us to explore. Nothing technical, just a little fun drive through what was once a lake bed. These stumps used to be completely under water. We got a few miles around the end of the lake where the river that feeds it enters and the weeds started to get a little thicker. The truck would have been under water at this point had this been a normal summer. We're about 4 miles out from our "input" point, and the weeds are getting pretty thick....again, we'd be under water normally here. Now at this point I trounce through the chest high weeds to get a different angle for a better pic. Then the original 4" piece of heater core hose (the only one I haven't replaced) decides to blow and let a blast of steam off through my new hood vents.... My cousin Josh's only words while popping out of the passenger window and pointing were, "dude, look!" So the picture taking stopped, and we limped the 5 miles home just as the MJ's temp gauge redlined as we pulled into the driveway. The MJ started missing and running rough which I hope was a result of coolant being blown all over the ignition system and distributor. I'll get her dried out tomorrow and see what's up. So tomorrow at least its new heater hoses and I think I'm following Hornbrod's lead on a new Rad and Spal controller.....viewtopic.php?f=9&t=8342 It was disappointing because I wanted to make it another couple of miles back into no man's land....as soon as I get it fixed we're heading back out there. Good thing I had the 1 ton steering, skid plate, and diff covers because those weeds were hiding a lot of 1-2' thick logs that we hit on the way back. I tried to follow our tracks out but I lost them in the weeds and I was trying to keep the speed up to keep air flow through the rad.....normally I would have stopped and fixed it, but I spent the previous day redoing the front main seal and steering on my brother's CJ and for some reason I left all my tools out of the MJ and at the house..... :dunce:
Backdraft Posted August 23, 2011 Posted August 23, 2011 Awesome pictures! I feel your pain about no rain and 100+ temps. I live on a lake and its currently 6-8 feet below normal. They don't let us on the lakebed here though....LOL. Anyway, like I said great pictures and your truck is one of my absolute favorites.
Comanche County Posted August 23, 2011 Author Posted August 23, 2011 Awesome pictures! I feel your pain about no rain and 100+ temps. I live on a lake and its currently 6-8 feet below normal. They don't let us on the lakebed here though....LOL. Anyway, like I said great pictures and your truck is one of my absolute favorites. Thanks dude!
Blue88Comanche Posted October 13, 2011 Posted October 13, 2011 nice build :thumbsup: did you get your subs in yet? I should be finishing up my twin 10" box this weekend.
Comanche County Posted October 13, 2011 Author Posted October 13, 2011 They're in but my boxes are too small. I'm thinking about building one like yours. I like that. It'll be a while before I build something though, on top of the other Jeeps I'm working on, I discovered yesterday that my front axle is bent, not bad but enough to visibly tilt the tires in. I thought I needed offset ball joints, not the case. It's getting a truss when I get it straightened, going to truss the rear too.
neohic Posted October 13, 2011 Posted October 13, 2011 ...It's getting a truss when I get it straightened, going to truss the rear too. For what they need to be, just fab your own out of some 3/16" or thicker material. Mine: Granted, I don't need mine trussed... but I know that it's there if I ever go with bigger shoes.
Blue88Comanche Posted October 13, 2011 Posted October 13, 2011 They're in but my boxes are too small. I'm thinking about building one like yours. I like that. It'll be a while before I build something though, on top of the other Jeeps I'm working on, I discovered yesterday that my front axle is bent, not bad but enough to visibly tilt the tires in. I thought I needed offset ball joints, not the case. It's getting a truss when I get it straightened, going to truss the rear too. if i still have the build plans for the box i will P.M. them to you.
Comanche County Posted October 31, 2011 Author Posted October 31, 2011 Took the MJ out to a new place in Tolar, TX and promptly blew the clutch line. Had to do the engine RPM to speed matching thing to get home. Fun day. Edit: another pic from a friend's camera. http://www.rocktrails.com/
89Comanche4x4 Posted October 31, 2011 Posted October 31, 2011 They're in but my boxes are too small. I'm thinking about building one like yours. I like that. It'll be a while before I build something though, on top of the other Jeeps I'm working on, I discovered yesterday that my front axle is bent, not bad but enough to visibly tilt the tires in. I thought I needed offset ball joints, not the case. It's getting a truss when I get it straightened, going to truss the rear too. you have 10" or 12" subs? i have one 10" and a double box that I'm going to cut and make into one. how much does you "too small" box pound? i don't want to put two subs in because i like havint the room to put my books for school and other random things back there instead of on the passenger seat or floor.
Comanche County Posted November 1, 2011 Author Posted November 1, 2011 I've got two 10"s. But my boxes don't have enough airspace or depth. They're CVR10s that require .8 cubic feet for a Sealed Compact MEV (Minimum Enclosure Volume) to 3 cubic feet for a Sealed SQ MEV (Max Enclosure Volume). I've got some little boxes that used to house MTX 10s but they are about 1/4" too shallow for the larger magnets and depth of the Kicker CVR 10s. My idea was to simply build a box that was one single space/volume that stretched the width of the cab but had a recess for the amp in the center behind the console. I'll need to get a new amp eventually as these will handle 800 watts each (400 rms), I'm pushing an old 600 watt sony right now. Sadly my old Alpine deck finally bit the dust, it doesn't even power up anymore. Looking to get Kenwood Excelon deck just so the controls are similar to the Excelon in my ZJ which pushes 1100 watts on two Kicker DC12s. Its louder than a human being can tolerate. I don't know how the ghetto donk drivers can stand those huge 15" plus systems, the system in my ZJ is loud but its the clarity with the additional two 6.5" component sets that I cherish.
Comanche County Posted November 1, 2011 Author Posted November 1, 2011 I fixed the clutch line for about 25 bucks. Went to the local auto/ag parts store and picked up a 1/4" x 30" brake line with the right fittings, a section of 3/16" x 24" high pressure hydraulic hose and two fittings to connect the pipe threaded hose to the brake line. It only took two 90 degree bends and just a bit of hand manipulation and the truck was back on the road in 10 minutes. I may get a stainless line from AA but this will work for now. The good thing about the long 30" brake line coming off the clutch MC is that there is no longer a rubber clutch hose close to the exhaust. This would make a cheap trail spare for anyone. Here's the new and old line for comparison and my "new" AX15... :banana: The fittings. The hydraulic hose connected directly to the slave. and the obligatory test drive poser shot.

Recommended Posts
Create an account or sign in to comment
You need to be a member in order to leave a comment
Create an account
Sign up for a new account in our community. It's easy!
Register a new accountSign in
Already have an account? Sign in here.
Sign In Now