

Salvagedcircuit
-
Posts
1381 -
Joined
-
Last visited
Content Type
Profiles
Forums
Gallery
Everything posted by Salvagedcircuit
-
Congrats on your new-to-you vehicle! That's an excellent lil setup there. Like with any restoration, start slow and work your way up. Grab a notepad and write down everything you think is wrong and address the problems one by one. The cruiser54 tips are golden: https://cruiser54.com/ I would definitely do #1, 3, 4, 11 & 22. All these are easy, don't take too much time and are not invasive. Additionally, look for any broken/severed vacuum lines and repair them with heatshrink or replace them. Remove any poor quality crimps or vampire clips. They are known sources of failure. I had seven crimps in my rear license plate light harness. Replace them with direct soldering and adhesive lined heatshrink when you are able. Some spots are hard to wield a soldering iron, so one good quality crimp with heatshrink is a good alternative. Good luck with it! The repair can sometimes be frustrating, but it's well worth it. When you get stuck, make sure to ask questions. There's a lot of very knowledgeable folks on this forum! Be the best comanche janitor you can be
-

Polished turbines
Salvagedcircuit replied to Smokeyyank's topic in MJ Tech: Modification and Repairs
It seems like the correct way to refurbish the turbine rims is to: Bead Blast rims Polish front spoke surfaces to mirror finish or turn spoke surface on lathe Gray powder coat entire rim Wipe off gray powder coat from spoke front or use tape before gray powder coat application Bake Clear powder coat entire rim Bake The powder coat companies nearby want $120/hr + materials For rims, this is just not worth it to me. I think the best way to budget restore these rims is to bead blast, polish with a drill + polishing agent, wipe surface with alcohol, clear spray paint. It just does not make sense to spend $300-500 a rim on these when there are folks on ebay who offer matched polished turbines for $200-400 each and will probably take less with some lowballing. -
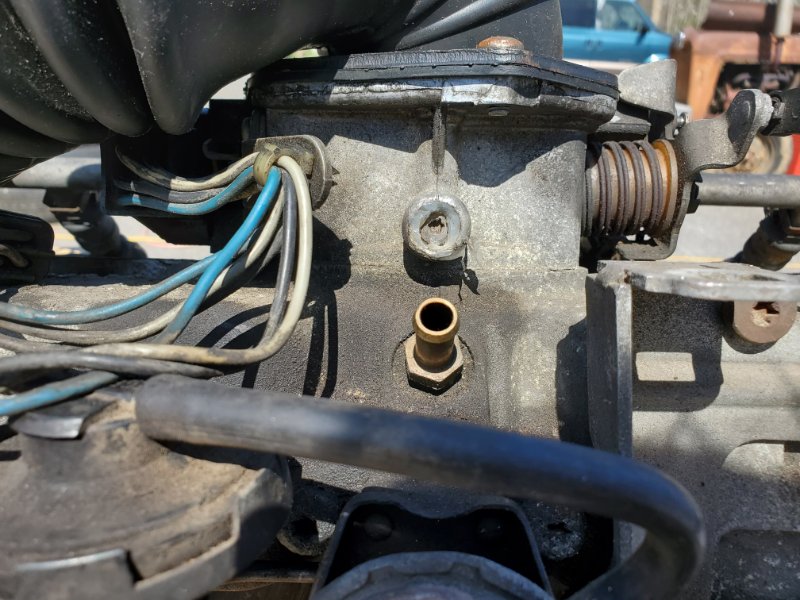
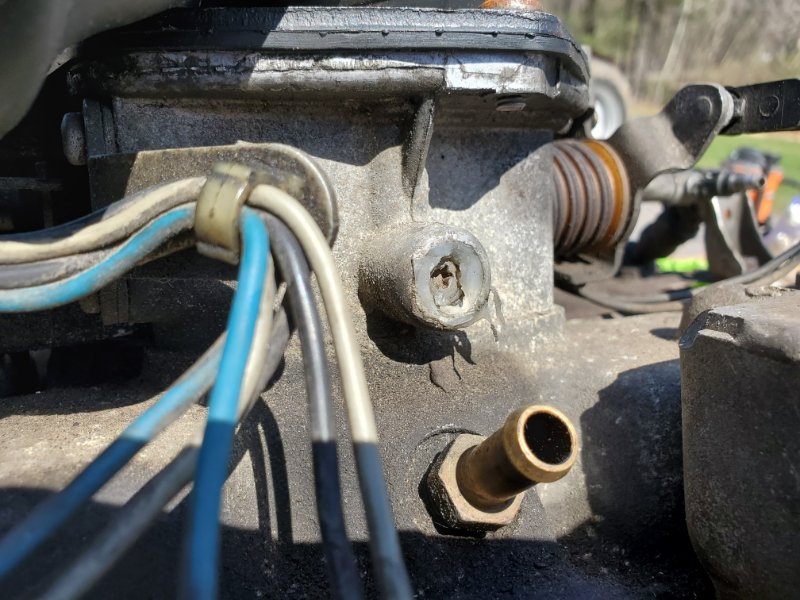
I have a stock throttle body on my '88 comanche. I have cleaned it all up, the inside, the IAC, but I noticed there is a torx screw and silicone coming out of one of the sides. My gut feeling is this is not normal. Does anyone know what is supposed to be here or why silicone was being used? I'm guessing the previous owner tried to seal it? I don't notice any cracks. Thanks.
-
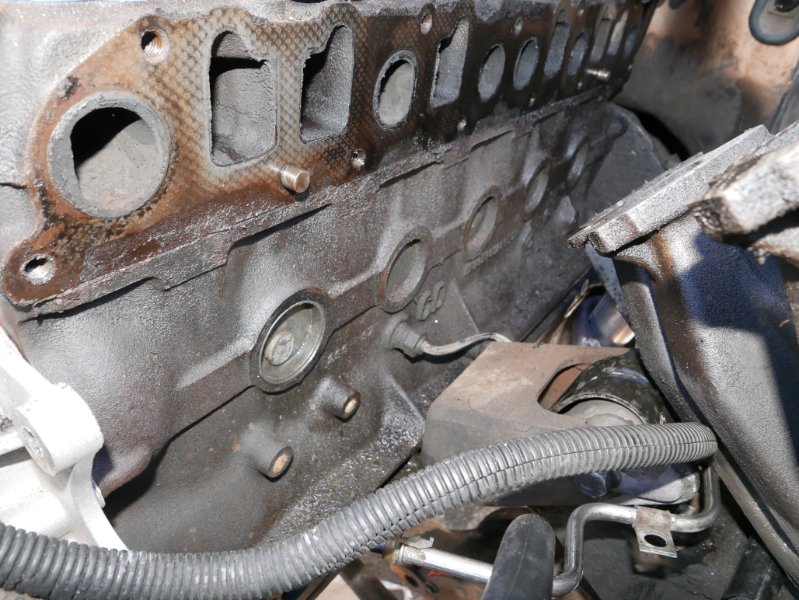
1988. The seller stated that the engine was an HO. So far, absolutely nothing is from an HO in my engine bay. So far, I know the bottom of the engine was remanufacturered at some point. The head and intake may be original because the head ports have 1/16in of carbon build up, the top of the of the head had literally 1/2in of carbon and sludge, and the intake has 1/16in carbon, possibly because my intake and exhaust manifold bolts were all finger tight except 1 bolt. I don't think the intake is supposed to have any carbon buildup, so I have still to figure out why that is. I'm currently in the process of cleaning it up.
-
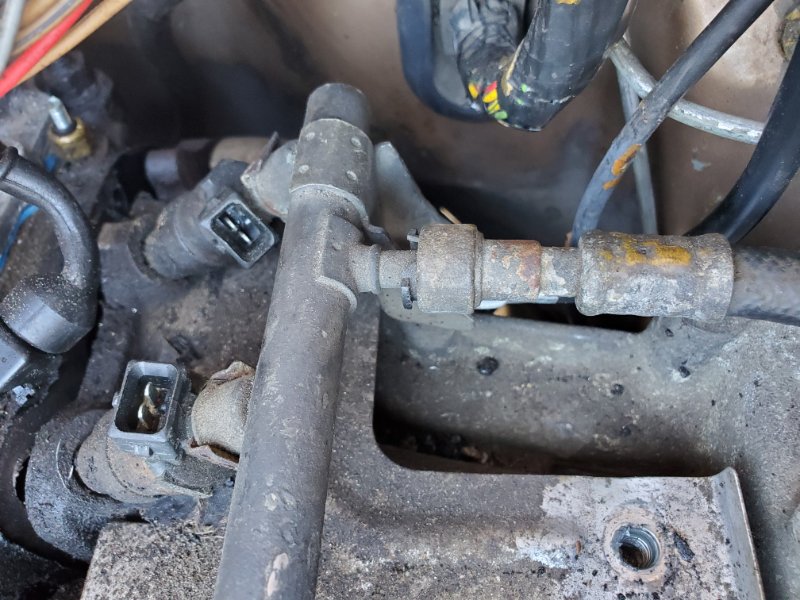
Fuel Rail Rear Disconnect Removal?
Salvagedcircuit replied to Salvagedcircuit's topic in MJ Tech: Modification and Repairs
You sir are a gentlemen and a scholar. I was able to remove the fitting and the o-rings on the rear plug look similar to the ones on the front. I had to use 2 people to remove the rear connector. My brother used a smooth jaw pliers-wrench on the dual tabbed plastic part and I wiggled and tuged the connector. It came off with ease. I simply did not have enough hand strength to squeeze the dual black release tabs on the connector. I also did not want to use a lot of force on a connector 30+years old. It worked in the long run and in a stroke of luck, nothing was deformed, broken or damaged. Thanks a ton @fiatslug87! -
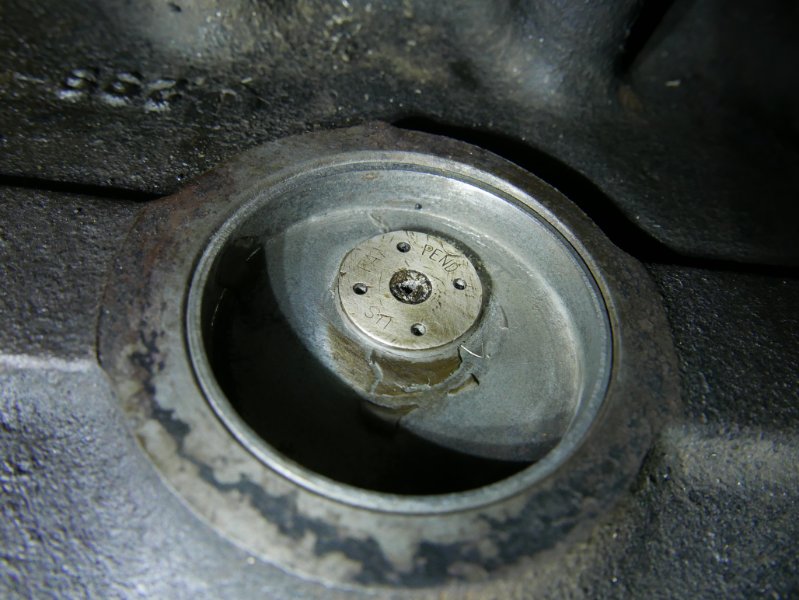
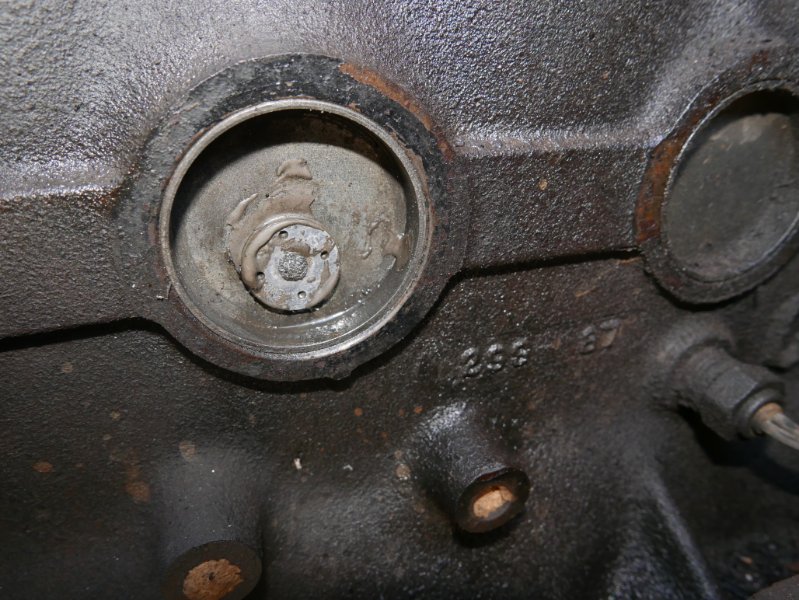
Yep. The last photo I posted is how I'm leaving it. Now that I know that there is not a hole in the welch plug, I'm not investigating further. I picked at the center a little bit, but not much. I'm going to call the previous owner and see who did the remanufacturing. Regardless, I doubt the engine warranty transfers owners, but it would nice to have an idea of how many miles are actually on the bottom of the engine. Thanks everyone for the input. Title was changed to help future comanche owners find answers
-
It seems my question has been answered https://www.chevelles.com/threads/engine-tag-on-freeze-plug.862705/ It's some kind of rebuild tag that melts when the engine overheats. Wild.
-
It feels like JB weld. The gray goop on the surface peeled off in gray shavings like JB weld. The mushroomed surface in the center that I thought was a nail, was soft. It shaved off clean. I shaved a little into it and it's soft. It's possible that the entire us pat pend washer was simply just jb welded on to the surface. I just have no idea why. Is there some kind of freeze plug patch kit? It just seems strange for this to be a warranty tag when it says nothing. Not even a company name or anything. Debating whether to try and remove it and see if there's something on the opposing face.
-
Thanks for the feedback guys! I am thinking it's either someone who tried to remove a plug and gave up and patched it or like @eaglescout526mentioned some kind of warranty tag. Do you think that's a nail holding it on? I'm hoping it's just held on with JB weld. I'm going to see if I can find photos of engine plug block heaters, maybe @Andy in Pa has a point. My plans are to degrease the side of the block, drain all the coolant then I'm thinking of taking a torch to the plug and seeing if the tag/washer falls off. If it falls off and there is no hole in the plug, I'll just leave it be. Thanks.
-
I finally got around to removing the exhaust manifold to address the smoking issues I've been having and I found this lovely present waiting for me on the front most engine Welch plug. That looks like a nail, washer and some JBweld to me. I think she's dead Jim. I knew the truck had 269k miles, but the engine seemed to run just fine, and I tested compression the first day after I purchased it: 128,130,130,126,130,128. It also idled great. But I have never seen anything like this in my life. If anyone has any opinions, that would be great. Is this some kind of rebuild mark? If so, it's the most shade-tree one I've ever seen. The previous owner told me this had engine work done and the engine had an "ho block" So far, I have yet to find anything HO in my engine bay. Otherwise, I think I'm going to need a new engine. Edit: Crisis averted. Read last response. Warranty rebuild tag.
-
Fuel Rail Rear Disconnect Removal?
Salvagedcircuit replied to Salvagedcircuit's topic in MJ Tech: Modification and Repairs
So you are saying that the front and back connectors internally are the same even though the connectors on the front and back of the renix fuel rail are different? I already purchased: Napa CRB 212305 fuel line repair kit 5/16 (Standard Motor Products HK7) Dorman 800-750 trans line repair kit 3/8 The Dorman 800-750 looks like it will be suitable for the front. Do I use another Dorman 800-750 on the back fuel rail connector or the Napa CRB 212305? Thanks! -
Fuel Rail Rear Disconnect Removal?
Salvagedcircuit replied to Salvagedcircuit's topic in MJ Tech: Modification and Repairs
Thanks for the input. Curious, is this a one-time-only fitting like the front? Are there any known replacement o-rings for this connector? The front fuel connector rebuild kits exist, but I'm not sure about the rear rebuild kits. Thanks. -
Hi. How on earth do you remove the rear fuel return line connector on a renix fuel rail? I was going to use a fuel rail insert, but the black tabs prevent me from inserting it into the fitting. I have tried pulling, pushing then pulling, squeezing the black tabs then pulling, using pliers to squeeze the black tabs then pulling. Nothing works. Does anyone know how to remove this?
-
Congrats man! Best of luck to you! Houses are always a lot of work, but the freedom and space make it all worth it
-
I believe that's @Zenobian_84 It's cool to see you back Jeep Driver. You do some excellent work. I was reading through your entire build thread and learned quite a bit. I just recently installed replacement engine mounts because my mounts and exhaust manifold bit the bullet. I was able to find some slightly used OEM engine mounts, but if I ever have to replace them, I'm going to take the same route you took. Take an off the shelf standard circular engine mount from some Toyota or Ford truck still in production, measure up my own creation, weld it up and be done.
-
1988 Pioneer Long Bed Metric Ton Edition DD
Salvagedcircuit replied to EUREKA's topic in Member Projects: Your Comanches
Lookin good! -
So much this. In some ways, it's too bad the rear frame has an "X" member, it will complicate a battery swap. The entire rear would have to be redesigned from scratch
-
If its a long bed, I'd rather see if one of those Mitsubishi k-trucks in the background would fit in the bed
-
Oh My Gosh They heard the cries of the jeep community. They actually did the thing. Amazing. Now I just have to sort out why my tailgate keeps shifting to the left and crunching my tailgate rubber bumpers, then I'll finally have a fix!
-
Olympic Edition Window Sticker
Salvagedcircuit replied to boxyjeep's topic in MJ Tech: Modification and Repairs
I certainly would love one of those too. Too bad that means I'd actually have to do the work to make it a big ton -
1988 SoCal Jeep Comanche Build
Salvagedcircuit replied to boxyjeep's topic in Member Projects: Your Comanches
Ok cool. Sometimes I forgot to check the supplier on amazon, it's so easy to overlook. The parts are coming out looking great otherwise . Keep it up! -
1988 SoCal Jeep Comanche Build
Salvagedcircuit replied to boxyjeep's topic in Member Projects: Your Comanches
That's one excellent method to paint bolts! The United States Postal Service, If it fits it ships a proud sponsor American vehicle restoration. The seller on that amazon link is: There is a good chance that kit is import rubbish that might not meet your expectations. I've used these cables below on my longbed and they fit and work well. Granted, I don't know if raybestos quality is any better than the link you posted, but just thought i'd let you know. One of these cables is for longbed only. There is a shorter shortbed version of one of the cables. I forgot which one. Parking brake cable cabin: RAYBESTOS BC93589 Parking brake cable rear: RAYBESTOS BC93591 -
92 The TowManche
Salvagedcircuit replied to iimafa's topic in MJ Hardcore Tech: Epic Journeys to Greatness
That must have been fun to fit in the large head unit. Nice job. I was considering doing the same, but opted to go with the stock unit for now and later move onto a simple boat/marine based radio to keep the plane-jane look. One thing to note. If you used electrical tape on the steering wheel, I'd highly suggest wrapping it in bicycle handlebar tape instead. Something like this: https://www.trekbikes.com/us/en_US/equipment/bike-accessories/bike-handlebar-grips-tape/bike-handlebar-tape/bontrager-gel-cork-handlebar-tape-set/p/23110/?colorCode=blue I wrapped a bike handlebar with electrical tape once and majorly regretted it. Handles become a gummy mess within 30minutes of use. I did not enjoy this so I switched back to a rubber bike handle. -
Olympic Edition Window Sticker
Salvagedcircuit replied to boxyjeep's topic in MJ Tech: Modification and Repairs
I like what you are thinking here...DO IT -
Thank you for giving the MJ some love. Used stock taillights may not exist in a few years, and I have this feeling mine may get stolen even if I use some obscure safety torx or pentalobe screw.