
howeitsdone
-
Posts
691 -
Joined
-
Last visited
Content Type
Profiles
Forums
Gallery
Everything posted by howeitsdone
-
1991 Eliminator Resto-Mod
howeitsdone replied to ghetdjc320's topic in Member Projects: Your Comanches
I bet you could easily put slats in the frame rails. Or even drop some square tubing in there. Also looks like you cut out the mounting bolt and then welded back in. Any particular reason or was it just easier? -
1991 Eliminator Resto-Mod
howeitsdone replied to ghetdjc320's topic in Member Projects: Your Comanches
Looks awesome! Seems like the pan fit well. -
Just put a magnet to mine and didn't take. So I'd say aluminum. The brackets are steel though.
-
1991 Eliminator Resto-Mod
howeitsdone replied to ghetdjc320's topic in Member Projects: Your Comanches
Looks like fun! -
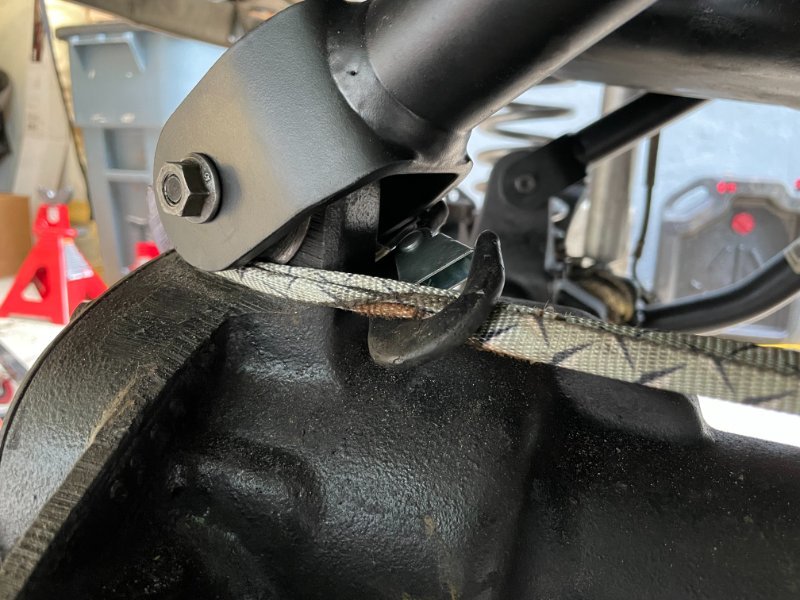
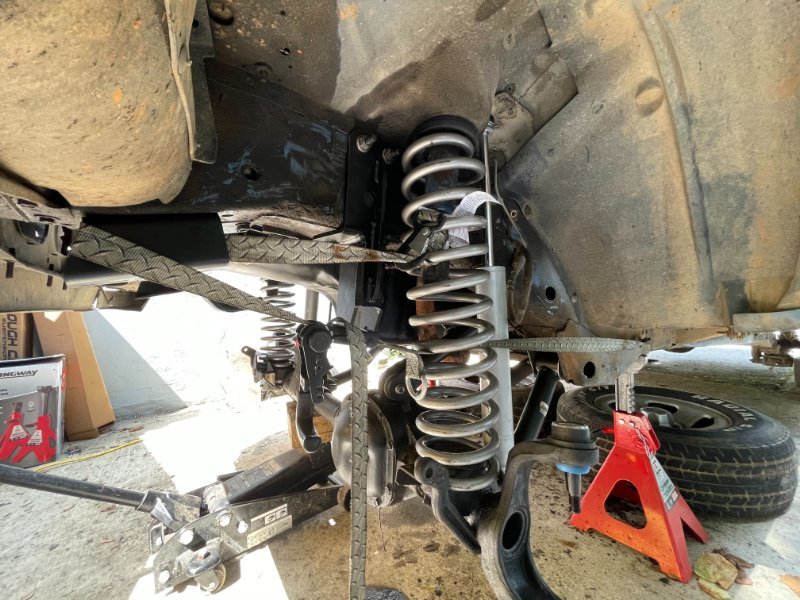
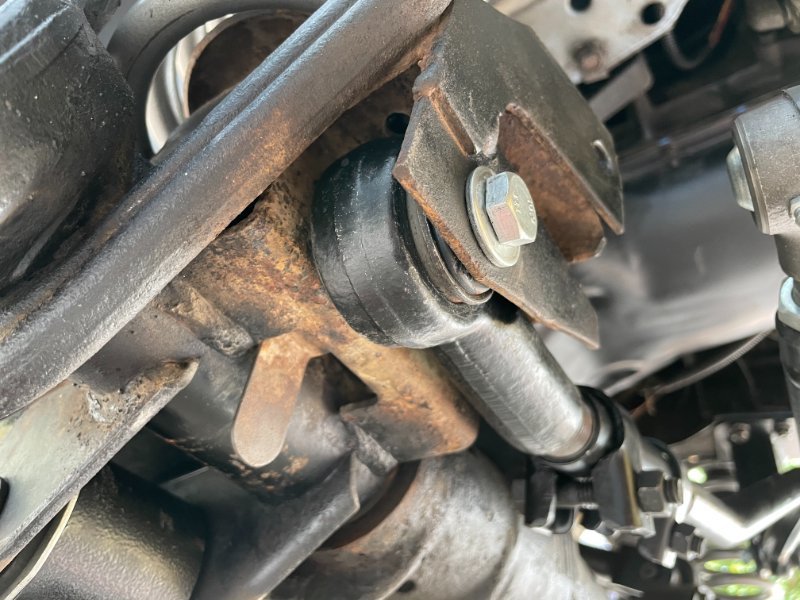
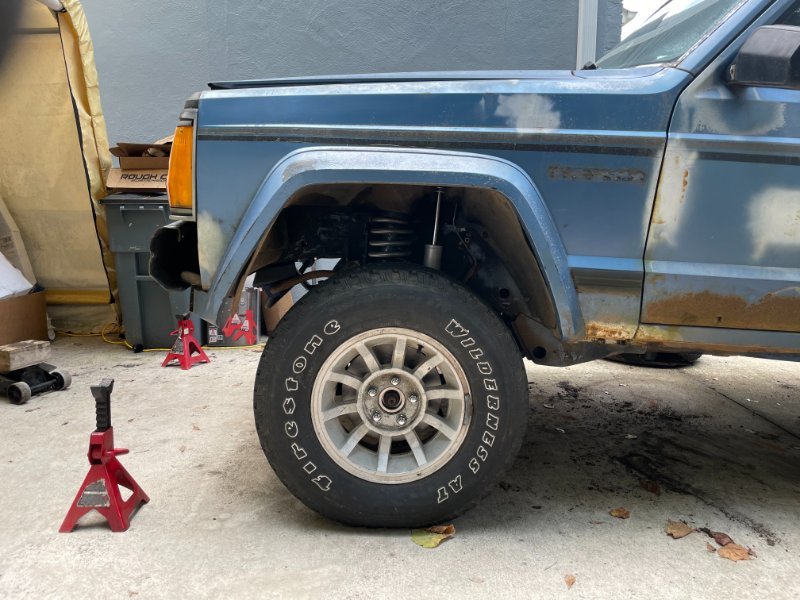
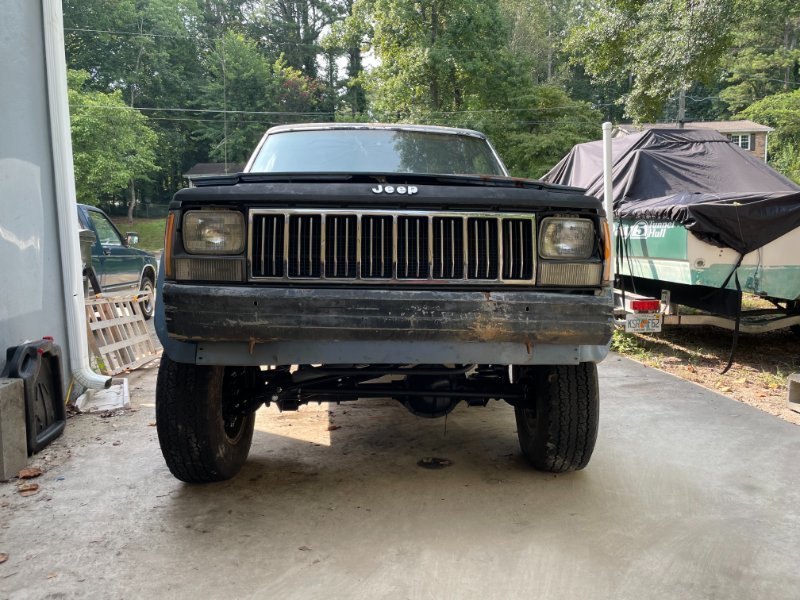
I feel like I didn't really get much done this weekend. But a huge thank you to @jeepmjga. He reached out last week and had the remaining turbines that I needed as well as floor pans. Went and saw him Friday to pick up and got to see his awesome project as well. Even threw in his old rear brake height valve in case mine didn't work (Haven't gotten that far yet). As soon as I got home, my porch had a few packages on it as well. One being a fan shroud from @Torq_Shep and another my UCAs from Core 4x4. I think the most accomplishing thing this weekend is the fact that it's resting on all 4 tires tonight. If you saw my tech thread about the u-joints, those made for a not so happy Saturday. Fortunately I was able to Frankenstein something for the time-being and get to finishing up the suspension and steering. Saturday I put the entire steering together and had a couple of things to overcome. I did the ratcheting trick to get the UCAs attached. Ended up getting the passenger spring in just fine, but couldn't get the driver's side without a compressor. So I rented one first thing on Saturday to get that out of the way. For some reason the spring was anything but straight and was hung up on the bump stop flange. So I (carefully) used a ratchet to pull it forward by routing it through the sway bar drop bracket through to the rear. As I was installing the track bar, I had trouble keeping the wrench on the rear nut. So I grabbed the flag nut and it just so happened to be the right thread and size as the new bolt. No telling if this may cause some death wobble or not; only time will tell. I wonder if people just notch out that part. It also made me realize that I didn't remove the rust and paint that area. The next step was putting the knuckles back on and the hubs. I didn't feel like messing with the brakes since I know I'll have to take them back off to fix my axle shaft issues. So I opted to leave the calipers off until next weekend since the truck isn't moving anywhere. A soon as I lowered it though I got into a really good mood! Sit's just the right height (minus new tires). I kept struggling with adjusting the drag link. Every time I adjusted one way or the other it somehow ended up way too far. So I decided to leave that for later me. The passenger side is also about 2-3in higher than the other. Later me will also need to figure out what that's all about. It may be hard to tell from the photo because the bumper is already crooked, but it's certainly a mystery to be solved. I ended my Sunday with trying to torque and grease everything. Again, with some success. Got pretty much everything except the ball joints and the end links on the knuckles torqued. I'll have to remove the wheels for the rest. I then spent the next 2 hours trying to grease the zerk fittings. For some reason they just aren't taking. Loosened them, tightened them, stared at them, but nothing worked. I'm thinking the fitting attachment on the gun might be broken or I'll need to grease when the axle is drooping (from what I've read). But I was too exhausted at that point and needed a break. Time to rest my brain and figure out solutions later this week. I am super anxious to get to the interior and body since that's my favorite part. But for now at least I can now see the progress.
.JPEG.f64525ddef98d68efeb557f5f63021d7.JPEG)

-
Axle U-Joints Breaking During Install
howeitsdone replied to howeitsdone's topic in MJ Tech: Modification and Repairs
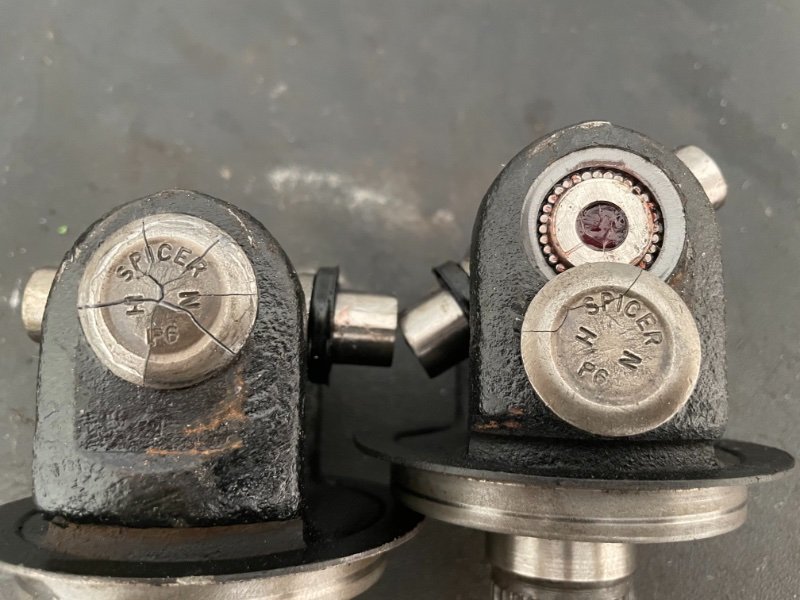
Install on the 2nd shaft went much better. I greased up the outside of the caps to help. Thank for the help! Now I'm thinking I will need a new stub. It turns out it's bent just enough so that the clip can't fit. So I'll look to source one today rather than just grind it down. So what did I learn? If there is too much pressure from the press on the u-joint, they won't survive. Back out the press and figure out why the cap isn't seating. I'm sure I needed to take a wire brush to the holes prior to installation and then grease them up. I also had much better luck this time with the hammer method to get them seated properly. I think the grease really helped. I just used the press to finish them off.
-
Looks nice! Something I hate about the WK2 is the lack of options for a lift. I would like more than 2.5". And I'm reminded of that every time I do an oil change.
-
https://huntsville.craigslist.org/cto/d/athens-jeep-comanches-for-sale/7362417799.html $1,000 isn't a bad way to get started Really wish the black SWB had a title though
-
Axle U-Joints Breaking During Install
howeitsdone replied to howeitsdone's topic in MJ Tech: Modification and Repairs
I'm thinking so too. One was really difficult to get out once the caps were removed I used the press for the driveshaft with no issues. Figured this would be the same process. Press one side in a bit past flush Press in the other side until almost in completely Insert clip into the first cap Press a bit more until able to install the 2nd clip I had another set that I had just bought that I thought were wrong but turned out correct. So I tried using the hammer instead, but the pins shot out of one of the caps during the process. So after looking at the good Spicer caps I decided to use one as a replacement. It's a tight fit, but managed to get it together. Not permanent, but should work for the next week or so. Just not sure what I'm doing wrong. Seems like everyone gets these installed pretty easily. -
Axle U-Joints Breaking During Install
howeitsdone replied to howeitsdone's topic in MJ Tech: Modification and Repairs
So the right one I did without anything; just left it open to allow movement. The left one I basically used a socket. It's an adapter for my press. -
So I've completely broken both of my new axle u-joints during the install and wondering what I'm doing wrong. I take all the caps off, insert into the holes, put a cap over one of the fittings and begin to press in with my ball joint press. That went fine on both. The problem is when installing the opposite side. When I'm pressing in the other side it 'pops' and then I'm left with what you see in the photo. Anybody know what I'm doing wrong?
-
Looks great! Did the SportTruck have a solid rear window or was that a choice during your build?
-
1992 2wd 2.5l 5spd - Georgia
howeitsdone replied to howeitsdone's topic in Craigslist/eBay... i.e. Not Your Stuff
Fortunately I am doing the repairs myself so I shouldn’t be anywhere near that cost. But if I was to do it over then I would 100% go with this truck instead. -
https://atlanta.craigslist.org/atl/cto/d/buford-1992-jeep-comanche-2wd-truck/7361081680.html Wish this was for sale a month and a half ago! Wouldn't gone this route instead Great deal for a rust-free body. Wish there were more pics though.
-
Just ordered via Amazon so hoping they're here on Saturday
-
Aftermarket tailight interest?
howeitsdone replied to m2bandit's topic in MJ Tech: Modification and Repairs
Why not make tail light guards? Wouldn't be super different from the rendering already. Just bars instead of flat metal. People are always keeping the original lights. There is no form of protection currently, unless you put your truck on a shelf and leave it there. And even then! -
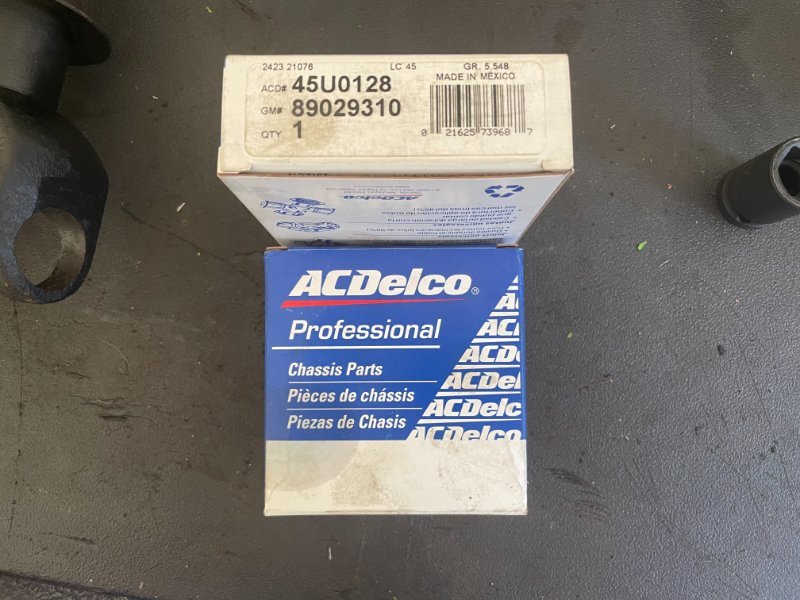
So I received the new U-Joints from RockAuto and they do not fit. Just an FYI to anyone who may purchase them, ACDelco U-Joints are too large. Can't fit them in without the caps, and even if you could the c-clip groove would be too far into the axle shaft itself. Dunno why RockAuto even lists them. When I was looking, I figured it was a great price for an OEM part so went ahead with it. Part number is 45U0128. Bummed out since that means I still can't install my hubs. Guessing this means I will have to shell out a little extra dough and just purchase from a local parts store.
-
My anxiety haha One heck of a fit!
-
Forgot to add Hollander as well. https://www.hollanderparts.com A lot of yards on car-part also use Hollander, but there are quite a few that you'll only find on one or the other. A lot of yards will ship smaller items if you ask too. But out in the country a lot of shops only deal in cash so just have that in mind when you source a yard because they aren't shipping. FWIW CSG Auto Parts in FL has one from an '87 listed. But like Pete said, just call and ask a place that has a chassis.
-
Gotta be a redneck treehouse! There's no driveshaft I wonder if they could fit smaller wheels on there...
-
A few years ago I was in Denver on vacation. I left a brewery and started walking down the block. Ended up stumbling (metaphorically and also probably physically) into Woods Boss on what happened to be their 1st day open. Really liked what I tried there. Cool owners too.
-
https://www.car-part.com
-
Completely with you on that! My 2012 GC is on it's 3rd radiator and 3rd water pump. I went with lesser products for the 1st replacement and paid the price, both literally and figuratively. I'll keep following to see how it goes!
-
Which model did you end up going with? I was looking at the MMRAD-XJ-89 but thinking the one may be overkill for my application.
-
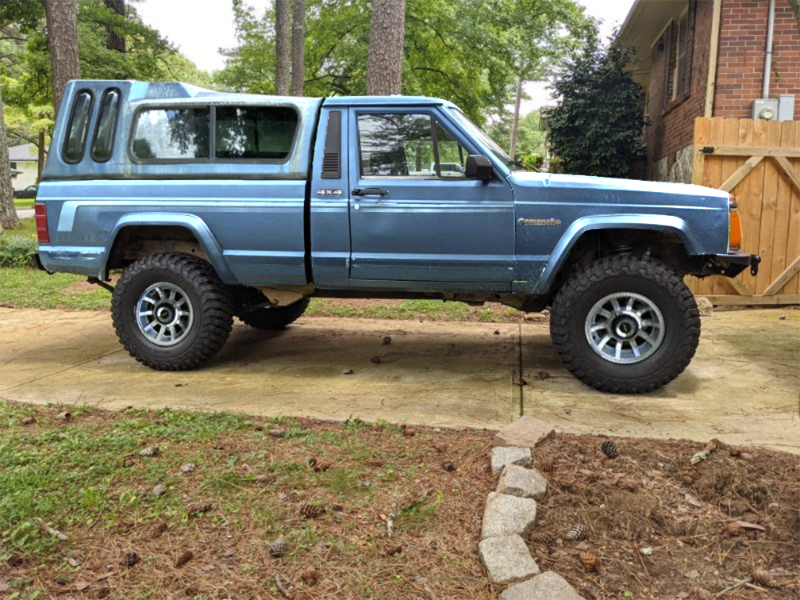
Well I went ahead and purchased the Core 4x4 UCAs. Tried to get opinions on them vs the Rubicon Express arms, but crickets for RE. I'm sure someone will pipe up with an opinion now AFTER I've made the purchase Not bad at $130 shipped though. While I wait for the Core UCAs & the axle u-joints to arrive, I stole @jeepmjga's photo and did a bang up Photoshop mock-up of what my final product should roughly be. He's also got a 4.5in lift with 32s so I painted the truck my color, added the topper, and the turbines. Had to modify the topper since he has a SWB and I have a LWB so it's kind of janky. Sort of get to see a resemblance to a final product. Although, I'm not sure if I should keep the stock blue, but it sure is growing on me. And, yes, I did 'forget' to put all the holes, rust, and white paint that I have currently into the photo