
500 MJ
-
Posts
3241 -
Joined
-
Last visited
-
Days Won
2
Content Type
Profiles
Forums
Gallery
Everything posted by 500 MJ
-
I haven't had issues with either...I've always respected the fact that these aren't heavy duty by any means though... Tow hooks let your strap fall off of the vehicle sometimes, that can't happen with a Clevis. I'll never use tow hooks on my vehicles.
-
I mean in terms of perhaps a truss or even some bracing on the C's or maybe some heavier buckets or brackets, i mean in gernal stiffing on the over all axle or just going to run it realtivly stock and fix from there? I'm hoping to run it relatively stock as far as bracing goes. Again, I'm not planning on getting into hairy situations that would need a truss or brace. The stock axle I have in the truck right now is working wonderfully for what I do and it is all stock. This one will essentially be an all new axle when finished with the locker and aftermarket shafts - that is the driving point behind it. If I were looking for something more structurally sound I would have most likely just bite the bullet and get something like this: http://www.currieenterprises.com/cestor ... px?id=1554 :rotfl2:
-
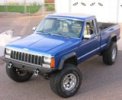
It looks like its in nice shape Rob... Now here is a good question, why don't you think your ZJ is worth $2,500? I know you've had some issues with it but from what I've seen of it she's solid rustwise and in nice shape...? :dunno: Also - from experience - I know you would want to keep this one in good shape and that means keeping it clean...I'll never own another black vehicle after I owned my black S-10. They are HARD to keep clean and every little dent and blemish shows up. BUT when they are clean and polished you don't find a better head turner... double edged sword. Final rule, completely fix your ZJ and sell it for $4000. Buy it, save up the extra cash to buy a winter beater XJ and store this bad boy away from the snow and salt next winter.
-
I bet I could too. ...but I am now 8 hours away from my Dad's shop where I make my magic happen and my full-time job is holding me here. I could probably get the brackets made here at my apartment with my basic tools - those won't be hard. Unfortunately the welding is the kicker though...you aren't the first person who wishes I had access to a welder where I'm at now and I'm sure you won't be the last.. I'd love to help you out if I could - I'd love to have a welder right now if I could. :wall: :wall: :wall: The other risk that is run by doing this is that the pipe length has varied for me quite a bit when I make these. You almost have to have the Jeep there to cut the pipe to the right length and then weld it between the brackets to guarantee everything will work. These are the reasons I posted this whole thread up. I'm probably not going to be able to help physically so I'll try to guide the rest of you guys the best I can.
-
Neither set cost me hardly anything to make. Basically the cost of materials and time. Materials ran me less than $30 each time but the pipes were always free (Dad works at a pipeline). You can go to a scrap steel yard and buy the strap steel stock for the brackets usually for scrap price...
-
Turning a parked beater into a decent daily driver . . .
500 MJ replied to AMC-MJ's topic in Member Projects: Your Comanches
:hmm: I sure hope you crushed every one of them, I'd hate to think of that junk being being put back on the road :hmm: Yah, my Dad and I got 'em for a reason - stripped 'em of all use-able parts then off to the crusher. We figured they were headed that way anyway, why not salvage what we could and then let 'em go... Kind of look at it as doing the Jeeping Community a service be keeping the good stuff to pass on to someone in need. -
These are the tow points that I have used now on every one of the XJs and MJs I've ever owned. The nice thing about them is that they are cheap to make and completely bolt on. They are easily accessible on the front of the vehicle. I've yanked many other Jeeps out with them and have been yanked out many times myself with them. Like most front tow points you can also make a tow bar to fit them for flat towing your XJ/MJ on the road. The only problems with them are that you have to cut slots in your front bumper to let them poke through and I drilled another hole in my frame to tie them in with three bolts on each side. Here they are on both of my MJs. The process starts with some strap steel, I've always used at least 3/16" thick but prefer to use 1/4". The pieces that you use have to be long enough to fit the stock holes for the bumper and also to protrude out of the front bumper enough that the hole for your tow hook clears the bumper - I use 11.5" long pieces. Here is the location of the holes that need to be drilled in the steel and other various "machining". I have this drawing available in .pdf format, if you would like a copy to print it, please PM me Once you have these brackets made you then weld the spanning pipe to the location marked for it. I put this pipe in to serve a few purposes: (1) I thought it would stiffen up my front end and provide another "bumper" under the stock one. (2) I thought it might help spread out the load from one bracket to both of them and also allow the brackets to be pulled from the side rather than always straight on. (3) I like to weld every chance I get. :rotfl2: On each set of these that I have made I have removed the front bumper at this step and then bolted the brackets on each side of the truck, measured the pipe, cut it and tack-welded it all together while it was still on the truck. Some of the lengths of the pipe have varied slightly, but 32 3/4" seems to be a good starting point to gather materials with. The tighter you cut the pipe to fit between the brackets the better off your end product will be. Here are a few OLD shots of this process when I made a set for my '88, forgot to take new shots for the last set I've made for my '90. On this older set I used 2 1/2" steel rather than 3"... No real reason, just what was available at the time... After you finish your welds you should have something like this: Now paint it and then bolt it up to the truck, I use a combination of new and old hardware for this (see pics). I sandwich the tow points between the bumper brackets and the frame. The top two bumper bracket bolt holes are used now and the third bottom one is still open. I fill this gap left by adding the brackets on with some washers and then snug the third bumper bracket bolt down and call it good. The third hole I made in the bracket is bolted up here as well. Drill a 1/2" hole in the frame steel and then use boxed end wrenches and needle nose pliers to thread the nut (and washers) onto the bolt inside the frame through the factory oblong holes in the front of the truck's frame. Don't tell me I'm crazy, IT CAN BE DONE! I always anit-seize this bolt good so I never have issues down the road. Passenger's side Driver's side Now you can measure on the back of your bumper and cut the slots in it. Measure, measure measure and then cut. I used a small drill to drill small holes in the bumper to see how close I was with my location where the tow points "should" be and after I tweaked things a bit I got it located and then cut my slots. Those little holes you made with the drill can be plugged easily with some body fiberglass or welded shut. This is what you are aiming to get with it. Once you have everything put back together you are done. Enjoy! A few more shots of the old set I made for reference:
-
...maybe. I don't plan on ever needing it to be stiffer though - aka I don't jump my Jeep :roll:
-
Turning a parked beater into a decent daily driver . . .
500 MJ replied to AMC-MJ's topic in Member Projects: Your Comanches
I've pulled 4-5 Jeeps out of the woods with those old things on them. Kinda figured they are not used on today's vehicles for a reason... Why not just go get a used set of radial tires? They are on Craigslist all the time for half the price of these things new... :dunno: -
How to find spot welds in rusted metal?
500 MJ replied to Rymanrph's topic in MJ Tech: Modification and Repairs
Magnetize it somehow and do something with some iron filings? 'bout all I got. -
So I've made a move. The truck is put away for the winter but that doesn't mean I'm not working on it...in some way. I've spoken in the past about future upgrades including OX lockers in the front and rear of the truck and I've finally gotten the first step toward this dream accomplished. I want to keep the truck as drive-able as I could during the process of getting the lockers installed so I decided to take a step back and buy another Dana 30 as my first step. This would allow me to build the axle I want, however long it takes me to do it in. The axle I got was from a '96 XJ so it did have the larger U-Joint shafts and there is no CAD on it. It was geared at 3.55 and came for the most part complete. It might look like it is pretty good shape but let me tell you guys it has led a rough life to this point. After getting it home I realized that there would be nothing I was going to save off of this thing except the housing and brake calipers... I took all of the steering linkage off before Christmas and gave it away to the scrap bin at the city recycling drop off. A few other parts went with it. Then it sat in the back of my truck until I went back home to Michigan for the Holidays. Once I got home my Dad and I ripped it down the rest of the way and found it to actually be in all-right shape once all of the grease and worn parts were gone. Ball joints were a bear to get out of the C's. No Ball Joint removal tool was going to touch them so we resorted to big hammers and heat, finally got 'em out. Took it into town to pressure wash it and with the help of some industrial toilet bowl cleaner it came out pretty nice. Part of the upgrades I want to do to this axle include the JCR Offroad 1-ton Over the Knuckle steering upgrade. To install this it is required to trim the front of the coil buckets and remove the stock sway bar links. I did just that and finished cleaning it up a bit more with the flap wheel and then primed the axle. Now that I've got a good base point I can build off of this one as time allows and have a completely rebuilt front end for the truck when I am done. Ball Joints were the first thing to go back on the axle because I figured I would need my Dad's help and his shop to put them back in. I put MOOG ones in and they went in really well. Like I said, this is going to take me some time to do, as I get money I'll be getting parts. Thats where I stopped for now. The axle is back in WI with me now laying on the floor of my warm apartment - another reason why it was crucial to clean this thing up! I'll keep you guys posted on what parts I'm getting and as they go back on the axle.
-
Lots of truth there!
-
:agree: :agree: :agree:
-
...so are both of Correy's :dunno:
-
:agree: I personally know someone who has gone through 10 of their cables. I wouldn't recommend the OX to anyone. I guess each to their own on this one. Is this guy's cable too short or did he just route it in the wrong place? I'm not planning on beating on my setup once I get it in. Sure I'll have fun with it but its going to be used for work just as much as it is for play. I need my truck to be around for me, I think thats the main reason I've never broken any parts on the trail. What most accomplish with the skinny pedal I can accomplish by thinking the obstacle through and idling over it in 4 Lo.... How did he brake the cables? OX makes a bolt that you can put in the cover to permanently lock the diff if you break a cable or you just decide to run without one...
-
You just need to nail down a welder to help you out and it will fly along Correy. You might be surprised at how easily it can be fixed. Before you get any work done on it you can start by getting your materials assembled and then you'll be ready to go. From what I remember seeing of it would think your best bet would be to get some Angle Iron that will cover over the rusted area. Make sure you get it to cover OVER the rust as the metal that seems to be "good" once you cut out all of the bad will still be thinner because of the damage. I think it will also be easier for you to lay steel on steel and weld it rather than do a butt weld with your thick angle and the thin truck steel. You CANNOT make a patch too big, you can always cut it down to fit. Adding on to a patch panel that is too small is not a good idea/practice. Once you have the length of angle steel you need you can cut reliefs into it with your sawzall so it will be able to be bent to follow the contours of the frame. Having all of this work done when you take it in to get it welded will greatly decrease the time the welder needs to spend playing around with your truck - giving you a better price out the door and a happier welder. 90% of welding work is prepping the surface to get welded - the other 10% is actually burning it in. So once you get the patch panel made up and get it to a welder, make sure that when they weld the truck up they support the frame of the truck directly under the patch by jacking the patch up into the frame and then welding it in. This will take all of the tension off of the bottom of the frame and transfer it to the top during the repair. This keeps the frame as close to "stock" as possible. Like I said, it will be a fairly quick job when it comes down to actually welding it. You shouldn't stress out about it cause it really isn't that bad. 8)
-
My Dad and I run with a little Lincoln Electric - I think its a 135 - its an older model, they don't offer it anymore??? Its a 110V and we love it. Really as long as you get yourself a 110V and its able to MIG, you should be good. Don't just limit yourself to flux-core, big waste of time and money if you ask me. MIG lets you do Aluminum, Stainless, and all kinds of other good stuff. Once you get a welder you can make your own cart!
-
rear disc brake conversion
500 MJ replied to misterroadman's topic in MJ Tech: Modification and Repairs
the stuff I got was off of a '98 ZJ dana 35. Thats all I got for ya on that one... -
:needpics:
-
I'm planning on putting OX lockers in my Dana 30 and Dana 44 in time... Cable operated, no air to mess with and doesn't need any electricity to lock or unlock. Simple mechanical activation, its either locked or unlocked, able to be engaged on the fly as well... http://www.ox-usa.com
-
rear disc brake conversion
500 MJ replied to misterroadman's topic in MJ Tech: Modification and Repairs
I've done the ZJ disc conversion on my '87 XJ D44. I used the same procedure as is outlined at http://www.madxj.com There is no direct link to the page but it is under the Technical side tab and then you need to scroll down to the Brakes headliner. The writeup on how to do it is the first one. Pretty simple to do. I had to weld some little home-made tabs on my e-brake cables to get them to work. As far as the axle seal spacers go I was able to make mine in our shop on the drill press with some hole saws and some 1/4" steel - took forever to cut them with the hole saws though... Here are some of the pics I've got of 'em: Here are the tabs I welded to the cables. Hope that helps. All years ('87-'89) XJ D44 were the same. -
...was that a car?
-
what is CRS? :dunno:
-
'88 Eliminator... Feb. 2009 - June 2026
500 MJ replied to neohic's topic in Member Projects: Your Comanches
I've got the same Grand Cherokee brakes on my XJ D44. They work great! You're gonna love 'em! -
I'm planning on doing a DIY thread on it once I get around to drawing the brackets I made on AutoCAD...