
500 MJ
-
Posts
3241 -
Joined
-
Last visited
-
Days Won
2
Content Type
Profiles
Forums
Gallery
Everything posted by 500 MJ
-
Rob, you haven't sold me on it yet either... I don't even want to tell 'ya what this guy thinks...
-
My 1989 Jeep Comanche Eliminator
500 MJ replied to Jeepman's topic in Member Projects: Your Comanches
What model rear axle is that? Never seen it before... -
They look cold. How's the XJ treating ya these days? Any plans on coming back up here for a weekend sometime?
-
My 1989 Jeep Comanche Eliminator
500 MJ replied to Jeepman's topic in Member Projects: Your Comanches
VERY NICE!!! -
I didn't know Correy made this until today. Nice job there buddy. :thumbsup:
-
Been a while since the last update. I'm still driving the truck around all of the time, within the last few weeks I've been on 4 - 8 hour road trips with it back and forth to Michigan. Still running fine. Before the snow hit I got a few more things done. I redid all of my front tie-rods. Also put some front tow points on the truck in case I end up in a ditch sometime this winter... Waiting for the springtime now, its too cold and snowy out there to do anything more. :(
-
mini beast Project: Stock To Beast!!!
500 MJ replied to MiNi Beast's topic in MJ Hardcore Tech: Epic Journeys to Greatness
You Bad Roger. :rotfl2: -
I did all of this work to my '90 4.0L 2wd MJ, the procedure is the same for all years of the MJ, 2wd or 4wd, any engine. First off get your parts. The parts I used are MOOG. Part numbers are as follows: Tie Rod End at Pitman Arm - MOOG ES2222L Tie Rod End at Draglink - MOOG ES2223R Tie Rod End at Driver's side Steering Knuckle - MOOG ES2221L Draglink - MOOG DS1046 Start by loosening the lug nuts and then lifting the vehicle. Support it correctly by using jackstands under vehicle's front axle. You are aiming to have enough space to work under the front of the vehicle so be sure to give yourself the space you need. I usually lift the truck up about 1' above it's ride height to allow myself to crawl around down there. Remove the tires. Now you should have something that looks like this: Remove all of the cotter pins from the castle nuts on your tie rod ends, steering stabilizer and drag link. This can be frustrating depending on how badly they are rusted. Give yourself plenty of time and patience. Also remove the nuts (and bolts) from the clamps on the tie rod and the clamps on the steering adjustment sleeve. Get a pipe wrench and loosen the tie rod by rotating it while it is still on the vehicle. This will allow you to remove the tie rod ends much easier once you remove the setup from the vehicle as you have already broken them free. Do the same for the steering adjustment sleeve with a BIG standard screwdriver. Prepare to remove the tie rod by loosening the castle nuts at the draglink and driver's side steering knuckle. Prepare to remove the drag link by loosening the castle nuts at the pitman arm and the passenger's side steering knuckle. Also loosen the castle nut at the steering stabilizer so it may be left on the vehicle (mine was good). I use a 3/4" 6 pt. boxed end wrench and a hammer to tap all of the nuts loose. Loosen all of the nuts completely and then re-thread them back on with a few turns. This will keep them intact during the removal process but allow you to remove them by hand once the tapered stud is broken free in the next step. Use a tie rod removal tool to break the seat of the tapered tie rod ends on the tie rod and draglink assemblies. The tool is inserted between the top of the dust boot and the surface that the tapered fitting is to be removed from. The tool is then struck (repeatedly) with a large hammer (I used a 3 lb. sledge) until the tapered stud releases from its seat. The tie rod can now be removed from the steering linkage assembly. The draglink can also be removed. This is what you should have removed from the vehicle. Remove the old tie rod ends from the draglink and driver's knuckle sides of the tie rod. Also remove the draglink and the pitman arm tie rod end from the steering adjustment sleeve. I found a bench vice to be useful for this step. I clamp the old rod end into the teeth of the vise and then turn the threads off with the pipe wrench. Now is where I took a break for the day and cleaned everything up with my wire wheel so I could paint the steering adjustment sleeve and tie rod before I installed the new parts in them. If you paint the parts or not is up to you. YOU SHOULD make sure that the threads in the steering adjustment sleeve and the tie rod are clean though. I use a household plumbing tool to do this. It is a wire brush for cleaning the inside of copper pipe prior to the sweating process and is usually available at your local hardware store. It looks like this. Assemble the new rod ends in the tie rod and steering adjustment sleeve. Make sure you put the new rod ends in the tie rod and steering adjustment sleeve with the same amount of turns to keep the rod ends threaded evenly in on both sides. When assembling these new rod ends make sure you use generous amounts of white lithium grease to lubricate the threads and keep them from rusting in the future. Make sure you remember to re-install the tightening clamps, but leave the bolts out of them for the moment. Begin by placing the draglink assembly back on the passenger's side steering knuckle. Tighten the castle nut down to 80 ft lbs with a torque wrench and then tighten the nut farther to align the holes for the cotter pin to go back in. I also grease the fittings when I am working on them so its done and out of the way. Make sure some grease flows out of the rod end and you should be good. Do the same at the pitman arm side of the draglink assembly. Tighten to 80 ft. lbs, align the holes and grease it. Also reinstall the steering stabilizer now and tighten it to 80 ft. lbs as well. Install the tie rod now to the draglink, tighten to 80 ft. lbs, align the holes and grease it. Finally put the tie rod on the driver's side knuckle, tighten to 80 ft. lbs, align the holes and grease it. Reinstall all of the cotter pins on the castle nuts. Now you can reinstall the nuts and bolts to the clamps on the tie rod and steering adjustment sleeve, but do not tighten them just yet. Now comes the part that most fear, the alignment of the front end. Put the tires back on the truck (I torque my lug nuts to 100 ft. lbs.) and let the truck back down to the ground. Make sure you have the steering wheel unlocked during this step and that the wheels are pointed as straight as possible at all times. Find a common point on the front and back of the wheels (I use the rim) to measure between with a yardstick and dowel rod (or some other stick). What you are looking to measure is just about the same distance between this common point of the wheels on the front and back. Rotate the tie rod to adjust this distance, if you greased everything up good you should be able to do it by hand. It is a good practice to have the front of the wheels about 1/8" less in measurement than the rear of the wheels. You DO NOT want the fronts of the wheels to be wider than the rear of the wheels. Once you think you have it correct, tighten down the clamps on the tie rod and steering adjustment sleeve and take the truck for a spin around the block. Bring it back and re-check your measurement. If it still looks good then you are done with your alignment. Now move onto making your steering wheel straight again, this is done by adjusting the steering adjustment sleeve. Loosen the clamps and adjust this sleeve until your steering wheel is where you want it. Then tighten the clamps back down. Thats it, you're done! Enjoy your new steering!
-
mini beast Project: Stock To Beast!!!
500 MJ replied to MiNi Beast's topic in MJ Hardcore Tech: Epic Journeys to Greatness
I still can't believe you are using pink paint... ;) -
Well, what did you come up with Rob?
-
Propane. Back home we have a 1000 gal. propane tank that my Dad has purchased outright (its not rented from the LP company, he owns it so he says what happens with it and when/if it gets filled). We primarily heat our house and shop with a wood boiler and a wood stove, however we have both hooked up to run on propane heat when its needed (boiler in the house and wall heater in the shop). Some winters last longer than others and we run out of wood. Flip the switch over to propane and it fires right up. The main reason I vote propane is that you COULD expand your system with it easier than your kerosene. If you wanted to go get yourself a 500 gal. tank and park it outside (depending on your codes...?) you could set yourself up with a ? 2,3 ? year supply of heat by paying one fill up bill. We buy our propane in the spring/summer (last time we filled the tank it was 1.19 / gal) and we are ready to go for the next year. Propane stores indefinitely. If you want another heater you could just tee your line and add the heater on the other side of the garage, still working off of the same tank. Its hard to store that much kerosene safely and I'm sure its harder to come by in mass quantities. Not all types of propane heaters are loud either...
-
Project "Eliminator"
500 MJ replied to 89eliminator's topic in MJ Hardcore Tech: Epic Journeys to Greatness
So why not get the JCR Offroad one and add onto it? Same basic starting point with the 5x2 tube? I'm a watchin... :popcorn: -
Comanche of the month, Jan 2010 --- MFPDM's 1988
500 MJ replied to Automan2164's topic in Comanche of the Month (MJOTM)
Agreed. One of the nicest on here! Congrats! -
Heater core clogged...bad
500 MJ replied to bermsurfer230's topic in MJ Tech: Modification and Repairs
Got it figured out with the low/no heat - I was a little too low on coolant to start with. Soon as I got it up to level it started kicking heat out again. Still puzzled though as to why the water valve doesn't close. I tried it on every setting I've got AND with the control interior lever shoved over to the cool side - apparently thats when it is supposed to close...no biggie I guess. I've got my heat back now. :clapping: -
89eliminator's 92 Eliminator
500 MJ replied to 89eliminator's topic in Member Projects: Your Comanches
What's the status on this thing? Ever get the interior/floors done? -
Heater core clogged...bad
500 MJ replied to bermsurfer230's topic in MJ Tech: Modification and Repairs
Well, I was able to get to the heater core and push some water through it and it seemed to flow just fine. I had a little bit of gunk come out from both sides and the water had a hint of brown tint to it but nothing that I would think that it was clogged up from... So I'm thinking now that the problem I am facing has something to do with the actuation of the heater control valve or it could be the valve itself... From what I can see it seems that the valve is actuated by vacuum? Are there any common spots to check this vacuum out at for leaking under the dash? Anyone else been here before? -
Heater core clogged...bad
500 MJ replied to bermsurfer230's topic in MJ Tech: Modification and Repairs
What pieces and parts of the dash did you have to remove to get to the heater core? I'm having the same issue you have with some very very weak heat. I'm going to try to see what I can do with diving into this problem today on the engine bay side, haven't had the chance to so far so I don't really know what I am in for... -
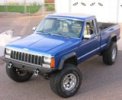
I doubt those flares are OEM...
-
Yes, I put my truck away in the winter cause its better than leaving it sit outside under the tree in front of my apt. and letting the plow push all the salty snow up against it and rusting it away. It comes out to play though, snow wheeling is my favorite type of wheeling. I'd prefer Saturday over Sunday if we get to choose which day...
-
Flowmaster 40 series on both Renix setups here. Won't run anything but them now.
-
if either of you guys go back to that yard and take the time to grab those Comanche AND Laredo emblems I WILL make it worth your time! I want another set of those for my '90.
-
I just noticed this and I think it qualifies as a "problem"... I'm wondering why we have a section of the MJ boards named "Forum probems or website ideas" ? :rotf:
-
C'mon now. We don't know the circumstances...he has full right to do what he wants to. It's his. Every once I awhile I look at my MJ and think what a nice chunk of change it would add to the down-payment of a house someday...then I smack myself in the head and come to my senses... :doh: I'm really interested to see what you get for it as well Darren. It will kind of give us a "going rate" for what some of the rest of us have... You've got a nice truck there, make sure you get your worth out of it, don't let it get undersold!
-
Nope, both tires for sale should have no issues that I/we are aware of. :thumbsup: The belt separation one is actually ON his F-150 right now, he wants to keep the third tire so he can swap that tire onto the truck and have no issues with the truck tires anymore. I'll get you a tread depths with the pics.
-
Rob, I didn't get the chance to get them down from the rafters today. We were busy pulling the ball joints out of our front axles and I just didn't get to them. I'll get you some pics tomorrow of them after I get them down. Also, a bit of a misunderstanding on my part. Dad said he has three but he only wants to sell two of them. Again, my fault on this one. I'll get you the pics of them and we can figure out a price if you don't feel like $50 is fair anymore... I wouldn't even waste your time or much less sell you drag slicks, you should know that... when it comes to tires I try to be as fair as possible when I describe them. Too many people aren't descriptive enough when they sell tires in my opinion. :???: