

AZJeff
-
Posts
1312 -
Joined
-
Last visited
-
Days Won
1
Content Type
Profiles
Forums
Gallery
Everything posted by AZJeff
-
Just a tidbit of nomenclature: what is being referred to as the “splitter“ by many of the posts in this discussion is properly called the “equalizer” in parking brake assemblies.
-
I went through this issue as well, as a previous owner had done a half-a##ed job of repairing cracks caused by some super-swamper tires that were on the machine when I got it.. You should be aware that the MJ/XJ steering box attachment is designed to "just barely" work with stock tires and stock ride height. Changing any of that will stress the frame where the steering box mounts to the point where cracking is a potential. The chances will increase if you do things like rock crawling. Part of the reason the "frame" cracks around the steering box is because the OEM GM/Saginaw box is only mounted with three bolts. Most recirculating ball boxes use four bolts, and that spreads the load on the frame against four points rather than three, lessening the load on each mounting bolt. Four-bolt Saginaw boxes CAN be installed, but it's a lenthy project, and unless you are doing serious off-roading with big tires, it's easier to just bolster the mounting of the three-bolt OEM box. The best thing to do is the following things to resolve your issue, even if you don't plan on doing any of the things I described above that can increase the risk of cracking: 1. ditch the OEM steering box spacer bracket that is made of cast aluminum, and install a steel steering box spacer. There are tons of suppliers for this part, and it helps to distribute the forces on the "frame" over a larger area. 2. increase the thickness of the outside (wheel side) surface of the frame. Some guys weld-in a reinforcing plate, but a good bolt-in plate will do the job if it's thick enough. I extended by RockHard bumper mounting flanges rearward to cover all three bolts for my box. The bumper flange was about 3/16" thick, so adding that layer over the relatively thin "frame" rail wall (that is probably only 1/16 or 3/32 thick) will considerably bolster that outer wall. 3. Use hardened washers under longer grade 8 bolts to attach the steering box. It will spread the clamping force out better on whatever you do to reinforce the outside wall of the "frame" There are two types of cracks that can occur in the MJ/XJ steering box area of the frame: 1. those that radiate out some distance from the mounting bolt holes. These can probably be addressed effectively by the steps I outlined above. 2. If the frame cracks are in the top or bottom surfaces of the "frame" rail, the cracks should be welded, and doubler plates should be welded over the repaired crack. Such cracks will NOT stop when the steering box mounting is repaired, and will continue to get worse. These types of cracks MUST be repaired via welding, as any of the three steps I described above won't really do much, if anything to stop the crack once it has started.
-
While we are on this topic, tell me about the Transgo shift kit.
-
Five minutes after I made my post, I saw Eagle’s chart. I drive about 85% in town, and the rest on mountain grades at highway speeds. 4:56 seems a bit overkill for occasional use, but convince me I am wrong.
-
BACGROUND: My MJ is equipped with an engine & control system from a 2000 XJ, and is thus OBD2. It also has a D44 in the back and a low-pinion D30 up front, with 32” tires. The current axle ratios are 3.55:1 Out here in AZ, when I am driving in the mountains on the highway (65 mph), the trans keeps shifting down as soon as the slightest grade. I end up having to lock it out of overdrive to avoid this annoying “hunting” for the best gear. I am thinking a rehearing of the axles would help to solve this. The question is: what would be the best ratio to install? BTW, I am not looking to make a rock crawler here, so I am looking for the lowest numerical ration I can install that will get rid of the struggle to stay in high gear on the highway.
-
Yeah, this is often a terminology issue among posters on many automotive forums. For an engine to truly start, it's a two-step process: the starter must rotate the engine, and then the fuel and ignition systems must provide gas and spark at the right moments. When a person writes "my vehicle won't start", he may mean one of two things: 1. there is no cranking of the engine when the key is turned to the "start" position (I call this the "no-crank" condition.) 2. the engine "cranks" as the starter turns it, but the engine does not actual "catch" and begin to run (I call this the "no-start" condition.)
-
I think in general, unless you are just "fed up" with all fact that you have a vehicle you poured money into, but now had a dead engine, you would be best off doing a "back yard" rebuild. The 4.0 is amazingly tolerant of repair methods that would be rejected by newer/fancier engines. It is quite possible to polish the crank and throw in some undersized bearings (using Plastigage, of course) and wind up with a viable engine. It wouldn't be a job I would be proud to do, but it would create a functional engine.
-
-
Cruiser…any advantage to your favorite swap over the classic 95-96 XJ booster/MC?
-
I agree that that the rad. drain is in a HORRIBLE location. Most guys resort to removing the lower rad. hose where it connects to the radiator. I agree with this approach. It is what it is....
-
Dirt in remanufactured engine?
AZJeff replied to BizarroStormy's topic in MJ Tech: Modification and Repairs
I assume since the one photo shows the Chrysler pentagon logo that the block you are talking about is not new, but is "REMANUFACTURED" from an existing used engine. Otherwise, someone making a "new" replacement engine would not be able to use that logo, as it is copyrighted to Chrysler. If it IS actually a NEW engine block, one possible explanation is that what you see is part the permanent mold sand castings that are used for cores inside the water jacket during the casting process. Essential, the permanent mold is a mixture of sand and a resin binder that holds the shape while the molten cast ironl is poured around it. After the cast iron hardens, the permanent mold sand pieces are broken up and removed from the holes in the water jacket by ultrasonic vibration. The texture/color looks very much like what is in your photos. -
Steering Box Wizards Come In Here--UPDATE IN NEW POST
AZJeff replied to AZJeff's topic in MJ Tech: Modification and Repairs
Here is a follow up to my steering box issues, for those of you who are interested. The remanufactured box I installed in my MJ 30 months ago was defective. Unfortunately, the warranty from Rock Auto was for 24 months. I purchased a NEW box (ouch), and I installed that, along with designing and fabricating a steering box brace similar to, but slightly simpler than, the one offered by Ironman4x4Fab.com The end result is that the Jeep steers like a new vehicle. It's smooth and sensitive, and best of all, no creaking/groaning sounds! -
You need a wiring diagram for the 1987 model year. I have one for the 1988 model year, if it is applicable. Others on this forum can confirm if it would applicable to your needs.
-
Is there a reason you. MUST have AGM? I ask because down here in AZ, the AGM construction does nothing to extend the life of most batteries, which die due to excessive heat in this environment.
-
Anyone have tips on oil pan gasket removal?
AZJeff replied to fiatslug87's topic in MJ Tech: Modification and Repairs
Carbide gasket scraper this will solve your problem without lots of aggravation. -
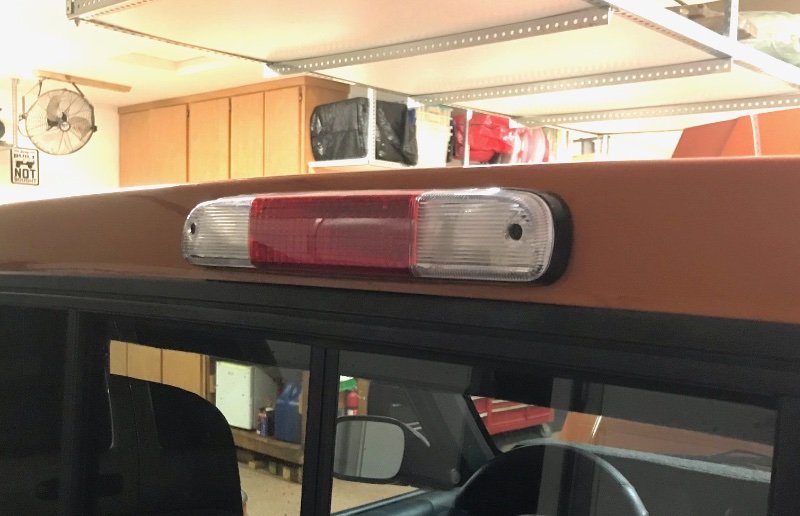
That is correct. I intercepted the line heading to the rear end of the vehicle, and made a splice there in the cab. Then I fished the line up inside the trim on the "B" pillar, and across through the headliner. I used insulated spade connectors to actually joing the light wiring to the new connection. The Ford light came with a wiring harness with three bulbs and a custom connector that attached to the normal Ranger wiring harness. I cut off that connector, and attached spade connectors. For a ground, I added a ring-tongue lug to the Ford ground wire, and attached that with a sheet metal screw inside the boxed in section at the top of the cab at the back. One last thing I did was to switch to LED lights in the sockets. I did that to lessen the chances I will ever have to take the light assembly back out.
-
Yes. The hole I cut is about 2 inches high, and about 9 inches across. However, with some masking tape and a sharpie pen to outline the cutout, it's easy to use a Dremel tool with a cutoff wheel to make the actual cut.
-
Are you talking about the one I posted the photo of on my MJ? That's the high mounted stop lamp/bed light for a 1998 Ford Ranger. You should be able to find those on Ebay or some other auto parts retailers on line.
-
Here is what it looks like, installed.
-
My MJ uses a high mounted stop light/cargo light assembly from a late model (1999 or thereabouts) Ford Ranger. You can buy Taiwanese copies that are decent from Amazon, and they include a closed-cell foam gasket. you will need to open up the hole in the cab to install these. I used a Dremel tool with a cut-off wheel. I then used Tinnerman-type “J-nuts” on the edge of the opening to allow the mounting screws to have a solid engagement, rather than just screwing into the cab sheet metal directly. The
-
The ball joint removal/installation tool you can borrow at AutoZone and it's competitors usually does not have the proper adapters for the XJ/MJ yoke and knuckle. HOWEVER...if you ask the store for what is loosely called the "4 wheel drive adapter kit", it will allow the "regular" ball joint tool to work on the XJ/MJ. In essence, you need the basic tool, PLUS this adapter kit to do the job correctly. I found this out when I borrowed the tool from my local O'reilly's.
-
Can I use a later XJ Heater Core
AZJeff replied to howeitsdone's topic in MJ Tech: Modification and Repairs
The heater core input/output pipes extend through the firewall just far enough so that heater hose can be slipped over them and clamped on. The foam rubber seal you see in the diagram is intended to keep water and air from the engine compartment from getting into the cab of the vehicle. It plays no part in the actual sealing of the coolant lines to the heater core. Since you are planning on replacing your core, there is a good chance that foam seal will be trashed with dry rot when you try to remove the core from the seal. If that happens, just get some other foam at a hardware store or fabric/sewing shop, and cut something to fit the space. Use contact cement to hold it to the heater box. -
Bueller?? (BUMP)
-
I don't have a stock MJ or XJ to measure, but I know plenty of the members here do. I need a measurement with someone with an MJ or XJ at factory STOCK ride height. What is the dimension between the centerline of bolt that hold the link to the axle bracket, and the flat surface on the sway bar where the link bushing are sandwiched?
-
Steering Box Wizards Come In Here--UPDATE IN NEW POST
AZJeff replied to AZJeff's topic in MJ Tech: Modification and Repairs
Thanks, I will investigate them.