
AZJeff
-
Posts
1295 -
Joined
-
Last visited
-
Days Won
1
Content Type
Profiles
Forums
Gallery
Everything posted by AZJeff
-
That is a VERY nice old engine compartment that looks pretty close to original production in appearance. You can wash all the grime off the engine with engine cleaner and some hot water. A pressure washer works better, but keep it away from anything fragile, like the underhood labels and the like. Once the engine compartment is free of the grime, the source of leaks will be MUCH easier to find. And added bonus is that fasteners that are not covered in oil soaked grit won't grind up your tools when you work on the vehicle.
-
OK, guys, I have decided to rebuild the engine in my MJ. As my sig line says, it's actually a 4.0 from a 2000XJ, so it's not a Renix system, obviously. I am debating doing a “stroker” when I do the rebuild, but I have some concerns/questions. The first (and most important question) is “will the stroker still meet the emissions standards of a standard (non-stroked) engine?” I am in a part of AZ that requires emissions testing, so I cannot create an engine that won't meet he EPA emissions standards for a 1989 vehicle. Secondly, I have read some stuff on various ways to create a stroker, and the more I read, the more confused I get as to all the possible ways to stroke the 4.0 Is there some website (or is someone here on CC) that can tell me how to create a relatively cost effective stroker? I really am not trying to all out in increasing torque/HP with my rebuild, but I figure if I am redoing the engine, maybe I should try to give it a bit of a bump while I have it apart. Your wisdom is appreciated.
-
If you are trying to actually RESTORE an MJ to the way it looked the day it left the factory, the OEM connectors are obviously needed. That said, the connectors AMC/Chrysler used in the MJ are not the best for an automotive application. In fact, they are pretty low-rent, as far as connectors go. And I say this as an engineer who used to spec. out connectors for adverse environments For a daily driver or resto-mod vehicle, there are lots of choices for multi-pin connectors that are FAR better than the OEM ones, and I would STRONGLY urge MJ owners to replace original troublesome connectors with something better.
-
You are doing it all wrong. You are supposed to KNOW to put the nut on first, but forget in your haste to cut the bolt, and then spend the next 10 minutes cleaning up the end of the cut threads with files.
-
Control Arm Calculations (Actual Geometry)
AZJeff replied to howeitsdone's topic in MJ Tech: Modification and Repairs
So you are doing this as an exercise in geometry. OK, I can buy that. I know life is quiet in Vernal, but have you run out of other projects for your MJ? How about stuff to fix around the house?😆😜 -
Lots of people get all wound up about using "correct grade" of bolts for applications that are VERY benign. When I say "benign", I means that oil pan bolts (and valve cover bolts) are examples of fasteners that are under VERY low stress, and, even more importantly, the joints they create do NOT require high clamping forces. An SAE grade 5 fastener is PLENTY strong enough to do the job. In addition, the torque requirements of oil pan bolts are such that, with practice (years of wrenching on vehicles), you can estimate the required torque without the need for fancy tools. (I have been working on cars for 50+ years, and a 4.0 oil pan, using the modern Fel-Pro silicone gasket, gets tightened to "wrist tight" with a 1/4" drive socket/ratchet.) If you are not practiced at judging torque needs on these types of fastener applications, I wouldn't say it's wrong to use a torque wrench to insure proper tightening. And using Loctite is totally unnecessary, if you tighten to appropriate torque spec.
-
Control Arm Calculations (Actual Geometry)
AZJeff replied to howeitsdone's topic in MJ Tech: Modification and Repairs
In any XJ/MJ front suspension, pinion angle takes precident over caster angle. ALWAYS. It is stated plainly in the shop manual,. That said, I have to ask: As I understand it, you want to do this theoretical calculation, and use that to set up your arms to match those calculated results. Your premise is that, by doing so, you remove any of the "trial and error" arm length adjustments, correct? Aside from the fact that adjusting arms is not as difficult as you are implying, there is another factor: Your vehicle is 30+ years old. I would not bet that the locator holes in the axle, nor the ones on the frame, and guaranteed to be at factory dimensions. Wallowing of holes, combined with possible bending of chassis and axle locating brackets might change the dimensions from the factory settings. Better yet, the fact that Jeep included lower control arm adjustments tells me that the dimensional consistency on the location of the control arm brackets, either on the axle end, or the chassis end, might not be very tight to begin with. In other words, doing all these theoretical calculations might still not prevent the use of trial and error control arm length adjustments. -
Issues with Clearwater Cylinder Heads
AZJeff replied to drcomanche's topic in MJ Tech: Modification and Repairs
The 0331 head is the reference for the design features of the head, and not necessarily the source for the raw casting and/or the casting process control used to create the head. The "TUPY" designation on the later 0331 heads is probably some sort of foundry ID code. When I replaced my cracked OEM 0331 head with a brand new one from Clearwater, I couldn't discern any physical difference between the old head and the new one, other than the new head supposedly was "improved" to prevent the cracking potential. Then again, I wasn't using a 3D scanner to map the profile of ever casting feature, particularly around the rocker bosses, which are the weak point on the early 0331 head. In a nutshell, I believe the TUPY head to be a 0331 design, with some sort of changes that are not visually obvious that reduce cracking potential. -
Issues with Clearwater Cylinder Heads
AZJeff replied to drcomanche's topic in MJ Tech: Modification and Repairs
The following link explains the differences in the various 4.0 heads 4.0 head differences I found this link on NAXJA -
Issues with Clearwater Cylinder Heads
AZJeff replied to drcomanche's topic in MJ Tech: Modification and Repairs
Having small amounts of foreign material still present on a reworked head would not be totally unexpected. However, gasket material still being present would NOT be acceptable. The only time Ihad an issue was they sent me the WRONG head. (A big block Chevy head won’t bolt up on to a 4.0 block, odd enough🥴). They fixed that right away, all on their nickel. Can you remove the gasket material yourself? -
Transmission crossmember studs
AZJeff replied to DirtyComanche's topic in MJ Tech: Modification and Repairs
The weld nuts in my frame were mostly trashed, so I opted to drill/tap to 7/16 UNC. It worked out fine, but a word of caution: those weld nuts in the frame are HARD. It took me an average of 10 minutes per hole to drill and tap with cutting oil. -
I know of one that is driven daily by a guy who works at the ZF automotive airbag factory a few miles north of my house. Since its AZ, the condition looks good, at least from a distance, and the white paint probably hides the sins of paint fade. Otherwise, I will see a couple per month while driving around.
-
Transmission crossmember studs
AZJeff replied to DirtyComanche's topic in MJ Tech: Modification and Repairs
That rating should be plenty adequate for those fasteners intended job. -
They were listed on eBay. Key Parts has a “store” on eBay.
-
"Gogmorgo" is correct. The 97+ engine control system has the returnees fuel system. Also, the wiring harness/ECU for those engines also is connected to the instrument cluster. This means that, to get everything to work as expected, one has to 1. change the wiring harness to match the engine 2. change the instrument cluster/dashboard to match the wiring harness 3. change the fuel gauge to match the instrument cluster 4. change the fuel tank to match the fuel guage When all of those are done together, you essentially have the instruments and engine controls of a 97+ XJ in your Comanche. (It's what I have.)
-
Fixing Connector Problems -- A Suggestion
AZJeff replied to AZJeff's topic in MJ Tech: Modification and Repairs
On the subject of electrical tape: that vinyl stuff that is commonly found at hardware stores and auto parts stores is HORRIBLE for taping up wire looms. The tape never stays wrapped at the end, and if the tape is used in a hot area (engine compartment), it gets all gooey, and is a mess to unwrap. I found some stuff on Amazon made by Tesa in Germany that seems to be a cloth/vinyl matrix, and it stays put once wrapped, and does not get gooey if placed in hot areas. And it’s really not expensive, either. -
I assume you meant "ATF +4" in your statement above. That will work just fine in your transfer case, but DO NOT use it in your transmission if it is an AW-4 automatic. For those, use what Cruiser recommended above.
-
For what appears to be an unrestored vehicle, the photos you posted show a VERY clean MJ. 👍
-
New coils? Coil Spacers? Helper springs?
AZJeff replied to Eriko5000's topic in MJ Tech: Modification and Repairs
That is a VERY good idea. In all my years of doing various front end work on XJ's and Mj's, I will tell you that a second set of hands makes the job MORE than twice as easy. Just keep the beer to a minimum until the job is done. -
I have had several XJ's and now an MJ here in PHX. I have run open cooling systems on all of them. I would guess I probably have the MOST severe cooling requirements of anyone on CC. I have found the CSF radiators with the OEM cooling fan clutch and electric fan to do the job just fine. (Along with the appropriate radiator cap.)
-
New coils? Coil Spacers? Helper springs?
AZJeff replied to Eriko5000's topic in MJ Tech: Modification and Repairs
You won’t hurt the axle, as long as you apply pressure on the tube. However….your life will be MUCH EASIER I’d you support the whole front of the vehicle on jackstands before you start trying to drop one side of the front axle. Trust me, I have done this numerous times, and the differing ease of changing springs is amazing! -
New coils? Coil Spacers? Helper springs?
AZJeff replied to Eriko5000's topic in MJ Tech: Modification and Repairs
I am pretty sure that an MJ, when brand new, had a slight rake towards the front. It was pretty common on trucks in that era. that said, since I don’t haul a lot of heavy stuff in my MJ, I prefer a level ride height, with no rake. To achieve that, I bought new springs, which were heavy duty (“Up-Country” for an XJ), and once they were installed, I discovered they actually raised the front end TOOmuch. I measured how overly tall the front end was (with the help of a 4 foot carpenters level on the bed rail) from my desired height. Then I removed the springs and cut off enough of the top coil with a cut-off wheel, and reinstalled the. Voila….I had the ride height/rake I desired, with new springs! -
that frame channel is impressively clean👍 it almost looks like a virgin factory assembly before the floor pan was attached. How did you clean it, out of curiosity?
-
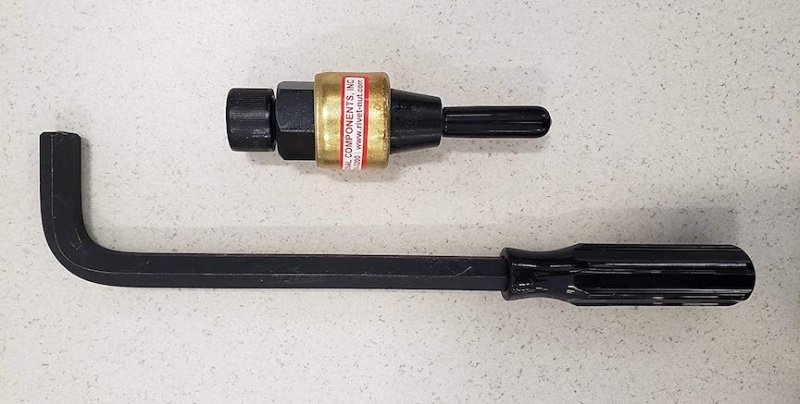
I think you must have missed the part where I said that the holes in the frame where the original nuts are welded in are probably AT LEAST 11mm in diameter. That means he will need to install a rivnut bigger than 11mm if he wants to reuse the existing holes. (He pretty much HAS to reuse the existing holes if he wants the crossmember to be in the correct spot.) Rivnuts larger than 11mm come as M12x1.75, or 1/2-13, and there are no lever-type hand tools that will work with sizes that big. There are "jackscrew" type tools that will do those larger sizes (as well as hydraulic tools), but they are a bit harder to find from retail outlets. A picture of one is attached.
-
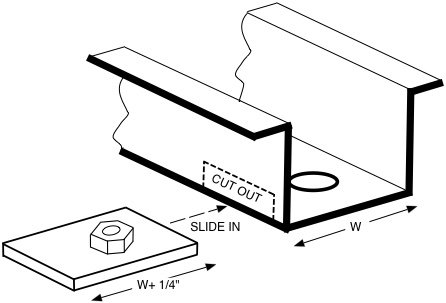
That is the tool I have as well. The biggest size you can pull with those is 5/16-18 thread. The size of the OEM bolts/studs that retain the crossmember are (IIRC) M10, which the closes equivalent in SAE would be 3/8" diameter. The nutplates Jeep welded into the frame would have had a slight clearance hole around the threaded part, probably about 11mm. I don't see how you are going to clinch a rivnut of the larger than 11mm using that hand tool. The BEST SOLUTION, of course, would be replace the now-broken nutplates with new nuts/washers in the frame rail. Option #1: take up the carpet, cut clearance holes into the floorpan over the frame rail, and use self-locking nuts/washers. Then cover the clearance holes with sheet metal, seam sealer, and screws or "pop" rivets. Option #2: Cut a small clearance window in the SIDE of the frame rail, right where it turns to go horizontal, adjacent to where the stripped nut plate is located. Then create a new nut plate by taking a 3/8" nut, and weld it to a piece of 3/16" thick steel plate. It is important that the plate you create STICKS OUT slightly on the outside of the frame, so you can hold it with some pliers when threading in the new bolt. That is why dimension "W" is increased to "W" plus 1/4" in the sketch attached. Once these are installed, some seam sealer can partially close up the opening created. The attached sketch will show you what I am suggesting.