

AZJeff
-
Posts
1312 -
Joined
-
Last visited
-
Days Won
1
Content Type
Profiles
Forums
Gallery
Everything posted by AZJeff
-
Issues with Clearwater Cylinder Heads
AZJeff replied to drcomanche's topic in MJ Tech: Modification and Repairs
The following link explains the differences in the various 4.0 heads 4.0 head differences I found this link on NAXJA -
Issues with Clearwater Cylinder Heads
AZJeff replied to drcomanche's topic in MJ Tech: Modification and Repairs
Having small amounts of foreign material still present on a reworked head would not be totally unexpected. However, gasket material still being present would NOT be acceptable. The only time Ihad an issue was they sent me the WRONG head. (A big block Chevy head won’t bolt up on to a 4.0 block, odd enough🥴). They fixed that right away, all on their nickel. Can you remove the gasket material yourself? -
Transmission crossmember studs
AZJeff replied to DirtyComanche's topic in MJ Tech: Modification and Repairs
The weld nuts in my frame were mostly trashed, so I opted to drill/tap to 7/16 UNC. It worked out fine, but a word of caution: those weld nuts in the frame are HARD. It took me an average of 10 minutes per hole to drill and tap with cutting oil. -
I know of one that is driven daily by a guy who works at the ZF automotive airbag factory a few miles north of my house. Since its AZ, the condition looks good, at least from a distance, and the white paint probably hides the sins of paint fade. Otherwise, I will see a couple per month while driving around.
-
Transmission crossmember studs
AZJeff replied to DirtyComanche's topic in MJ Tech: Modification and Repairs
That rating should be plenty adequate for those fasteners intended job. -
They were listed on eBay. Key Parts has a “store” on eBay.
-
"Gogmorgo" is correct. The 97+ engine control system has the returnees fuel system. Also, the wiring harness/ECU for those engines also is connected to the instrument cluster. This means that, to get everything to work as expected, one has to 1. change the wiring harness to match the engine 2. change the instrument cluster/dashboard to match the wiring harness 3. change the fuel gauge to match the instrument cluster 4. change the fuel tank to match the fuel guage When all of those are done together, you essentially have the instruments and engine controls of a 97+ XJ in your Comanche. (It's what I have.)
-
Fixing Connector Problems -- A Suggestion
AZJeff replied to AZJeff's topic in MJ Tech: Modification and Repairs
On the subject of electrical tape: that vinyl stuff that is commonly found at hardware stores and auto parts stores is HORRIBLE for taping up wire looms. The tape never stays wrapped at the end, and if the tape is used in a hot area (engine compartment), it gets all gooey, and is a mess to unwrap. I found some stuff on Amazon made by Tesa in Germany that seems to be a cloth/vinyl matrix, and it stays put once wrapped, and does not get gooey if placed in hot areas. And it’s really not expensive, either. -
I assume you meant "ATF +4" in your statement above. That will work just fine in your transfer case, but DO NOT use it in your transmission if it is an AW-4 automatic. For those, use what Cruiser recommended above.
-
For what appears to be an unrestored vehicle, the photos you posted show a VERY clean MJ. 👍
-
New coils? Coil Spacers? Helper springs?
AZJeff replied to Eriko5000's topic in MJ Tech: Modification and Repairs
That is a VERY good idea. In all my years of doing various front end work on XJ's and Mj's, I will tell you that a second set of hands makes the job MORE than twice as easy. Just keep the beer to a minimum until the job is done. -
I have had several XJ's and now an MJ here in PHX. I have run open cooling systems on all of them. I would guess I probably have the MOST severe cooling requirements of anyone on CC. I have found the CSF radiators with the OEM cooling fan clutch and electric fan to do the job just fine. (Along with the appropriate radiator cap.)
-
New coils? Coil Spacers? Helper springs?
AZJeff replied to Eriko5000's topic in MJ Tech: Modification and Repairs
You won’t hurt the axle, as long as you apply pressure on the tube. However….your life will be MUCH EASIER I’d you support the whole front of the vehicle on jackstands before you start trying to drop one side of the front axle. Trust me, I have done this numerous times, and the differing ease of changing springs is amazing! -
New coils? Coil Spacers? Helper springs?
AZJeff replied to Eriko5000's topic in MJ Tech: Modification and Repairs
I am pretty sure that an MJ, when brand new, had a slight rake towards the front. It was pretty common on trucks in that era. that said, since I don’t haul a lot of heavy stuff in my MJ, I prefer a level ride height, with no rake. To achieve that, I bought new springs, which were heavy duty (“Up-Country” for an XJ), and once they were installed, I discovered they actually raised the front end TOOmuch. I measured how overly tall the front end was (with the help of a 4 foot carpenters level on the bed rail) from my desired height. Then I removed the springs and cut off enough of the top coil with a cut-off wheel, and reinstalled the. Voila….I had the ride height/rake I desired, with new springs! -
that frame channel is impressively clean👍 it almost looks like a virgin factory assembly before the floor pan was attached. How did you clean it, out of curiosity?
-
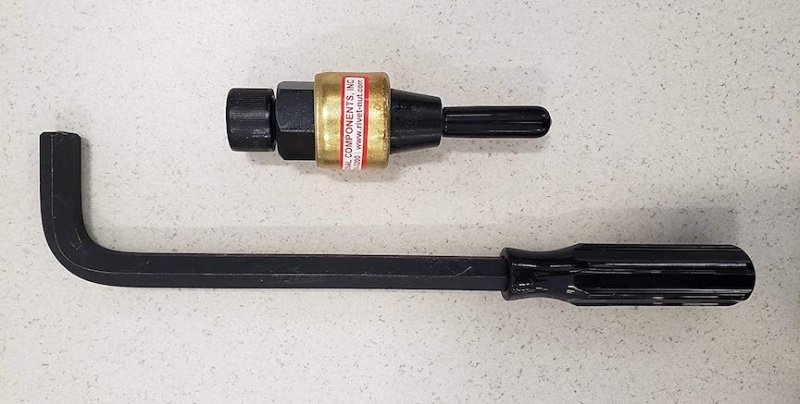
I think you must have missed the part where I said that the holes in the frame where the original nuts are welded in are probably AT LEAST 11mm in diameter. That means he will need to install a rivnut bigger than 11mm if he wants to reuse the existing holes. (He pretty much HAS to reuse the existing holes if he wants the crossmember to be in the correct spot.) Rivnuts larger than 11mm come as M12x1.75, or 1/2-13, and there are no lever-type hand tools that will work with sizes that big. There are "jackscrew" type tools that will do those larger sizes (as well as hydraulic tools), but they are a bit harder to find from retail outlets. A picture of one is attached.
-
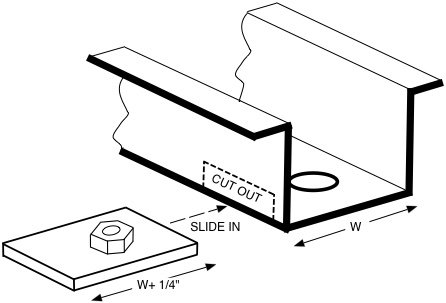
That is the tool I have as well. The biggest size you can pull with those is 5/16-18 thread. The size of the OEM bolts/studs that retain the crossmember are (IIRC) M10, which the closes equivalent in SAE would be 3/8" diameter. The nutplates Jeep welded into the frame would have had a slight clearance hole around the threaded part, probably about 11mm. I don't see how you are going to clinch a rivnut of the larger than 11mm using that hand tool. The BEST SOLUTION, of course, would be replace the now-broken nutplates with new nuts/washers in the frame rail. Option #1: take up the carpet, cut clearance holes into the floorpan over the frame rail, and use self-locking nuts/washers. Then cover the clearance holes with sheet metal, seam sealer, and screws or "pop" rivets. Option #2: Cut a small clearance window in the SIDE of the frame rail, right where it turns to go horizontal, adjacent to where the stripped nut plate is located. Then create a new nut plate by taking a 3/8" nut, and weld it to a piece of 3/16" thick steel plate. It is important that the plate you create STICKS OUT slightly on the outside of the frame, so you can hold it with some pliers when threading in the new bolt. That is why dimension "W" is increased to "W" plus 1/4" in the sketch attached. Once these are installed, some seam sealer can partially close up the opening created. The attached sketch will show you what I am suggesting.
-
The rivnuts needed to attach the M10 OEM bolts are gonna be pretty big, and to get a solid clinch of the nut into the frame, you are going to need a LOT of force on the pulling mandrel. I don’t thing the mechanical tool I have would clinch a rivnut that big properly. Do you have access to a hydraulic clinching tool, because that would do the job MUCH better on a rivnut that big.
-
Need to replace cooling system
AZJeff replied to Smokeyyank's topic in MJ Tech: Modification and Repairs
I bought a CSF from Rock Auto about 3 years ago, and found the workmanship (and thus performance) to be totally accceptable. I know that other guys have reported otherwise, but that has been my experience with both my current MJ and my previous XJ. I am a big fan of the open cooling system because they are "self-burping" and thus the issue of air trapped in the cooling system seems to be non-existent. -
Any manual transmission RWD car/truck/Jeep can be flat towed. Just be sure to put the transmission in neutral, and keep the parking brake off.
-
Brake light on after dual diaphragm install
AZJeff replied to Geek's topic in MJ Tech: Modification and Repairs
There is another way to reset the switch, but it depends on how easily the small spool valve in the distribution block will move. Some can be VERY difficult to get them to slide. Here is what you do: Unscrew the plastic switch body from the distribution block and look down into the hole in the block with a flashlight. You will see the spool valve in the bottom of the hole. This is what the plunger on the switch is in contact with. CAREFULLY using a small pick, you can usually push the spool valve back to it's center position. (The center position is where the diameter of the spool valve is smaller than the rest.) Once the spool in centered, the switch can be reinstallated, and should remain off. -
More than anything else, this is dependent on the quality of the raw acrylic resin used in molding the replacement lenses. Keeping them out of the sunlight when practical will help. (You should see what AZ sun does to plastics out here, even those that are “UV stabilized”). The best thing to extend their life is probably limiting sunlight exposure, and that applies to ANY taillights, not just ones on an MJ.
-
Fixing Connector Problems -- A Suggestion
AZJeff replied to AZJeff's topic in MJ Tech: Modification and Repairs
Wanna know another way to clean up oxidized copper wires? Cleaners like "CLR" or other similar mild acids will eat away the oxidation. Of course, one needs to make sure that the cleaner is flushed away with water so the stuff doesn't continue to eat the copper wires. -
Fixing Connector Problems -- A Suggestion
AZJeff replied to AZJeff's topic in MJ Tech: Modification and Repairs
I understand the comment about corroded wire being difficult to solder. I have a work around I have used for years: crimp on solderable butt splices. Once the wires are stripped, then a crimped sleeve is used to attach the two pieces, and then the whole assembly is soldered. Finish up with heat shrink, and the joint is as good as new. -
The 4.0 engine in the MJ and XJ has what I call a "intolerant" cooling system. When all the parts of the system are in "as new" condition, the system can keep the vehicle temperature within design limits just barely. Because of this, the vehicle cannot tolerate any serious degradation of ANY part of the overall system. If any parts of the system starts to degrade (pressure tank, water pump, thermostat, cooling fans, or radiator), now the system can no long do the job, and it starts overheating. Start with the pressure tank and its' cap. If that isn't holding pressure, it needs to be fixed so it does. I am thinking that, since you report you are overheating at road speeds, your cooling fans are not the culprit, because enough air enters the radiator without the fans under those conditions. Then look at the radiator itself. Is the coolant nice and clean, or does it look grungy? Grungy coolant tends to imply poor cooling system maintenance, and that leads to clogged radiators. I am thinking this is where your issue is, but I hate firing the parts cannon without further examination.