


cruiser54
-
Posts
9413 -
Joined
-
Last visited
-
Days Won
14
Content Type
Profiles
Forums
Gallery
Everything posted by cruiser54
-
7.5 trans fuse is for reverse lights, even if equipped with a manual. Also for Power/Comfort switch on the autos.
-
Is there power at the TCM? How solid is its ground checked with a meter?
-
CRUISER'S MOSTLY RENIX TIPS TRANSMISSION CONNECTOR REFRESHING OCTOBER 30, 2015 SALAD 19 COMMENTS Over near the transmission dipstick tube are 2 rather large connectors. One is black and goes to the NSS and the gray connector goes to the transmission itself . These 2 connectors carry all the info between TPS, TCU, NSS, speed sensor, and transmission solenoids. Unplug each one, visually inspect for corrosion or bent pins, spray them out with electrical contact cleaner and plug them back in. Additionally, if your Jeep is an ’87 to ’90 Renix, it’s always a good idea to reach up under the glovebox area and unplug the connector to the TCU and spray it out along with the receptacle of the TCU. While you’re there, find the fuse right in that area for the TCU. Remove it and spray out it’s receptacle and clean any corrosion from the fuse.
-
Yes
-

Disconnected wire on knock sensor.
cruiser54 replied to Fryedaddy's topic in MJ Tech: Modification and Repairs
And be aware of the routing.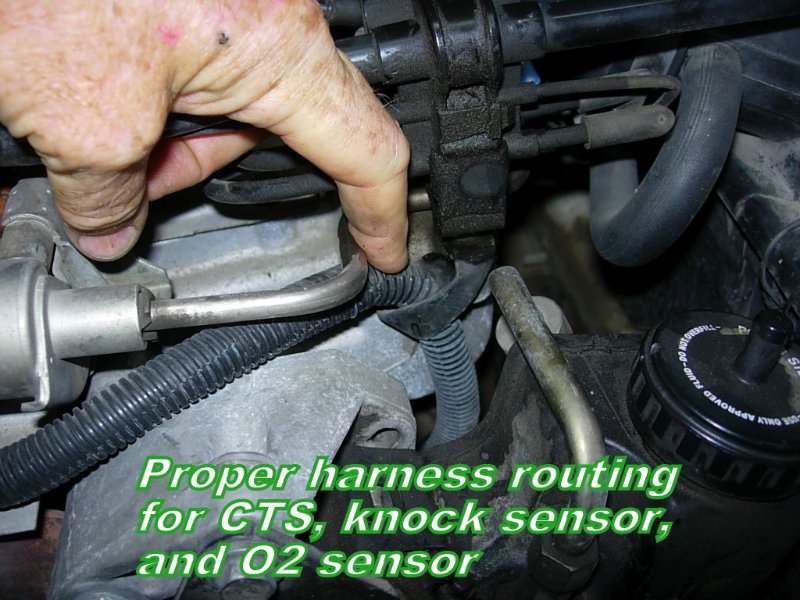
-
87' Comanche Throttle Sticking
cruiser54 replied to Rivabanks's topic in MJ Tech: Modification and Repairs
Accelerator cable. You MIGHT be able to get a new end in the HELP section of your local parts store. -
87' Comanche Throttle Sticking
cruiser54 replied to Rivabanks's topic in MJ Tech: Modification and Repairs
No pic. -
What's the root cause? Deficiency in diet? Could a supplement help? https://goutpatients.com/what-causes-gout/
-
Have you completed Tips 1 through 5 at www.cruiser54.com? Copper plugs are fine. How old are the plug wires, cap, and rotor? Should be replaced every 30,000 miles like the plugs.
-
Remember those days well....
-
Geez, the ZJ is not a whole lot different than stock!!!!! If a guy didn't know there was a ZJ box in an MJ, likely wouldn't tell the difference......
-
The stator can be unplugged and it will still run.
-
Sorta. But the timing and fuel injector pulse widths are determined much more via input from MAP, TPS and oxygen sensor.
-
which Wilwood prop valve should I use?
cruiser54 replied to ctxj93's topic in MJ Tech: Modification and Repairs
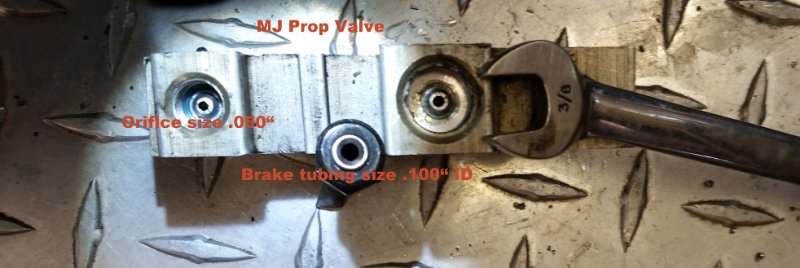
Dual diaphragm booster with whatever master is on it. I prefer 99 to 2004 WJ. Ditch the distro valve. Put a union between the front brake lines. Use one line to the rear discs you're using, install a Wilwood prop valve, and eliminate all that monkey motion crap from the factory at the rear. And YES, braided lines make a noticeable difference. I have them on every car I own. Even the clutch slave lines..... -
which Wilwood prop valve should I use?
cruiser54 replied to ctxj93's topic in MJ Tech: Modification and Repairs
-
which Wilwood prop valve should I use?
cruiser54 replied to ctxj93's topic in MJ Tech: Modification and Repairs
This is why you discard the distro block. Done it both ways. Keeping the distro block and eliminating it. Way better overall braking without it. See the XJ valve has .100" passages. The MJ distro has .050" passages.
-
Are you using the 242 shifter indicator on the floor? That's modern stuff right there. That's all you need. Believe it or not, back in the olden days our 4 wheelers had 2 sticks for 4wd. Both had the lettering worn off the knobs. There was a crappy dash plaque to illustrate how to move the levers. Somehow we got by.
-
Dielectric Grease or Bad Fuse Box
cruiser54 replied to CognizantPotato's topic in MJ Tech: Modification and Repairs
Spray it out with Brake Kleen. Put a teeny twist on the male spades and put it back together. -
anyone make a relay pack for the hvac/blower yet?
cruiser54 replied to Pete M's topic in MJ Tech: Modification and Repairs
A relay set-up would be great. I believe the draw of the blower motor and a few other power suckers are likely culprits in toasting the heater control connector along with the brown wire at the ignition switch. I think Renix are worse simply because their ground circuit for the blower motor is long and under sized. Simple fix. And the fact that the blower speed increases as a result of the fix in my Tips kinda supports this. Click the link below for a more thorough explanation of the circuitry and a super simple fix. http://cruiser54.com/?p=211 This is one of those fixes to do "just cuz" fixes. Get ahead of the curve!!!! -
Uh, no. The ECU does that stuff based on input from sensors. CPS only tells the ECU what speed the engine is spinning. Just a speed sensor.
-
Mechanical Fan Shroud
cruiser54 replied to billyblankss's topic in MJ Tech: Modification and Repairs
Center bottom, wide enough to go past the fan clutch. -
That's Tip 5 for the most part. Good to verify it though.
-
Use only the flat 3 wire connector. Have you read my write-up on setting the tPS?
-
which Tips have you completed? Check fuel pressure with a gauge.
-
Mechanical Fan Shroud
cruiser54 replied to billyblankss's topic in MJ Tech: Modification and Repairs
I modify the shroud at the bottom with a cutoff wheel so it will come out easily.