


cruiser54
-
Posts
9413 -
Joined
-
Last visited
-
Days Won
14
Content Type
Profiles
Forums
Gallery
Everything posted by cruiser54
-
70 and 100 at the bottom of the grade? That truck even have a thermostat in it?
-

1987 AMC COMANCHE what is bestbswap?
cruiser54 replied to Mc754sofla's topic in MJ Tech: Modification and Repairs
CRUISER'S MOSTLY RENIX TIPS REAR MAIN SEAL DIAGNOSIS OCTOBER 31, 2015 SALAD 3 COMMENTS I’d be looking up ABOVE first, and VERIFYING the source of the oil leak YOURSELF. Everybody, who doesn’t own or have to pay for or perform your vehicle repairs, loves to poke their noggin UNDER the Jeep and come out bearing the false bad news that your RMS is leaking. Many mechanics, friends, and good old Uncle Bob seem to enjoy telling you it’s the rear main seal. Has a catastrophic ring to it, doesn’t it? A simple leak at the back of the valve cover or other source could produce the same symptoms. You don’t need to be a mechanic to figure this out. If you have good eyesight and a dim flashlight, you’re good to go on your own. Don’t jump on the RMS/oil pan gasket bandwagon right off the bat. Almost any oil leak on your 4.0 is gonna drip from the RMS area for two simple reasons: First off, the engine sits nose-up and any oil will run back to the RMS area. Secondly, the RMS area is also the lowest point on the engine. Simple physics and the old plumber’s adage apply here: “Crap flows downhill”. Valve cover gasket, oil pressure sending unit, oil filter adapter seals and distributor gasket, in that order, have to be eliminated as possibilities first. A little tip here. Rather than use a dizzy gasket, use an o ring instead. NAPA #727-2024. Tips 12 and 13 will help you get your distributor back in place correctly. -
Or, DON'T bleed it. Try this. Pump the clutch pedal about 40 times. Walk away for 10 to 15 minutes or longer. See how it works. There's also a procedure to get the FUZZ off the the new clutch disc.
-
1987 AMC COMANCHE what is bestbswap?
cruiser54 replied to Mc754sofla's topic in MJ Tech: Modification and Repairs
I know I've only had one cup of coffee this morning, but this ^^^ post makes no sense to me........ -
Yep. Plenty of work to do.
-
Power Steering Pressure Switch?
cruiser54 replied to WahooSteeler's topic in MJ Tech: Modification and Repairs
On the 4 cylinders and the V6s. -
Leaking under passenger side dash after A/C fix
cruiser54 replied to bezjeep's topic in MJ Tech: Modification and Repairs
It doesn't detach. -
Leaking under passenger side dash after A/C fix
cruiser54 replied to bezjeep's topic in MJ Tech: Modification and Repairs
Or just pull it off and clean it. -
Leaking under passenger side dash after A/C fix
cruiser54 replied to bezjeep's topic in MJ Tech: Modification and Repairs
I knew it....LOL. Usually all a guy has to do is pinch the snake's mouth from each side and keep his face out of the way. All sorts of crap comes out. -
HO vs Renix
cruiser54 replied to Dickinson County Comanche's topic in MJ Tech: Modification and Repairs
Parts availability. IAT, but there actually is a replacement. Knock sensor. There are alternatives. What else can't you get? We never did a dyno test, but I have run HOs on Renix as described above. HO exhaust manifold, crush removed, bored throttle body. I have done Renix with throttle bored throttle body and crush removed. Can't tell the difference. I will say this. I was Service Manager and Shop Foreman at a Jeep dealer from 1980 through 1992. I had 13 Comanches as demos. I ordered them myself. Myself, and the techs were disappointed in the performance of the HO compared to Renix. We were driving each version, side by side every day. Crank time to start was the only perceivable difference. And, I ran them HARD. Each and every one of them. -
Renix was used on numerous vehicles in Europe before Jeep used the system.
-
Click the link below. Even has video!! PS...I've lost 35 pounds since the video was filmed......
-
HO vs Renix
cruiser54 replied to Dickinson County Comanche's topic in MJ Tech: Modification and Repairs
HO myth buster Renix in 90 made 182 HP. HO in 91 made 190 HP. That's 8 HP difference. HO only made more HP than Renix at higher RPMs and not a bit more torque. HO had a 58 mm throttle body versus a 52 mm throttle body on a Renix. That’s 20% more air available through the HO throttle body. The HO also had a better design header. See where I'm going with this? It’s only a 4% horsepower increase….. The whole 8HP was not mostly from the head, but from the bigger TB and better exhaust manifold. Put a 60mm TB from www.strokedjeep.com on your present manifold using the Renix head, eliminate the "crush" in your headpipe with proper re-routing, and go for it. HO stands for Highly Overrated. __________________ -
HO vs Renix
cruiser54 replied to Dickinson County Comanche's topic in MJ Tech: Modification and Repairs
You won't have to drill for the temp sender and the knock sensor hole is drilled and tapped already. Here's all you need to put an HO into a Renix. CRUISER'S MOSTLY RENIX TIPS HO INTO RENIX SWAP OCTOBER 31, 2015 SALAD 68 COMMENTS This swap is easier than some will lead you to believe. And generally Pooh-poohed by those who have never done it. Those of us who have done it, like myself, will share with you the things that need to be done for a successful swap. Just think of it as swapping in a long block. XJ Cherokee and ZJ Grand Cherokee 4.0L engine blocks interchange. 2000+ TJ Wrangler and WJ Grand Cherokee 4.0L engine blocks interchange. YJ and 1997-1999 4.0L TJ blocks will interchange in XJ/ZJ XJ/ZJ blocks, and the 2000+ TJ/WJ blocks do not interchange without significant modifications. TJ/WJ 4.0L Engine blocks underwent clean sheet design changes effective in the 1999 WJ Grand and 2000 TJ Wrangler. These blocks are not interchangeable with XJ/ZJ engine blocks. The reason is motor mount bolt holes and belt driven accessory mounting bolt holes are in different locations, or not present at all, TJ/WJ vs. XJ/ZJ. Now that we know which engines we can use, let’s get down to business. The HO and Renix have some differences but none that can’t be overcome very easily. One running change was that the rear of the head was no longer drilled and tapped for the temperature gauge sender beginning in the 96 model year. The sender can be relocated to the threaded hole in the thermostat housing taken from an HO engine. You’ll have to extend the wire to that location. Some brave souls even drill and tap the HO head at the rear for the sender. You will be using the intake and exhaust manifolds from your Renix, along with all your sensors and wiring. Since the intake ports of the HO are slightly different, you use a new Renix gasket. Exhaust ports are identical. An alternative on exhaust manifolds: As far as exhaust, you can use the Renix exhaust manifold and be fine. If you want to use the HO exhaust manifold, you must go with an HO headpipe and screw your O2 sensor into that headpipe. Standard Renix harness is plenty long to do so. A bung can be welded into the HO manifold to accept the EGR tube. You will need to use your Renix distributor as it is different than the HO design. See Tips #12 – Setting Your 4.0 to #1 TDC and #13 – Distributor Indexing to be sure you get the distributor installed correctly. The flywheel or flexplate from the Renix must be used so your CPS gets the correct signals. The valve cover from the Renix allows you to keep your CCV system intact and requires no modifications. The HO block will have a plug in the coolant galley on the driver’s side of the block, closest to the front, which needs to be removed so your Coolant Temp Sensor can be installed in it’s place just as it is on the Renix. It requires a 5/16” square drive or a modified 3/8” drive that has been ground down to fit. Do this before installing the engine. As for the knock sensor, which is located just above the oil pan on the driver’s side of the engine about mid way, all the blocks I’ve seen are threaded for it. If not, I’ve heard they may be drilled but not tapped. Tap the hole if that’s the case. XJ: “Regular” (not Grand) Cherokees ’84-’01 ZJ: Grand Cherokee ’93-’98 (Gen1) WJ: Grand Cherokee ’99-’04 (Gen2) YJ: Wrangler ’87-’95 (Gen1) TJ: Wrangler ’97-’06 (Gen2) -
1989 Comanche fuel pump relay buzzing...
cruiser54 replied to Andy in Pa's topic in MJ Tech: Modification and Repairs
I have big hands and have no trouble. -
Leaking under passenger side dash after A/C fix
cruiser54 replied to bezjeep's topic in MJ Tech: Modification and Repairs
Most of the time the tip of the hose facing down is stuck closed. -
Leaking under passenger side dash after A/C fix
cruiser54 replied to bezjeep's topic in MJ Tech: Modification and Repairs
-
Need opinions on this video/audio
cruiser54 replied to NC Tom's topic in MJ Tech: Modification and Repairs
It's just a vacuum fitting. No, I never considered a non-metallic fitting. No special reason. -
1989 Comanche fuel pump relay buzzing...
cruiser54 replied to Andy in Pa's topic in MJ Tech: Modification and Repairs
You'll see them up there. -
1989 Comanche fuel pump relay buzzing...
cruiser54 replied to Andy in Pa's topic in MJ Tech: Modification and Repairs
Don't have to pull anything to access the ECU. Remove it bracket and all using a 10mm ratcheting wrench.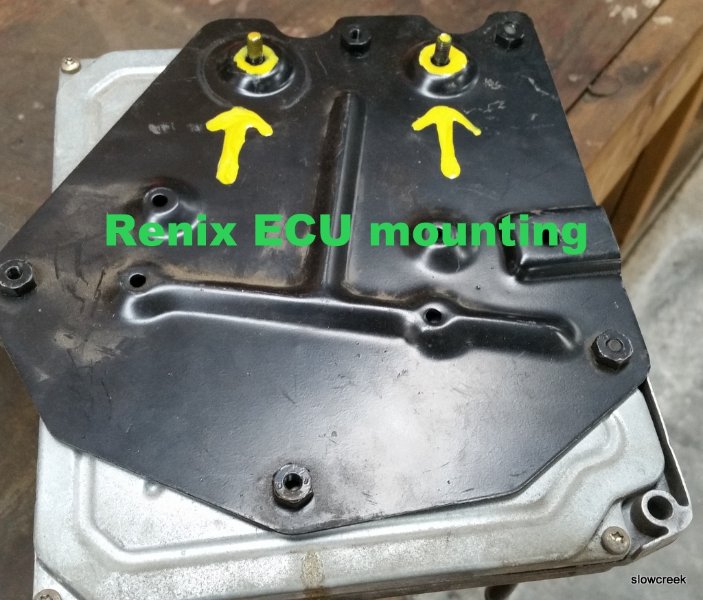
-
1989 Comanche fuel pump relay buzzing...
cruiser54 replied to Andy in Pa's topic in MJ Tech: Modification and Repairs
Make sure there isn't a wire NOT connected to the dipstick stud. Could be dangling in the general vicinity. -
Need opinions on this video/audio
cruiser54 replied to NC Tom's topic in MJ Tech: Modification and Repairs
The fitting is 1/8" NPT by whatever the vacuum hose is. Probably get it lots of places. The extra CPS connector is probably left over from a cPS mod made years ago. The tech was supposed to cut the old one off. -
1989 Comanche fuel pump relay buzzing...
cruiser54 replied to Andy in Pa's topic in MJ Tech: Modification and Repairs
CRUISER'S MOSTLY RENIX TIPS RENIX GROUND REFRESHING OCTOBER 30, 2015 SALAD 62 COMMENTS The Renix era XJs and MJs were built with an under-engineered grounding system for the engine/transmission electronics. One problem in particular involves the multiple ground connection at the engine dipstick tube stud. A poor ground here can cause a multitude of driveabililty issues, wasted time, failed emission tests, and wasted money replacing components unnecessarily. All the components listed below ground at the dipstick tube stud: Distributor Sync Sensor, TCU main ground, TCU “Shift Point Logic”, Ignition Control Module, Fuel Injectors, ECU main ground (which other engine sensors ground through, including the Oxygen sensor, Knock Sensor, Cruise Control and Transmission Sync signal. All extremely important stuff. The factory was aware of the issues with this ground point and addressed it by suggesting the following: Remove the nut holding the wire terminals to the stud. Verify that the stud is indeed tightened securely into the block. If the whole stud turns, you can use a 7/32″ six point socket or wrench to hold it so the nut can be removed. Worst case, cut the wires and remove the stud and nut. Install new terminal eyelets on the wires when going back together. Scrape any and all paint from the stud’s mounting surface where the wires will attach. Surfaces must be clean, shiny and free of any oil, grease, or paint. Inspect the wire terminals. Check to see that none of the terminals are crimped over wire insulation instead of bare wire. Be sure the crimps are tight. It wouldn’t hurt to re-crimp them just as a matter of course. Sand and polish the wire terminals until clean and shiny on both sides. Apply a liberal coating of OxGard, which is available at Lowe’s and other stores. Reinstall all the wires to the stud and tighten the nut down securely. While you’re in that general area, locate the battery negative cable which is fastened to the engine block just forward of the dipstick stud. Remove the bolt, scrape the block to bare metal, clean and polish the cable terminal, apply OxGard, and reattach securely. Another area where the grounding system on Renix era Jeeps was lacking is the engine to chassis ground. There is a braided cable from the back of the cylinder head that also attaches to the driver’s side of the firewall. This cable is undersized for its intended use and subject to corrosion and poor connections at each end. Remove the cable end from the firewall using a 15mm wrench or socket. Scrape the paint off down to bare metal and clean the wire terminal. Apply OxGard. Reattach securely. Remove the other end of the cable from the rear of the head using a 3’4″ socket. Clean all the oil, paint and crud from the stud. Clean the wire terminal of the cable and reattach securely with a liberal coating of OxGard. 2 STRONG suggestions regarding the ground system: I prefer to add a #4 gauge cable from the firewall to a bolt on the rear of the intake manifold, either to a heat shield bolt or fuel rail bolt. A cable about 18″ long with a 3/8″ lug on each end works great and you can get one at any parts store already made up. NAPA has them as part number 781116. A further improvement to the grounding system can be made using a #4 cable, about 10″ long with 3/8″ terminals at each end. Attach one end of this cable to the negative battery bolt and the other end under the closest 10mm headed bolt on the radiator support just forward of the battery. NAPA part number 781115. For those of us with Comanches, it’s very important to remove the driver’s side tail lamp assembly to access the ground for the fuel pump. Remove the screw holding the black ground wire. Scrape the paint from the body and corrosion from the wire terminal. Add a 10 gauge wire, with an eyelet on each end, from that grounding point to a bolt on the frame. Better yet, on both Cherokees and Comanches, complete Tip 29 for the best fuel pump grounding. Be sure to scrape all mounting points to bare metal and apply OxGard also. If you want to UPGRADE YOUR GROUND AND BATTERY CABLES with custom made parts, contact Paul at www.jeepcables.com -
1989 Comanche fuel pump relay buzzing...
cruiser54 replied to Andy in Pa's topic in MJ Tech: Modification and Repairs
Understood. I was thinking along the lines of leaving no stone unturned. As for the ECU, you can using any Renix 4.0 ECUs. there's even some advantages. Why not refresh the ECU connector? -
Need opinions on this video/audio
cruiser54 replied to NC Tom's topic in MJ Tech: Modification and Repairs
Correct. Lame. Takes half an hour. Seriously, do one part per day. Not to be ignored. Here's one to look at. CRUISER'S MOSTLY RENIX TIPS THROTTLE BODY TO MAP SENSOR HOSE FIX JANUARY 23, 2016 CRUISER54 43 COMMENTS The Renix throttle bodies have a strange and failure prone connector on the side where the MAP supply originates and then runs up to the MAP sensor located on the firewall. This hose/pipe assembly is no longer available for purchase. The real kicker here is how critical this line is in supplying the correct vacuum signal to the MAP, the most relied upon sensor for the ECU to read regarding air/fuel ratio. Any cracks, melted spots, or loose rubber connectors can cause major starting and driveability issues. There’s a simple fix though. All that’s required is a 1/8” NPT tap, a new throttle body gasket ( Napa FPG 60742 ), a vacuum fitting (Napa 05703-B102), two vacuum elbows (Napa CRB2670), and a length of new plastic piping (Napa CRB2672). Remove the throttle body and take it to the workbench. Using an oiled tap along with a driver, carefully thread the lower of the 2 holes of the throttle body where the old fitting was plugged in. Don’t go too deep. These are pipe threads. Flush the hole with carb cleaner and inspect for any left over cuttings. This is an excellent time to do a complete throttle body and IAC cleaning. See Tip 11. Take the vacuum fitting (05703-B102 ) and apply a LITTLE bit of thread sealer on the threads only. I prefer Permatex #2 but almost anything is fine. . Carefully screw the fitting in until snug. Install one of the vacuum elbows on the MAP sensor so it points toward the throttle body, and the other vacuum elbow on your new throttle body fitting so it points up to the MAP sensor. Cut a length of the new plastic tubing (approximately 13 inches) to fit between the vacuum elbows and install it making sure there is enough slack for some engine movement. Route it according to the photo. We don’t want any rubbing or chafing with engine movement. Not a bad idea to use some contact cement or Gasga-Cinch sparingly on the tubing to elbow connectors.