

gogmorgo
-
Posts
5984 -
Joined
-
Last visited
-
Days Won
4
Content Type
Profiles
Forums
Gallery
Everything posted by gogmorgo
-

-
 Mine was dropping out on my ‘91 recently. Couple things that might help isolate the issue to a certain area. If the odometer works but the speedometer doesn’t, it’s definitely an issue with the gauge. If your cruise control does work then it’s also likely to be the gauge, because the computer is seeing the speed data. If your cruise control does not work, then it’s very likely to be a sensor or wiring issue. In my case I was intermittently losing and regaining connection while hitting bumps, and I would also lose and regain cruise. The speed sensor wiring is in one of the bundles coming up the trans dipstick tube. I noticed one of the connectors there seemed slightly loose, and after unplugging and cleaning the connectors at the dipstick I haven’t had another issue.
 -
http://gojeep.willyshotrod.com/HowtoNSSrebuild.htm I'll second the neutral safety switch. I bet your reverse lights are also intermittent. When I cleaned mine out, I ran a bead of rtv around the gasket for extra protection. Always use protection.
-
It's good to be cautious doing this. I haven't confirmed it firsthand but I've seen reports that some transfer cases in CAD-equipped models don't have a true neutral that disconnects the driveshafts from each other in neutral. This is no concern if you still have a functioning CAD because with the engine off you'll have no vacuum to keep it engaged, but if you've permanently locked it in or swapped to a one-piece axle shaft you might find yourself going down the road with axles locked together. Probably not the end of the world if you're just rolling in a straight line with no load in the drivetrain, but it might lead to some interesting handling, and you might still see some problematic binding and at minimum crow-hopping and tire scrubbing. Editing now because I scrolled up to where a discussion about this was happening… ten years ago. The information Cruiser presents a few posts up isn’t entirely correct. ‘91-‘93 were still CAD axles. I believe the transition happened mid-year in ‘93 but I’m not infallible in my memory either. For what it's worth I bought a 3/4 ton truck at the end of last summer, drove out with the 2wd shortbed, hooked it on to the back of the new-to-me truck, and hauled it nearly 500 miles home. It went surprisingly well. Left the ax5 (manual) in neutral. The MJ followed very nicely behind the GMC. I left the steering column unlocked, and no issues with it tracking straight. Going around tighter corners you'll notice it steers itself towards the tow vehicle, it's kinda funny watching the steering wheel wind itself over as you start the turn and then wind itself back as you straighten back out again afterwards, like there was an invisible person sitting there steering the thing. Normally I would recommend a trailer for that sort of drive, but I don't have my own, would've had to screw around renting a Uhaul (it's always a screwaround when you live in the middle of nowhere without a UHaul location for over 50 miles) and fuel was not cheap at all at the time and I saved a ton of money taking the 2.5 shortbed instead of dragging a trailer 400 some miles behind my ZJ. Likely saved fuel on the return with the smaller, lighter load. Didn’t really seem to affect the big GMC too much having the little MJ drafting behind it the whole way. Other than when I touched the brakes and the badly warped rotors and worn out calliper pins made everything start banging and shaking… but that’s hardly the MJ’s fault.
-
I just paid $350 for a set of oem wheels for my Lada. Same situation, tires aren’t worth anything. But it was only a set of four. Junkyard price will usually be $50/wheel at least around here. But these look to be in decent shape, and the 15x8 tend to be a little more desirable.
-
Yeah, slightly below where you would ideally have it set. It's a Newton's third law, equal and opposite reactions thing. When you put significant torque into the rear tires, the axle tries to spin the opposite direction. This is the same lifting force that picks up the front end of drag racers, just not as extreme. There's always going to be a little compliance in the leaf springs, bushings, control arm bushings on a linked axle, so setting the pinion slightly low means you'll have proper alignment under load. In most cases when you're driving you'll be under some load, cruising at a steady speed for example you're usually pushing into the wind. In your case, looking at noises after lifting off the throttle, I'd suspect a different issue. Under liftoff and presumably engine braking if coasting in gear, you're pushing the other direction, so if anything skipping the slight pinion drop and putting it higher would make deceleration in gear better. Backlash issues would generally either manifest as a clunk when going between off and on throttle, or else a rapid unscheduled and irreversible disassembly of the rear axle, usually not long after install. So I doubt that's your issue. It's normal to get a little flutter in the exhaust on engine braking, which could rattle the pipe around a bit. Pinion bearings could make noise under decel. They would also theoretically make noise under acceleration as well but it could be drowned out by the exhaust note I guess. Usually accompanied by a pinion seal leak. Carrier bearings could also make noise, but again they would usually make more noise accelerating. Wheel bearings? Honestly it's real tough to correctly diagnose a noise over the internet.
-
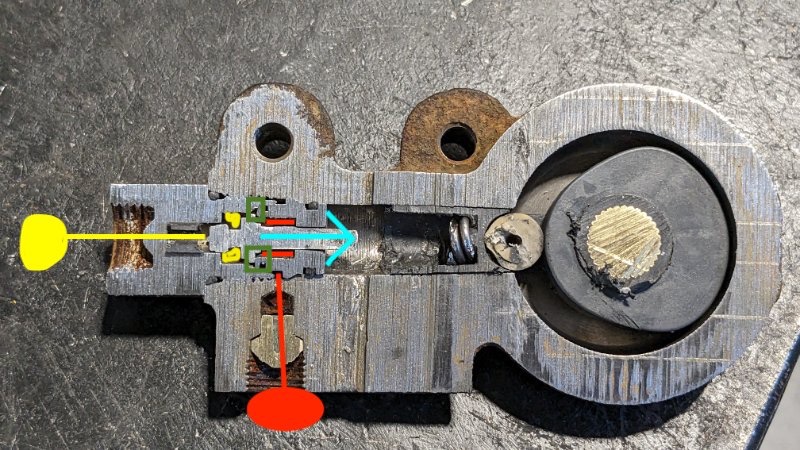
Internal view of the rear leveling valve.
gogmorgo replied to coheed's topic in MJ Tech: Modification and Repairs
To be clear, the adjustability I mentioned in my post is only referring to the valve behaviour changing as the linkage to the axle moves through its regular travel. I think in hydraulic terminology you'd refer to this as a pressure limiting or pressure reducing valve, and then you would call it adjustable because you can change the spring tension to change the pressure drop through the valve. Because it adjusts itself during normal operation I think you'd be more properly calling it a variable pressure limiting valve, but we're getting into the weeds. A typical adjustable valve wouldn't have the cam mechanism for the adjustment, usually they'd have a screw of some kind to increase or decrease spring tension manually, the way many aftermarket adjustable brake proportioning valves do it. But the cam and roller is a good way to make big adjustments quickly. Getting that much change in spring tension with a screw mechanism would be much more complicated, and likely not reliable enough to be constantly going back and forth going down the road. (Note that a pressure limiting valve is different from a pressure relief valve, which relieves excess pressure by providing an exit path for fluid to prevent system pressure from building too much pressure. Hydraulics will usually relieve back to a reservoir, but some safety relief valves like on a propane or hot water tank will just dump to atmosphere... but again... weeds) The adjustment with the "fork adapter" little bracket thing is less about adjusting the valve itself and more about adjusting the valve linkage. It repositions the linkage on the valve. You would have wanted to do that if you changed out the springs from factory, and wanted to make the valve worth with the existing linkage. The thread I believe you're referring to the OP was trying to find the correct orientation for the valve after a lift to set it up with an extended linkage. Confirming valve alignment to properly adjust an adjustable linkage. It's also the thread I saw that prompted my own rabbit hole dive. And I think it links to this one, so I may as well link back to it. I wouldn't necessarily recommend doing that particular adjustment where you pop the linkage off the valve itself and reposition the bushing and arm before stuffing it all back together. It looks to me like you're pressing a bushing with no splines onto a splined shaft, cutting new splines in the bushing at the same time. The manual recommends replacing the bushing every time you pull it off, and I'd be surprised if they were still available. Not that I actually checked beyond a quick google search just now... but the MoparPartsGiant places suggest it's been discontinued. Not surprising. -
Internal view of the rear leveling valve.
gogmorgo replied to coheed's topic in MJ Tech: Modification and Repairs
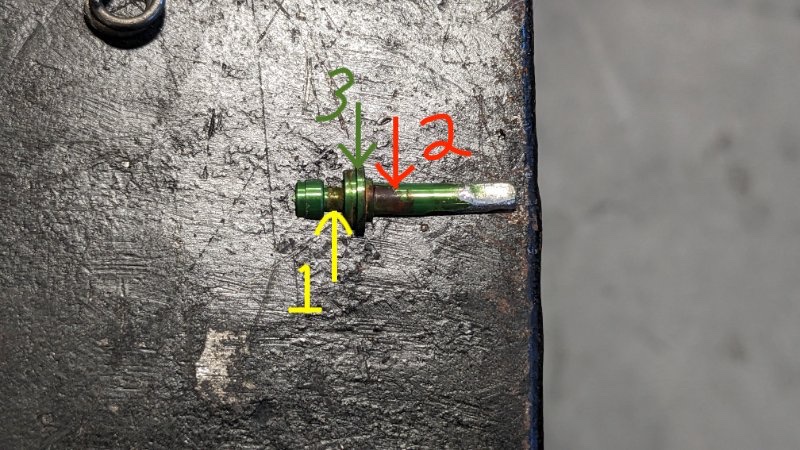
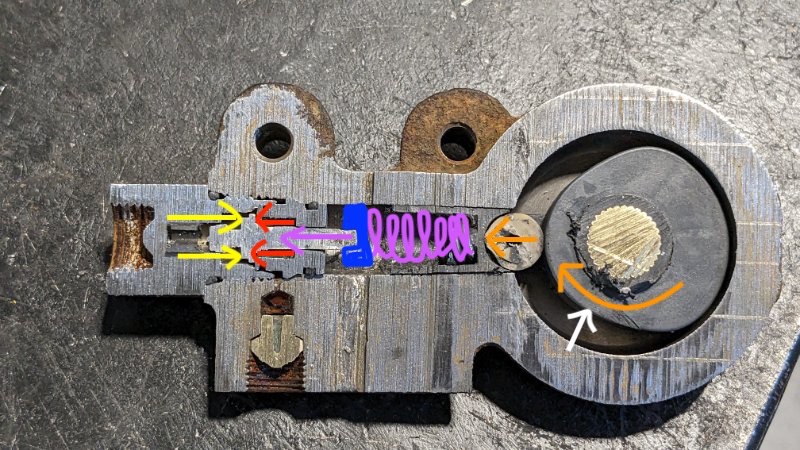
I stumbled across this thread earlier this week and have spent waaaaay too much time thinking about this. The fluid flow through the valve, I mean. I have to make some assumptions based on not having the pieces at hand, but the result is a fairly standard sort of adjustable pressure regulating valve. While thinking about how the valve works, remember there's two modes of operation of the valve. The first dynamic mode is while fluid is flowing, when you step on the brake pedal and the wheel cylinders fill and push the shoes into the drums. Fluid pressure is not going to be the same through all parts of the system while fluid is flowing. Pressure will be lowest at the wheel cylinder end, and every little restriction, valve, orifice, kink in a line, is going to create a pressure spike as fluid resists moving through the restriction, up to the highest pressure area in the master cylinder. The second mode is while you're holding steady pressure on the pedal and everything is static. The shoes have hit the drums and fluid is no longer flowing to expand the wheel cylinders. In static mode, pressure will be more or less the the same throughout the system. This is the "fill" phase. If you excuse my crude MS Paint style diagram. This is also the first assumption I'm making. Fluid enters the side port, and by assumption there are orifices that allow it to fill the red chambers. It's a safe enough assumption, the fluid has to go somewhere and there's nowhere else really for it to go. Likely there's holes drilled in the side of the inner valve body. The pressure in the red chamber shuttles the valve core over in the direction of the blue arrow, allowing the flow to exit the valve and fill the wheel cylinders. As the wheel cylinders fill and expand, flow slows down, and system pressure increases, something interesting happens. The outlet pressure (yellow) equalizes with the inlet pressure (red). This makes the valve core shuttle itself back closed, blocking off flow through the valve seat (the green boxes). This is the limit of pressure of rear braking. The valve core shuttles closed due to a common trick of hydraulic valves: When you look at the valve core, you can see the diameter indicated by arrow 1 (yellow) is smaller than the diameter at point 3 (red). This means that the valve seat, flange portion, the thick bit at point 3 (green) is going to have a larger surface area on the outlet (yellow) side than the inlet (red) side. And because force due to pressure increases with surface area for the pressure to act on, the valve core will get shuttled towards the side with the lower force acting on it. As outlet pressure (yellow) increases towards equal with inlet (red) pressure, at a certain balance point the larger surface area pushes the valve closed, stopping flow and limiting total pressure available to the rear brakes. So how does the adjustable proportioning come in? I'm going to make another assumption. I'm completing the spring in purple, and adding a spring seat in blue to push against and actuate the valve core. This adds a helper force to the inlet (red) pressure, helping to shuttle the valve open against the outlet (yellow) pressure. And as the external valve lever gets actuated, the cam rotates with the orange arrow, pushing the roller into the spring and compressing it, increasing the purple spring force. The more force coming from the spring, the more pressure you'll be able to put into the rear brakes. So yeah. Hydraulics. Lots of fun. Hopefully this helps people understand how the valve works, and I didn't just waste a whole bunch of time because I'm bad at explaining things in an easy-to understand format. Also the white arrow in the last picture is where I suspect the properly adjusted valve is supposed to leave the roller sitting on the cam, somewhere along that cam ramp, so that braking pressure doesn't drop off dramatically if the rear suspension is drooped for some reason, but so gentle increases in squat contribute to increases in rear brake pressure. The flat spot at roughly the 8 o'clock position on the roller would also support that being where it sat around ride height, with the constant motion slowly wearing down that one point.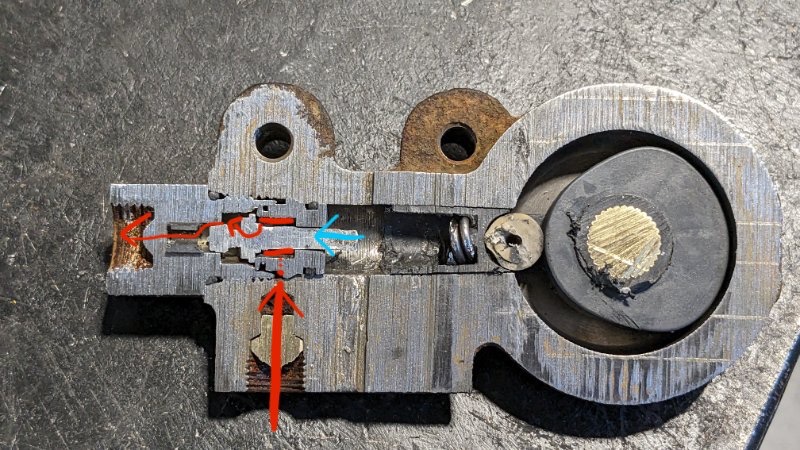
-
With the proper dimensions it seems like a cinch to reproduce this bracket deal with a cnc laser cutter. Could cut a dashed line to score the fold lines, and ship it flat in an envelope, let the user make the bends. If there's interest, not sure if there would be knowing the correct angle. But there's also another one for sale on eBay right now. https://www.ebay.com/itm/174690899235? Also the installer tool, J-35853-1 https://www.ebay.com/itm/334927934248?. Although that doesn't look like anything super fancy, other than maybe having hollows to fit over the end of the valve shaft and the nub on the back of the valve. For what it's worth, while searching for a source for the tools, I came across this: https://itsajeepworld.com/wp-content/uploads/2019/11/brake-system.pdf Instructions for using the tool and setting it up, which I'm sure you already had, but handy for anyone else. Most places I've seen an angle quoted to hold it up without a rod down to the axle, it's suggested to go slightly above horizontal, like yours is now.
-
Once you bolt the track bar back on
-
Brake height sensing vlave
gogmorgo replied to Eagle_SX4's topic in MJ Tech: Modification and Repairs
Just copy and paste the URL into the editor and it'll automatically insert the preview banner and everything like this one: -
Keep in mind it's usually advised to put your "parallel" pinion 1-2° below parallel to account for pinion climb under torque. And it's very unlikely you'll find yourself in the position with your setup, but avoid setting your ujoint angles at 0°. It'll take out the ujoints in short order if the bearings aren't rolling around under torque.
-
Main power distribution wire splices
gogmorgo replied to xxmetal's topic in MJ Tech: Modification and Repairs
Crimps like this are very common, not just with AMC or budget minded automakers, and they’re still used in current production vehicles. They’re usually pretty reliable as long as they don’t see exposure to moisture or much movement. Modern crimps are a bit better but the methods of insulation haven’t really improved much, other than the plastics in use aren’t 40 years old. Fabric reinforced “duct” tapes are honestly better than the cheap electrical tape most DIYers are using. -

-
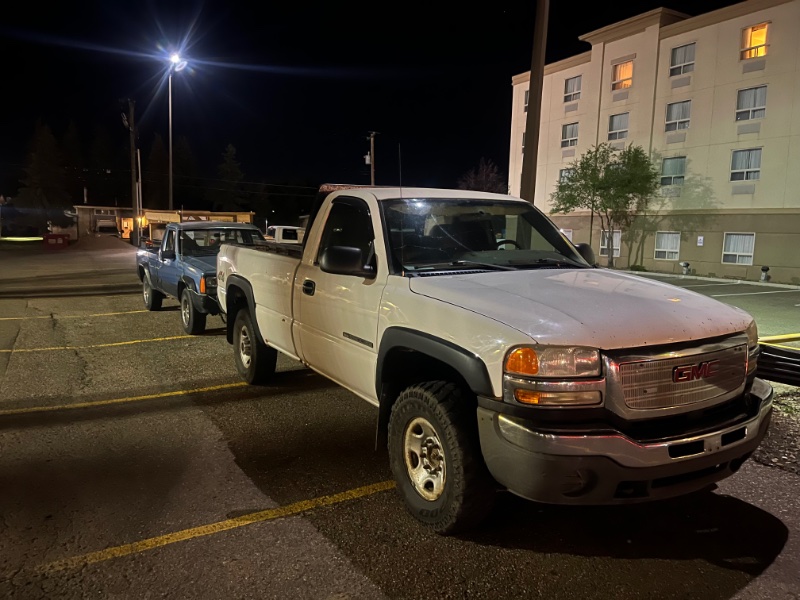
Would you recommend getting this trailer hitch?
gogmorgo replied to robfg67's topic in MJ Tech: Modification and Repairs
Guess I could see that. Looks a little more to me like a d-ring tab or something but the resolution is pretty low. -
Would you recommend getting this trailer hitch?
gogmorgo replied to robfg67's topic in MJ Tech: Modification and Repairs
I’m curious what this is: I’d talk to Krusty about his hitches, see if it’s worth the drive vs just getting one shipped. But the truck looks to be in pretty decent shape, might be other good parts to rob off it if it hasn’t been picked clean already. Seems to have a pretty full collection of chrome trim bits, with the bed rails, tailgate cap, wind deflectors, running boards…it all looks aftermarket but indicates a truck someone took some pride in.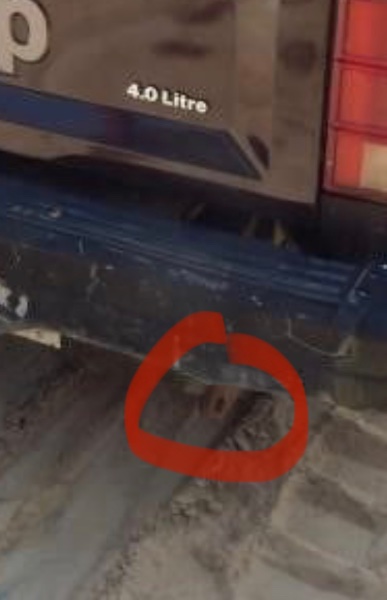
-

-
Interior reassembly question
gogmorgo replied to gogmorgo's topic in MJ Tech: Modification and Repairs
I think I remember this coming up a few times, after posting. Its bizzare. But there you go. Maybe the next time it comes apart it’ll get something. Maybe not. -
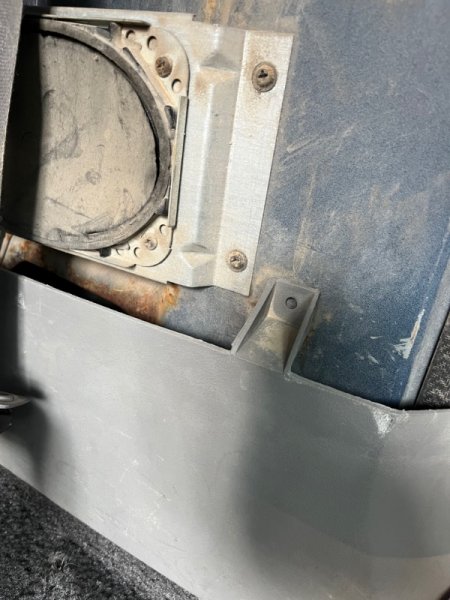
Is there a fastener of some kind holding this? It’s the panel that goes along the bottom of the door opening. It looks to me as though there should be something, but no hole drilled, no evidence of adhesive, doesn’t even look to be witness marks of anything on either the plastic or door pillar. I’m putting this thing back together after having pulled it apart four years ago. No recollection of what went where, fortunately theres not many panels or fasteners so it’s not too bad, but… well it looks like something should go there, both sides have the standoff, it just doesn’t look like anything was ever there. Without pulling apart my other MJ to look, it feels like there’s something holding it, but I’d have to pull it apart.
-
Only Runs with Bypasses Resistor
gogmorgo replied to Discoman9001's topic in MJ Tech: Modification and Repairs
New ballast resistor could have been bad out of the box. Have you checked it for continuity? Or excessive resistance? -
My brother learned about those when he was 15. I remember being surprised he didn’t know what it did, I’d been playing with them for as long as I can remember in the parents’ cars. But the memory of the incident is burned into my mind. For some reason he decided the best way to touch it after it stopped glowing was to lick it. I can still smell it.
-
INSANE OIL PRESSURE GUAGE?
gogmorgo replied to ruralandalone's topic in MJ Tech: Modification and Repairs
I would suspect the sending unit is on the way out. Take a look to see if it’s dribbling oil. But also take a look at the wire for it. If it rubbed and shorted to ground somewhere it’ll max out the gauge every time it makes contact. -
A few years back I was in Lethbridge for a bit and we got a dump at the end of September, just a little over a foot. My 2.5/2wd lives on winter tires because mountains and I’m lazy. It was pretty funny cruising around with an open rear diff and watching big 4x4 trucks on questionable rubber struggling to get around, while I wasn’t having problems. Stuck and abandoned in parking lots. Tires make a big part of the equation, but an open bed full of wet heavy snow likely didn’t hurt anything. But I’d also suggest the 4x4 MJs get beat on a fair bit in comparison to the 2wds. They’re always in rougher shape up here, and not just the MJs. 4x4 was a big expensive option and people weren’t going to shell out for it if they didn’t need it for whatever they were doing with the truck. This is before everyone and their dog had a crew cab half ton to haul their family around in.
-

-
Hot engine, smoke and sticky brakes
gogmorgo replied to Virginia's topic in MJ Tech: Modification and Repairs
Low brake fluid would cause the opposite problem, brakes that don’t work at all. Stuck brake seems likely. Pushing through a sticky brake will make the truck work harder, usually makes it drive kinda funky too. If you take it for a short drive you should be able to tell which wheel is getting hot, or lift it off the wheels off the ground and see if one’s dragging. The first one I had happen to me, I’ve never seen a gas station clear out so quickly as I did the one time I pulled off the highway and straight up to a pump, which is when I realized my brake was seized. It wasn’t so much a puff of smoke off the brake, billowing more like. I’ve have to do every calliper on my Jeeps at some point. The original drums likely aren’t asjusted well enough to cause seizing problems but don’t discount them either.